Formatting a USB drive can seem daunting, especially if you're used to the graphical interfaces of modern operating systems. But fear not! Using the Command Prompt to format a USB drive is a quick and efficient method. In this guide, we’ll walk you through the steps in a friendly, easy-to-follow manner. Whether you're clearing out old files or preparing the drive for a new use, you'll be a pro in no time!
Understanding USB Formatting
Before we dive into the formatting process, let’s take a moment to understand why formatting is necessary and what it entails.
When we format a USB drive, we essentially prepare it for use by the operating system. This process involves several key steps:
- File System Selection: The first step is to choose a file system. Common options include:
- FAT32: Best for compatibility across different devices (like cameras and game consoles), but limited to files under 4GB.
- NTFS: Ideal for Windows users, supports large files and advanced features like permissions, but may not work on all devices.
- exFAT: A great choice for larger drives, compatible with both Windows and Mac, and supports files over 4GB.
- Partitioning: This involves dividing the USB drive into sections, allowing it to hold multiple file systems (if desired). Most users will only need a single partition.
- Deleting Existing Data: Formatting wipes all existing data on the USB drive. So, ensure you've backed up anything important before proceeding!
Understanding these elements can help you make informed choices about how to format your USB drive. For example, if you plan to use the drive primarily with Windows, NTFS might be your best bet. On the other hand, if you're sharing files between different devices, FAT32 or exFAT would be more appropriate.
Lastly, it’s important to note that formatting a USB drive will not only erase files but also improve performance and reliability. Over time, file systems can become cluttered, leading to slower read/write speeds. Formatting helps reset the drive, ensuring that it functions optimally.
Now that we've got the basics down, you're ready to jump into the actual formatting process! Let’s keep going!
Also Read This: How to Connect Dailymotion with Roku TV for Easy Streaming
3. Preparing Your USB Drive
Before diving into the technical steps of formatting your USB drive, let’s ensure you’re fully prepared. Here’s what you need to do:
- Backup Your Data: Formatting a USB drive will erase all the data on it. So, if you have important files, make sure to copy them to another location. You can drag and drop files to your computer or use cloud storage solutions like Google Drive or Dropbox.
- Check for Drive Issues: Ensure your USB drive is functioning properly. Sometimes, drives may have errors or be corrupted. Check for any prompts or messages that might indicate issues.
- Ensure Sufficient Space: If you plan to keep some files on the USB drive, check that there’s enough space available after formatting. If you're wiping it clean, this might not be a concern.
Now that your data is safe and your drive is ready, let’s discuss the physical aspects of your USB drive:
- Insert the USB Drive: Plug the USB drive into one of the USB ports on your computer. Make sure it's securely connected.
- Label Your Drive: While not mandatory, it’s helpful to label your drive, especially if you have multiple drives. This can help you identify which one you are formatting.
Once you've prepared your USB drive, you’re all set for the next steps. This preparation ensures that you won’t encounter any hiccups along the way.
Also Read This: Can You Save Dailymotion Videos and Keep Your Favorite Clips
4. Accessing Command Prompt
Now that your USB drive is prepared, it's time to access the Command Prompt. Don’t worry; it’s straightforward! Here’s a step-by-step guide to help you get there:
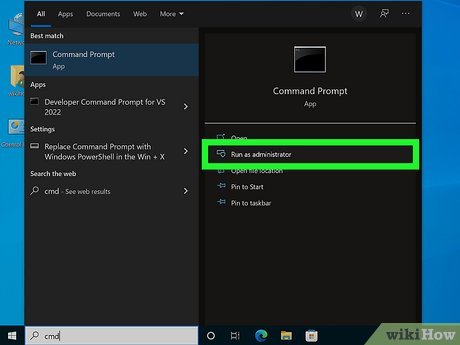
- Open the Start Menu: Click on the Windows icon located in the bottom-left corner of your screen or press the Windows key on your keyboard.
- Type 'cmd': In the search bar, type cmd or Command Prompt. You'll see the application appear in the search results.
- Run as Administrator: It’s crucial to run Command Prompt with administrative privileges to ensure you have the right access. Right-click on the Command Prompt icon and select Run as administrator.
After you have the Command Prompt open, you should see a black window with a blinking cursor. This is your command line where you’ll input the necessary commands to format your USB drive.
Here’s a quick tip: If you're using Windows 10 or 11, you can also use the Windows + X shortcut to quickly access the Power User menu and select Command Prompt (Admin) from there!
And that’s it! You are now ready to proceed with formatting your USB drive using Command Prompt. Let’s move on to the next steps where you’ll learn the commands to perform the formatting!
Also Read This: Download Dailymotion Videos to MP4 Quickly and Easily With This Proven Method
5. Identifying Your USB Drive
Before diving into the formatting process, it’s essential to accurately identify your USB drive. This step is crucial to ensure that you don’t accidentally format the wrong drive, which could lead to data loss. Here’s how you can do that:
- Insert Your USB Drive: Plug your USB drive into an available USB port on your computer. Wait for a moment to allow your system to recognize it.
- Open Command Prompt: You can do this by searching for "cmd" in the Windows search bar. Right-click on it and select "Run as administrator" to open it with elevated privileges.
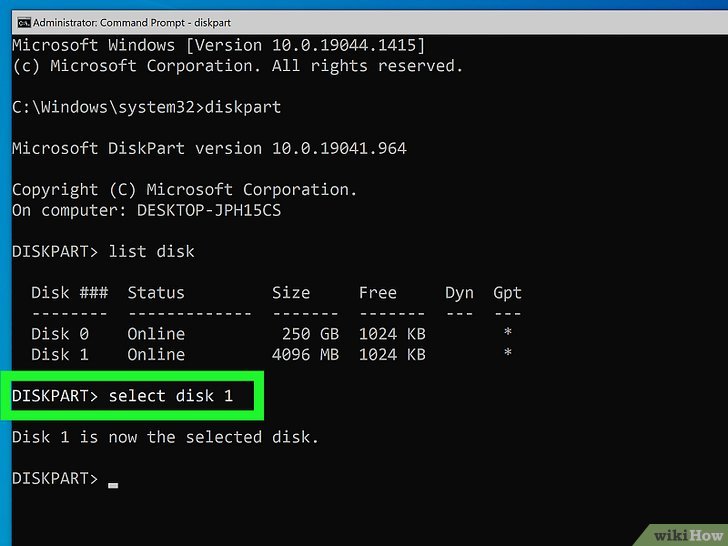
- Type the Command: In the Command Prompt, type
diskpartand press Enter. This will launch the DiskPart tool, which allows you to manage your drives. - List All Drives: Once in DiskPart, type
list diskand hit Enter. This command will display all the disks connected to your computer.
Here’s a quick breakdown of what you might see:
| Disk Number | Size | Status |
|---|---|---|
| Disk 0 | 500 GB | Online |
| Disk 1 | 16 GB | Online |
In the example above, you would want to identify Disk 1 as your USB drive (assuming you have a 16 GB USB). Make sure to note the disk number, as you'll need it for the next step!
One last tip: If you’re unsure about which disk is your USB drive, you can unplug it and run the list disk command again to see which one disappears. This way, you can confidently identify your USB drive.
Also Read This: How to Use Salon Express: Professional Nail Art at Home
6. Formatting the USB Drive
Now that you’ve identified your USB drive, it’s time to format it. Formatting will erase all data on the drive, so ensure you’ve backed up anything important. Here’s how to proceed:
- Select Your USB Drive: In the DiskPart window, type
select disk X(replace X with your disk number, e.g.,select disk 1). Press Enter to select your USB drive. - Clean the Drive (Optional): If you want a fresh start, you can clean the drive by typing
cleanand hitting Enter. This command removes all partitions on the selected disk. Be cautious with this step! - Create a New Partition: Type
create partition primaryand press Enter. This action creates a new partition on the USB drive. - Format the Drive: Now, it’s time to format! Type
format fs=fat32 quickand hit Enter. Thefs=fat32part specifies the file system type; you can also usentfsif you prefer. - Assign a Drive Letter: Finally, assign a drive letter by typing
assignand pressing Enter. This step will make your USB drive visible in Windows Explorer.
Once you see the message that you’ve successfully formatted the drive, you’re all set! You can now start using your USB drive for storage, backups, or transferring files.
And that’s it! You’ve navigated through the steps to identify and format your USB drive using Command Prompt. Simple, right? Just remember to double-check the disk number before formatting to avoid any mishaps!
Also Read This: How to Watch Dailymotion on Amazon Fire Stick
7. Verifying the Format
After you’ve completed the formatting process, it’s essential to verify that your USB drive is correctly formatted and ready for use. Here’s how you can do it using Command Prompt:
- Open Command Prompt: Press Windows + R, type
cmd, and hit Enter. This opens the Command Prompt window. - List all drives: Type
diskpartand press Enter. Once you’re in DiskPart, typelist volumeand hit Enter. This displays all the drives connected to your computer. - Identify your USB drive: Look for your USB drive in the list. It will usually show up as something like
Volume 3with the label you assigned during formatting. - Check the format: Note the File System column. It should display FAT32 or NTFS, depending on your choice during formatting.
If everything looks good, congratulations! Your USB drive is now formatted and ready to store files. If not, don’t worry; you can always reformat it following the previous steps.
To further confirm that the drive is working properly, try creating a test file:
- Open File Explorer and locate your USB drive.
- Right-click on the drive and select New > Text Document.
- Name it something simple, like Test File, and hit Enter.
If you can create and delete files without any issues, you’re all set!
8. Troubleshooting Common Formatting Issues
It’s not uncommon to encounter a few hiccups while formatting your USB drive. Don't worry! Here are some common issues you might face and how to resolve them:
1. USB Drive Not Recognized
If your USB drive isn’t appearing in DiskPart or File Explorer, try these steps:
- Check if the USB is properly connected. Sometimes, a loose connection can cause detection issues.
- Try plugging it into a different USB port, preferably on another computer, to rule out hardware issues.
2. Formatting Error Messages
You might see error messages like “Windows was unable to complete the format.” If this happens:
- Try using an alternative file system like exFAT instead of FAT32, especially if your drive is larger than 32GB.
- Run a disk check by typing
chkdsk X: /f(replace X with your USB drive letter) in Command Prompt to fix any underlying issues.
3. Drive Write-Protected
If you receive a message indicating the drive is write-protected, check for a physical switch on the USB stick (some models have this feature). If your drive doesn’t have a switch, you can try:
- Opening Command Prompt and typing
diskpart, thenlist disk. - Select your drive with
select disk X(replace X with the disk number). - Finally, type
attributes disk clear readonlyand press Enter.
By following these troubleshooting tips, you should be able to handle most formatting issues effectively. Remember, patience is key, and sometimes a little persistence can go a long way!
 admin
admin


