Flipping images in PowerPoint is a simple yet effective technique that can instantly improve the look and feel of your presentation. Whether you want to create a mirrored effect, adjust the orientation of a picture, or simply add a unique touch to your slides, flipping images can help you achieve just that. The process is quick and doesn't require advanced skills, making it an accessible tool for anyone using PowerPoint. In this guide, we will walk you through the benefits and steps involved in flipping images to enhance your presentations.
Why Should You Flip Images in PowerPoint?

Flipping images in PowerPoint isn't just a fun feature; it serves several practical purposes that can enhance your slides. Here are some reasons why you might want to flip an image:
- Improved Visual Balance: Sometimes, the way an image is positioned can make a slide feel unbalanced. Flipping an image can help distribute visual weight more evenly across the slide.
- Creating Symmetry: Symmetry in design is aesthetically pleasing. Flipping images can help you achieve a mirrored effect that creates harmony and flow between elements on your slide.
- Changing Perspective: Flipping an image horizontally or vertically can give it a fresh perspective. This is useful if you want to convey the same idea but from a different viewpoint.
- Fixing Image Orientation: Sometimes images appear upside down or in the wrong direction. Flipping the image allows you to quickly correct the orientation without needing to adjust the source file.
- Adding Creativity: Flipped images can give your presentation a creative and dynamic feel, making it stand out from the typical, straightforward designs.
In short, flipping images is a simple tool that can significantly enhance the visual appeal of your PowerPoint slides. It adds creativity and clarity while helping your presentation look more polished.
Also Read This: How to Resize an Image in Gmail Signature
Steps to Flip an Image in PowerPoint

Flipping an image in PowerPoint is an easy process that only takes a few steps. Whether you're working on a Windows PC or a Mac, the procedure remains the same. Follow these simple steps to flip any image in PowerPoint:
- Select the Image: First, click on the image you want to flip. It should be selected with small circles (handles) around the edges.
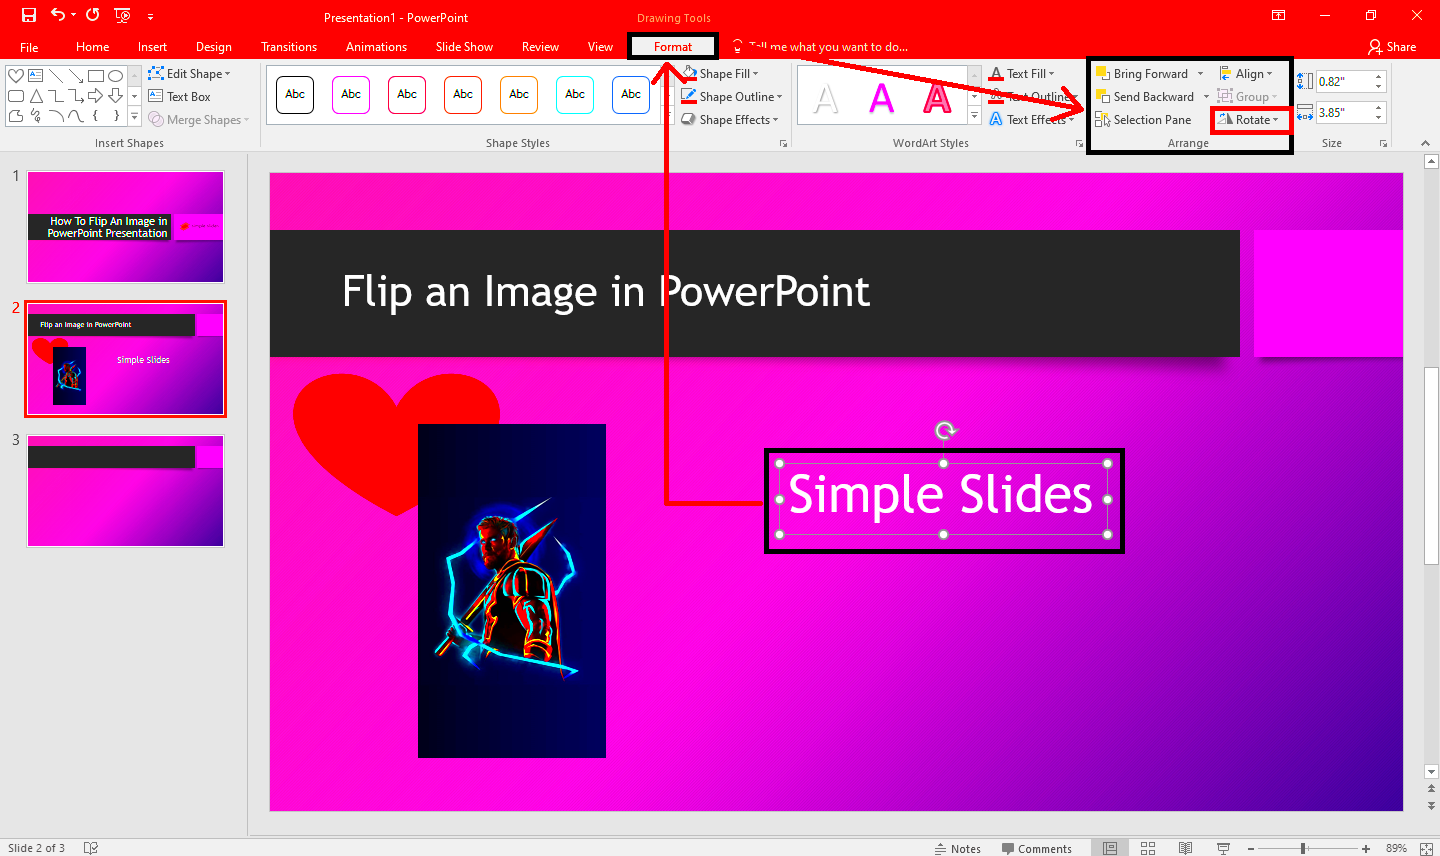
- Go to the Format Tab: Once the image is selected, navigate to the “Picture Format” tab at the top of PowerPoint.
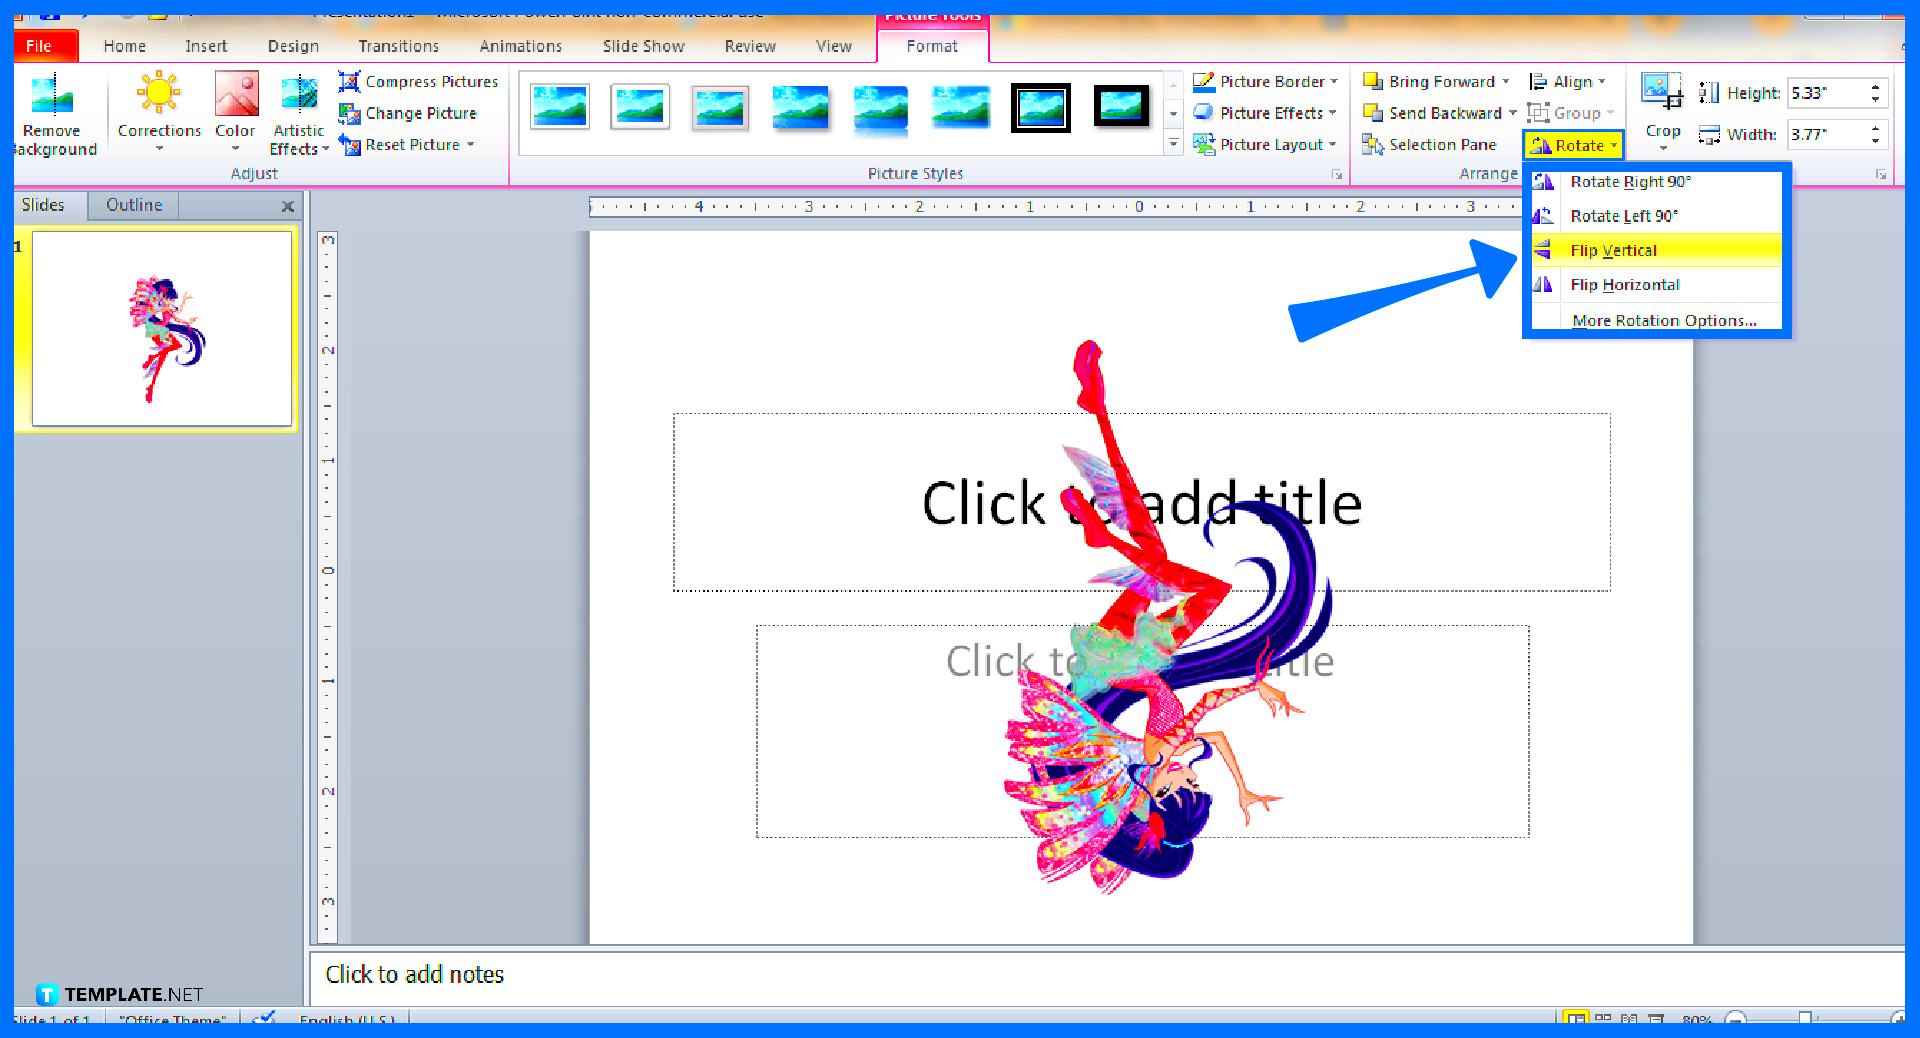
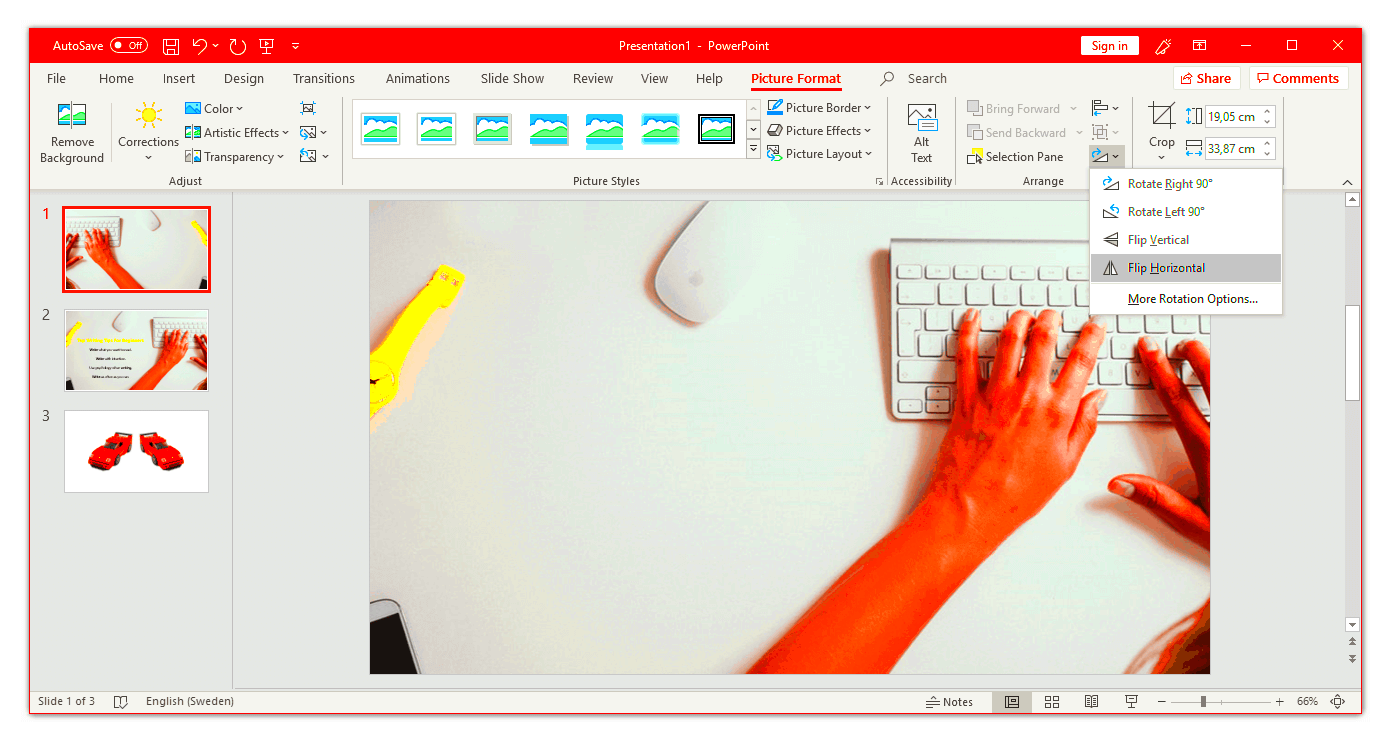
- Find the Rotate Option: Look for the “Rotate” button in the toolbar. This is often located on the right side of the toolbar. Click on it to open a dropdown menu.
- Choose the Flip Option: In the dropdown menu, you’ll see options for rotating the image. Select either “Flip Horizontal” or “Flip Vertical” depending on the effect you want.
- Adjust the Image if Needed: After flipping, you may need to adjust the image’s placement or size to ensure it fits well on your slide.
That’s it! By following these steps, you can easily flip any image in PowerPoint. Whether you want to flip horizontally or vertically, PowerPoint offers both options, giving you flexibility with your designs.
If you're working with multiple images, you can repeat these steps for each image to maintain consistency in your presentation. It’s a great way to add visual interest and make your slides more engaging.
Also Read This: The Purpose and Uses of Adobe Stock
Using the Rotate Tool to Flip Images

The Rotate tool in PowerPoint is one of the easiest and most efficient ways to flip images. This built-in feature allows you to flip an image horizontally or vertically with just a few clicks. Whether you're creating a symmetrical design, correcting image orientation, or adding a creative twist to your slide, the Rotate tool gives you full control. Here's how you can use it:
- Select the Image: Click on the image you want to flip to select it. A border with small circles (handles) should appear around the image.
- Open the Picture Format Tab: In the top ribbon of PowerPoint, find and click on the “Picture Format” tab. This tab will give you access to all image-related editing tools.
- Click on the Rotate Button: On the Picture Format tab, locate the “Rotate” button. Clicking it will open a dropdown menu with several options for rotating and flipping the image.
- Choose Flip Horizontal or Flip Vertical: In the dropdown menu, you will see options like “Flip Horizontal” and “Flip Vertical.” Select the one that fits your needs. Flip Horizontal mirrors the image from left to right, while Flip Vertical mirrors it top to bottom.
That’s it! You’ve successfully flipped your image using the Rotate tool. This is a great method when you want to quickly alter the direction of an image without affecting its overall quality. Additionally, you can rotate images in small increments for more precise adjustments using the same Rotate dropdown menu.
Also Read This: Changing the DPI of an Image in Paint
Keyboard Shortcuts for Flipping Images
If you’re looking to save time while working on your PowerPoint presentations, keyboard shortcuts are a fantastic option. Instead of clicking through multiple menus, you can flip your images in just a few keystrokes. Here’s how:
- Flip Horizontal: Select the image, then press Alt + J + 3 on a Windows PC or Command + Option + 3 on a Mac. This will flip the image horizontally, creating a mirror effect.
- Flip Vertical: To flip an image vertically, select the image and press Alt + J + 4 on a Windows PC or Command + Option + 4 on a Mac.
Using keyboard shortcuts can make flipping images faster and more efficient, especially when you have multiple images to work with. These shortcuts reduce the need for extra clicks and help you focus more on the content of your presentation.
Remember, keyboard shortcuts work best for quick adjustments, so if you’re looking to make precise image rotations or flips, the Rotate tool might be a better option. However, these shortcuts are perfect for when you need speed and efficiency.
Also Read This: Step-by-Step Guide to Posting an Image on Brightspace
Adjusting Flipped Images for Perfect Alignment
After flipping an image, it’s common to need some adjustments to ensure the image is perfectly aligned on your slide. Flipping an image can sometimes change its positioning, especially if it’s now facing the opposite direction. But don’t worry, making sure your flipped images are aligned is a straightforward process. Here’s how you can do it:
- Aligning the Image Using the Alignment Tools: PowerPoint provides an easy way to align images on your slide. After flipping your image, go to the "Picture Format" tab and click on the “Align” button. Here you can align your image to the left, center, right, top, middle, or bottom of the slide. This helps in achieving a clean, balanced layout.
- Use the Gridlines and Guides: PowerPoint allows you to use gridlines and guides to ensure that your images are aligned properly. To activate these, go to the “View” tab and check the box for “Gridlines” and “Guides.” These tools give you a visual reference to help place your image in the right spot.
- Manually Adjust the Image’s Position: If you prefer more control, you can simply drag the image into place. Click and hold the image, then move it around the slide until you’re satisfied with its position.
- Resize the Image: Sometimes flipping an image can change its visual balance. If the flipped image looks too large or small for the slide, you can resize it by dragging the corner handles. Hold down the Shift key to maintain the image’s aspect ratio while resizing.
By using these techniques, you can ensure that your flipped images are perfectly aligned and look great on your slides. Whether you’re adjusting positioning, resizing, or using alignment tools, PowerPoint gives you plenty of options to make your flipped images fit seamlessly into your presentation.
Also Read This: How to Get Accepted into Getty Images Tips for Getting Your Photos Approved by Getty
Common Issues When Flipping Images in PowerPoint
Flipping images in PowerPoint is generally an easy task, but sometimes you may run into a few issues. These problems can be frustrating, especially if you’re trying to perfect your presentation. Understanding some of the most common issues and knowing how to solve them can save you time and effort. Let’s go over a few challenges you might face when flipping images and how to address them:
- Image Losing Quality: One common issue when flipping an image is that it may appear blurry or pixelated. This often happens if the image is stretched or resized too much before being flipped. To prevent this, make sure you’re using a high-resolution image, and avoid resizing it drastically after flipping. If you need a larger image, try to source a higher-quality version instead of stretching a smaller one.
- Misalignment After Flipping: Sometimes, after flipping an image, it may no longer align properly with other elements on your slide. To fix this, use the alignment tools in PowerPoint (found under the “Picture Format” tab) or manually adjust the image’s position using gridlines or guides to keep everything in place.
- Flipping Doesn't Work as Expected: In rare cases, an image may not flip the way you intend. This could be due to the image being locked or part of a group of objects. If this happens, try ungrouping objects or unlocking the image by selecting it and going to the "Format" tab, then checking the object properties.
- Flipped Text or Icons Appearing Upside Down: When flipping images that include text or icons, the flipped version might look strange, as text is mirrored or icons are reversed. In such cases, consider flipping only the image part and keeping the text or icons separate, or adjust their orientation manually to maintain readability.
By being aware of these common issues and knowing how to resolve them, you’ll be better equipped to handle any challenges when flipping images in PowerPoint. Always remember to preview your slides to check for any visual inconsistencies.
Also Read This: Rental Costs at Image Studios: What to Expect
Conclusion
Flipping images in PowerPoint is a powerful tool that can make your presentations more dynamic and visually appealing. Whether you’re adjusting image orientation, improving alignment, or adding creative elements to your slides, flipping images is a simple and effective way to enhance your design. By following the easy steps outlined in this guide, you’ll be able to flip images quickly and efficiently, while also avoiding common issues that can arise during the process.
Remember to use the Rotate tool for precise flipping, experiment with keyboard shortcuts for speed, and always adjust your images for perfect alignment. With a little practice, flipping images will become second nature, and your presentations will look more polished and professional.
So next time you want to add a unique touch to your PowerPoint slides, don’t hesitate to flip your images. The small change can make a big difference in the overall look and feel of your presentation.
FAQ
Q1: Can I flip multiple images at once in PowerPoint?
A1: Unfortunately, PowerPoint doesn’t allow you to flip multiple images at once. You’ll need to select and flip each image individually. However, you can select multiple images for other tasks, such as resizing or aligning them.
Q2: Will flipping an image affect its transparency or background?
A2: No, flipping an image does not affect its transparency or background. The image's original properties remain the same, including transparency, background, and any other effects you've applied.
Q3: How can I undo a flip if I don't like the result?
A3: If you’re unhappy with how the image looks after flipping, you can easily undo the action by pressing Ctrl + Z on Windows or Cmd + Z on Mac. This will return the image to its original state.
Q4: Can I flip images in PowerPoint on both Mac and Windows?
A4: Yes, flipping images works the same way on both Windows and Mac versions of PowerPoint. The interface and steps are nearly identical, so you can follow the same instructions regardless of the platform you're using.

 admin
admin


