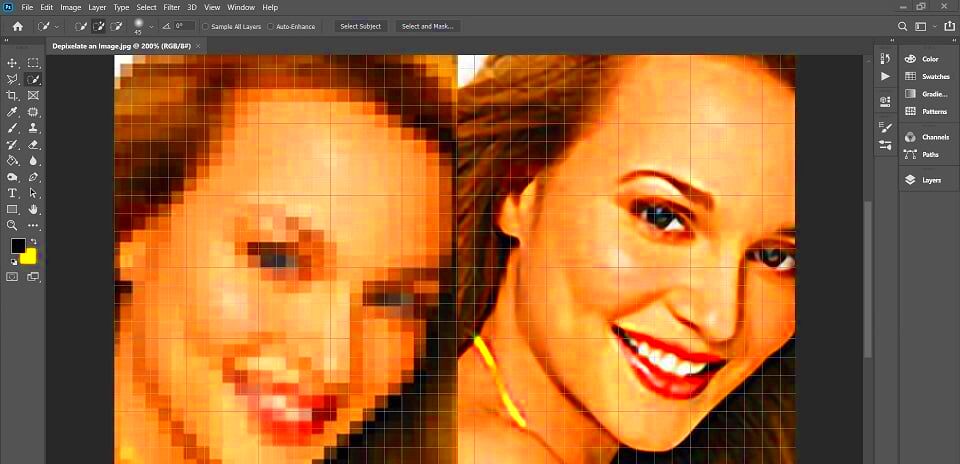
Pixelation is a common issue when working with images, especially when they are enlarged or poorly compressed. When an image loses clarity and becomes blocky or blurry, it’s considered pixelated. Fortunately, Photoshop offers several tools to fix this problem. In this guide, we'll walk you through the steps to improve your pixelated images and bring them back to their sharp, clear best.
Whether you're working on a photo, graphic design, or any other image, understanding how to repair pixelation is essential for maintaining quality. Let's dive into the process!
Understanding Why an Image Becomes Pixelated

Before we can fix pixelation, it’s helpful to know why it happens in the first place. There are a few main causes:
- Low Resolution: Images with low resolution (fewer pixels per inch) tend to become pixelated when enlarged.
- Compression: Images that are heavily compressed lose details, making them appear blurry or blocky.
- Scaling: When you increase the size of an image beyond its original dimensions, the pixels are stretched, causing them to become visible as large blocks.
- File Type: Certain image formats like JPG or GIF are prone to pixelation when edited or saved multiple times.
Understanding these causes will help you prevent future pixelation and ensure better quality images in your projects. Now, let’s look at how you can fix these issues in Photoshop.
Also Read This: how to show tiff image in browser
Steps to Fix a Pixelated Image Using Photoshop

Now that you know the causes, it’s time to tackle the problem. Here are the steps to fix a pixelated image using Photoshop:
- Open the Image in Photoshop: Start by launching Photoshop and opening your pixelated image.
- Duplicate the Background Layer: It's always good practice to work on a copy. Right-click on the background layer and choose Duplicate Layer.
- Use the 'Camera Raw Filter': Go to Filter > Camera Raw Filter. In the panel, adjust the 'Details' tab, specifically the 'Noise Reduction' slider to reduce pixelation.
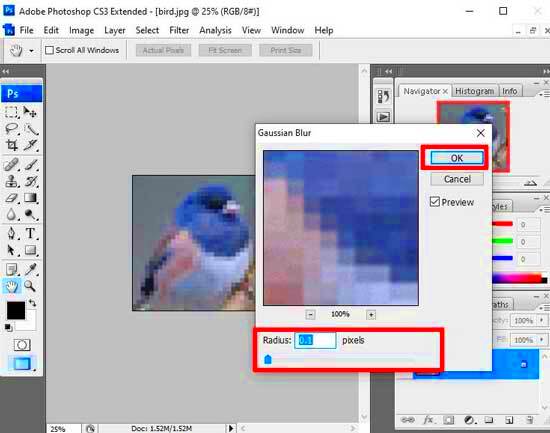
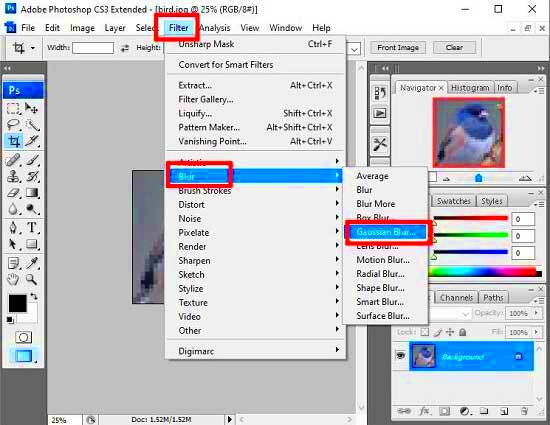
- Apply the 'Gaussian Blur' Tool: Next, apply a slight blur to your image. Go to Filter > Blur > Gaussian Blur and adjust the radius. This can smooth out harsh pixel edges.
- Sharpen the Image: After blurring, you might need to sharpen the image to bring back some detail. Go to Filter > Sharpen > Unsharp Mask and adjust the sliders.
- Use the 'Smart Blur' Tool: For further refinement, try the Smart Blur tool (under Filter > Blur > Smart Blur). This can help smooth out areas of the image while retaining important details.
- Final Touches: After these adjustments, zoom in and assess the image. Use the Clone Stamp Tool or Healing Brush Tool for any last-minute touch-ups.
These steps should help you restore clarity and reduce pixelation. Keep in mind that every image is different, and you may need to experiment with the settings to get the best result. Let’s explore other tools in Photoshop that can enhance your image further.
Also Read This: How to Extract Audio from a YouTube Video in Simple Steps
How to Use the Photoshop Noise Reduction Tool
The Photoshop Noise Reduction tool is one of the most effective ways to clean up pixelated images. It works by reducing the "noise" in an image, which often contributes to a pixelated or grainy look. This tool is especially useful when your image has visible grain or specks that make it look less crisp. Here's how you can use the noise reduction tool to smooth out your
- Open Your Image in Photoshop: Start by opening your image in Photoshop and duplicating the background layer, as this helps protect your original image.
- Navigate to the 'Filter' Menu: Go to Filter > Noise > Reduce Noise. This will open a new window with sliders that control various aspects of noise reduction.
- Adjust the Strength: The first slider is the Strength slider, which controls how much noise is reduced. Move the slider to the right to increase noise reduction, but be careful not to overdo it, as this can soften the image too much.
- Preserve Details: Next, use the Preserve Details slider to keep important details in the image while reducing noise. This is especially helpful for images with fine textures.
- Reduce Color Noise: Use the Reduce Color Noise slider to remove color specks and pixelation. Adjust this slider carefully to avoid any color shifts.
- Sharpen Details: You can also use the Sharpen Details slider to add back any sharpness that was lost during the noise reduction process. This will help keep the image clear and detailed.
Once you're satisfied with the adjustments, click OK to apply the changes. The noise reduction tool is an excellent way to reduce pixelation caused by noise while maintaining image clarity.
Also Read This: Extracting Audio from YouTube Videos for Personal Use
Using the Blur Tool to Improve Image Quality
While the blur tool might sound like it would make your image worse, it can actually be a great way to smooth out pixelated areas and improve overall quality. This tool works by softening the sharp edges of the pixelated blocks, helping to blend them with the surrounding pixels. Here's how to use the blur tool to improve your image quality:
- Select the Blur Tool: Open your image in Photoshop and choose the Blur Tool from the toolbar. It looks like a droplet of water.
- Adjust the Brush Settings: In the options bar, adjust the brush size and strength. For pixelated areas, you’ll want a larger, softer brush with low strength to gently blur the blocks.
- Apply the Blur: Click and drag the blur tool over the pixelated areas. Be sure to use light strokes, as too much blur can lead to a muddy image. Work in small sections to maintain control over the effect.
- Refine the Blurred Area: If necessary, go over the area multiple times to smooth out the pixelation. You can adjust the brush size as needed for smaller or larger areas.
Using the blur tool helps reduce pixelation without losing important details. It can create a much smoother transition between blocks of color, making the image appear less harsh and more visually appealing.
Also Read This: IMDb Awards Galore: Adding IMDb Accolades – Showcasing Your Accomplishments
Sharpening the Image to Add Detail
After you've used the blur tool or noise reduction tool, the next step is often sharpening your image to bring back some of the lost detail. When you reduce pixelation or noise, the image can sometimes appear soft or blurry. Sharpening helps to enhance edges and make the image more crisp and defined. Here's how you can sharpen your image in Photoshop:
- Open the Image: Start by opening your image in Photoshop and duplicating the background layer for non-destructive editing.
- Use the 'Unsharp Mask': Navigate to Filter > Sharpen > Unsharp Mask. This is one of the most effective sharpening tools in Photoshop. In the dialog box, adjust the following sliders:
- Amount: Controls the strength of the sharpening effect. Start with a lower value (around 100%) and increase if necessary.
- Radius: This controls the width of the edges that are sharpened. A smaller radius is typically better for finer details, while a larger radius works for thicker lines.
- Threshold: This determines how much contrast between pixels is required for sharpening to occur. A lower threshold sharpens more pixels, while a higher threshold sharpens fewer pixels.
Sharpening adds clarity and brings out the details of your image. It's a key step after reducing pixelation, ensuring that your image looks crisp and well-defined without looking over-processed.
Also Read This: The Cost of the Rumble App and Its Subscription Fees
Advanced Techniques to Fix Pixelation in Photoshop
If the basic tools in Photoshop don’t fully fix the pixelation in your image, there are advanced techniques that can help you get even better results. These methods involve more precise tools and settings, allowing you to tackle pixelation from different angles. Let’s explore some advanced techniques that can restore the quality of your image:
- High Pass Filter and Soft Light: This method is excellent for adding sharpness and reducing pixelation. Duplicate your image layer, apply the High Pass Filter (Filter > Other > High Pass), and set the blending mode to Soft Light. This technique enhances edges without adding noise or grain.
- Content-Aware Fill: If pixelation occurs in a specific area, the Content-Aware Fill tool can help. Select the pixelated area, then go to Edit > Fill and choose Content-Aware. Photoshop will intelligently replace the affected area with similar textures from the surrounding pixels.
- Layer Masking for Detailed Edits: Use layer masks to work on specific areas without affecting the rest of the image. You can blur pixelated regions or apply noise reduction to only the parts of the image that need it.
- Refining with the Pen Tool: For high-precision editing, the Pen Tool allows you to isolate pixelated areas and create smooth vector paths. You can then mask or adjust these areas with tools like the Brush Tool or Gaussian Blur.
- Using the 'Topaz Labs' Plugin: If you need a more automated approach, try using third-party plugins like Topaz DeNoise AI or Topaz Sharpen AI, which are designed to fix pixelation and noise issues more effectively with minimal effort.
These advanced techniques can significantly improve the quality of your pixelated images. Remember, each image is different, so experimenting with these methods will help you find the best solution for your specific needs.
Also Read This: How to Create Eye-Catching Borders for Your Images in GIMP
Common Mistakes to Avoid While Fixing Pixelated Images
Fixing pixelation can be tricky, and it's easy to make mistakes that could make the problem worse. Avoiding these common errors will help you get the best results and preserve the quality of your image. Here are some mistakes to watch out for:
- Overusing the Blur Tool: While the blur tool is helpful for reducing pixelation, too much blur can make the image look unnatural and soft. Always use the blur tool sparingly and focus on specific areas.
- Excessive Noise Reduction: Noise reduction is essential, but over-applying it can remove important details and create a plastic-like appearance. Find the right balance to preserve textures and details.
- Not Working on a Duplicate Layer: It’s always best to work on a duplicate layer to avoid altering your original image. Non-destructive editing ensures you can go back to the original if needed.
- Relying Too Much on One Tool: Relying solely on one tool (like noise reduction) may not fix pixelation entirely. Combining multiple techniques—such as noise reduction, sharpening, and using the blur tool—can yield better results.
- Ignoring the Image’s Resolution: Fixing pixelation in a low-resolution image may only offer limited results. Consider the image's original resolution and the degree of enlargement before deciding whether pixelation can be fixed.
- Not Checking Your Edits in Detail: Zoom in closely to check the changes you’ve made. Sometimes, pixelation can appear fixed from a distance, but up close, you may notice areas that need more attention.
By avoiding these common mistakes, you can improve your image editing process and achieve better results when fixing pixelation in Photoshop.
Also Read This: Share Your Portfolio Directly from the Behance Mobile App
FAQ
Q: Can I fix pixelation in an image without losing quality?
A: While it's challenging to fully restore a pixelated image to its original quality, Photoshop offers tools like noise reduction, blur, and sharpening to minimize the pixelation and make the image look clearer. The results depend on the degree of pixelation and the resolution of the image.
Q: Why does my image become pixelated after enlarging it?
A: When you enlarge a low-resolution image, the pixels are stretched beyond their original size, which makes them more noticeable and causes pixelation. To avoid this, always use high-resolution images for larger prints or enlargements.
Q: Are third-party plugins like Topaz Labs really necessary?
A: Plugins like Topaz Labs can be very helpful for reducing pixelation and enhancing image quality, but they are not essential. Photoshop’s built-in tools, when used correctly, can also provide excellent results. Use plugins if you're looking for faster, more automated fixes.
Q: How can I prevent pixelation in the future?
A: To prevent pixelation, always start with high-resolution images, avoid excessive enlarging, and use proper file formats like TIFF or PNG for better image quality. Also, be cautious when compressing images as this can lead to pixelation.
Conclusion: Enhancing Your Images in Photoshop
Fixing pixelation in Photoshop requires a combination of the right tools and techniques to restore image quality. Whether you're dealing with pixelated photos or graphics, using methods like noise reduction, sharpening, and advanced tools can make a significant difference in improving clarity. Always remember to work non-destructively by duplicating layers and applying adjustments carefully. Each technique, from blurring to using third-party plugins, can help target specific pixelation issues in your image.
While pixelation can be challenging, with the right steps, you can enhance your images and achieve better results. The key is to experiment with different methods and tools to find what works best for each specific image. With patience and practice, you’ll become more skilled at restoring and enhancing pixelated images in Photoshop, ensuring that your visuals are as clear and professional as possible.

 admin
admin


