When it comes to digital images, understanding pixel size and image dimensions is crucial. These two factors determine how clear or sharp an image will appear when viewed on different devices or printed. Pixel size refers to the number of pixels that make up an
Understanding Image Resolution and Pixel Size

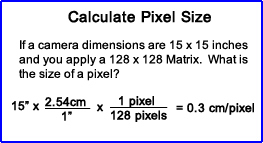
Resolution is another important aspect of image quality, often linked closely with pixel size. In simple terms, resolution refers to the number of pixels per inch (PPI) or dots per inch (DPI) in an image. A higher resolution means that the
Here’s a breakdown of the key terms:
- Pixel size: The individual dots of color that make up an image.
- Resolution: The amount of detail in an image, measured in pixels per inch (PPI) or dots per inch (DPI).
- Dimensions: The width and height of an image in pixels.
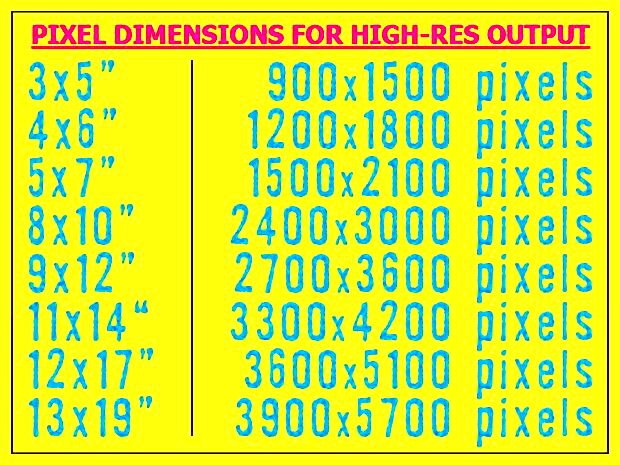
For example, an image with 1920x1080 dimensions and a resolution of 72 PPI is suitable for web use, while a higher resolution like 300 DPI is preferred for print purposes. By understanding how these concepts work together, you can ensure your images look great on any platform.
Also Read This: How to Use Adobe Photoshop CS8 on Dailymotion Exploring the New Features
How to Find Pixel Size of an Image on Windows

Finding the pixel size of an image on Windows is easy. Here’s a simple step-by-step guide to help you:
- Right-click on the image file.
- Select Properties from the menu.
- Click on the Details tab.
- Scroll down to the Image section, where you’ll see the width and height in pixels.
This will give you the pixel dimensions (e.g., 1920x1080) of your image. If you need more detailed information, such as the resolution (PPI), you may have to use photo editing software like Photoshop or an online tool.
Alternatively, you can open the image in a program like Microsoft Paint. Once the image is open, go to Resize in the toolbar, and you will see the pixel dimensions displayed. This method is quick and convenient for basic image size checks.
Also Read This: How to View and Manage Your LinkedIn Resume and Profile
Finding Pixel Size of an Image on Mac

Finding the pixel size of an image on a Mac is quite simple. You don’t need any special software to do this; your Mac has built-in tools that make it easy. Follow these steps to find the pixel dimensions of your image:
- Locate the image file in Finder.
- Right-click (or control-click) on the image file.
- Click on Get Info from the context menu.
- In the Get Info window, look under the More Info section to see the dimensions of the image in pixels (e.g., 1920 x 1080).
Alternatively, you can open the image in the Preview app. Once the image is open, go to the Tools menu and select Show Inspector (or press Command-I). In the inspector window, you'll see the image’s dimensions under the General Info tab.
This method is quick, easy, and effective for checking pixel size on your Mac, whether you’re working on graphic design, photo editing, or just want to know the image details for web use.
Also Read This: How to Automatically Trace an Image in Photoshop
Using Online Tools to Find Pixel Size

If you don't want to use built-in tools or software, online tools provide an easy way to check the pixel size of an image. These tools are great because they don’t require installation, and you can use them directly in your browser. Here's how you can use online tools:
- Visit a reliable online image metadata tool like Image Size Finder or Get DPI.
- Upload your image to the tool’s website.
- The tool will automatically display the image's pixel dimensions (e.g., 3000x2000) along with other details like resolution and file size.
Many online tools also allow you to check the image’s resolution (DPI/PPI) and even resize it if needed. These tools are often free and don’t require you to download anything, making them an excellent choice for quick checks while on the go.
Keep in mind that using a trusted online tool ensures that your privacy is respected and your data is secure. Always opt for reputable websites to avoid uploading sensitive images to untrusted sources.
Also Read This: Top Image Processing Job Opportunities in the USA
Using Photoshop to Check Pixel Size
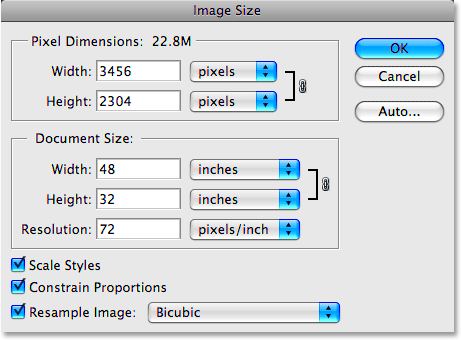
If you need more advanced image details, Photoshop is a powerful tool that provides comprehensive information about your image, including its pixel size. Here's how you can check the pixel size in Photoshop:
- Open your image in Adobe Photoshop.
- Go to the Image menu in the top toolbar.
- Select Image Size from the dropdown menu.
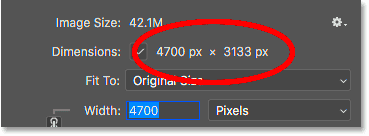
- A window will pop up showing the width and height of your image in pixels.
In this window, you can also adjust the resolution and dimensions if needed. Photoshop allows you to view detailed information about the image, such as its resolution (DPI), and even offers options to change the image size while maintaining its quality. If you need to resize the image, you can do it here without distorting the pixels.
Photoshop is ideal for professionals working on graphic design, digital art, or photography. It gives you full control over the pixel size and ensures that your images look sharp and clear on any platform.
Also Read This: How to Download Licensed Images from Adobe Stock
Why Pixel Size Matters for Image Quality
Pixel size plays a key role in determining the quality of an image. The larger the pixel size, the more detail an image can capture, resulting in sharper, clearer visuals. If you’ve ever tried to zoom into an image only to see it become blurry or pixelated, you’ve experienced the effects of insufficient pixel size. When an image has a high pixel count, it can maintain its sharpness even at larger sizes or when zoomed in.
Here’s why pixel size matters:
- Sharpness and Clarity: A larger pixel size means more pixels in the image, which contributes to higher resolution and sharper details.
- Printing: When printing images, a higher pixel count ensures that they remain clear and crisp on paper, especially for large prints.
- Screen Quality: On high-definition screens, images with a higher pixel count appear sharper and more vibrant, improving the overall viewing experience.
In contrast, low pixel size can lead to blurry or pixelated images, especially when resized or displayed on larger screens. This is why understanding and working with pixel size is crucial for photographers, graphic designers, and anyone working with digital images. High pixel size ensures that your images will look their best, whether on the web, in print, or on devices.
Also Read This: How to Layer Images for Stunning Designs
How to Resize Images without Losing Quality
Resizing images can be tricky. If done incorrectly, you can end up with blurry or distorted visuals. However, if you follow the right techniques, you can resize images while maintaining their quality. Here are some tips:
- Use Image Editing Software: Software like Photoshop, GIMP, or Lightroom allows you to resize images while preserving their quality. These programs use algorithms to resample the image, preventing pixelation.
- Maintain Aspect Ratio: When resizing, always keep the aspect ratio intact (the ratio between width and height). This ensures the image doesn’t get stretched or squished.
- Choose the Right Resampling Method: If using Photoshop, choose a high-quality resampling method like Bicubic Smoother for enlarging or Bicubic Sharper for reducing size.
- Start with a High-Resolution Image: If you start with a high-resolution image, resizing it down will generally retain better quality than resizing up. Always try to avoid increasing the pixel count of a low-resolution image.
Additionally, if you need to enlarge an image significantly, you may want to consider using online tools or software that specializes in enhancing images, such as AI-based upscalers, which use artificial intelligence to add pixels and preserve detail during resizing.
By using these techniques, you can resize your images without compromising quality, ensuring that they look sharp and clear wherever they are used.
Also Read This: How to Start Selling on 123RF Step-by-Step Guide for Contributors
FAQ
Q1: What is pixel size, and how does it affect an image?
Pixel size refers to the number of pixels that make up an image. Larger pixel sizes result in higher-quality, sharper images, while smaller pixel sizes can lead to a loss of detail and blurry visuals.
Q2: How can I check the pixel size of an image?
You can check the pixel size of an image by right-clicking the image and selecting "Properties" (on Windows) or "Get Info" (on Mac). You can also use image editing software like Photoshop or online tools to view the pixel dimensions.
Q3: Does increasing the pixel size improve image quality?
Increasing the pixel size of an image doesn’t automatically improve quality. It’s more effective to start with a high-resolution image. Enlarging an image beyond its original size may lead to pixelation, so it's best to work with images that have the appropriate resolution for your needs.
Q4: How can I resize an image without losing quality?
To resize an image without losing quality, use image editing software like Photoshop, ensuring you maintain the aspect ratio and choose the correct resampling method. Also, avoid enlarging low-resolution images as this can cause pixelation.
Q5: Can online tools help me find pixel size or resize images?
Yes, many online tools can help you find pixel size and even resize images. These tools are usually free and easy to use, making them a convenient option for quick tasks.
Conclusion
Understanding pixel size is essential for ensuring the quality of your images, whether you're working on a website, creating graphics, or preparing photos for print. The right pixel size ensures that your images look clear, sharp, and vibrant. By checking pixel size, resizing images properly, and using the right tools, you can maintain image quality across different platforms and devices. Remember, larger pixel sizes generally lead to better quality, but it’s also important to manage resizing techniques to avoid any loss of clarity. Whether you're using built-in tools on your computer or advanced software like Photoshop, knowing how to work with pixel size is key to creating high-quality visuals that perform well on any medium.

 admin
admin


