Editing an ISO image can be a useful task, whether you need to add files, remove outdated content, or modify its structure. An ISO image is essentially a digital copy of a physical disk, like a CD or DVD. It contains all the files and directories that were present on the disk, packaged into a single file. By editing the ISO
Understanding ISO Files and Their Uses

ISO files are disk images, commonly used for software distribution, backups, or creating bootable drives. When you download software or operating systems, you often get them in ISO format. Here are some common uses for ISO files:
- Software Distribution: Developers use ISO files to distribute programs and operating systems, as they maintain the file structure and ensure easy installation.
- Backup Purposes: ISO images are often created for archiving purposes, allowing users to store and later restore the contents of physical disks.
- Creating Bootable Media: An ISO image can be used to create bootable USB drives or CDs for installing operating systems or running recovery tools.
By understanding the role and uses of ISO files, you can better appreciate the value of editing them for specific purposes, such as adding files or modifying boot configurations.
Also Read This: How to Create Stunning Brochures with VectorStock
Tools You Need to Edit an ISO Image

To edit an ISO image, you’ll need the right tools that allow you to manipulate the contents of the ISO without corrupting it. Here are a few popular tools to help you get started:
- PowerISO: This tool is widely used for creating, editing, and extracting ISO files. It offers a simple user interface for adding and removing files from an ISO image.
- UltraISO: UltraISO is another popular tool that can handle ISO images with ease. It allows for both editing and creating ISO images from scratch.
- Daemon Tools: Though primarily known for mounting ISO files as virtual drives, Daemon Tools also offers options for editing the content of ISO images.
- WinRAR: While WinRAR is mostly used for file compression, it can also open ISO images, allowing you to extract and modify their contents.
- ISO Master: A free and open-source tool for Linux users, ISO Master is perfect for editing and creating ISO files by offering basic features for file addition, deletion, and extraction.
Choose the tool that best fits your operating system and your specific needs, keeping in mind that some tools are more feature-rich than others. Once you've selected the right tool, you’ll be ready to dive into editing your ISO image.
Also Read This: How to Use Getty Images for Licensing and Usage Rights as a Beginner
Steps to Edit an ISO Image Using Software

Editing an ISO image might sound complicated, but it’s a relatively straightforward process once you have the right software. In this section, we’ll walk through the general steps to edit an ISO image using commonly available tools. The process is very similar across most software, so you can apply these steps regardless of which tool you're using.
- Download and Install Software: First, download and install the software of your choice (such as PowerISO, UltraISO, or Daemon Tools).
- Open the ISO Image: Launch the software and open the ISO image you want to edit. This is typically done by clicking the "Open" or "Browse" button in the software interface.
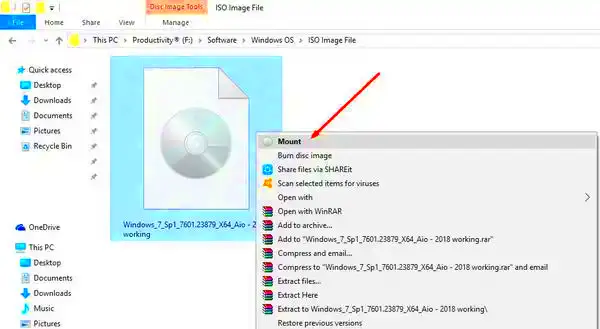
- Mount the ISO (Optional): Some software allows you to mount the ISO file as a virtual drive. This can make it easier to access and edit the contents directly, just like any folder on your computer.
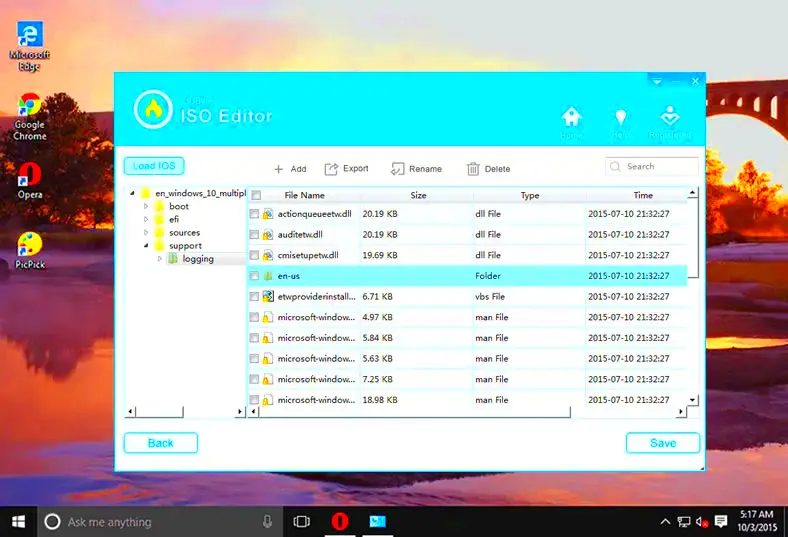
- Edit the ISO Image: Once the ISO is opened or mounted, you can begin editing. You can add, delete, or replace files within the ISO, depending on your needs.
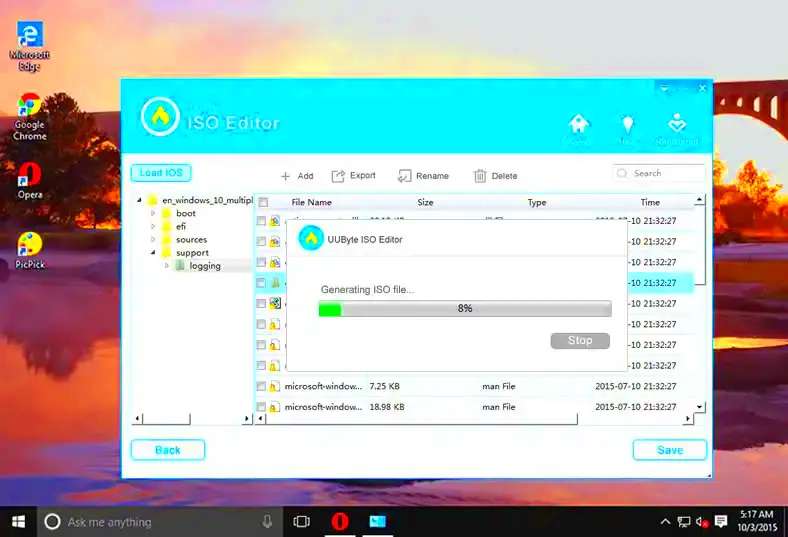
- Save Changes: After editing, be sure to save the changes. Most software will offer an option to save the edited ISO file as a new version to prevent overwriting the original image.
- Verify the ISO Image: Lastly, verify the integrity of the edited ISO to ensure there are no errors. Some tools have built-in verification features.
Following these steps will help you easily modify your ISO images without much hassle. Keep in mind that certain tasks, like creating bootable ISOs, may require additional steps or settings adjustments.
Also Read This: How to Find Pixel Dimensions in an Image
Adding Files to an ISO Image
One of the most common tasks when editing an ISO image is adding files to it. Whether you need to add new documents, programs, or updates to an existing ISO, the process is fairly simple. Below are the steps for adding files to an ISO image:
- Open the ISO Image: Launch the editing software and open the ISO image where you want to add files.
- Select the File(s) to Add: Browse your system and select the file(s) you wish to add to the ISO image. You can select multiple files or folders at once, depending on the software.
- Drag and Drop: In many ISO editing tools, you can drag the selected files directly into the open ISO image window. This will automatically add them to the image.
- Use the Add File Option: Alternatively, most software has an “Add” or “Insert” button. Click on this option and navigate to the location of your files to add them to the ISO image.
- Save the Changes: Once the files are added, don’t forget to save the edited ISO. You may want to save it under a new name to avoid overwriting the original.
Adding files to an ISO image is especially useful when you're customizing bootable ISOs or creating backups with updated content. It’s important to check that the ISO image size hasn’t exceeded any size limits for your intended use, such as when creating bootable media.
Also Read This: How to Split Images for Printing
Removing Files from an ISO Image
Sometimes, you may need to remove unnecessary or outdated files from an ISO image. This is a great way to save space or streamline an ISO before burning it to a disk or USB drive. Here's how you can remove files from an ISO image:
- Open the ISO Image: As always, the first step is to open your ISO image using your preferred software.
- Browse the ISO Contents: Once the ISO is open, browse through the contents to find the files you want to remove.
- Select the Files to Remove: Highlight the files or folders you want to delete. In some tools, you can select multiple files by holding down the "Ctrl" key (or "Cmd" key on macOS).
- Delete the Files: Right-click on the selected files and choose the “Delete” option. Alternatively, you can use the software’s toolbar or menu to remove them.
- Confirm Deletion: Some software will ask you to confirm the deletion. Make sure you’re okay with removing the files, as this action can’t always be undone.
- Save the Edited ISO: After removing the files, don’t forget to save the updated ISO image. Choose “Save” or “Save As” to create a new version with the changes.
Removing files from an ISO image is a quick way to trim down the size of an image, especially if you're creating a customized boot disk or just need to get rid of unneeded content. Always make sure to verify the image after editing to avoid any potential issues.
Also Read This: Learn What’s the Royalty for Shutterstock
Saving and Verifying the Edited ISO Image
After making the necessary changes to your ISO image, it's important to save and verify it to ensure the modifications are intact and the image is functioning correctly. Whether you’ve added, removed, or replaced files, these final steps help avoid issues like corrupted or unusable ISO images. Here’s how you can save and verify your edited ISO image:
- Save the Edited ISO Image: Most ISO editing tools will have a “Save” or “Save As” option. If you don’t want to overwrite the original file, choose “Save As” to create a new version of the ISO image with the changes.
- Choose the Destination: Select the location on your computer where you want to save the edited ISO file. Make sure you have enough disk space to accommodate the modified image.
- Verify the Integrity: Many ISO editing tools offer built-in verification features. Use these to ensure that the ISO is not corrupted and that the files within the image are accessible. Some tools will perform an automatic check as part of the saving process.
- Manual Verification: If the software doesn’t have an automatic verification feature, you can manually check the contents of the ISO by mounting it and ensuring all files are present and working as expected.
Saving and verifying the edited ISO image is crucial to avoid errors when using it later, whether you’re burning it to a disk or creating bootable media. Always double-check your ISO to prevent any issues before finalizing your project.
Also Read This: How to Enlarge Purchased Adobe Stock Image
Common Issues and How to Fix Them
When editing ISO images, you might run into a few common issues. These can range from errors in the file structure to problems with bootable ISOs. Understanding these issues and knowing how to fix them can save you time and frustration. Below are some common issues and how to resolve them:
- Corrupted ISO Files: Sometimes, the ISO file may become corrupted during the editing process. This can prevent it from being mounted or used properly. To fix this, try using a different ISO editing tool or restore the file from a backup if available.
- File Size Exceeds Limits: Some bootable ISO tools have file size limits. If your edited ISO image is too large, you might not be able to burn it to a disk or USB. To fix this, try removing unnecessary files from the ISO or compressing large files.
- Boot Issues: If you’re editing a bootable ISO and it fails to boot, ensure that you haven’t altered essential boot files. Tools like Rufus can be used to test the bootability of the ISO before you use it on a physical disk.
- Missing or Inaccessible Files: If you’ve added files to the ISO but they’re not showing up or accessible after saving, check that the file paths inside the ISO aren’t broken. Also, ensure that the ISO is properly saved and not corrupted during the editing process.
By addressing these common issues early, you can save time and ensure your edited ISO images function correctly. Always back up your original ISO before making major edits, just in case something goes wrong.
Also Read This: How to Record PC Gameplay for YouTube and Grow Your Gaming Channel
FAQ
Here are some frequently asked questions about editing ISO images that might help clarify any doubts you have:
- What is an ISO image?
- An ISO image is a complete copy of a disk, typically used for software distribution, backups, or creating bootable media. It contains all the files and folders that were originally on the disk, packaged into a single file.
- Can I edit an ISO image without losing its contents?
- Yes, as long as you use the right software and follow the correct steps, you can edit an ISO image without losing its contents. Just make sure to save the changes properly and verify the integrity of the edited ISO.
- Do I need special software to edit ISO files?
- Yes, you need software like PowerISO, UltraISO, or Daemon Tools to edit ISO files. These programs allow you to open, modify, and save ISO images easily.
- Can I add or remove files from an ISO image?
- Yes, you can add new files or remove existing ones from an ISO image. Most ISO editing software makes this process simple by providing options to drag and drop files or use dedicated buttons for file management.
- How can I verify that my edited ISO image is working correctly?
- You can verify the ISO by mounting it on your computer or using a tool that allows you to check the integrity of the image. Most editing software also provides verification features to ensure the file is not corrupted.
- What should I do if the ISO image becomes corrupted?
- If your ISO becomes corrupted, try using a different tool to open and repair the image. In some cases, you may need to restore it from a backup if available. It's always a good idea to back up your original ISO before making major edits.
Conclusion
Editing an ISO image can be a useful skill when you need to customize disk images, create backups, or make changes to bootable media. By following the steps outlined in this guide, you can easily add, remove, or modify files within your ISO images using simple tools. It’s essential to save and verify the edited ISO to avoid errors that may arise later. Common issues like corrupted files or boot problems can be easily fixed with the right approach. With the proper tools and knowledge, editing ISO images becomes a manageable and beneficial task for many different purposes.

 admin
admin


