
Image subtraction in PowerPoint is a useful technique that allows you to create more visually appealing presentations. It involves removing parts of an image to highlight specific elements or to combine different visuals in a creative way. This can enhance the clarity of your slides, making them more engaging for your audience. Whether you're designing a presentation for work, school, or personal use, knowing how to subtract images can add a professional touch to your visuals.
Why Subtract Images in PowerPoint
Subtracting images can serve various purposes in your presentations. Here are some reasons to consider this technique:
- Focus on Key Elements: By removing distractions, you can draw attention to what truly matters.
- Create Unique Designs: Combining images or subtracting unwanted parts can lead to original designs.
- Enhance Visual Appeal: Clean, edited images can make your slides look polished and professional.
- Tell a Story: Effective image subtraction can help convey your message more clearly and effectively.
Overall, learning how to subtract images can greatly improve your presentation skills, making it easier to communicate your ideas.
Also Read This: Find Out How to Upload Photos to Shutterstock
Preparing Your Images for Subtraction
Before diving into the actual process of image subtraction, it’s essential to prepare your images properly. Here are some steps to follow:
- Select the Right Images: Choose images that are relevant to your content. High-quality images work best.
- Import Images into PowerPoint: Use the "Insert" tab to add images. You can insert images from your computer or online sources.
- Arrange Your Images: Place your images on the slide where you plan to work on them. Make sure they are sized appropriately.
- Consider Image Format: Ensure your images are in a compatible format (like .jpg or .png) to avoid any issues during editing.
By following these preparation steps, you set yourself up for a smoother and more effective image subtraction process. A little planning goes a long way in creating stunning visuals.
Also Read This: Learn How to Free Download Shutterstock Images With These Easy Steps
Using the Remove Background Tool
The Remove Background tool in PowerPoint is a fantastic feature that helps you isolate the important parts of an image by eliminating the unnecessary background. This tool makes it easy to highlight subjects, making your presentations cleaner and more focused. It's user-friendly and requires no advanced skills, which makes it perfect for anyone looking to enhance their slides quickly.
Here's how to use the Remove Background tool effectively:
- Select Your Image: Click on the image you want to edit. This activates the Picture Tools format tab.
- Access the Remove Background Feature: Go to the Format tab and click on "Remove Background." PowerPoint will automatically identify areas to remove.
- Adjust the Selection: Use the “Mark Areas to Keep” and “Mark Areas to Remove” options to refine your selection. This lets you control exactly what stays and what goes.
- Finalize the Changes: Once satisfied with your selection, click “Keep Changes.” Your image will now have a cleaned-up background.
Using the Remove Background tool can significantly enhance your visuals, making your message clearer and your slides more engaging.
Also Read This: Removing Getty Image Watermarks from Your Photos
Creating Custom Shapes for Image Subtraction
Creating custom shapes for image subtraction in PowerPoint allows you to tailor your visuals precisely to your needs. This technique can be especially helpful when you want to highlight a specific area of an image or create a unique design. By using shapes, you can cut out portions of images in creative ways.
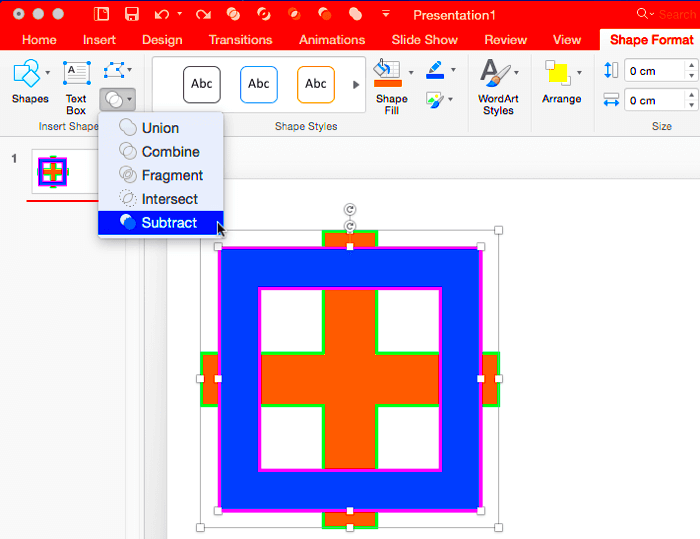
Here’s a simple way to do it:
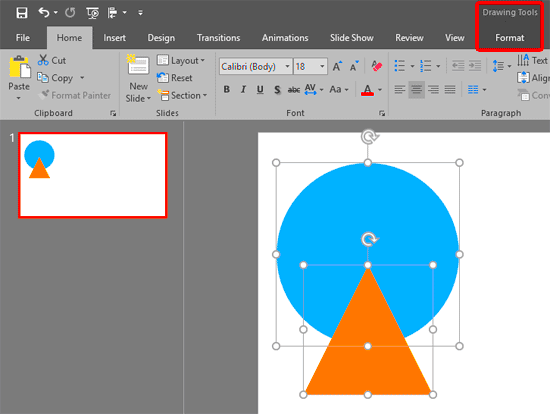
- Insert a Shape: Go to the “Insert” tab, click on “Shapes,” and select a shape that fits your needs.
- Draw the Shape Over the Image: Position and resize the shape over the area you want to keep from the image.
- Merge the Shape with the Image: Hold down the Shift key to select both the shape and the image. Then go to the Format tab, and select “Merge Shapes” to subtract.
Using custom shapes can help you create stunning visuals that stand out. It’s a fun way to play with designs while effectively conveying your message.
Also Read This: Teams Screen Share: Sharing Screen on Microsoft Teams on Mac
Using the Crop Tool for Effective Subtraction
The Crop tool in PowerPoint is another handy feature that allows you to remove unwanted parts of an image. It’s straightforward to use and gives you a lot of control over what appears in your final presentation. This tool is perfect for focusing on specific elements without going through the complex process of removing backgrounds or creating shapes.
To use the Crop tool effectively, follow these steps:
- Select Your Image: Click on the image to activate the Picture Tools format tab.
- Open the Crop Menu: Click on “Crop” in the Format tab to reveal cropping options.
- Adjust the Crop Area: Drag the black cropping handles to select the area you want to keep. You can crop from any side or corner.
- Apply the Crop: Click outside the image or press “Enter” to finalize the crop. Your image will now display only the selected area.
Using the Crop tool not only makes your slides look cleaner but also allows you to focus on the most important parts of your visuals. It’s an easy yet powerful way to enhance your presentations.
Also Read This: Choosing the Best Platform for Your Content on Twitch or YouTube
Combining Multiple Images
Combining multiple images in PowerPoint can create dynamic and visually appealing slides. This technique allows you to tell a more comprehensive story by layering different visuals. Whether you want to create a collage or highlight specific elements across various images, combining them can add depth to your presentations.
Here’s how you can effectively combine multiple images:
- Insert All Images: Use the “Insert” tab to add all the images you want to combine onto your slide.
- Arrange Your Images: Position and resize the images to fit your design. You can overlap them or place them side by side as needed.
- Adjust Transparency: To create a layered effect, select an image, go to the Format tab, and adjust the transparency under “Picture Tools.” This can help create a blended look.
- Group the Images: Once satisfied with the layout, hold down the Shift key and select all the images. Right-click and choose “Group.” This makes it easier to move and resize the combined image as one unit.
Combining multiple images not only makes your slides more engaging but also allows for greater creativity. Experimenting with different arrangements can lead to stunning visuals that captivate your audience.
Also Read This: How to Flip an Image in PowerPoint
FAQ About Image Subtraction in PowerPoint
When it comes to image subtraction in PowerPoint, many people have questions about the best practices and features available. Here are some frequently asked questions:
| Question | Answer |
|---|---|
| Can I subtract parts of an image using any version of PowerPoint? | Most recent versions of PowerPoint (2010 and later) support the image subtraction features like Remove Background and Crop. |
| Is it possible to undo changes made during image subtraction? | Yes, you can always use the Undo function (Ctrl + Z) to revert your last action. |
| Are there any limitations to the Remove Background tool? | While it's effective, it may not work perfectly for all images, especially those with complex backgrounds. |
| Can I use image subtraction for videos as well? | No, the image subtraction tools are specifically for images. However, you can layer images over videos. |
Understanding these common questions can help you navigate image subtraction more confidently and effectively.
Conclusion on Image Subtraction Techniques
In conclusion, mastering image subtraction techniques in PowerPoint can significantly enhance your presentation skills. Whether you're using the Remove Background tool, creating custom shapes, or simply cropping images, each method offers unique benefits that can elevate your slides. The ability to combine multiple images opens up even more creative possibilities.
As you practice these techniques, remember that the key is to keep your visuals clean and focused. Don’t hesitate to experiment and find what works best for your content. With these skills, you’ll be well on your way to creating professional-looking presentations that captivate your audience. Happy presenting!
 admin
admin


