Have you ever wondered where all those mysteriously hidden folders are on your Windows 8 system? It can be frustrating to think that there are files and folders you can't access easily. That's where this guide comes in! We’ll walk you through some easy steps to reveal hidden folders, making sure you have all the files you need at your fingertips.
Understanding Hidden Folders

Hidden folders in Windows 8 serve various purposes, both functional and security-related. So, what's the big deal about them? Let's break it down.
1. What are Hidden Folders?
Hidden folders are simply directories on your computer that have been marked as "hidden" by the system or the user. This means they won’t show up during a casual browsing session. You might wonder why they exist in the first place.
2. Why Use Hidden Folders?
Hidden folders can be helpful for several reasons:
- Protection of files: They can store sensitive files that you don't want others to see, making it a bit more challenging for curious users to find them.
- System files: Many system files are hidden by default to prevent accidental deletion or modification, which can lead to issues with your operating system.
- Organization: Some applications create hidden folders to keep their data organized without cluttering up your main file explorer view.
3. How are Folders Hidden?
There are a couple of ways folders can be hidden:
- Manual setting: Users can right-click a folder, go into properties, and then check the "Hidden" box.
- System settings: Windows occasionally hides folders by default to keep essential files out of reach.
Now that you understand why these hidden folders exist, let's move forward and learn how to uncover them. It’s surprisingly simple!
Accessing Folder Options

So, you've got some hidden folders on your Windows 8 machine, and you’re itching to access them! The first step you need to take is to access the Folder Options. Don't worry; it's super easy, and I'll guide you through it!
Follow these simple steps:
- Open File Explorer - You can do this by either clicking the folder icon on your taskbar or by pressing the Windows key + E on your keyboard. Boom, you’re in!
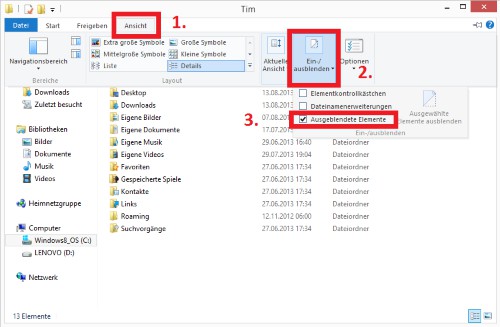
- Locate the “View” Tab - Look towards the top of the File Explorer window, and you’ll see several tabs. Head over to the View tab.
- Find Folder Options - In the View tab, there’s a little area on the right-hand side called “Options.” It might just look like a tiny arrow on the right side of your toolbar. Clicking that will bring up the Folder Options dialog.
Once you’re in the Folder Options, you’ll find a few different tabs: General, View, and Search. You’re going to want to focus on the View tab here, which is where you'll enable the visibility of those elusive hidden folders.
And there you have it! You’ve successfully accessed the Folder Options. Easy-peasy, right?
Enabling Hidden Items in File Explorer

Now that you've accessed the Folder Options, it’s time to enable those hidden items! This is where the magic happens. By following these steps, you’ll be unearthing those hidden treasures on your computer.
- Select the View Tab - If you haven’t already, switch to the View tab in the Folder Options window.
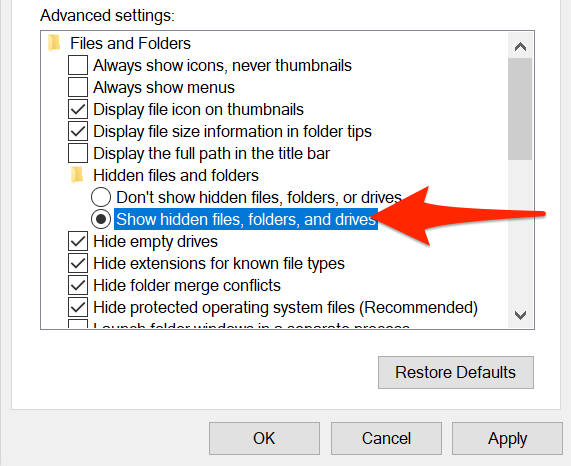
- Advanced Settings - In this tab, you’ll see a section called “Advanced settings.” Here’s where we’re going to make some changes!
- Show Hidden Files and Folders - Look for the option that says “Show hidden files, folders, and drives.” Click on the circle next to this option to enable it.
- Uncheck the Hidden Items option - You may also see an option that says “Hide protected operating system files (Recommended).” If you’re feeling adventurous and want to explore, you can uncheck this box too! Just keep in mind that modifying these files can affect your operating system.
- Apply Your Changes - Finally, click Apply, then OK. And that’s all it takes!
Now, head back to File Explorer. You should see all those hidden files and folders that were once cloaked in secrecy. Happy exploring!
Using Command Prompt to Reveal Hidden Folders
If you’re comfortable using the Command Prompt, it's a powerful tool for revealing hidden folders on your Windows 8 system. This method is straightforward and can be a real time-saver. Here’s how you can do it:
- Open Command Prompt: You can quickly access the Command Prompt by pressing the Windows key and typing "cmd" in the search bar. Right-click on it and select "Run as administrator" to ensure you have the necessary permissions.
- Navigate to the Directory: Use the
cdcommand to navigate to the directory where you suspect the hidden folders reside. For instance, if you're looking in the Documents folder, you would typecd C:\Users\YourUsername\Documentsand hit Enter. - Display Hidden Files: Now, type the following command and hit Enter:
dir /a:h. This command will list all hidden files and folders within the current directory. - Unhide the Folder: If you identify a folder you want to unhide, use the command
attrib -h "FolderName"and replace "FolderName" with the actual name of the folder. This removes the hidden attribute, making it visible.
And that's it! You've successfully used the Command Prompt to reveal and manage hidden folders. Just be cautious when modifying files and folders through this method, as making unwanted changes can affect your system.
Additional Tips for Managing Hidden Folders
Once you've revealed hidden folders on your Windows 8 system, it's good to have some additional tips up your sleeve for managing them effectively. Here are some insights to help you handle hidden folders with ease:
- Regularly Review Hidden Folders: Keep an eye on your hidden folders. They can sometimes accumulate unnecessary files. Regularly checking will help you organize better.
- Backup Important Data: Before making changes to hidden folders, ensure that vital data is backed up. It's easy to accidentally delete or modify important files when tampering with hidden content.
- Be Mindful of System Folders: Some hidden folders are essential for system functionality. Avoid changing or deleting contents in folders like
ProgramDataorAppData, as this could disrupt software operations. - Use File Management Tools: Consider using third-party file management tools that can help streamline the visibility and access of hidden folders. They often provide a user-friendly interface and additional functionalities.
These tips can enhance your experience with hidden folders, facilitating better organization and ensuring your data remains intact. Happy organizing!
Easy Steps to Reveal Hidden Folders on Windows 8
Windows 8 has a unique user interface that may make discovering hidden folders a bit challenging for some users. Hidden folders are often designated by the operating system to prevent accidental deletion or modification of important files. Fortunately, revealing these folders is a simple process that can enhance your file management experience. Follow these easy steps to show hidden folders on Windows 8.
Step 1: Open File Explorer
To begin, first open File Explorer. You can do this by clicking on the folder icon in the taskbar or pressing the Windows + E keys on your keyboard.
Step 2: Access the View Tab
Once File Explorer is open, locate the View tab on the ribbon at the top of the window and click on it.
Step 3: Show Hidden Items
In the View tab, you will see several options. Look for the checkbox labeled Hidden items and click on it. This action will immediately reveal all hidden folders and files within the current directory.
Step 4: Additional Options
If you wish to make hidden folders visible system-wide, follow these additional steps:
- Click on the Options dropdown in the View tab.
- Select Change folder and search options.
- In the Folder Options window, switch to the View tab.
- Select Show hidden files, folders, and drives and uncheck Hide protected operating system files.
- Click OK to apply your changes.
By following these easy steps, you can effortlessly reveal hidden folders on Windows 8, allowing for a more efficient and organized file navigation experience.
Conclusion
Revealing hidden folders on Windows 8 is a straightforward process that enhances accessibility and control over your files, ensuring you have the necessary visibility to manage your computer efficiently.
 admin
admin


