Welcome to the colorful world of DIY loop band bracelets! If you’re looking for a fun and creative way to express your style, you’ve come to the right place. These vibrant, elastic bands can be transformed into stunning accessories that showcase your personality. Plus, making loop band bracelets is not just enjoyable – it’s also a fantastic way to improve your dexterity and unleash your creativity. In the age of social media, sharing your unique creations on platforms like Dailymotion can turn your hobby into a passion. So, grab your bands and let’s dive in!
Getting Started with Loop Bands
Before we jump into making fabulous loop band bracelets, let’s chat about getting started. Here’s what you’ll need to embark on your crafting adventure:
- Loop Bands: The most essential component! They come in a rainbow of colors and designs.
- Hook Tool: This handy tool will help you weave and create your bracelet designs with ease.
- Storage Container: Keeping your bands organized is crucial. A small box or even a compartmentalized container works beautifully.
- Table or Flat Surface: A clean space is essential to lay out your materials and work on your designs.
- Instructional Videos: Platforms like Dailymotion have numerous tutorials to help you get started on different styles.
Now that you have your materials set, let’s explore some basic tips:
- Choose Your Design: Whether you want a simple single-strand or a more intricate multi-strand bracelet, pick a design that excites you. Dailymotion is a treasure trove of ideas!
- Color Combinations: Getting creative with colors is one of the best parts of making loop band bracelets. Mix and match different colors to find a combination that you love.
- Practice Makes Perfect: Don’t get discouraged if your first few attempts don’t turn out as expected. Crafting is about trial and error, so embrace the process!
- Customization: Once you get the hang of it, feel free to add charms or beads to personalize your bracelets further.
- Share Your Creations: Don’t forget to show off your beautiful bracelets! Share them on your social channels, especially on Dailymotion, and connect with fellow DIY enthusiasts.
As you embark on your loop band bracelet journey, remember that it’s all about having fun and being creative. So gather your supplies, brainstorm some designs, and get ready to let your imagination run wild. Happy crafting!
Also Read This: How to Cut My Hair at Home with Dailymotion Tutorials for Beginners
3. Essential Tools and Materials Needed
Before diving into the colorful world of DIY loop band bracelets, it's important to gather your tools and materials. This will make the process smoother and more enjoyable! Let’s take a look at what you’ll need to get started:
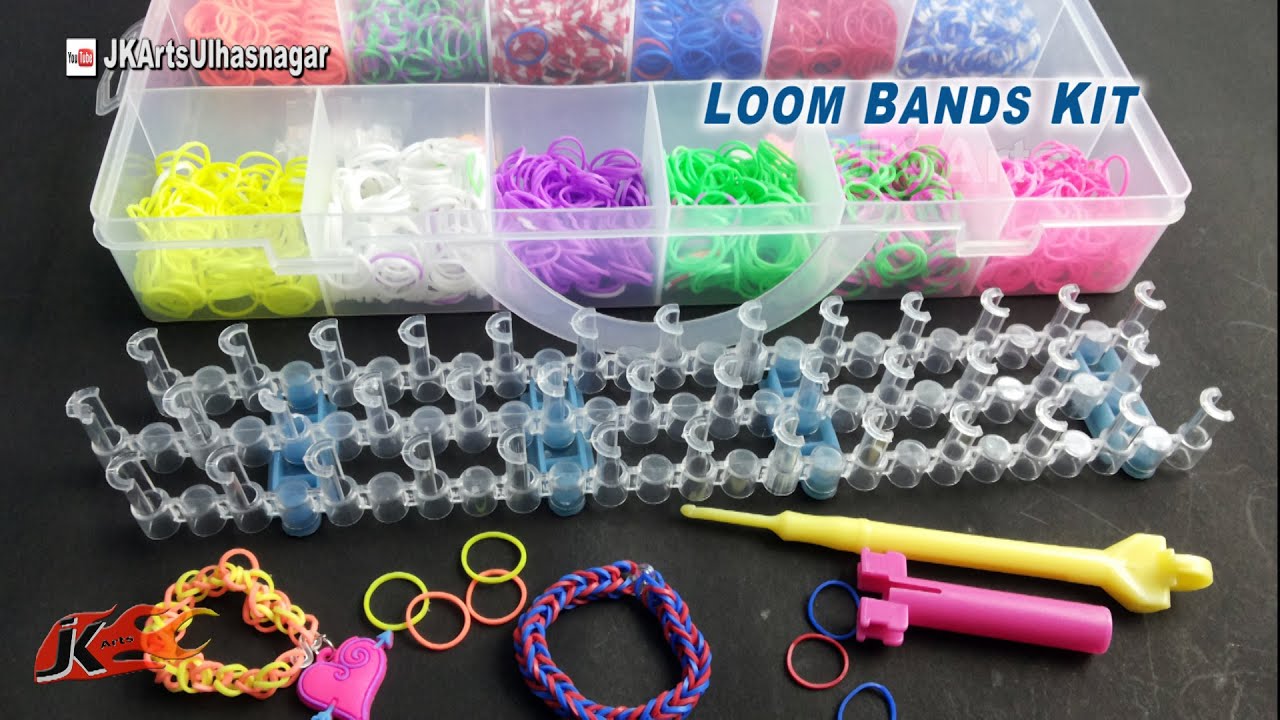
- Loop Bands: The star of the show! These come in a variety of colors and are usually made of stretchy silicone. You can purchase them in bulk or in a pack with assorted colors for more creativity.
- Hook Tool: This small, hook-shaped tool is used to pull the bands through the loops. While some beginners use their fingers, a hook tool can make it much easier to create tight and well-designed bracelets.
- Bracelet Loom (Optional): While not necessary, a loom helps in aligning your bands and keeps them secure while you work. If you plan to make a lot of bracelets, investing in one is a great idea!
- Scissors: You’ll need these for trimming any excess bands once your bracelet is made.
- S-clips or C-clips: These connectors hold your bracelet together and come in handy at the end of your crafting. You can also use beads or charms for more intricate designs.
- Storage Container: To keep your bands organized by color, having a compartmented storage container can save a lot of time and frustration later on. Keep those tiny bands from rolling away!
Once everything is gathered, you’ll be all set to start creating beautiful loop band bracelets. Remember, personalization is key, and having a variety of colors and materials will let your imagination run wild!
Also Read This: The Role of Dailymotion in Hosting Creative Experiments and DIY Content
4. Step-by-Step Tutorials for Beginners
Now that you have your materials ready, let’s dive into some simple, step-by-step tutorials for making your first loop band bracelet. Don’t worry if you’re a complete novice – we’ll take it slow!
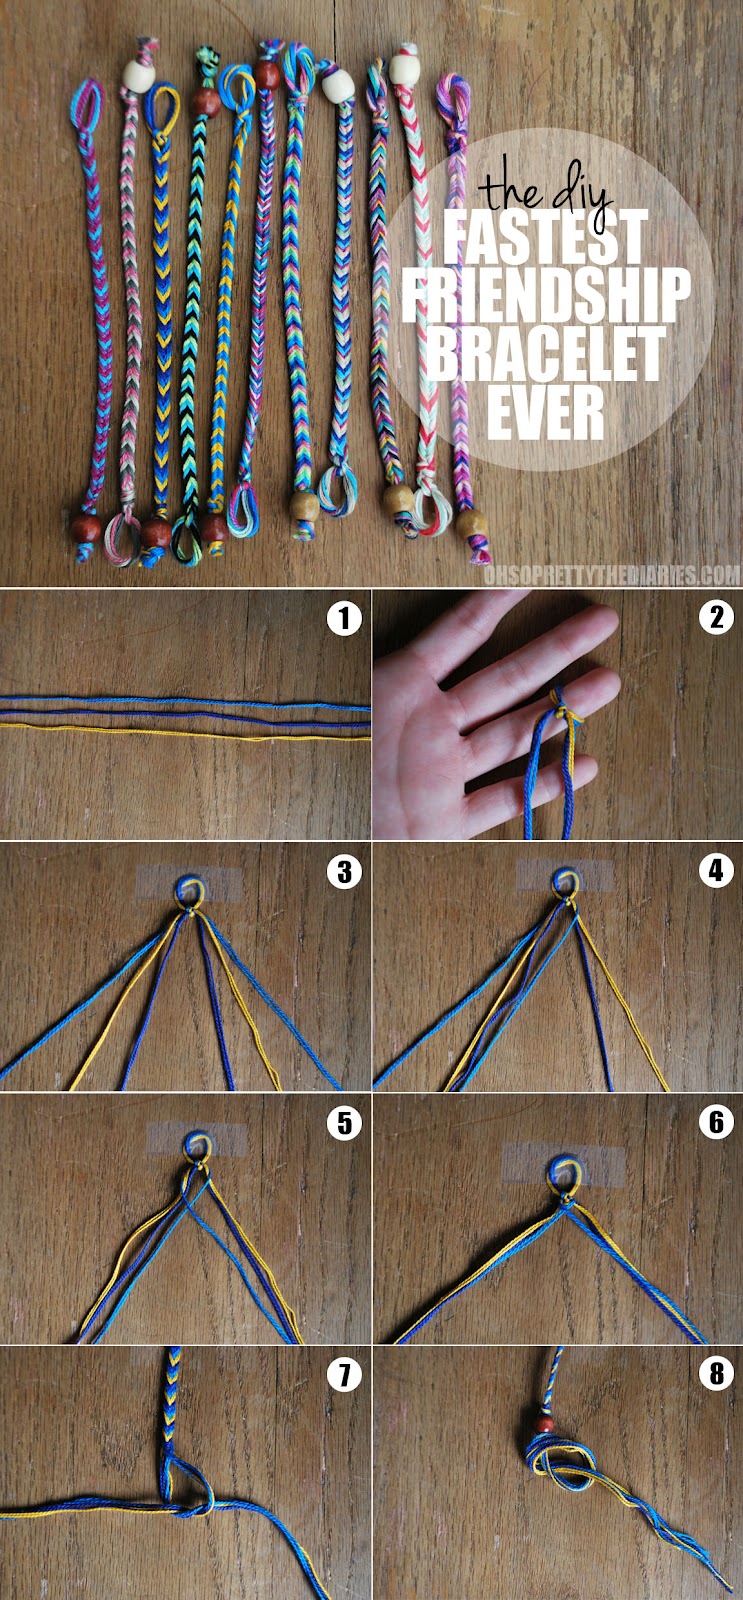
Simple Single Loop Band Bracelet
This is the perfect starting point for beginners. Follow these steps:
- Choose Your Colors: Pick 2-3 colors of loop bands. Let’s say you grab pink, purple, and white.
- Start with the Base: Take your first band (let’s go with pink) and stretch it in a figure-eight shape on your fingers or loom.
- Layer It Up: Place the next band (purple) over the pink one, also forming a figure-eight. Keep stacking bands, alternating colors.
- Hook and Secure: It’s time to grab your hook tool! Use it to pull the bottom band (pink) over the top band (purple) and off your fingers or loom.
- Repeat Until Desired Length: Keep adding bands and pulling them through until your bracelet reaches your desired length.
- Finish Off: Once you're happy with the size, use an S-clip to secure the ends together. Make sure it’s tight so your bracelet won't fall apart!
Congratulations! You’ve just made your first simple bracelet. Feel free to switch up colors, try different patterns, and most importantly, have fun with it!
Checkerboard Pattern Bracelet
Once you’ve mastered the simple bracelet, let's elevate your crafting skills with a checkerboard pattern, which looks more advanced but is actually quite easy!
- Color Selection: Choose two contrasting colors, say black and white, for a striking effect.
- Base Setup: Start the same way by creating a figure-eight shape with the first color (black).
- Alternating Colors: Now, place a figure-eight of the white loop band on top of the black one. You will be alternating these two colors.
- Continue Adding Bands: Repeat the process, ensuring that each new band loops through the most recently added colored band.
- Finalize: Once again, use your hook tool to pull the bottom bands over the top ones, securing your bracelet. Finish with an S-clip.
And there you have it—a stylish checkerboard bracelet! Experiment with different color combinations and designs, and remember that practice makes perfect. Enjoy your creative journey with loop band bracelets!
Also Read This: How to Change Background in Adobe Photoshop CS6 Easy Steps to Follow
5. Advanced Techniques for Creative Bracelet Designs
If you’ve mastered the basics of loop band bracelets, it’s time to dive into some advanced techniques that will take your creations to the next level! These methods will not only enhance your skills but also enable you to design unique and eye-catching bracelets that will be the envy of your friends.
Here are a few advanced techniques to explore:
- Fishtail Technique: This pattern creates a beautiful, woven look that mimics a fishtail braid. To achieve this, you’ll need to alternate the bands between the left and right sides of the loom. Start with two bands and stack them, then switch gears with the next set to build layers.
- Diamond Pattern: For a more intricate design, the diamond pattern will impress. This involves a careful placement of colors and varying lengths of bands. The key is to create a pyramid-like structure. Don’t forget to secure the ends properly!
- 4D or 3D Designs: These designs pop out from the surface, adding a 3-dimensional aspect to your bracelets. You can achieve this by layering bands in unique arrangements. A little extra effort goes a long way in creating something spectacular!
- Color Blending: Experimenting with color transitions can yield stunning results. By using varying shades of the same color or different colors that complement each other, you can create a gradient effect that adds to the charm of your bracelets.
In addition to these techniques, keep experimenting with different loom setups and hooks. The more you practice, the more proficient you’ll become in the art of loop band bracelet making!
Also Read This: How to Download Dailymotion Videos to Your Computer: Easy Steps
6. Popular Loop Band Bracelet Patterns to Try
Ready to make some fabulous bracelets? Here are some popular loop band bracelet patterns that are not only trendy but also fun to craft! These patterns will help you showcase your creativity and skills.
| Pattern Name | Difficulty Level | Materials Needed |
|---|---|---|
| Single Chain | Beginner | Loop bands, loom, hook |
| Waterfall Bracelet | Intermediate | Loop bands, loom, hook |
| Starburst Bracelet | Intermediate | Loop bands, loom, hook |
| Hexafish Bracelet | Advanced | Loop bands, loom, hook |
| Block Stitch Bracelet | Advanced | Loop bands, loom, hook |
Let’s take a quick look at some details about these patterns:
- Single Chain: The simplest pattern—perfect for beginners! Just connect loops in a chain and see how quickly you can make a colorful bracelet.
- Waterfall Bracelet: This pattern adds a beautiful cascade look, creating a gradient appearance that is visually stunning.
- Starburst Bracelet: A popular choice for its unique shape, this bracelet really stands out! It’s perfect for showcasing vibrant colors.
- Hexafish Bracelet: If you’re ready for a challenge, this intricate design will push your limits. It resembles fish scales and requires keen attention to detail.
- Block Stitch Bracelet: A unique and fun approach—this pattern uses varying sizes of bands to create blocks that interlock perfectly.
Don't hesitate to mix and match colors or personalize these designs to make them your own! Happy crafting!
Also Read This: How to Watch Have I the Right to Kill on Dailymotion
7. Tips for Caring and Maintaining Your Bracelets
So, you've crafted your fabulous loop band bracelets and are excited to show them off! But did you know that keeping them looking fresh requires a bit of care? Here are some handy tips to ensure your creations stay vibrant and last for a long time:
1. Store Them Properly:
It’s essential to store your bracelets in a cool, dry place away from direct sunlight. If they are exposed to the sun for prolonged periods, the colors can fade. A jewelry box or a small pouch works wonders for keeping them organized and protected.
2. Avoid Contact with Water:
While loop band bracelets are made of durable materials, it’s best to remove them before swimming, showering, or engaging in any water activities. Water can weaken the bands over time, leading to breaks and a loss of elasticity.
3. Clean Gently:
If your bracelets start collecting dust or grime, give them a gentle clean. Use a soft cloth to wipe them down. For deeper cleaning, you can use a damp cloth with a mild soap, but make sure to dry them thoroughly afterward. Never use abrasive materials, as they can scratch or damage the bands.
4. Keep Away from Harsh Chemicals:
Chemicals from lotions, perfumes, or cleaning products can leave residues or cause damage to your bracelets. If you plan on applying any products, put your bracelet on after applying them to your skin.
5. Avoid Excessive Stretching:
While loop bands are elastic, stretching them excessively can lead to deformation. When putting them on, do it gently and avoid pulling them too tight. This way, they'll maintain their shape and elasticity much longer.
6. Inspect Regularly:
Take a moment every now and then to inspect your bracelets. Look for any signs of wear and tear, like fraying or broken bands. Catching wear early can save your bracelet from a complete breakdown. If you notice any issues, consider repairing or replacing them sooner rather than later.
7. Get Creative with Upcycling:
If you ever have a bracelet that isn’t in prime condition anymore, don’t toss it! Bring it back to life by using the materials to create new designs. You can recycle the bands into other crafts, merging them into keychains or hair accessories.
By following these simple maintenance tips, your loop band bracelets can remain a vibrant part of your jewelry collection for years to come!
Also Read This: How to Apply Party Makeup for a Glamorous Look on Dailymotion
8. Where to Find More Creative Tutorials on Dailymotion
Ready to take your loop band bracelet game to the next level? Dailymotion is an amazing platform filled with a plethora of DIY tutorials waiting for you to explore. Here’s where you can find more creative content:
1. Search for Specific Keywords:
When you visit Dailymotion, use the search bar at the top. Enter keywords like "DIY loop band bracelets," "loop band tutorials," or "bracelet making." You'll find numerous videos from enthusiasts and creators who love sharing their tips and tricks!
2. Follow Popular Creators:
Once you find a tutorial you enjoy, check out the creator’s channel. Many artists consistently post new content about different DIY projects. Subscribe to their channels and turn on notifications to stay updated on their latest posts.
3. Explore Related Tags:
Dailymotion allows you to explore content by tags. After watching a video, scroll down to the related tags section. Explore these tags to discover other videos and topics that pique your interest, such as "crafting," "colorful designs," or "wrist accessories."
4. Check Out DIY Playlists:
Many creators curate playlists filled with their DIY projects. Take a look to see if you can find playlists dedicated to loop band crafts or general bracelet designs. This way, you can watch a series of related videos without searching for each one individually!
5. Interact with the Community:
Engage with comments on videos, ask questions, and share your experiences! Dailymotion has a vibrant community of crafters and DIY enthusiasts who can offer insights, tips, and encouragement.
With these tips, you'll easily find an abundance of creative tutorials on Dailymotion that can inspire your next bracelet project. Happy crafting!
Conclusion and Encouragement to Start Crafting
As we wrap up our exploration of DIY loop band bracelets, it's clear that this creative endeavor is more than just a fun activity; it's an opportunity to express yourself and unleash your imagination. Whether you're a seasoned crafter or a beginner, the joy of making your own bracelets can be incredibly fulfilling.
Here are a few reasons to get started with your own DIY loop band bracelets:
- Enhance Creativity: Experimenting with colors and patterns allows you to showcase your unique style.
- Improve Fine Motor Skills: The intricate process of looping bands can help enhance dexterity and hand-eye coordination.
- Bonding Activity: Crafting can be a great way to spend time with friends or family, sharing techniques and ideas.
- Personalized Gifts: Handmade bracelets make heartfelt presents for birthdays, holidays, or just because.
To assist you in your crafting process, consider these essential supplies to kickstart your loop band bracelet journey:
| Supplies | Description |
|---|---|
| Loop Bands | Various colors and sizes for diverse designs. |
| Hook Tool | A handy tool for weaving bands together. |
| Bracelet Loom | An optional platform that makes crafting easier. |
| Clips | To secure the ends of your bracelets. |
So gather your materials, find a comfortable space to work in, and let your creativity flow! Start crafting today, and don’t hesitate to share your unique designs and tutorials. Happy crafting!
 admin
admin