Hey there, DIY enthusiasts! Are you ready to unleash your creativity and make some fabulous headbands right at home? Whether you’re gearing up for a casual outing or a fancy event, stylish headbands can add a fun twist to any look. In this guide, we'll walk you through the simple steps to craft your own headbands using materials that you probably already have lying around. So grab a cup of tea, get comfortable, and let’s dive into the exciting world of DIY headbands!
Materials Needed

Before we jump into the crafting process, let’s gather our supplies. Making headbands is not only simple but can also be quite economical, especially when you repurpose materials you already own. Here’s a handy list of materials you’ll need:
- Fabric: Choose materials based on your style. Cotton, lace, or velvet are all great options.
- Headband Base: You can use plain plastic headbands, wire frames, or even fabric strips to create your base.
- Scissors: A good pair of scissors is essential for cutting your fabric.
- Hot Glue Gun: This is perfect for attaching fabric securely to the headband.
- Sewing Supplies (optional): Needle and thread can be used for a more secure finish.
- Decorative Elements: Think beads, sequins, buttons, or flowers to add a personal touch.
- Measuring Tape: Handy for cutting fabric to the right size.
- Iron (optional): To smooth out your fabric before you start crafting.
With these materials in hand, you’re all set to start creating beautiful headbands that showcase your personality and style! Stay tuned for the next steps where we’ll guide you through the DIY process.
Step-by-Step Instructions

Making your own headband can be a fun and rewarding experience. Let's dive into the process with this simple step-by-step guide:
- Gather Your Supplies: Before you jump in, make sure you have everything you need. Here’s a quick list:
- Fabric (cotton, stretchy jersey, or lace)
- Scissors
- Sewing machine or needle and thread
- Measuring tape or ruler
- Fabric clips or pins
And voilà! You’ve got yourself a chic headband to flaunt!
Tips for Customizing Your Headbands

Now that you’ve mastered the basics, let’s talk about customizing your headbands to truly make them your own. Personal touches can elevate your accessory game!
- Choose Unique Fabrics: Don’t settle for plain! Look for fun patterns like florals, polka dots, or even metallics. Vintage fabric can add a unique flair.
- Add Embellishments: Think beyond the fabric. Sew on beads, rhinestones, or appliqués to give your headband some sparkle. Feathers or lace can also create an intriguing effect!
- Experiment with Different Widths: Wider headbands can be boho-chic, while narrower ones add a touch of elegance. Try different widths to see what complements your style best.
- Mix and Match: Combine two different fabrics for a contrast effect. This can be done by sewing a smaller strip of one fabric onto a larger strip of another for a fun twist.
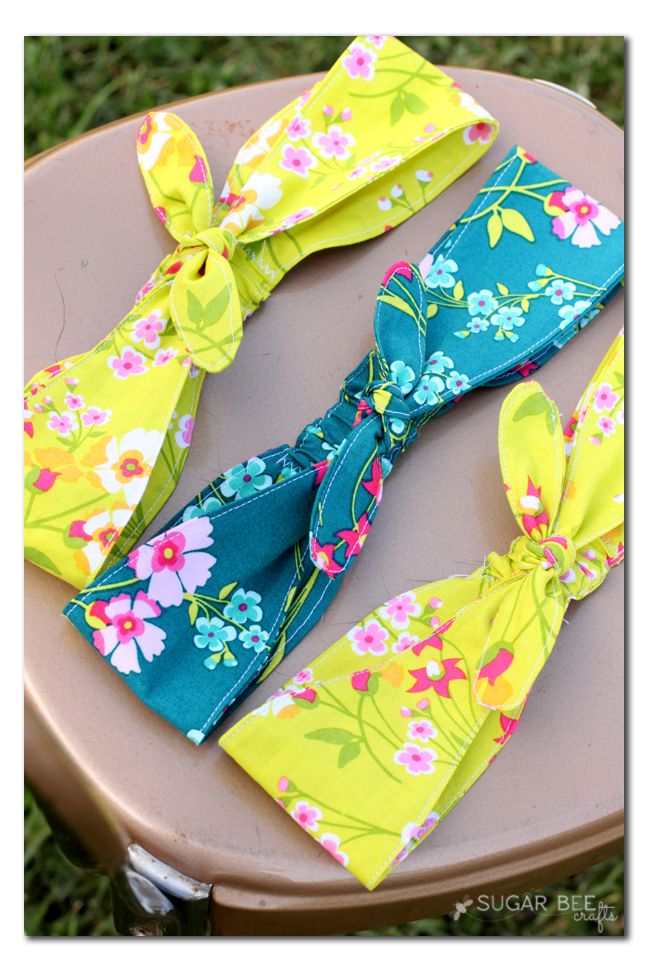
- Include a Knot or Bow: Tying a cute knot or bow at the top not only adds character but also keeps it trendy. Just follow the same steps, and leave some length for the bow.
- Personalize with Initials: If you’re feeling crafty, use fabric paint or iron-on letters to spell out your initials or a fun word that resonates with you.
With these tips, your headbands will not only be stylish but also an expression of who you are. Have fun customizing!
Different Styles of Headbands to Try
If you're diving into the world of DIY headbands, you're in for a treat! There are so many different styles to experiment with, each offering a unique twist to your accessory collection. Here’s a breakdown of some fun and trendy headband styles you can try:
- Knotted Headbands: These are super popular and easy to make. Just grab some fabric, twist it in the middle, and secure it with a stitch. They look chic and can easily elevate any outfit!
- Fabric Covered Headbands: Take a simple plastic headband and cover it with your choice of fabric. This is a great way to make custom pieces that match your wardrobe.
- Ribbon Headbands: Use satin or grosgrain ribbon to create a delicate, feminine look. You can create simple loops or more complex designs – the choice is yours!
- Floral Headbands: Perfect for spring and summer, these add a touch of whimsy. Use artificial flowers for durability, and attach them to a basic headband for an instant upgrade.
- Reversible Headbands: Want versatility? Make a reversible headband that features two different designs. This way, you can switch up your look in seconds!
Each style has its own charm, so don’t hesitate to mix and match techniques to create something that speaks to your personal style. Happy crafting!
Caring for Your Handmade Accessories
- Storage: Always store your headbands in a cool, dry place. Consider using a dedicated jewelry box or a simple hanging organizer to prevent them from becoming tangled or misshapen.
- Avoid Water: Since many DIY headbands are made from fabric or embellishments, it's best to keep them away from water to prevent damage or staining.
- Spot Clean: If your headband gets dirty, gently spot clean it with a damp cloth. If it’s made of fabric, you might be able to wash it by hand. Just remember, air drying is essential!
- Check for Repairs: Regularly inspect your headbands for loose threads or any parts that may need reattachment. Fixing small issues immediately can help avoid bigger problems down the line.
- Rotate Regularly: If you have a collection, rotate your accessories to avoid excessive wear on any single piece. This keeps your style fresh and your accessories in top shape!
By following these simple care tips, you'll ensure your handmade headbands remain stylish and ready to rock whenever you want to wear them!
DIY Headbands - How to Make Stylish Accessories at Home
Headbands are versatile accessories that can elevate any outfit, providing both style and functionality. They are perfect for keeping hair off your face during workouts, adding a pop of color to your attire, or even complementing an elegant look for a night out. Making your own headbands at home can be a fun and rewarding DIY project. Here’s how to get started:
Materials Needed
- Fabric (cotton, stretchy knit, or any material of your choice)
- Elastic band (optional for stretchable headbands)
- Scissors
- Measuring tape
- Sewing machine or needle and thread
- Pins
Basic Steps to Make a DIY Headband
- Choose your fabric and measure the desired length and width of your headband.
- Cut the fabric accordingly. A good starting size is about 20 inches long and 4 inches wide.
- Fold the fabric in half lengthwise, right sides together, and pin it to secure.
- Sew along the long edge with a seam allowance of about 1/4 inch.
- Turn it right side out. You can add an elastic band at this point if you prefer a stretchable headband.
- Finish by sewing the ends together neatly.
- Embellish as desired with bows, beads, or fabric paint.
Creative Variations
| Style | Description |
|---|---|
| Knotted Headband | Features a stylish knot at the front for a chic appearance. |
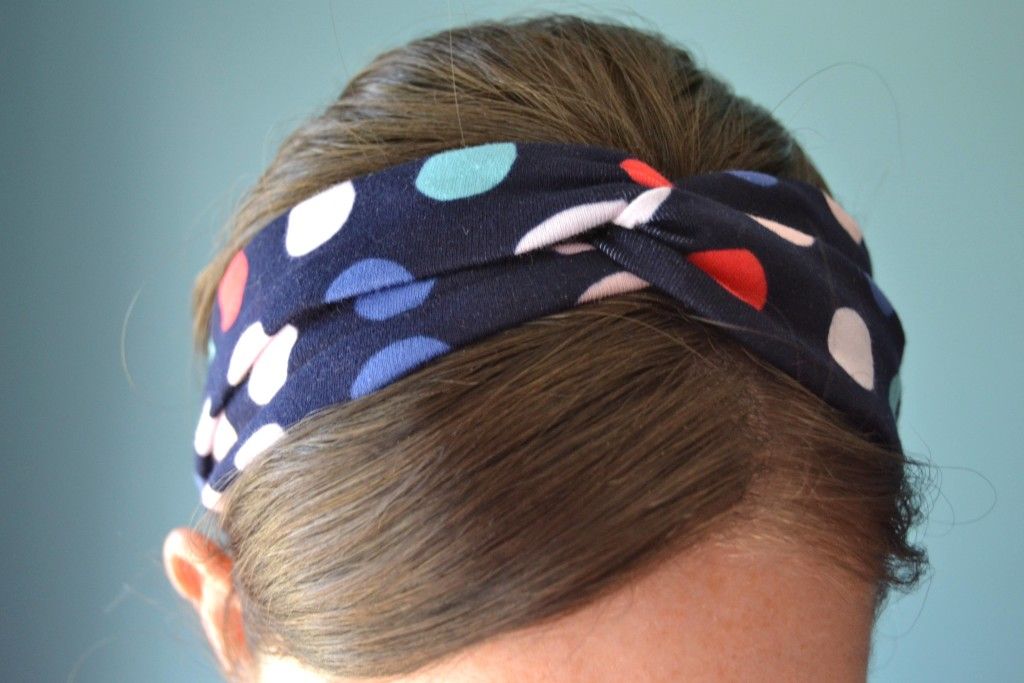
| Twisted Headband | A unique twist creates visual interest and adds a fashionable touch. |
| Floral Headband | Embellished with faux flowers for a whimsical and feminine look. |
Creating your own DIY headbands not only allows you to express your personal style but also provides an enjoyable crafting experience. Whether you're making them for yourself or as gifts, these fashionable accessories are easy to customize, ensuring you have the perfect match for any outfit!


