Cutting out images is a key skill for anyone working in design or photography. It allows you to isolate subjects, remove backgrounds, or create composite images. Whether you're preparing visuals for a project or just want to tidy up a photo, understanding how to cut out
Why Use Illustrator for Image Editing

Adobe Illustrator is a popular choice for image editing, especially when it comes to cutting out images. Here are a few reasons why:
- Vector Graphics: Illustrator uses vector graphics, which means images can be resized without losing quality. This is ideal for detailed cuts.
- Precision: The software provides powerful tools that allow for precise cutting and editing, ensuring clean edges and professional results.
- Versatile Tools: Illustrator offers a variety of tools for cutting, including the Pen Tool, Clipping Masks, and the Eraser Tool, giving you flexibility in your editing.
- Integration: It integrates well with other Adobe products, making it easy to use alongside Photoshop and InDesign for more complex projects.
Overall, Illustrator combines ease of use with professional capabilities, making it a go-to option for graphic designers and artists alike.
Also Read This: How to Create an Impressive Portfolio on Behance That Showcases Your Skills
Tools for Cutting Out Images

When it comes to cutting out images in Illustrator, several tools can help you achieve the best results. Here’s a breakdown of the essential tools:
| Tool | Description |
|---|---|
| Pen Tool | This tool allows for precise path creation around the subject. It’s ideal for complex shapes and curves. |
| Clipping Mask | Use a clipping mask to hide parts of an image while keeping the cutout shape intact. This is great for quick edits. |
| Shape Builder Tool | This tool helps in merging and removing parts of overlapping shapes, making it easier to create clean cuts. |
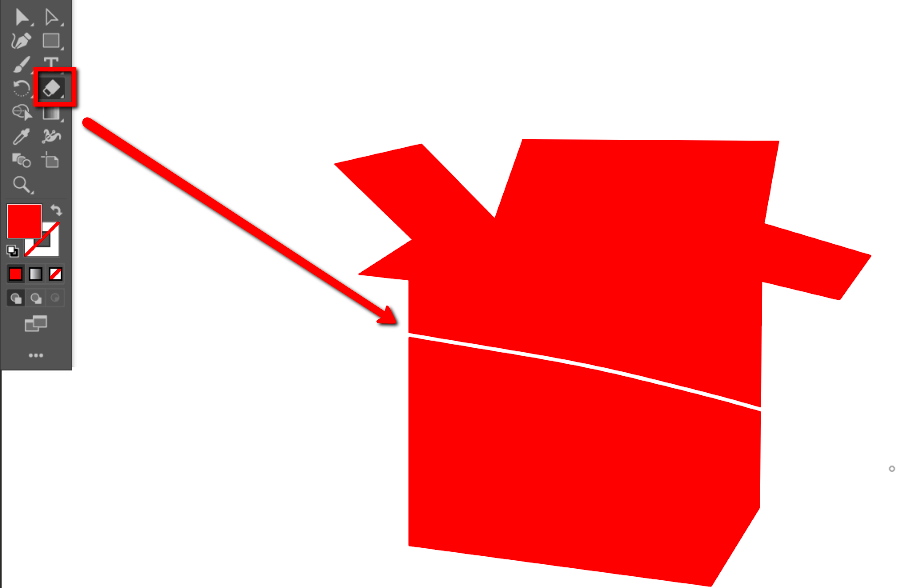
| Eraser Tool | Perfect for quickly removing unwanted sections of an image, but use it with caution to avoid losing important details. |
Understanding these tools will help you get comfortable with cutting out images in Illustrator, allowing for a smoother editing experience.
Also Read This: Does 123RF Offer a Free Trial? Exploring Options to Access the Platform
Step by Step Guide to Cutting Out Images

Cutting out images in Illustrator can seem daunting at first, but with a clear process, you’ll find it manageable. Here’s a straightforward guide to help you get started:
- Open Your Image: Start by opening the image you want to cut out in Illustrator. You can do this by selecting File > Open.
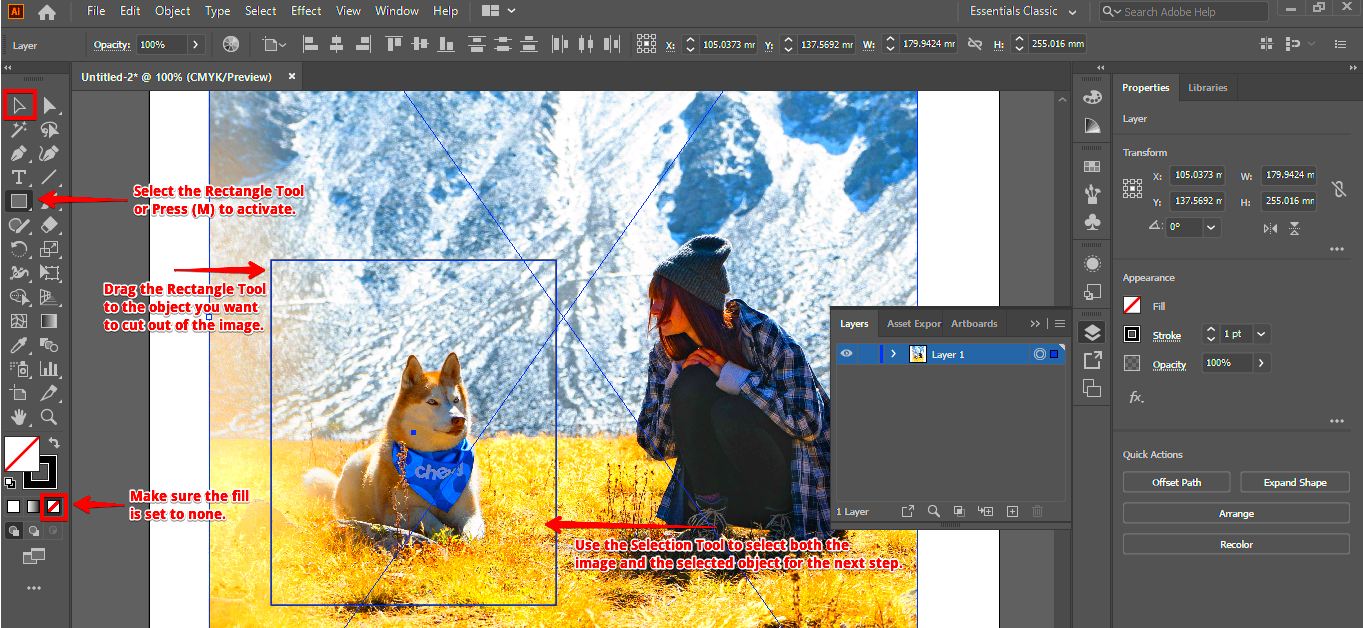
- Select the Pen Tool: Choose the Pen Tool from the toolbar. This is your main tool for creating paths around the subject.
- Trace Around the Subject: Click to create anchor points around the edges of your subject. Use curves by clicking and dragging to adjust the path smoothly.
- Close the Path: Once you’ve traced around your subject, close the path by clicking on the starting anchor point. This creates a complete outline.
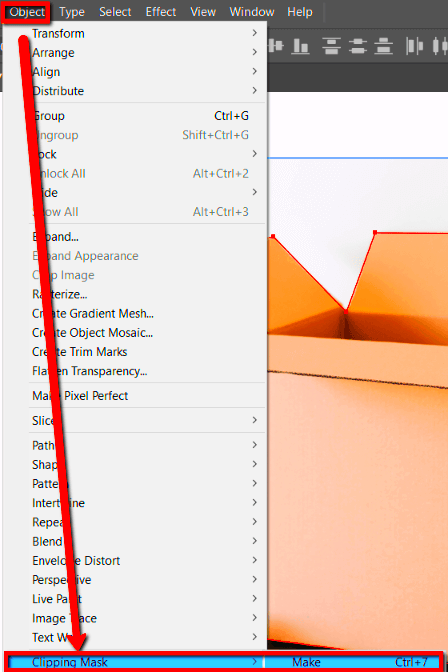
- Create a Clipping Mask: Select both your subject and the path you’ve drawn. Right-click and choose Make Clipping Mask. This will hide everything outside your path, isolating your subject.
- Adjust as Needed: If there are areas that need refining, you can adjust the path or add additional anchor points for a more precise cut.
By following these steps, you’ll be well on your way to creating clean, professional cutouts of your images in Illustrator.
Also Read This: Understanding the Life of a YouTuber and Content Creation
Refining Edges for a Smooth Finish
Once you’ve cut out your image, refining the edges is crucial for a polished look. Here are some techniques to achieve smooth edges:
- Feathering: Use the Feather effect to soften the edges of your cutout. This can help blend your image into the background or make it appear more natural.
- Adjusting Anchor Points: Go back to the Pen Tool and adjust the anchor points around the edges. This allows you to fine-tune the shape and smooth out any jagged lines.
- Use the Smooth Tool: Found under the Pencil Tool, the Smooth Tool lets you click and drag over your edges to automatically smooth them out.
- Expand Appearance: If your edges are still too harsh, select your image and go to Object > Expand Appearance. This gives you more control over the shape of your cutout.
These methods will ensure your cutouts look clean and professional, enhancing the overall quality of your design.
Also Read This: How to Change Background in Adobe Photoshop 7.0
Common Mistakes to Avoid
Even experienced users can make mistakes while cutting out images. Here are some common pitfalls and how to avoid them:
- Rushing the Process: It’s easy to hurry through cutting out an image, but taking your time will yield better results. Pay attention to detail.
- Ignoring Background Colors: Sometimes, the background color can bleed into your cutout. Always check for any unwanted background remnants before finalizing your image.
- Overusing the Eraser Tool: While the Eraser Tool can be helpful, relying on it too much can lead to loss of detail. Instead, focus on precision with the Pen Tool.
- Neglecting to Save Your Work: Regularly save your work to avoid losing your progress. Use File > Save As to keep versions of your edits.
By being mindful of these mistakes, you’ll improve your cutting out skills and produce higher-quality images in Illustrator.
Also Read This: The Science of Viral TikTok Videos: What Makes Them So Addictive
Tips for Effective Image Cutting
Cutting out images can be a tricky task, but with the right tips, you can make the process smoother and more effective. Here are some practical suggestions to improve your skills:
- Start with a High-Quality Image: The better the quality of your original image, the easier it will be to cut out. Low-resolution images can lead to rough edges and loss of detail.
- Zoom In for Precision: When cutting out images, zoom in closely to see the details. This allows for more accurate placements of anchor points and better control over your cuts.
- Use Layers: Organize your work by using layers. This way, you can separate your cutout from the background and make adjustments without affecting other elements.
- Practice with Different Tools: Don’t hesitate to experiment with various tools like the Eraser Tool or the Shape Builder Tool. Each tool has its strengths, and finding what works best for you is essential.
- Take Breaks: If you find yourself getting frustrated or tired, take a short break. A fresh perspective can help you see areas for improvement that you might have missed.
By following these tips, you’ll enhance your image cutting skills and create cleaner, more professional results.
Also Read This: How to Embed Video on Behance to Showcase Your Creative Work
FAQ
Here are some frequently asked questions about cutting out images in Illustrator:
- What is the best tool for cutting out images? The Pen Tool is often the best choice for detailed and precise cuts, but other tools like Clipping Masks and Shape Builder can be useful too.
- Can I cut out images from a low-resolution photo? While you can, low-resolution images may result in jagged edges. Always try to work with high-resolution images for the best results.
- How do I save my cutout images? After completing your cutout, save your file as an AI, EPS, or PNG to preserve the transparency and quality.
- Is it possible to undo mistakes? Yes! You can always use the Undo command (Ctrl + Z) to revert any mistakes during your editing process.
- Can I use Illustrator for photo editing as well? Yes, while Illustrator is primarily for vector graphics, it can also be used for basic photo editing tasks, especially when working with cutouts.
Conclusion
Cutting out images in Illustrator is a valuable skill that can elevate your design projects. By understanding the tools available and following a systematic approach, you can achieve professional results. Remember to practice regularly, experiment with different techniques, and don’t be afraid to make mistakes. Each cutout you create will enhance your skills and confidence. With these tips, you’re now equipped to tackle any image cutting task with ease. Happy editing!

 admin
admin


