Cutting out an image in Google Slides is a useful skill for anyone looking to enhance their presentations. Whether you're creating a presentation for work, school, or personal projects, being able to remove unwanted parts of an image can make your slides look cleaner and more professional. Google Slides offers an easy way to crop and cut out parts of an
Why You Might Want to Cut Out an Image in Google Slides

There are several reasons why you might want to cut out an image in Google Slides. Here are some common scenarios:
- Fitting an image to a specific shape: Sometimes, you want to display an image in a specific form, like a circle or a star. Cutting out parts of an image helps you achieve this look.
- Removing unwanted parts: If an image has extra space or unwanted background, cropping or cutting it out ensures that only the relevant part is displayed.
- Improving presentation aesthetics: Clean, well-edited images make your slides more visually appealing and keep the audience focused on key information.
- Creating custom visuals: You can cut out portions of images and combine them to create unique visuals, which can be helpful for infographics or custom graphics in presentations.
Also Read This: How to Become an Adobe Stock Contributor
Steps to Cut Out an Image in Google Slides
Now that you know why cutting out an image can be useful, let's go over the steps to do it in Google Slides.
- Open your Google Slides presentation: Start by opening the presentation where you want to cut out an image.
- Insert the image: If you haven't already added an image, click on the “Insert” menu, then select “Image” and choose the source of your image (upload, search, etc.).
- Select the image: Click on the image you want to cut out. This will highlight it and display the image editing tools.
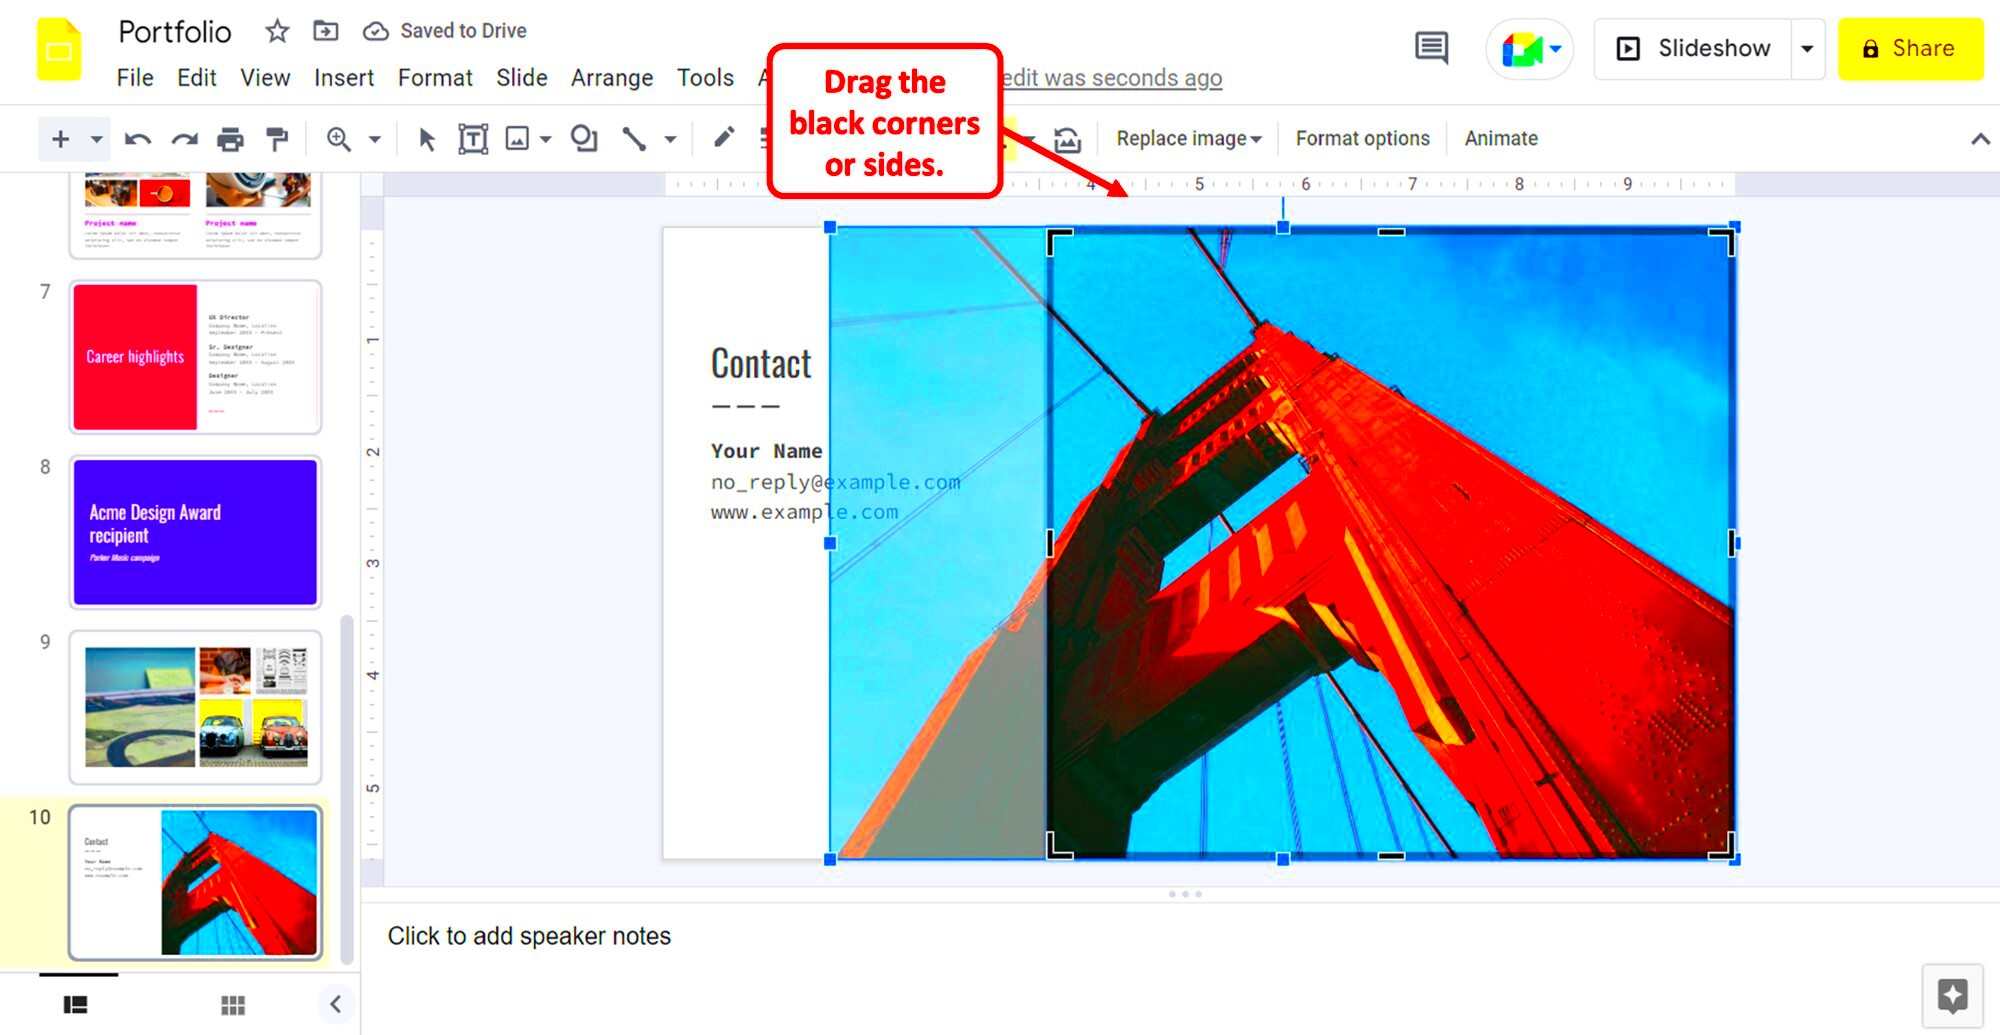
- Click on the Crop tool: You will see a small crop icon in the toolbar above. Click on it to activate the cropping options.
- Adjust the cropping handles: Drag the black cropping handles around the image to define the area you want to keep. Everything outside of this area will be cut off.
- Finalize the crop: Once you’re happy with the selection, click the “Enter” or “Return” key, or click anywhere outside the image to apply the crop.
- Refine the image (optional): If needed, you can further adjust the cropped image using the “Mask” tool for specific shapes or make additional edits.
That’s it! These steps should help you cut out any part of an image in Google Slides to make it fit your presentation perfectly.
Also Read This: How to Use Adobe Photoshop CS8 on Dailymotion Exploring the New Features
Using the Crop Tool for Image Cutting
The crop tool in Google Slides makes it simple to cut out parts of an image. Whether you want to remove excess background, focus on a particular detail, or resize an image to fit your slide layout, the crop tool does the job effectively. Here’s how you can use it:
- Select the Image: Start by clicking on the image you want to edit. This will highlight the image, and the crop tool icon will appear in the toolbar.
- Activate the Crop Tool: Click the crop icon in the toolbar. You’ll notice the image will have black handles along its edges, which you can adjust.
- Adjust the Cropping Area: Drag these handles inwards or outwards to define the part of the image you want to keep. Anything outside the selected area will be cropped out.
- Apply the Crop: Once you're satisfied with the selection, press "Enter" or click anywhere outside the image to finalize the crop.
Remember, the crop tool is a non-destructive way to edit your image, which means you can always readjust the cropping area later if needed. This tool allows you to keep your images looking sharp and fitting perfectly into your presentation layout without permanently removing parts of the image.
Also Read This: Printing Licenses for Adobe Stock Images
How to Adjust the Cropped Image in Google Slides
After cropping an image in Google Slides, you may want to make additional adjustments to the image to ensure it looks just right. These adjustments can help refine the image’s placement and appearance within your slide. Here’s how you can do it:
- Resize the Cropped Image: If the image is too large or too small, simply click on it to bring up the resize handles. Drag these handles to adjust the size of the image to your liking.
- Reposition the Image: You can move the cropped image around your slide by clicking and dragging it to a new position. This allows you to place it exactly where you want.
- Adjust the Aspect Ratio: If you want the cropped image to maintain its aspect ratio (so it doesn't stretch or distort), hold down the Shift key while resizing.
- Refine the Crop: If you're not happy with the initial crop, you can always click the crop tool again to adjust the cropping handles and change the cut-out area.
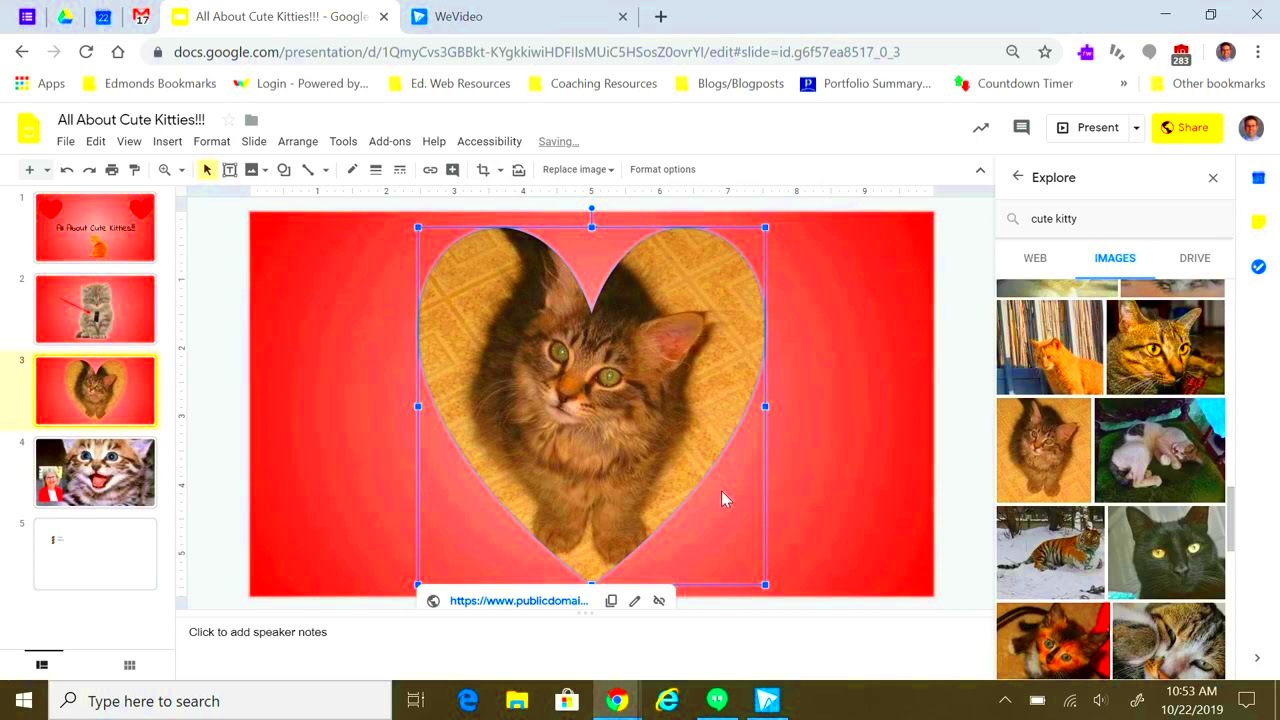
- Use the Masking Tool: For a more creative touch, you can apply a mask to the image. This lets you crop your image into different shapes, such as circles or stars, giving it a custom look.
These simple steps help you fine-tune the appearance and placement of your cropped images, allowing for more control over how they appear in your slides.
Also Read This: Checking Image Size: Quick Tips
Enhancing Your Cut-Out Images in Google Slides
Once you’ve cropped your image in Google Slides, it’s time to enhance it to make it stand out in your presentation. There are several ways to improve the quality and visual appeal of your cut-out images. Here’s what you can do:
- Adjust Brightness and Contrast: Click on the image, then go to the "Format options" menu. Here, you can adjust the brightness, contrast, and transparency to make your image fit better with the overall design of the slide.
- Add Shadows: Shadows can help add depth to your cut-out images. Under the "Format options," you can choose from different shadow effects and adjust the angle, distance, and transparency for a more polished look.
- Apply Reflection: Adding a subtle reflection underneath the image can create a professional look. This option is available in the "Format options" menu and can be customized for size and transparency.
- Change the Image Style: You can apply borders, borders with rounded corners, or even add a soft edge to your cut-out image. These effects can be found in the “Format options” menu under "Drop shadow" or “Border color” and “Border weight.”
- Use Filters: Filters are a quick way to give your image a unique appearance. In the "Format options" menu, you’ll find preset filters like "Black and White," "Sepia," and others that can drastically change how the image looks.
By enhancing your cut-out images, you can make them look more professional and integrate them seamlessly into the overall design of your Google Slides presentation. Experiment with different effects and adjustments to find the perfect look for your images!
Also Read This: Trick a Monkey Image: Fun Ideas
Common Issues When Cutting Out Images and How to Fix Them
When cutting out images in Google Slides, you might run into some issues that could affect the final result. Don’t worry—these problems are usually easy to fix! Below, we’ve listed some common challenges and their solutions to help you get the best results from your cropped images:
- Image Becomes Blurry After Cropping: Sometimes, cropping an image too much can cause it to lose clarity. To avoid this, try not to crop too tightly around the subject. If the image is still blurry, consider using a higher-resolution image to start with, as a low-res image will often appear pixelated after cropping.
- Unwanted Background Shows After Cropping: If parts of the background remain visible after cropping, you may need to refine the crop area. Simply click the image, activate the crop tool again, and adjust the cropping handles to ensure only the desired part of the image remains.
- Image Doesn’t Fit the Slide Properly: If your cropped image is too big or small for the slide, you can resize it. Select the image and drag the resize handles while holding the Shift key to maintain the aspect ratio, ensuring the image stays proportionate.
- Image Gets Stretched or Distorted: To avoid distortion, make sure that when resizing, you hold the Shift key to maintain the image’s original proportions. This ensures that the image does not get stretched out in any direction.
- Difficulty in Getting a Clean Cut: If the edges of your cut-out image look rough or jagged, zoom in on the image for better precision when adjusting the cropping area. A steady hand and a careful eye will help you achieve cleaner, sharper edges.
These are just a few of the common issues you might face when cutting out images in Google Slides. By following the fixes outlined above, you should be able to quickly resolve them and enhance your presentation with ease.
Also Read This: Capturing Still Images from Videos for Easy Sharing
FAQ
Here are some frequently asked questions about cutting out images in Google Slides, along with their answers:
- Can I undo a crop if I make a mistake? Yes! If you accidentally crop an image incorrectly, simply click the "Undo" button (or press Ctrl + Z) to revert the image back to its original state.
- Can I resize the image after cropping it? Absolutely! You can resize the cropped image anytime by clicking on it and dragging the resize handles. Hold the Shift key to maintain the aspect ratio.
- Can I crop an image into a shape in Google Slides? Yes, you can use the "Mask" tool to crop images into different shapes like circles, stars, or custom shapes. Just select the image, click the "Crop" tool, and choose the "Mask" icon.
- How do I restore parts of the image that I cropped out? Unfortunately, Google Slides does not allow you to restore parts of an image once it's cropped. To get the full image back, you would need to insert it again.
- Can I cut out the background of an image in Google Slides? Google Slides does not have a dedicated background removal tool. However, you can crop out the unwanted background manually, or use external tools like Google Drawings or a third-party image editor before importing the image into Google Slides.
Conclusion
Cutting out images in Google Slides is a valuable skill that can help you create more professional and visually appealing presentations. With the crop tool, you can easily remove unnecessary parts of an image, adjust its size, and make it fit perfectly into your slide layout. Remember, if you encounter any common issues, they can usually be fixed with a few simple adjustments.
By following the steps and tips in this guide, you’ll be able to cut out images with confidence, enhancing your presentation’s overall design. So next time you’re working in Google Slides, don’t hesitate to crop and adjust your images to create the perfect look for your slides!

 admin
admin


