Are you tired of spending hours with a curling iron only to have your curls fall flat? If so, you’re in for a treat! In this post, we’ll explore how to achieve gorgeous curls using a straightener. This technique not only saves time but can also give you beautiful, beachy waves. Grab your straightener, and let’s dive into the fantastic benefits of using this versatile tool for curling your hair!
Benefits of Using a Straightener for Curling Hair
Using a straightener for curling your hair might seem unconventional, but trust me, it comes with a bag full of fabulous benefits! Let’s break them down:
- Versatility: A straightener is not just for straightening; it can do it all! You can create everything from tight curls to loose waves, making it a multi-functional tool.
- Ease of Use: Many find that using a straightener is easier than mastering a traditional curling iron. With a bit of practice, you’ll be curling like a pro in no time!
- Faster Styling: Straighteners can style your hair quickly, especially if you have thick or long locks. You can go from poker straight to bouncy curls in just minutes.
- Heat Distribution: A straightener typically offers even heat distribution across its plates, which can lead to more consistent curls without hot spots that fry your hair.
- Reduced Damage: When done correctly, curling with a straightener can minimize the damage since it often requires less heat than some curling irons and can use lower temperatures on some hair types.
- Long-lasting Results: Curls made with a straightener tend to hold better and withstand the elements compared to those created with traditional curling tools, giving you more time flaunting those beautiful locks.
As you can see, using a straightener has numerous advantages that can make your hair styling routine more efficient and enjoyable. Ready to unlock the secret to beautiful curls? Stay tuned for the next sections where we’ll dive into the step-by-step process of curling your hair with a straightener!
Also Read This: How to Save Dailymotion Videos Directly to Your Phone Gallery
3. Essential Tools and Products
Curling your hair with a straightener can be a game changer, but to achieve those beautiful waves or curls, it's important to have the right tools and products on hand. Let's dive into what you need!
1. Quality Flat Iron: This is the most crucial tool for curling your hair. Look for a flat iron with a larger plate that can smoothly glide over your hair. A ceramic or titanium plate is ideal because it heats evenly and reduces damage. Make sure your straightener can reach a high temperature if you have thick hair, but also has adjustable settings for finer hair.
2. Heat Protectant: Never skip this step! Protecting your hair from heat damage is vital. Use a good heat protectant spray or serum before styling. This creates a barrier between your hair and the high temperatures of the straightener, keeping your strands healthy and shiny.
3. Hair Clips: These are essential for sectioning your hair. You'll find it much easier to curl your hair in sections rather than trying to tackle it all at once. Grab a few sturdy clips to hold your hair where you want it while you work on the rest.
4. Comb or Brush: Before you even think about curling, make sure your hair is tangle-free. A wide-tooth comb or a paddle brush can help you out here. Always detangle your hair gently to avoid breakage!
5. Finishing Products: Curls deserve some love after styling! A light hairspray can help hold your curls without making them stiff. Alternatively, a curl-boosting mousse or finishing serum can enhance shine and definition. Choose products based on your hair type for the best results.
With these tools and products at your disposal, you’ll be ready to create stunning curls that last! Now that you're equipped, let's move on to the actual technique.
Also Read This: How to Bowl Fast in Cricket Expert Techniques on Dailymotion
4. Step-by-Step Guide to Curling Hair with a Straightener
Ready to start curling? Follow this simple step-by-step guide to achieve those gorgeous curls using your straightener!
- Prep Your Hair: Start with clean, dry hair. You can curl your hair on the second day, but ensure it's not excessively oily. Apply a heat protectant throughout your locks, focusing on the tips.
- Section Your Hair: Divide your hair into manageable sections using hair clips. It’s best to work in layers, starting from the bottom. For thick hair, consider dividing it into smaller subsections.
- Get the Right Temperature: Set your straightener to an appropriate temperature for your hair type. Fine hair typically does well at lower settings (around 300°F), while thick hair may need 400°F or more.
- Time to Curl:
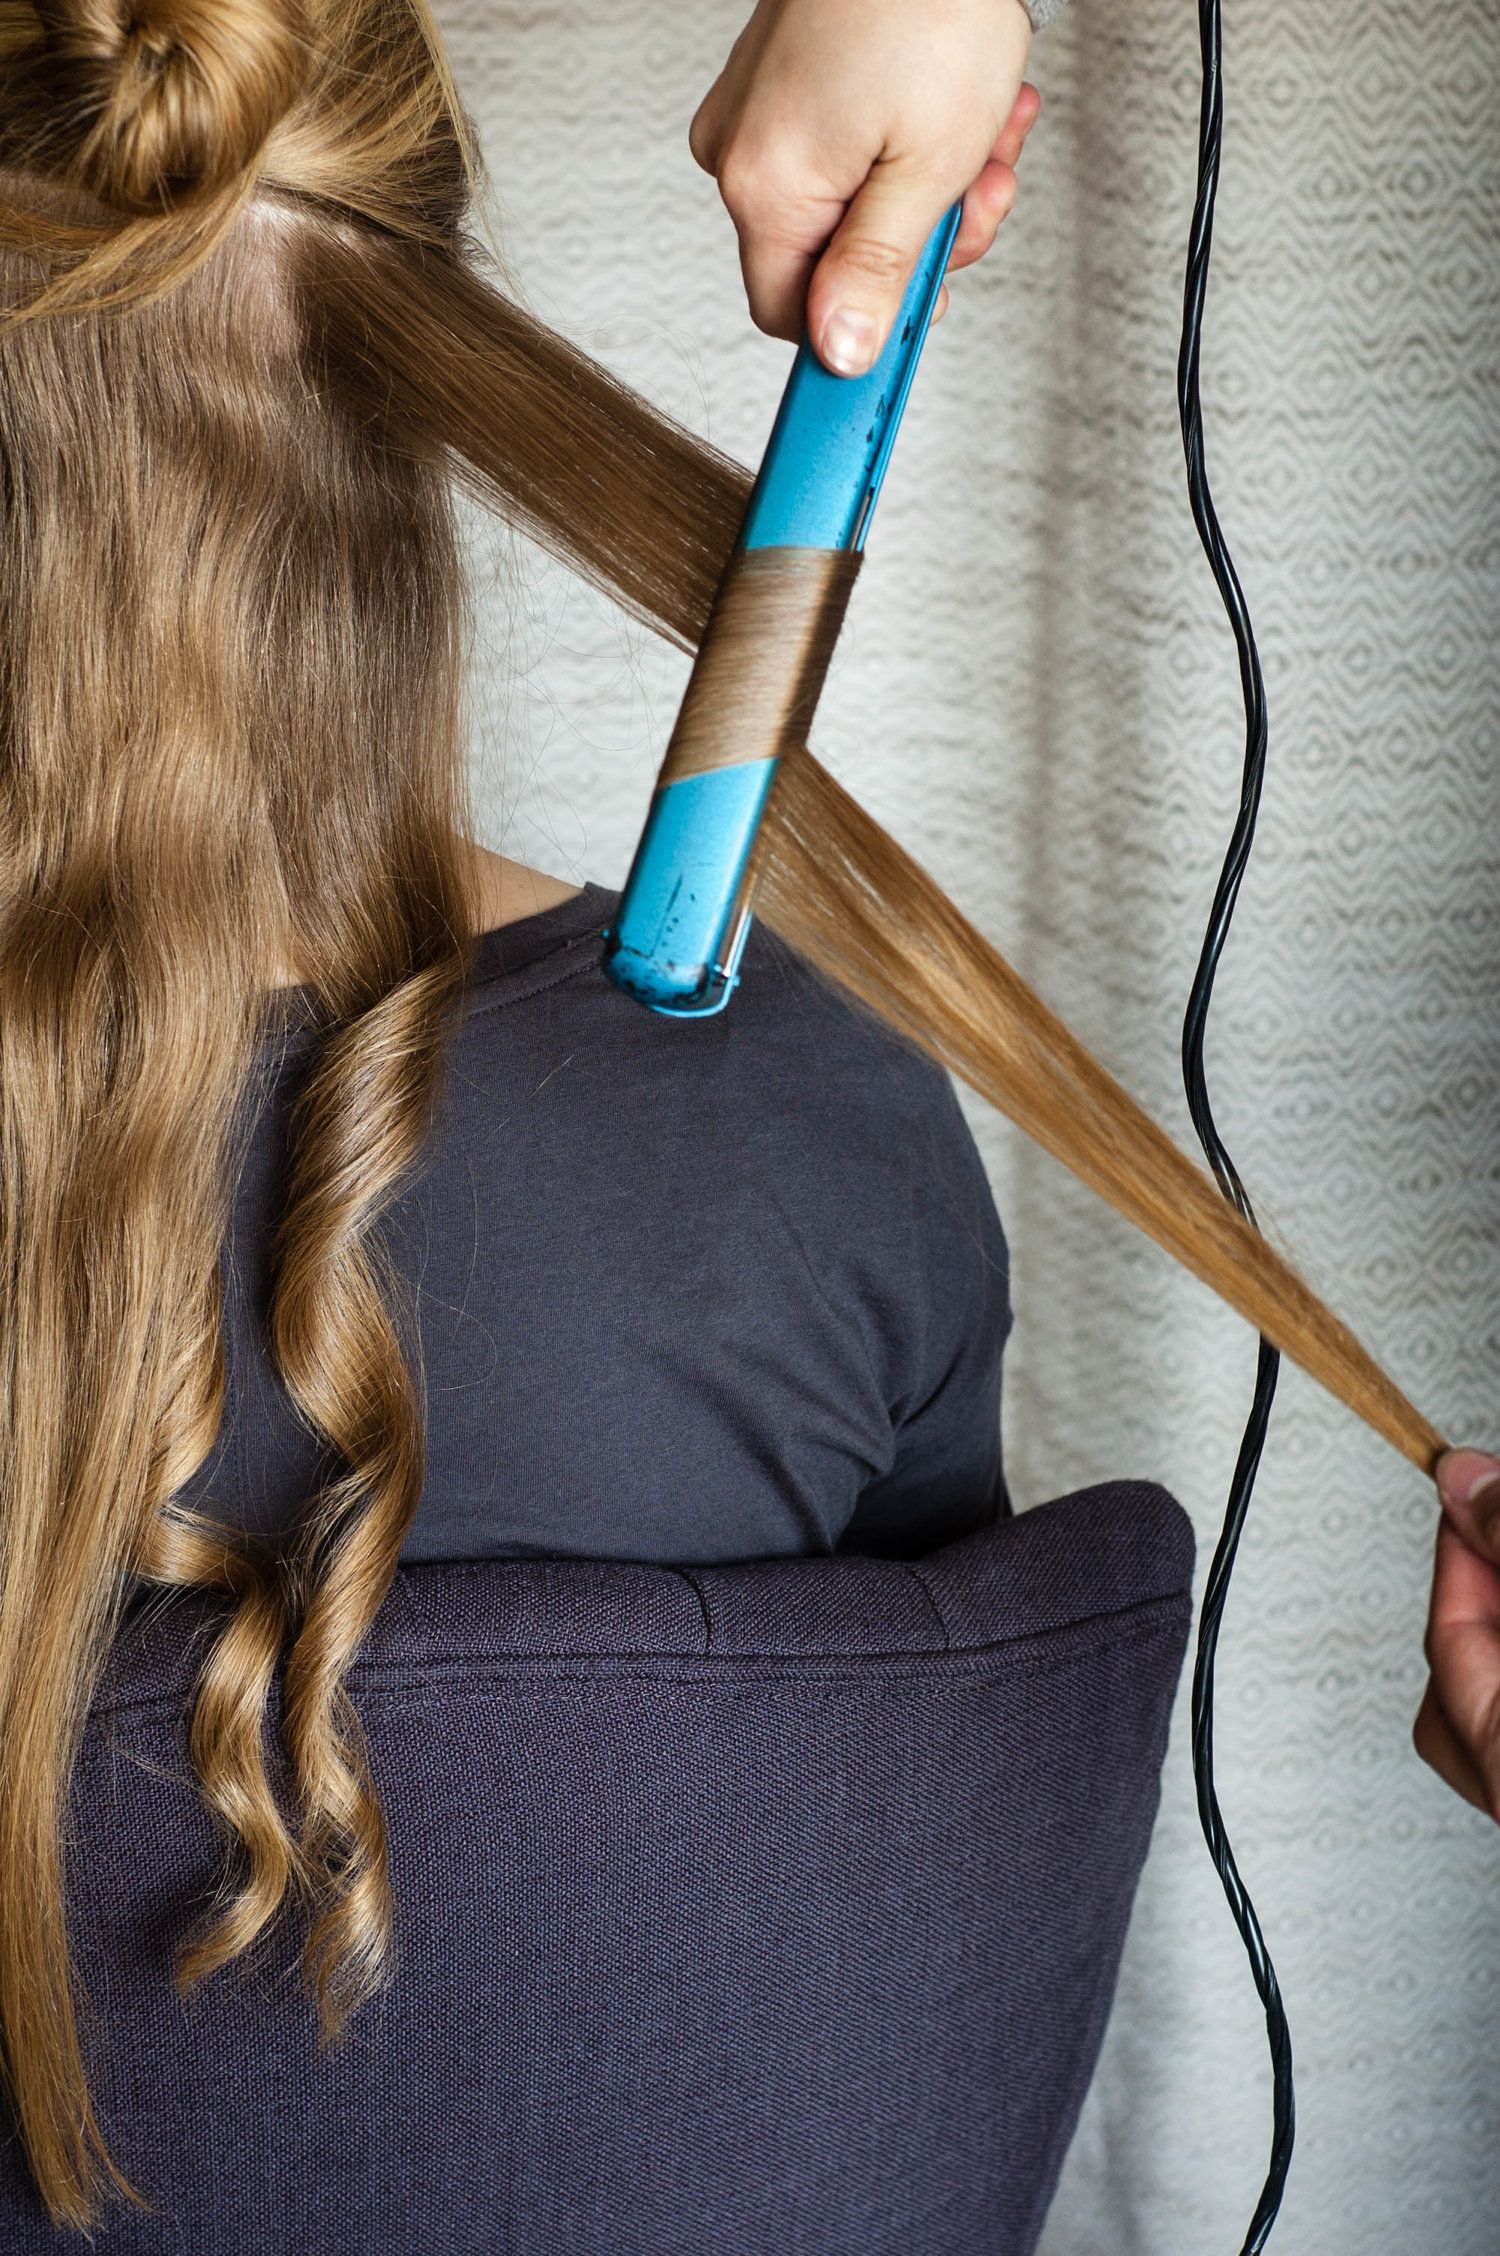
- Take a small section of hair (about 1-inch wide).
- Clamp the straightener at the root of the section and turn it away from your face, a half to full turn depending on the curl style you want.
- Slowly pull the straightener down through your hair, maintaining the tension and making sure the hair wraps around the plates. The slower you go, the tighter the curl!
- As you reach the ends of your hair, slightly twist the straightener back towards your face to cool the curl in place.
- Repeat: Continue with the other sections of your hair. Remember, the smaller the sections, the tighter the curls will be!
- Set the Curls: Once you've curled all your hair, gently run your fingers through your curls for a more relaxed look. Finish with a light hairspray to hold them in place without the crunch.
And there you have it! With practice, you'll get the hang of curling your hair with a straightener in no time. Enjoy your beautiful curls!
Also Read This: Step-by-Step Guide to Making a Tutu Dress Using Dailymotion Tutorials
5. Tips for Achieving Different Curl Styles
When it comes to curling your hair with a straightener, the possibilities are endless! Depending on your desired look, there are various techniques to help you achieve beautiful curls. Here are some handy tips to help you create different curl styles:
- Beachy Waves: For those effortless, tousled beach waves, take larger sections of hair (about 2 inches) and wrap them loosely around the straightener. Move the straightener down the length of your hair without clamping too tight. This creates loose waves that are perfect for a casual look.
- Tight Curls: If you're aiming for tighter, more defined curls, use smaller sections of hair (1 inch or less). Clamp the hair with your straightener, twist it once or twice, and slowly slide it down to the ends. This method gives you lovely ringlet-like curls that can be dressed up or down.
- S-Curls: For soft, romantic S-curls, start by curling away from your face on one side and towards your face on the other side. This contrast creates a more natural look. Make sure to hold the hair in place for a few seconds before releasing to set the curl.
- Volume at the Roots: To add volume and lift from the roots, grab large sections of hair at the crown of your head, place the straightener at the roots, and gently lift while curling the hair. This technique gives body and bounce.
- Messy Bun Style: If you love the messy bun look, curl your hair first and then gather the curls into a loose bun at the back of your head. Pull a few strands out for a relaxed vibe.
By experimenting with different sizes of sections, tension, and curling styles, you can switch up your look depending on your mood or occasion. Remember to finish with a good hairspray for extra hold!
Also Read This: Learn How to Play Ads on Dailymotion Videos in Blogger with Video Help
6. Common Mistakes to Avoid When Curling Hair
Curling your hair with a straightener can seem straightforward, but there are a few common pitfalls that many people encounter. Avoiding these mistakes can make a big difference in the quality of your curls:
- Using Too Much Hair: One of the biggest mistakes is taking too large sections of hair. If the section is too thick, the heat won’t penetrate evenly, leading to flat or incomplete curls. Stick to sections that are around 1 to 2 inches wide for best results.
- Not Adjusting the Heat Setting: Different hair types require different heat settings. If you have fine or damaged hair, opt for a lower heat setting to prevent frying your strands. Conversely, coarse hair might require higher heat to achieve lasting curls.
- Rushing the Process: Curling your hair takes time and patience. If you're in a hurry, you might not give each section enough time to heat up properly. Allow the straightener to sit on each curl for a few seconds to ensure it's styled right.
- Neglecting Product: Skipping heat protectant sprays can leave your hair vulnerable to damage. Invest in a good quality product to shield your hair from the heat of the straightener. Additionally, finishing products can help set your curls and add shine.
- Over-curling One Section: Repeatedly going over the same section can lead to frizz and damage. Try to limit each section to a couple of passes with the straightener to maintain a healthy look. If a curl doesn't work out, just let it go and try again on the next pass!
By keeping these common mistakes in mind and being mindful of your techniques, you'll find it easier to create beautiful curls that last all day. Remember, practice makes perfect!
Also Read This: Lunch Ideas for School Easy DIY on Dailymotion
7. How to Maintain Your Curls Throughout the Day
So, you've spent some time creating those beautiful curls with your straightener, and now the big question is: how do you keep them looking gorgeous all day long? Maintaining curls can sometimes feel like a battle, but with the right techniques and products, you can ensure your hard work doesn’t go to waste. Here are some *essential tips for maintaining those curls throughout the day:
- Use a Good Hairspray: After styling your hair, a light mist of hairspray can work wonders. Look for a flexible hold formula that won’t leave your hair feeling stiff. This way, your curls will stay bouncy and natural-looking.
- Don’t Touch Your Curls: It’s tempting to toss your hair or run your fingers through your curls throughout the day, but this can lead to frizz and messiness. Try to leave them alone as much as possible!
- Pin Curls for Extra Hold: If you have the time, pin your curls up in sections after you’ve styled them and let them cool. This helps the curl set and can give you more staying power. Once they are cool and set, remove the pins and shake them out gently.
- Revive with a Curling Cream or Mousse: If you notice your curls losing shape, a quick dab of curl cream or mousse can help revive them. Apply a small amount to your palms, scrunch it into your curls, and they’ll regain some of their bounce.
- Keep a Travel Size Product Handy: Always carry a small bottle of hairspray or styling gel in your bag for quick touch-ups. A little spritz here and a dab there can make a world of difference.
- Don’t Overwash: While maintaining cleanliness in your hair is important, washing your hair too frequently can strip natural oils and lead to frizz. Try to allow a day or two between washes to maintain your curls.
With these maintenance tips, you’ll be able to enjoy your stunning curls all day long. It's all about finding what works for your hair type, so don’t hesitate to experiment a little!
Also Read This: How to Save Dailymotion Videos as MP4 Files on Any Device
8. Conclusion
And there you have it! Curling your hair with a straightener isn't just a quick fix—it's an amazing skill that can open up a world of beautiful hairstyle possibilities. With the right techniques and a little practice, you can achieve gorgeous and long-lasting curls that turn heads everywhere you go.
Remember, the key steps* are:
- Choosing the right straightener and sections of hair.
- Perfecting your curling technique.
- Maintaining your curls throughout the day.
After all, confidence is the best accessory you can wear with your curls, so enjoy the journey of creating different looks that suit your style. Whether you want soft beachy waves or bouncy ringlets, you now have the tools and tips to make it happen.
So, grab your straightener, and start curling! With practice, you’ll find your rhythm and be able to create stunning curls in no time. Happy styling!
Additional Resources and Tutorials
Learning how to curl your hair with a straightener can be challenging, but there are plenty of resources available to help you master this technique. Here are some fantastic options you might find useful:
- YouTube Tutorials: Video tutorials allow you to see the process in action. Some recommended channels include:
- The Beauty Department
- Luxy Hair
- Kayley Melissa
- Online Courses: Websites like Skillshare and Udemy offer structured courses on hair styling that include sections on using a straightener for curls.
- Blogs and Articles: Numerous beauty blogs provide step-by-step guides and tips. Check out:
Books on hair styling can also be extremely beneficial. Consider these popular titles:
- "The Hair Book" by Anne Veck: Detailed techniques for various styles.
- "Hair Rules!" by Anthony Dickey: A comprehensive guide to different hair types and styles.
By utilizing these resources, you'll be well on your way to creating stunning curls with your straightener. Remember, practice makes perfect, so don't hesitate to experiment and find the technique that works best for you!
 admin
admin


