Google Slides is a great tool for creating presentations, and one useful feature it offers is the ability to crop
images. Cropping can help you focus on specific parts of an image or change its shape. If you're looking to make your presentations visually appealing, cropping
images into circles can add a unique touch.
Steps for Cropping Images into Circles

Cropping
images into circles is a straightforward process in Google Slides. Here’s how to do it:
- Open your Google Slides presentation.
- Insert the image you want to crop by clicking on Insert in the menu, then select Image.
- Once the image is added, click on it to select it.
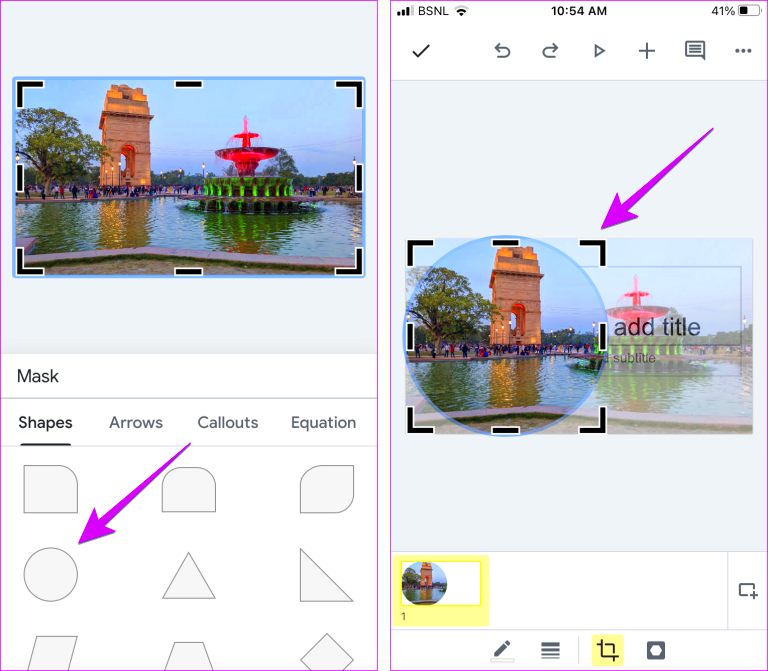
- Click on the Crop image icon in the toolbar (it looks like a rectangle with a diagonal line).
- In the dropdown menu, select Shapes and then choose the Oval shape.
- After selecting the oval shape, drag your cursor to draw the circle over the area you want to keep.
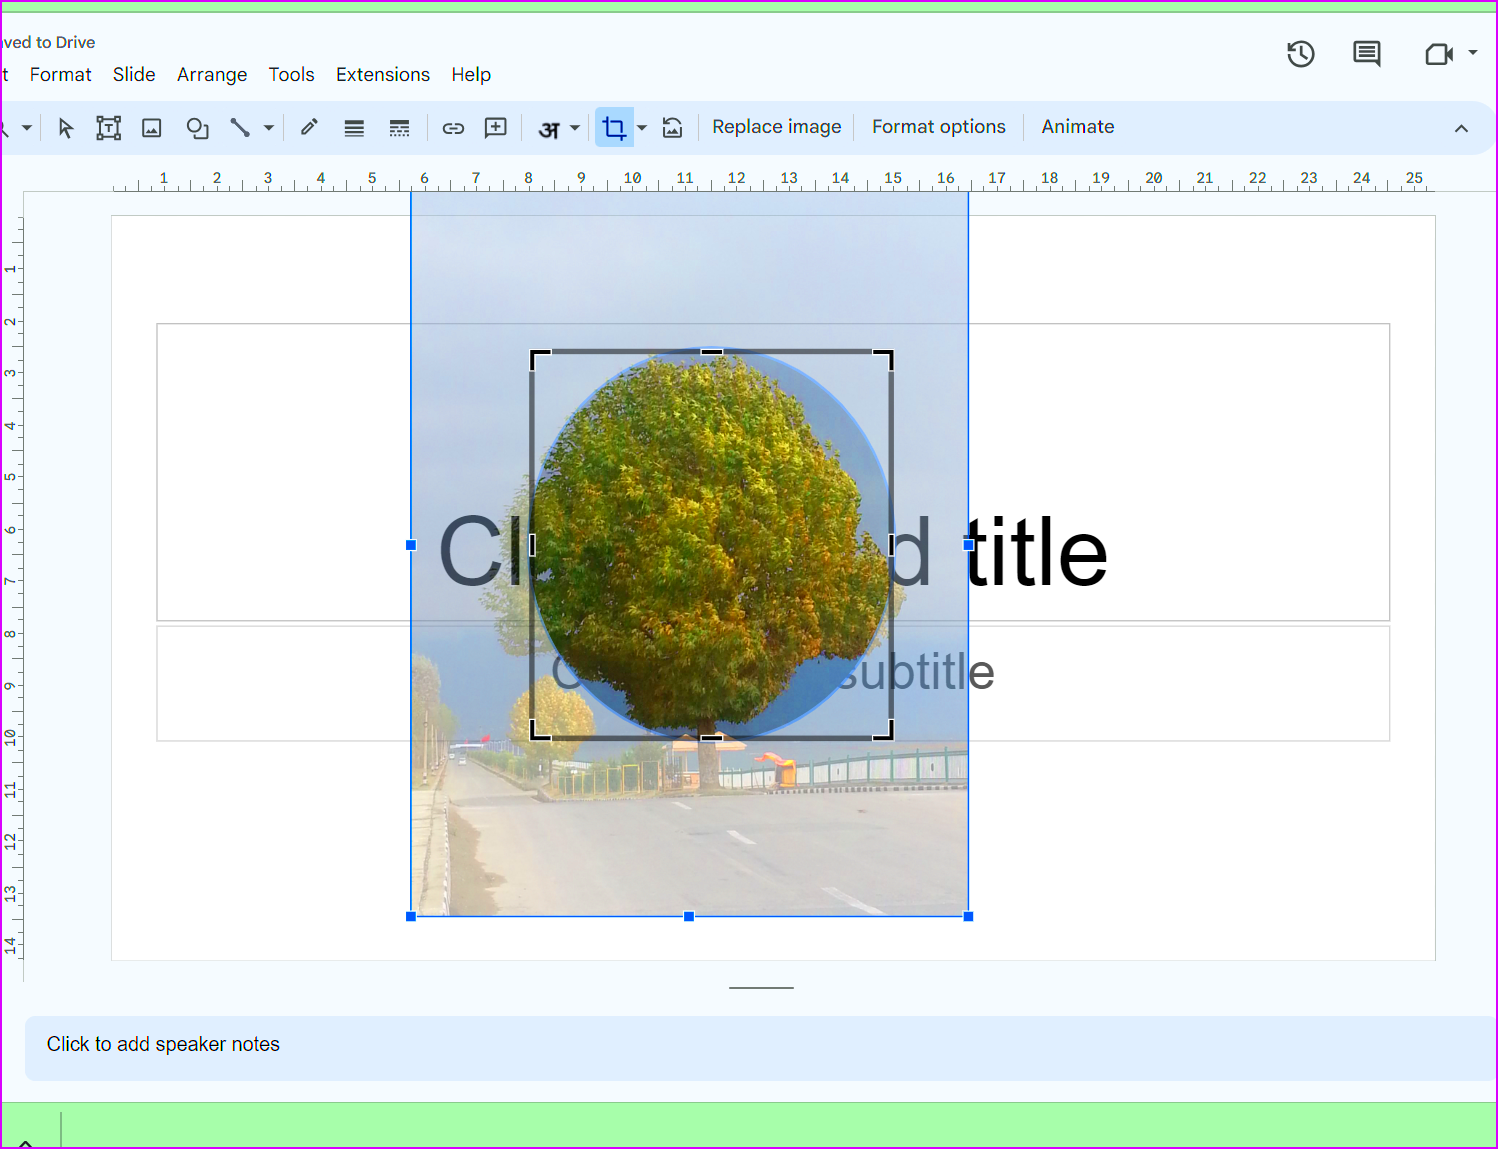
- Adjust the size by dragging the corners of the shape.
- Click outside the image to see the final cropped image.
That's it! Your image is now cropped into a circle, ready to enhance your presentation.
Using Shape Tools for Circular Cropping
The shape tools in Google Slides make it easy to create circular cropped
images. Here’s a detailed look at how to use these tools effectively:
First, ensure you have your image inserted. Once selected, the shape options will appear. Here's how to make the most of them:
- Selecting the Right Shape: When you click on the Crop image icon and choose Shapes, pick the Oval shape for circles. This ensures your crop is perfectly round.
- Resizing the Shape: After drawing the circle, you can adjust its size. Click and drag the corners to make your circle larger or smaller.
- Positioning the Crop: If the circle isn’t centered over the part of the image you want, you can click and drag the image within the circle to reposition it.
- Fine-Tuning the Crop: For a more precise crop, you can double-click the image, which allows you to move the circle shape around until it fits perfectly.
Using these shape tools not only simplifies the cropping process but also adds a creative flair to your
images in Google Slides. Don't be afraid to experiment with different shapes to see what works best for your presentation.
Adjusting Image Position and Size
Once you've cropped your image into a circle, it’s essential to adjust its position and size to ensure it fits well within your slide. Proper alignment and scaling can significantly improve the overall appearance of your presentation. Here’s how to do it:
After cropping your image, you might notice it doesn't look quite right or may not fit the intended area. Here are some steps to adjust the position and size:
- Repositioning the Image: Click on the image to select it. You can drag the image within the circular crop to focus on the part you want to highlight. Simply click and hold the image, then move it around.
- Resizing the Image: To make the image larger or smaller, click on the corners of the circular crop. Hold the Shift key while dragging to maintain the circle's proportions.
- Using the Format Options: For precise adjustments, right-click on the image and select Format options. Here, you can change the size numerically or adjust the image’s position on the slide.
- Aligning with Other Elements: If you have other images or text on your slide, use the alignment tools in Google Slides to center the cropped image or align it with other objects for a balanced look.
By following these tips, you’ll ensure that your circular
images are not only eye-catching but also perfectly placed within your slides.
Adding Borders and Effects to Circular Images
To make your circular images stand out even more, consider adding borders and effects. These enhancements can draw attention and make your images look more professional. Here’s how to do it:
Adding a border and effects is simple:
- Adding Borders: Select your circular image, then click on the Border color icon in the toolbar. Choose a color that complements your slide. You can also adjust the border thickness and style, such as solid or dashed.
- Applying Shadow Effects: Click on the image, right-click, and select Format options. From there, you can add a shadow effect. Adjust the transparency, angle, distance, and blur to create the desired look.
- Using Reflections: Similar to shadows, you can add reflections to your images. Go to Format options, and enable the reflection feature. This adds a nice touch, especially for circular images.
- Experimenting with Styles: Google Slides offers various preset styles. With the image selected, check the Format options for different style suggestions that might fit your theme.
These small touches can elevate your presentation and make your images pop!
Tips for Enhancing Circular Cropped Images
Enhancing your circular cropped images goes beyond simple cropping and borders. Here are some tips to ensure your images not only look good but also communicate effectively:
- Choose High-Quality Images: Start with high-resolution images. Blurry images can detract from the overall quality of your presentation.
- Maintain Consistency: Use a consistent style for all images in your presentation. Whether it’s the same border style, shadow effect, or cropping shape, consistency helps create a cohesive look.
- Use Color Wisely: Ensure that the colors in your cropped images complement your slide design. Avoid clashing colors that can distract your audience.
- Test Visibility: Always preview your slides to check how your images appear. Make adjustments if they don’t stand out against the background.
- Limit Text Overlays: If you plan to overlay text on your images, keep it minimal. Make sure the text is legible by choosing contrasting colors and a clear font.
- Consider Audience Engagement: Use images that resonate with your audience. Images should enhance your message rather than distract from it.
By following these tips, you’ll ensure your circular cropped images are effective and visually appealing, enhancing the overall impact of your presentation.
Common Issues with Circular Cropping
Cropping images into circles in Google Slides is generally straightforward, but you might run into some common issues. Understanding these problems and how to fix them can save you time and frustration. Here are a few things to watch out for:
- Image Quality Loss: If you try to enlarge a low-resolution image after cropping, it may appear pixelated. Always start with a high-quality image to avoid this issue.
- Improper Alignment: Sometimes, the cropped image doesn’t look centered. You can easily adjust it by clicking and dragging the image within the circle until it’s positioned correctly.
- Border Overlap: If you apply a border that’s too thick, it may cover part of your image. Adjust the border thickness in the Format options to ensure it complements rather than obscures your image.
- Shadows and Effects Misalignment: If shadows or reflections are not set properly, they can make the image look awkward. Experiment with the settings in Format options to find the best effect.
- Background Clashing: Make sure the background of your slide does not clash with your circular cropped image. Test different backgrounds to find one that enhances your image.
- Distraction from Text: If you have text on the slide, ensure that it doesn’t distract from your circular image. Use colors and fonts that create a clear contrast for easy reading.
By being aware of these common issues, you can troubleshoot them quickly and make your circular images look their best.
Conclusion
In conclusion, cropping images into circles in Google Slides can elevate the visual appeal of your presentations. This process not only allows you to highlight specific parts of an image but also adds a creative touch to your slides. Remember to adjust the position and size of your images for optimal placement, and don’t shy away from adding borders and effects to enhance their appearance. By being mindful of common issues and applying the tips discussed, you can create professional-looking presentations that captivate your audience. So, the next time you work on a presentation, try out these techniques and watch your slides come to life!
FAQs About Cropping Images in Google Slides
Here are some frequently asked questions about cropping images in Google Slides:
- Can I crop an image into a different shape besides a circle?
Yes, you can crop images into various shapes using the shape tools in Google Slides. Simply choose a different shape from the dropdown menu when cropping.
- What if my image gets distorted after cropping?
If your image looks distorted, ensure you maintain the aspect ratio by holding down the Shift key while resizing.
- Is it possible to undo a crop?
Yes, you can undo a crop by clicking on the Undo button in the toolbar or by pressing Ctrl + Z on your keyboard.
- Can I animate my circular images?
Absolutely! You can add animations to your images just like any other object in Google Slides.
- Do I need to resize my image before cropping?
No, Google Slides allows you to crop images of any size directly. However, starting with a larger image may help retain quality.
- Are there any keyboard shortcuts for cropping images?
While there aren’t specific shortcuts for cropping, you can use Ctrl + K to quickly access the crop tool after selecting your image.
These FAQs cover common queries, making your image cropping experience in Google Slides smoother and more efficient!

 admin
admin


