Cropping images in Procreate is a simple yet powerful technique that can help improve your artwork's composition and focus. Whether you're refining your illustrations, preparing a design for printing, or simply cleaning up the edges of your canvas, cropping gives you full control over your image's dimensions and framing. In this guide, we’ll explore why cropping is essential and walk you through the process of using Procreate’s built-in tools to achieve the perfect crop. Let’s dive into the basics of cropping and why it matters in your creative process.
Why Cropping Images is Essential in Procreate

Cropping is a key element in digital art, and Procreate offers a variety of ways to crop your images effectively. Here’s why it’s essential:
- Improves Composition: Cropping helps you focus on the most important part of your image, removing unnecessary space and distractions. This can make your artwork more engaging and visually appealing.
- Refines Your Artwork: When working on a canvas that’s too large, it’s easy to lose track of your focal point. Cropping allows you to zoom in on specific areas, creating cleaner lines and better detail.
- Prepares for Printing: When preparing your artwork for print, cropping ensures the right aspect ratio and size, avoiding unwanted white space or distortions in the final print.
- Works with Multiple Images: Cropping can be useful when you want to combine multiple images, creating the perfect layout for your design.
Overall, cropping in Procreate helps you create polished, professional artwork by focusing on the most important elements and cutting out the unnecessary. It’s a simple yet crucial step in your creative workflow.
Also Read This: Discover How to Remove Text from Shutterstock Images
How to Crop Images in Procreate Using the Selection Tool

The selection tool in Procreate is a versatile feature that allows you to select specific parts of your image for cropping. Here’s how to use it:
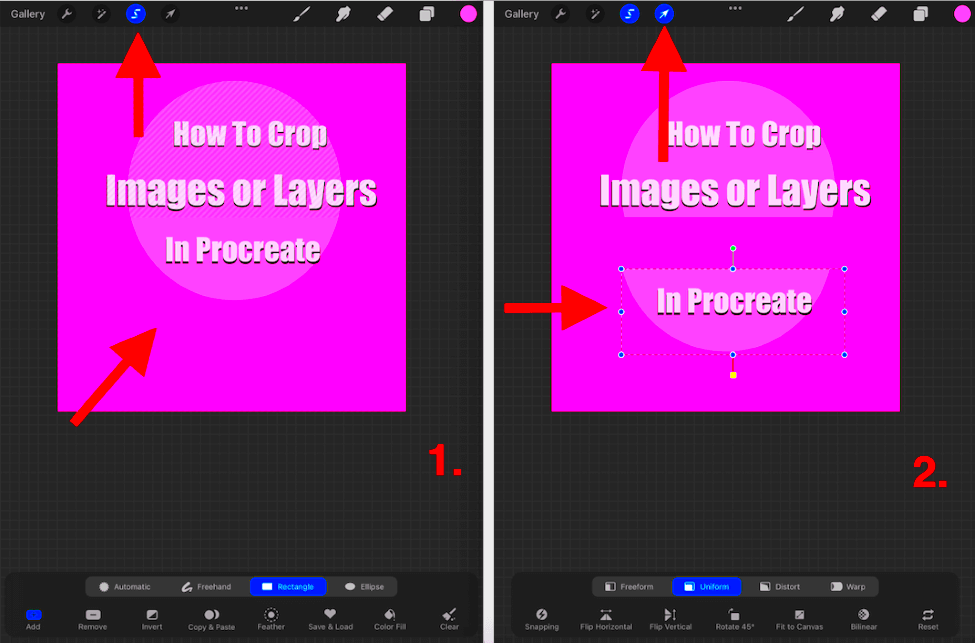
- Select the Selection Tool: First, tap the “S” icon in the top toolbar to activate the selection tool. You’ll see options like freehand, rectangle, and ellipse. Choose the one that fits your needs.
- Outline the Area You Want to Crop: With the selection tool active, draw around the area you want to keep. If you choose the rectangle or ellipse option, simply drag to create your selection. For freehand, you can draw a custom shape.
- Refine the Selection: Once the area is selected, you can move the borders or adjust the shape by dragging the points along the selection line. If you make a mistake, just tap the undo button to correct it.
- Cut or Copy the Selection: After selecting the area, tap on the Actions menu (the wrench icon), go to “Add” and choose “Crop and Fill.” This will crop the image to the selected area and remove any excess space.
- Final Adjustments: If needed, you can use the transform tool to reposition or resize the cropped section. This gives you full control over the final layout of your image.
Using the selection tool in Procreate gives you precision and flexibility in cropping. It’s a straightforward method that works well for most of your cropping needs, whether you're isolating a subject or trimming excess space.
Also Read This: Create Your Own Behance Portfolio with a Personalized URL
Using the Transform Tool for Cropping in Procreate

The Transform Tool in Procreate is one of the most versatile features for cropping and adjusting your images. Unlike the selection tool, which is more for defining a specific area, the Transform Tool lets you resize, rotate, and reposition your entire canvas or a selection within it. Here's how you can use it for cropping:
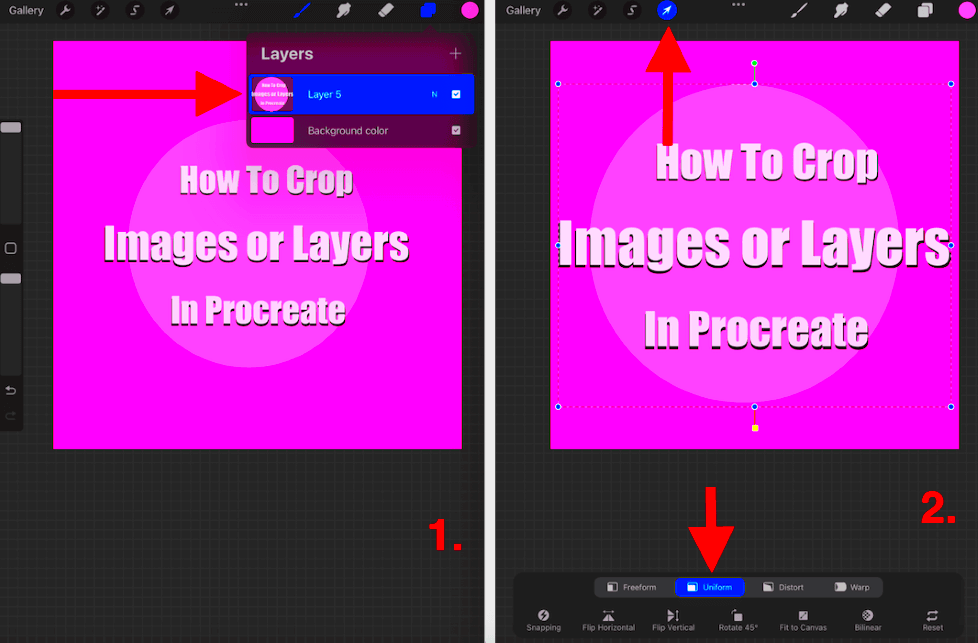
- Activate the Transform Tool: Tap the “Arrow” icon at the top of your screen to bring up the Transform Tool. You’ll see a bounding box around your canvas.
- Resize Your Canvas: Drag the corners of the bounding box to resize your canvas. If you want to crop the edges of the image, drag the sides inward. This will adjust the canvas size to better fit your desired composition.
- Reposition Your Image: To focus on a specific part of your image, tap and hold inside the bounding box, then drag to reposition your artwork. This can help you center the image or move it to a new location on the canvas before cropping.
- Apply the Transformation: Once you're happy with the crop, tap the “Apply” button in the top right corner. This finalizes the changes and crops the image based on the new canvas dimensions.
The Transform Tool is perfect for adjusting the overall layout of your image and cropping in a way that’s both flexible and precise. It gives you more control over your image’s composition compared to other cropping methods.
Also Read This: Resizing Images in Paint: A Quick Guide
Adjusting the Canvas Size After Cropping
Once you've cropped your image in Procreate, you may find that you need to adjust the canvas size to ensure it fits your desired proportions. Fortunately, Procreate makes it easy to resize your canvas even after cropping to get everything just right. Here’s how to do it:
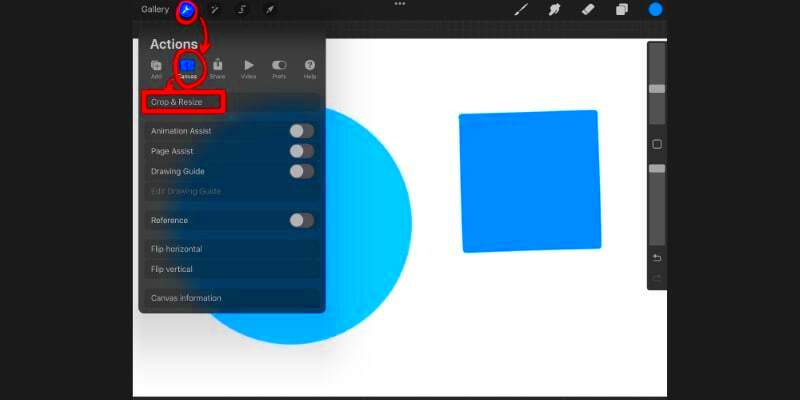
- Open the Canvas Settings: Tap the wrench icon at the top of the screen to open the Actions menu. From there, go to the “Canvas” tab.
- Select "Crop and Resize": Once in the Canvas settings, select “Crop and Resize” to open the cropping interface.
- Resize the Canvas: You can now adjust the width and height of the canvas by dragging the corners or entering specific dimensions in the fields provided. This will allow you to get the exact size you need.
- Keep in Mind the Resolution: When adjusting the canvas size, keep an eye on your image’s resolution. If you shrink the canvas too much, you may lose detail or quality in your artwork.
- Confirm the Resize: Once you're happy with the new canvas size, tap the "Done" button to apply the changes.
Adjusting the canvas size after cropping is a helpful step for ensuring that your artwork fits perfectly within the frame or aligns with specific dimensions. It also ensures that your design stays balanced and proportionate.
Also Read This: Discover an AI Website for Creating Images without Sign-Up
Cropping Multiple Images in Procreate
If you’re working with multiple images in Procreate, cropping them efficiently is key to saving time and maintaining a smooth workflow. Whether you’re working on a complex illustration, collage, or design project, knowing how to crop multiple images at once can make a huge difference. Here’s how to do it:
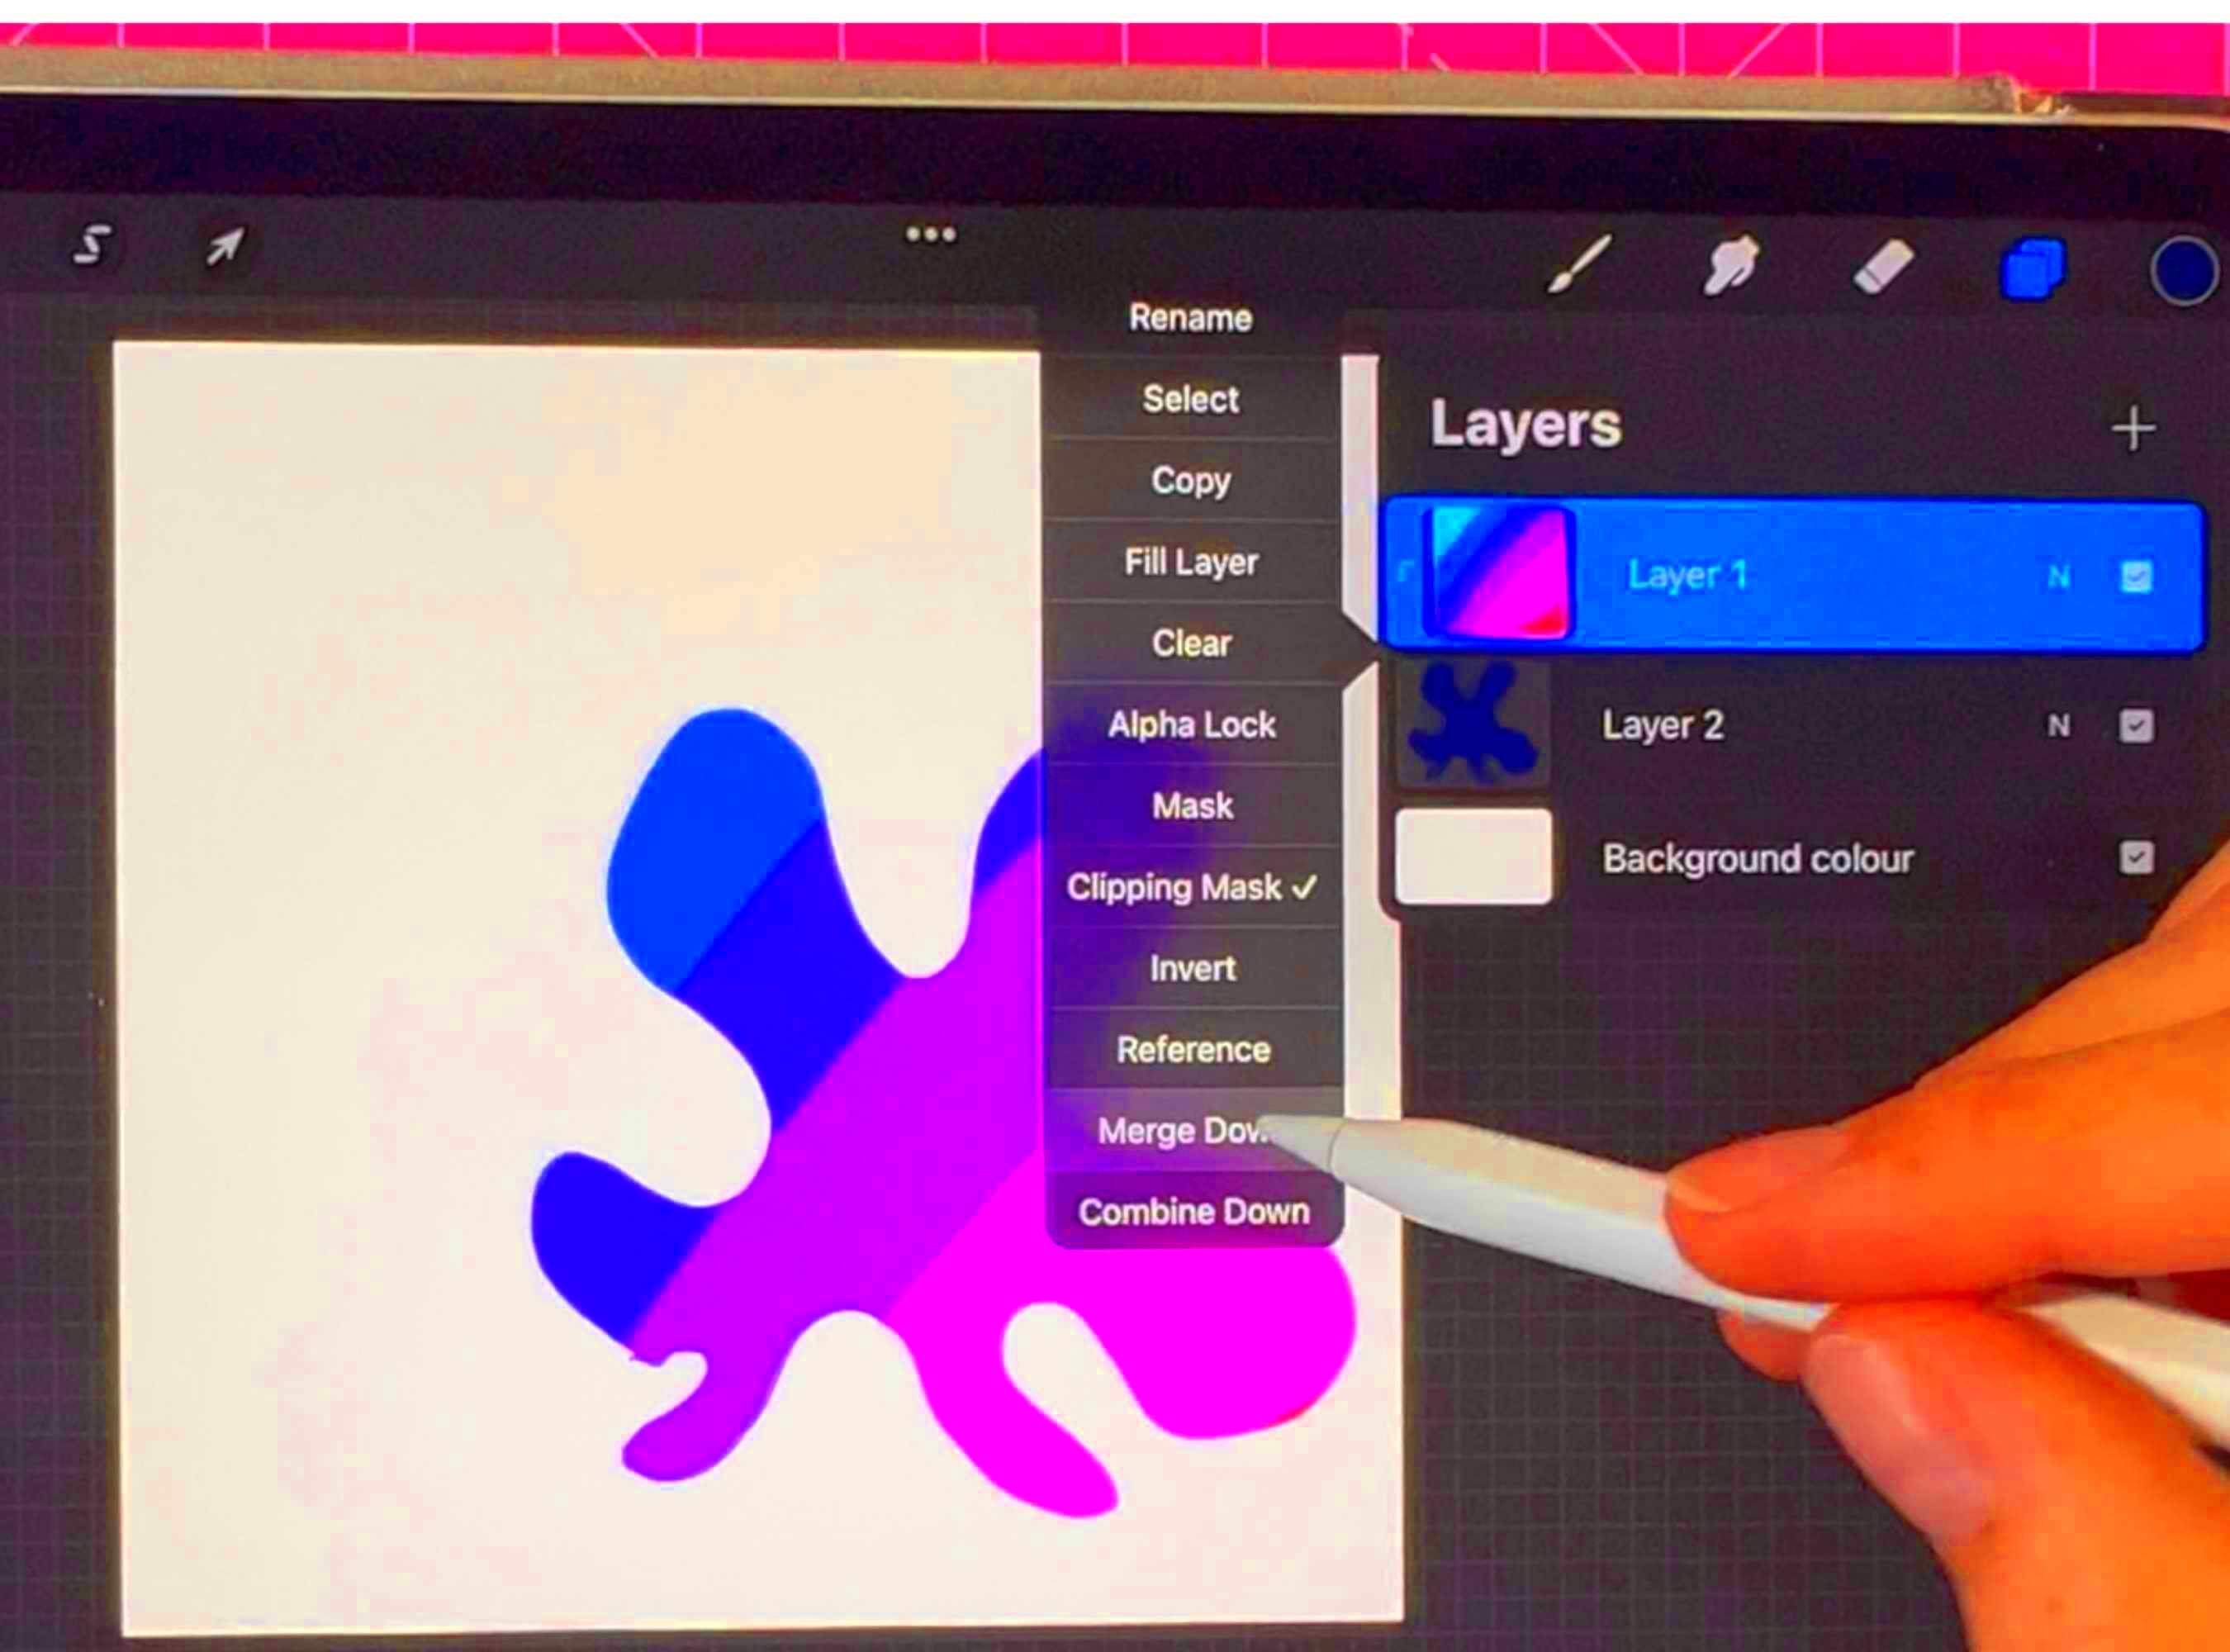
- Layer Management: First, ensure that each image you want to crop is on its own layer. You can add new layers by tapping the Layers icon (the two overlapping squares) and selecting the “+” button.
- Activate the Selection Tool: Tap the selection tool and choose your preferred mode (rectangle, ellipse, or freehand). Select the area of the image you want to keep on each layer.
- Crop Each Image Individually: After selecting each image, tap the Actions menu, go to “Add,” and choose “Crop and Fill” to crop the selected portion. You can repeat this for each image in the project.
- Use the Transform Tool to Position: After cropping, use the Transform Tool to move, resize, or rotate the cropped images to fit within your project. This allows you to organize multiple images quickly and precisely.
- Final Adjustments: Once all images are cropped and positioned, you can make additional edits or refinements. For instance, you can apply filters or adjust layer opacity to achieve the desired effect.
By cropping multiple images in Procreate, you can streamline your creative process, ensuring that everything fits together perfectly and you maintain full control over each element. Whether you're creating a multi-image composition or simply cleaning up your workspace, these steps will help you stay organized and efficient.
Also Read This: How to Add an Image Signature in Apple Mail on iPhone for Quick Access
Common Cropping Mistakes to Avoid in Procreate
Cropping might seem like a simple task, but there are a few common mistakes that can affect the quality of your artwork. By being aware of these pitfalls, you can avoid frustration and get better results when cropping your images in Procreate. Here are some common mistakes to watch out for:
- Not Using the Right Tool: Procreate offers several tools for cropping, like the Selection Tool and the Transform Tool. Choosing the wrong one for your specific task can lead to imprecise results. For example, the Selection Tool is great for cropping specific areas, while the Transform Tool is better for resizing and repositioning.
- Over-Cropping: Sometimes it’s tempting to crop too much, cutting off important parts of the image. Always leave a little extra space around your subject to avoid losing valuable elements in your artwork.
- Ignoring Resolution: When resizing or cropping your canvas, always consider the resolution. Reducing the size of your canvas too much can lead to a loss of image quality and make your artwork appear pixelated or blurry when zoomed in or printed.
- Inconsistent Aspect Ratios: If you need your image to fit certain dimensions, make sure to maintain a consistent aspect ratio. Avoid freehand cropping unless absolutely necessary, as it can lead to distorted proportions.
- Forgetting to Save Progress: Cropping can sometimes lead to irreversible changes, especially if you’re working with large images. Always save a copy of your original image before making significant edits, so you have something to go back to if needed.
Being mindful of these common cropping mistakes will help ensure that your images stay sharp, properly framed, and true to your original vision. Avoiding these errors will also save you time in the long run and help you create professional-looking artwork with ease.
Also Read This: How to Record PC Gameplay for YouTube and Grow Your Gaming Channel
Tips for Perfect Cropping in Procreate
Achieving the perfect crop in Procreate is a skill that takes practice, but with the right techniques, you can refine your images quickly and efficiently. Here are some useful tips for perfect cropping:
- Use Guides for Precision: Procreate allows you to create guides that can help you crop with precision. Enable the grid or ruler in the settings for better alignment when cropping.
- Maintain the Rule of Thirds: When cropping, consider the rule of thirds to create a more balanced composition. This means dividing your image into thirds both horizontally and vertically and positioning key elements along those lines.
- Zoom In for Detail: When cropping areas with fine details, zoom in to get a clearer view of the edges. This will ensure that you don’t accidentally cut off important parts of your design.
- Keep an Eye on Proportions: Always check the proportions of your image after cropping. If you're adjusting for a specific size, use Procreate’s crop tool to maintain the correct aspect ratio, ensuring the image doesn’t look stretched or compressed.
- Experiment with Different Crops: Don’t be afraid to try different cropping styles. Sometimes a small adjustment can completely change the feel of your artwork. Experimenting will help you discover new perspectives.
- Use the Undo Button: If you make a mistake while cropping, Procreate’s Undo button (CMD+Z on iPad) is your best friend. You can go back and try again without losing your progress.
With these tips, you’ll be able to crop your images like a pro. Practice is key, but once you get the hang of these techniques, your artwork will have a more polished and professional finish.
Also Read This: Get to Know How to Make Money Selling Photos on Shutterstock
Frequently Asked Questions
If you’re new to cropping in Procreate, you might have some questions about the process. Here are answers to some of the most frequently asked questions:
- How do I crop a specific area of my image?
To crop a specific area, use the Selection Tool in Procreate. Select the area you want to keep, then go to the Actions menu and tap "Crop and Fill" to crop it. - Can I crop multiple layers at once?
Unfortunately, Procreate doesn’t support cropping multiple layers simultaneously. You’ll need to crop each layer individually. However, you can use the Transform Tool to move and adjust multiple layers after cropping. - How do I change the aspect ratio of my image?
To change the aspect ratio, go to the Canvas settings in the Actions menu, tap “Crop and Resize,” and adjust the width and height of the canvas while maintaining the desired ratio. - What happens if I crop an image too much?
If you crop too much and cut off important parts of your artwork, there’s no way to recover the lost pixels. That’s why it's important to always leave extra space when cropping, or save a backup of your original image before making significant changes. - Can I undo a crop after I’ve made it?
Yes! If you make a mistake or change your mind, you can easily undo a crop using the Undo button (CMD+Z), which will revert the changes. - Is there a way to resize the canvas without affecting the image?
Yes, you can resize the canvas using the "Crop and Resize" feature in the Canvas settings without affecting the actual content of your image. Just make sure you’re only resizing the canvas and not the image itself.
These FAQs should help clear up any confusion you have about cropping in Procreate. If you have any other questions, don’t hesitate to explore Procreate’s user guide or reach out to the community for tips!
Conclusion: Mastering the Art of Cropping in Procreate
Mastering cropping in Procreate is an essential skill for any digital artist. Whether you're cleaning up an image, adjusting the composition, or preparing artwork for print, the ability to crop effectively can take your designs to the next level. Throughout this guide, we’ve explored different cropping methods, from using the Selection Tool to leveraging the Transform Tool for resizing and repositioning. We’ve also covered tips to avoid common mistakes and highlighted ways to perfect your cropping technique with Procreate’s tools.
The key to mastering cropping is practice and attention to detail. Always keep in mind your artwork’s resolution, proportions, and composition when cropping. Use guides and grids to keep everything aligned, and don’t hesitate to experiment with different cropping styles to see what works best for your project. Remember to save your work frequently and consider saving backup copies to prevent accidental loss of important elements.
With these tools and tips in your toolkit, you’ll be well-equipped to make precise, effective cropping decisions that enhance your artwork. Keep experimenting, refining, and practicing until cropping becomes second nature, and you’ll be able to create professional-level designs in Procreate with ease.

 admin
admin


