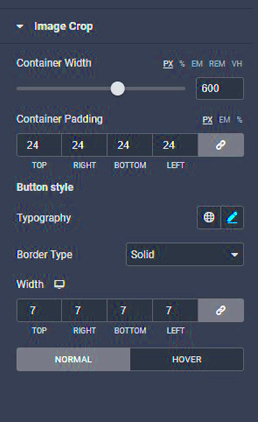
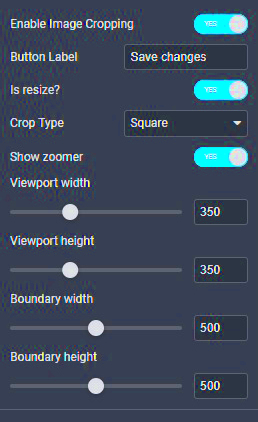
Cropping images in Elementor is a simple yet powerful tool that helps improve the look of your website. Whether you want to fit an image into a specific section or focus on a particular part of the image, cropping gives you full control. Elementor’s easy-to-use interface makes this task accessible, even for beginners. With just a few clicks, you can adjust images to match your design needs, ensuring that your website looks polished and professional.
Why Cropping Images is Important for Your Website

Cropping images is essential for maintaining a clean and organized look on your website. Here are a few reasons why cropping images is important:
- Enhances Design Aesthetics: Cropping allows you to remove unnecessary parts of an image, helping it fit neatly into the layout and improve visual appeal.
- Improves Loading Time: By cropping out parts of an image that are not needed, you can reduce the file size, leading to faster page loading times.
- Focuses Attention: Cropping can help highlight the most important part of an image, guiding your visitor’s attention where it matters most.
- Consistency in Visuals: Cropped images help maintain a uniform look across your website, ensuring that images have consistent size and proportions.
Overall, cropping enhances the overall user experience and ensures that your site is both visually appealing and functional.
Also Read This: How Often Should I Post on YouTube for Consistent Growth
Steps to Crop Images in Elementor
Elementor makes cropping images straightforward. Follow these steps to crop your images with ease:
- Step 1: Select the Image Widget. Open your page in Elementor, then drag and drop the Image Widget onto your section.
- Step 2: Choose Your Image. In the Image widget settings, click on the image to open your media library. Select the image you want to crop.
- Step 3: Crop Using the Image Editor. Once the image is selected, you’ll see an option to crop it. Click on the image, and a simple crop tool will appear. Drag the edges to crop the image as desired.
- Step 4: Adjust Aspect Ratio (Optional). If you need to adjust the aspect ratio, you can use the settings in the image editor to maintain proportions or customize them.
- Step 5: Apply the Changes. After cropping, click "Apply" to save your changes and exit the editor. Your cropped image will now be displayed on your page.
With these simple steps, you can crop your images efficiently without the need for external tools or complex software.
Also Read This: Tips to Play Football Better with Step-by-Step Dailymotion Videos
Adjusting Image Dimensions and Aspect Ratio
Adjusting the image dimensions and aspect ratio is crucial for achieving the perfect fit on your website. Sometimes, images may appear stretched or distorted if not properly adjusted. With Elementor, you can control these aspects to ensure your images align with your design goals. Whether you're working with banners, product photos, or any other type of image, getting the right size and aspect ratio can make a big difference in the overall look of your site.
Here's how you can adjust the image dimensions and aspect ratio in Elementor:
- Resize the Image: In the Image Widget settings, you can adjust the width and height manually or select a preset size, such as "Full", "Medium", or "Thumbnail". This allows you to quickly match the image to your desired dimensions.
- Maintain Aspect Ratio: By enabling the "Constrain Proportions" option, Elementor automatically maintains the image's original ratio when you adjust its width or height. This ensures the image doesn't get stretched or distorted.
- Custom Aspect Ratio: If you need a specific aspect ratio, you can crop the image and resize it to fit within the desired proportions. Elementor's image editor provides tools for customizing the aspect ratio to fit the design precisely.
- Preview Changes: Always preview your changes before finalizing them to make sure the image looks as expected within your layout. This helps ensure that it doesn’t appear too large or too small.
By adjusting the dimensions and aspect ratio properly, you ensure that your images look great and fit seamlessly into your website design.
Also Read This: Iconic Church Steeples Across the USA Captured in Stunning Photos
Using Elementor's Image Editor for Advanced Cropping
Elementor offers an easy-to-use image editor that lets you take your cropping to the next level. Unlike basic cropping tools, this editor provides advanced options for more precise adjustments, ensuring that your images always look their best on your site.
Here’s a deeper look into how you can use Elementor’s image editor for advanced cropping:
- Open the Image Editor: To access the image editor, click on the image within the Image Widget, then choose the “Edit Image” button. This opens a set of tools that will help you fine-tune your image.
- Crop with Precision: Use the crop tool to select exactly the part of the image you want to keep. You can drag the edges of the cropping box to resize it and adjust the focal point of your image.
- Adjust Brightness, Contrast, and Saturation: The image editor also lets you modify other image properties, such as brightness, contrast, and saturation. This allows you to enhance the image and match the overall look and feel of your website.
- Flip and Rotate: If needed, you can flip or rotate the image directly within the editor. These tools are helpful for creating visual balance or fixing orientation issues in photos.
- Save and Apply: After making your adjustments, click the “Save” button to apply the changes. You’ll then be able to see your updated image directly in the Elementor editor.
The advanced cropping and editing tools in Elementor allow you to fine-tune your images without relying on external software. With a few clicks, you can make your images match the design of your site perfectly.
Also Read This: Download Short Video from Likee in a Snap
Tips for Cropping Images Without Losing Quality
When cropping images, maintaining high quality is essential, especially for images used in professional or business websites. Cropping too aggressively or in the wrong way can cause pixelation and blurriness, which can make your site look unprofessional. Fortunately, there are ways to crop images while preserving their quality.
Here are some tips to crop images without losing quality:
- Use High-Resolution Images: Start with high-resolution images. The higher the original quality, the more you can crop without losing details or sharpness.
- Avoid Over-Cropping: Don't crop too much from the image. Cutting out large portions can reduce image quality, especially if the subject matter is too small. Aim to crop just enough to focus on the important elements.
- Maintain Aspect Ratio: When adjusting the crop, always keep the aspect ratio in mind. This helps avoid stretching or distorting the image. Use Elementor's "Constrain Proportions" option for easy aspect ratio control.
- Resize After Cropping: After cropping, resize the image to fit the intended display size. Reducing the image size will reduce file size and improve load times without sacrificing too much quality.
- Use the Right File Format: Consider the file format of the image. JPEGs are best for photographs, while PNGs work better for images with transparent backgrounds or sharp edges. Choosing the right format helps maintain quality while keeping file sizes small.
By following these tips, you can crop your images effectively while preserving their sharpness and clarity, ensuring they look great on your website.
Also Read This: Is Shutterstock Images Safe? Ensuring Trust and Legitimacy in Your Stock Photography
Common Issues While Cropping Images in Elementor
While cropping images in Elementor is generally straightforward, some common issues can arise. Understanding these problems and how to resolve them will help you crop images efficiently without hassle. Let's look at a few challenges you might face when cropping images and how to fix them.
- Image Blurriness: Sometimes after cropping, the image can appear blurry. This typically happens when the original image resolution is low. To avoid this, always start with high-quality images that have a higher resolution.
- Incorrect Aspect Ratio: If the aspect ratio is not maintained during cropping, the image can get stretched or squished. To solve this, use Elementor’s “Constrain Proportions” option, which locks the aspect ratio and ensures the image remains proportional.
- Over-Cropping: Cutting away too much from the image can lead to a loss of important details or make the image look poorly framed. Be mindful of how much you crop and try to focus only on the parts of the image that matter.
- Image Not Fitting Correctly: After cropping, sometimes the image might not fit well within the section of the page. If this happens, adjust the dimensions of the image within Elementor, or use the "Object Fit" settings to control how the image fills its container.
- Changes Not Saving: In some cases, the image edits may not save properly. This can occur due to browser issues or Elementor settings. Refresh your browser or clear the cache if changes aren't reflected. Also, ensure that Elementor is updated to the latest version.
By knowing how to troubleshoot these common issues, you can crop images smoothly and avoid unexpected problems that can affect your site's appearance.
Also Read This: Follow This Easy Guide for Beginners on How to Use Streamable
FAQ
Here are some frequently asked questions about cropping images in Elementor:
- Can I crop images in Elementor without losing quality?
Yes, as long as you use high-resolution images and avoid over-cropping, you can crop images in Elementor without significant quality loss. - How can I maintain the aspect ratio when cropping?
To maintain the aspect ratio, enable the "Constrain Proportions" option in Elementor's image editor. This ensures the image doesn't stretch or distort. - Can I crop an image after it’s already been uploaded to my website?
Absolutely! You can crop any image uploaded to your site by selecting it in Elementor and using the built-in image editor. - What is the best image format for cropping?
For most images, JPEG is the best option, especially for photographs. PNG is ideal for images with transparent backgrounds. - How do I resize the image after cropping it?
After cropping the image, you can resize it by adjusting the width and height in the Image Widget settings within Elementor.
Conclusion
Cropping images in Elementor is an essential skill for creating a well-designed and functional website. With the right approach, you can enhance your site’s visual appeal, improve load times, and focus your visitors' attention where it matters most. By following the steps and tips outlined in this guide, you can crop images with ease while avoiding common pitfalls. Whether you're a beginner or an experienced designer, Elementor’s image editor provides the tools needed to make your images look their best. Remember, always start with high-quality images, maintain proper aspect ratios, and adjust dimensions carefully to achieve optimal results.

 admin
admin


