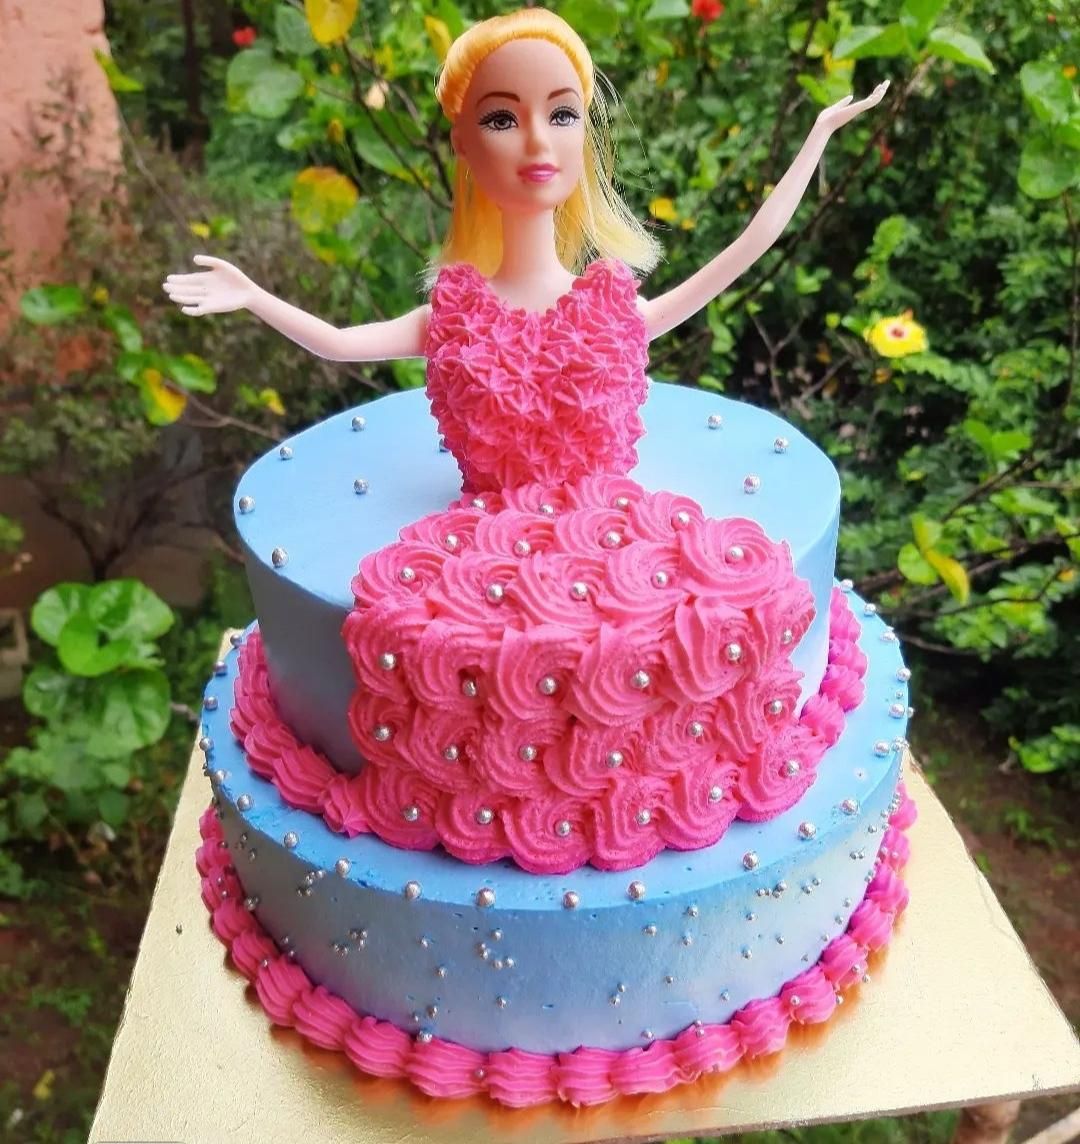
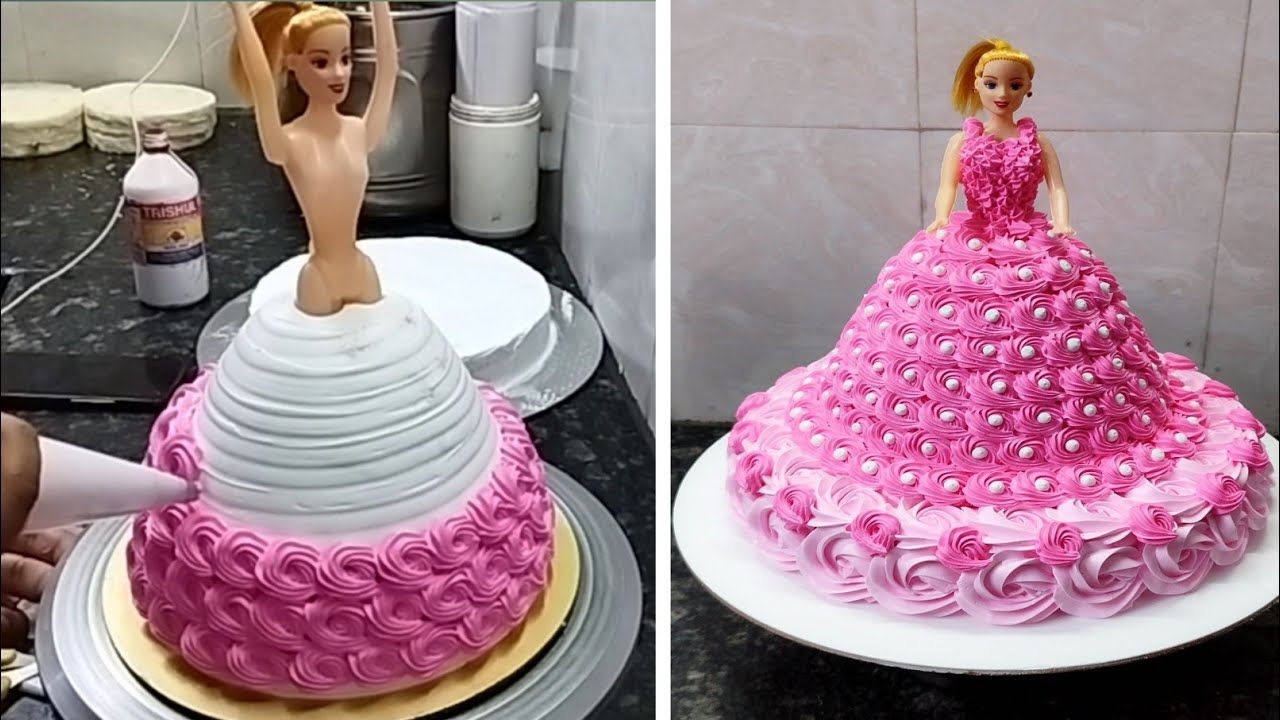
Doll cakes are a delightful blend of whimsy and creativity that captivate children and adults alike. Imagine a stunning cake that looks like a doll, with the cake forming the dress and the doll’s upper body emerging gracefully from the top. These cakes are not only visually enchanting but also incredibly fun to make. Whether you're celebrating a birthday, a special occasion, or simply indulging your artistic side, doll cakes can add a magical touch to your event. With a variety of designs and customization options available, you can craft a cake that perfectly suits your theme or the tastes of your little princess.
In this tutorial, we'll delve into the world of doll cakes, exploring different designs, techniques, and tips to help you create a masterpiece that will leave everyone in awe. So, gather around, let your imagination run wild, and get ready to impress with a cake that combines baking and artistry!
Gathering Your Ingredients and Tools

Before diving into your doll cake creation, it’s essential to gather all the necessary ingredients and tools to make the process smooth and enjoyable. Below, I've compiled a list to ensure you’re fully equipped:
Essential Ingredients:
- Cake Batter: Choose your favorite flavor! Options include vanilla, chocolate, or red velvet.
- Buttercream Frosting: This will be used for covering your cake and for extra decoration. You can make it from scratch or use store-bought.
- Food Coloring: To tint your buttercream or fondant to match your doll's dress color.
- Fondant: This can be used for covering the cake or crafting details for the decorations.
- Doll Figurine: A clean, unused doll (typically a Barbie) that will be placed in the cake.
Necessary Tools:
- Cake Pans: Typically, you’ll need two round pans for the dress shape.
- Mixing Bowls: For preparing your batter and frosting.
- Spatula and Piping Bags: Great for smooth frosting application and intricate designs.
- Rolling Pin: If you're using fondant, this tool is essential for rolling it out.
- Knife or Cake Leveler: For leveling your cake layers before stacking.
Having everything ready at your workspace will make crafting your doll cake a joyous experience. So gather these supplies and let’s bring creative ideas to life!
Preparing the Cake Layers

Creating a stunning doll cake starts with the foundation - the cake layers. This part of the process is not only fun but also crucial for ensuring your cake stands tall and looks fabulous!
First things first, you’ll want to gather your ingredients and tools. Here’s a basic list to get you started:
- 2-3 cake mixes (vanilla, chocolate, or any flavor you prefer)
- Eggs and oil (as required by the cake mix)
- Standard round cake pans (6-inch and 8-inch recommended)
- Baking spray or parchment paper (for easy removal)
- Cooling racks
Now, let’s dive into the preparation!
Step 1: Bake the Cakes
Follow the instructions on your cake mix to prepare the batter. Once you’ve mixed everything thoroughly, pour your batter into the greased cake pans. For a typical doll cake, use one 8-inch round pan and two 6-inch round pans to create layers that resemble the dress of the doll.
Step 2: Bake and Cool
Preheat your oven and bake as per the package instructions. Once they’re done, remove them from the oven and let them cool in the pans for about 10-15 minutes. Then, transfer them to cooling racks to cool completely.
Step 3: Level the Cakes
Once the cakes are cool, use a serrated knife to level the tops if they are domed. This helps in stacking them evenly, which is key for a balanced doll cake.
With your cake layers prepared, you’re one step closer to creating an adorable doll cake that will impress everyone at the party!
Assembling the Doll Cake
Now that you have your cake layers ready, it’s time to assemble your doll cake! This is where the magic truly begins, as you shape your cake into a stunning dress for your doll.
Step 1: Position the Base
Start with the largest cake layer (the 8-inch one) as the base. Place it on your cake board or serving platter. This is where your doll will sit, so make sure it’s stable and centered!
Step 2: Add Filling
If you want to take your cake to the next level, add some filling! You could use buttercream, jam, or whipped cream between the layers. Spread an even layer of filling on top of your bottom cake layer before adding the next layer.
Step 3: Stack the Layers
Next, place one of the smaller cake layers (6-inch) on top of the first layer you just filled and repeat the process with filling. Once that’s done, add the remaining cake layer on top, ensuring everything is aligned perfectly.
Step 4: Insert the Doll
Now it’s time for the star of the show! Take your doll (make sure it's clean) and insert it into the center of the cake, going down through to the board. This will give the cake the appearance of a dress flowing around the doll.
Step 5: Crumb Coat
To seal the layers and crumbs, apply a thin coating of frosting around the entire outside of the cake, making sure it’s smooth. This is called the crumb coat, and it helps keep everything tidy as you finalize your design.
At this point, your cake is looking fantastic! The assembly process is complete, but don’t forget the best part: decorating your cake will tie everything together beautifully.
5. Decorating Your Doll Cake
Now that you’ve baked the perfect cake and shaped it into a doll, it’s time to let your creativity shine by decorating it! This part is incredibly fun and rewarding because it’s where your cake transforms into a work of art. Here’s a step-by-step breakdown to guide you:
- Prepare Your Tools: Gather all the essentials—fondant, buttercream, decorations like edible glitter, or sprinkles, and any molds for creating detailed elements.
- Set Up Your Workspace: Ensure you have a clean, spacious area to work in. Lay down parchment paper to catch any mess!
- Dress the Doll: If you’re using a plastic doll, carefully wrap her waist with fondant to create a dress. You can also use different colors of fondant to create layers or patterns. A popular style is a ruffled skirt that adds volume and flair.
- Create Unique Features: Use edible markers or gel colors to draw facial features on the doll. This makes the cake even more personalized. You can also add hair with chocolate or fondant strands.
- Adorn with Accessories: It’s all in the details! Use small edible objects like sugar flowers, pearls, or gems to accessorize the gown. Consider creating a tiara or necklace for an extra touch of glam.
Remember, the beauty of a doll cake lies in its whimsical, playful appeal. Don’t stress too much about perfection—just have fun with the process!
6. Tips for a Stunning Finish
Achieving a stunning finish on your doll cake might seem daunting, but with a few simple tips, you can elevate your cake to the next level. Here are some tried-and-true secrets:
- Think Colors: Use a color palette that complements the theme of your doll. Pastels often work well for fairy tale designs, while bold colors can enhance a princess or superhero cake.
- Texture is Key: Incorporate various textures to make your cake visually appealing. For example, smooth buttercream combined with ruffled fondant can create an exciting contrast.
- Lighting Matters: If you’re showcasing your cake at a party, pay attention to lighting. Natural light can highlight colors and textures beautifully, enhancing the overall look.
- Don’t Rush Drying Times: Allow all decorations to dry completely before transporting your cake. This helps maintain the design integrity and avoids any smudging.
- Practice Makes Perfect: Don’t be afraid to practice your piping skills or fondant technique on a scrap piece before working on your final cake. This can build your confidence!
With these tips in your toolkit, you're all set to create a doll cake that even a professional would envy. Remember, the most important part is to enjoy the baking and decorating process!
Creative Doll Cake Design Tutorial
Doll cakes are a delightful fusion of creativity and baking that can mesmerize both kids and adults alike. This tutorial will guide you step-by-step on how to craft an elegant doll cake that not only is a treat for the taste buds but also serves as a stunning centerpiece for any occasion. Here’s everything you need to know to make your own fabulous doll cake.
Ingredients Needed:
- 2 to 3 layers of your favorite cake (vanilla, chocolate, or red velvet)
- Buttercream frosting (enough for layering and decorating)
- Food coloring (optional, for colored frosting)
- Doll (clean and sanitized, preferably with a removable skirt)
Tools Required:
- Mixing bowls
- Spatula
- Rolling pin
- Offset spatula
- Knife for leveling
- Decorating tools (piping bags, tips, etc.)
Step-by-Step Instructions:
- Bake Your Cakes: Prepare your cake batter and bake the layers according to the recipe.
- Level and Stack: Once the cakes are cooled, level them with a knife. Stack and frost the layers with buttercream.
- Insert the Doll: Cut a hole in the center of the top layer to accommodate the doll's waist. Insert the doll gently.
- Decorate: Use buttercream, fondant, or edible glitter to create a beautiful gown for the doll.
- Final Touches: Add embellishments, such as flowers or edible pearls, to enhance the gown's design.
This creative doll cake design not only showcases your baking talents but also adds a personal touch to celebrations. The combination of cake and doll creates a unique dessert that looks fabulous and tastes delicious. With practice, you will be able to explore various designs, colors, and decorations for diverse occasions. Unleash your creativity and enjoy your baking journey!
Conclusion and Final Thoughts
Create memorable moments by making a stunning doll cake that is perfect for birthdays, graduations, or any special occasion. Your loved ones will be enchanted by the whimsical design and delighted by the delicious taste!


