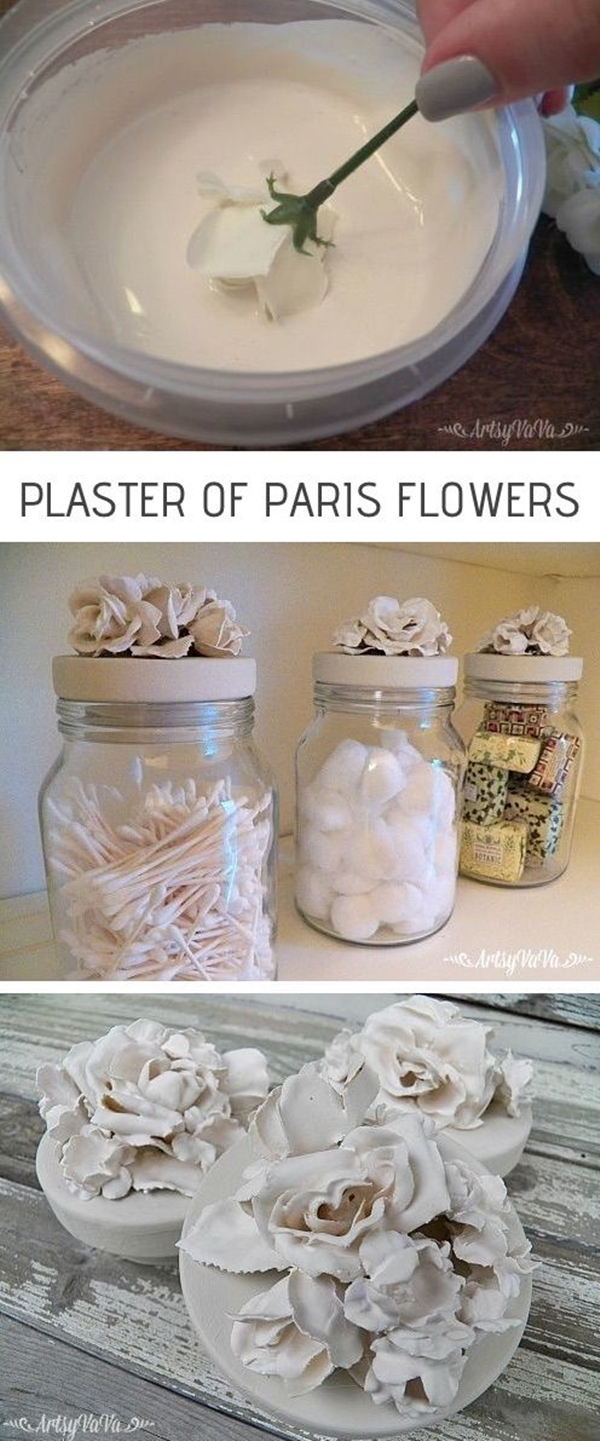
Plaster of Paris is a versatile and popular crafting material that can ignite your creativity in countless ways! Whether you’re a newbie looking to dip your toes into the world of crafting or a seasoned DIY enthusiast, this medium opens up a world of possibilities. Originating from the gypsum mines in Montmartre, Paris, this fine white powder, when mixed with water, transforms into a workable paste that sets hard in no time.
It’s used for everything from art projects, home décor, sculpture, and even mold-making. What makes it stand out is its quick-drying properties, allowing you to see the results of your work almost instantly. Plus, it’s incredibly easy to shape, making it great for kids’ projects as well! In this blog post, we aim to guide you through various creative crafting ideas using Plaster of Paris, so you can express yourself and unleash your artistic side!
Essential Tools and Materials

Before diving into the creative world of Plaster of Paris, it’s important to gather all the necessary tools and materials. Having the right items on hand can make your crafting experience more enjoyable and efficient. Here’s what you’ll need:
- Plaster of Paris: The star of the show! Available at craft stores or online.
- Water: You’ll need this to mix with the plaster.
- Mixing Container: A sturdy bowl or bucket works well to mix your plaster.
- Stirring Stick: A wooden stick or old spoon to blend the plaster and water smoothly.
- Molds: Silicone molds or plastic containers to shape your creations.
- Protective Gear: Wear gloves and a mask to keep the dust at bay during mixing.
- Paintbrushes and Paint: For adding color and finishing touches to your projects.
- Sandpaper: Useful for smoothing rough edges after your project has dried.
- Sealer:** Optional, but a sealant can help protect your finished item from moisture and damage.
With these tools and materials lined up, you’re ready to unleash your creativity and explore the endless possibilities that Plaster of Paris has to offer!
3. Step-by-Step Crafting Process

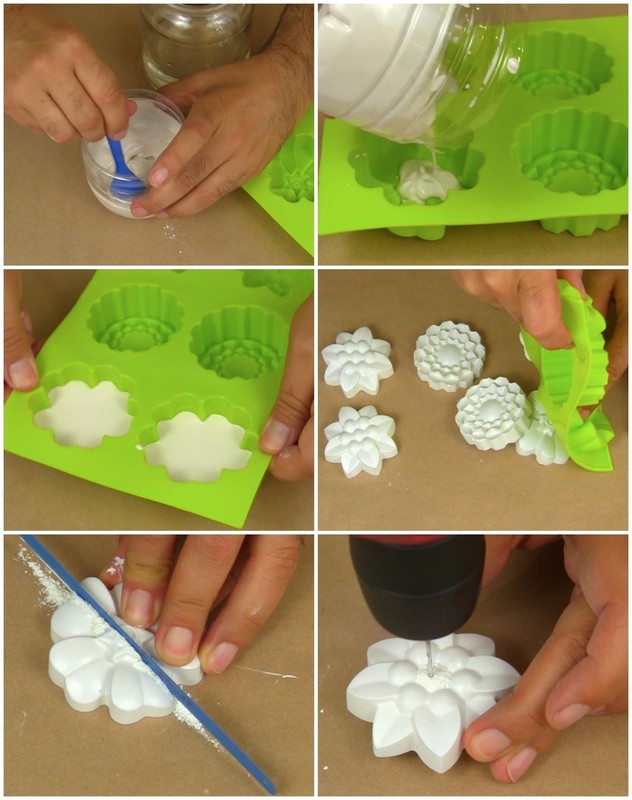
Crafting with Plaster of Paris is not only fun but also quite straightforward once you get the hang of it. Let's break it down into simple steps that make it easy for you to follow along. Here’s how you can get started:
- Gather Your Materials: You'll need the following supplies:
- Plaster of Paris
- Water
- Mixing bowl
- Wooden stick or spatula
- Molds or surfaces for your projects
- Sandpaper (for finishing)
- Paint and brushes (for decorating)
And that’s it! You now have a beautiful creation made from Plaster of Paris, ready to showcase or gift to someone special.
4. Creative Project Ideas
Now that you know how to craft with Plaster of Paris, why not explore some exciting project ideas? Here are a few creative concepts to ignite your imagination:
- Decorative Wall Art: Create unique wall hangings by pouring plaster into stencil molds or freehanding designs on a flat board. Once set, paint them in vibrant colors.
- Photo Frames: Use plaster to make personalized frames. You can embed decorations like seashells or pebbles before it sets for an added touch.
- Planters: Design small pots for your indoor plants. Utilize a two-part mold system for an interesting shape.
- Statues and Figurines: Try your hand at sculpting small figures or animals. This project can be especially rewarding and can vary in skill level.
- Coasters: Make a set of custom drink coasters using round molds. You can even decorate them with fabric or paint to give your table a personal touch.
- Holiday Ornaments: Create seasonal decorations for holidays like Christmas or Halloween. They make great gifts or keepsakes!
The world of crafting with Plaster of Paris is only limited by your imagination. So grab your materials and let creativity guide you on a fun journey of making something truly special!
Tips and Tricks for Successful Crafts
When it comes to crafting with Plaster of Paris, a little guidance can go a long way. Here are some handy tips and tricks to ensure your projects turn out beautifully every time:
- Prepare Your Workspace: Make sure to cover your work surface with old newspapers or a plastic sheet. Plaster can be messy, and this will save you time on cleanup!
- Mix Slowly: When mixing Plaster of Paris, add the powder to water gradually, rather than the other way around. This helps to avoid clumps and ensures a smoother consistency.
- Use the Right Tools: Invest in a set of mixing bowls, spatulas, and molds. Silicone molds are particularly easy to work with, making it easier to remove your finished pieces.
- Work Fast: Plaster of Paris sets quickly, usually within 15 to 30 minutes. Plan out your project and keep all your tools and materials within reach.
- Add Color Wisely: If you want to add color, consider using acrylic paints after the plaster has fully dried. Mixing paint into the plaster can affect the setting process.
- Don't Rush Drying: Allow your plaster casts to dry naturally. Avoid using heat sources like hairdryers, as they can cause cracks.
With these tips in your toolkit, you're all set to tackle your next plaster crafting project like a pro!
Conclusion and Further Resources
Crafting with Plaster of Paris opens up a world of creative possibilities, from decorative pieces to functional art. By following the tips and techniques discussed in this guide, you're well on your way to crafting stunning items that showcase your artistic flair.
If you're eager to learn more, consider exploring the following resources:
| Resource | Description |
|---|---|
| YouTube Craft Channels | Check out channels dedicated to Plaster of Paris crafts for step-by-step video instructions. |
| Crafting Blogs | There are countless blogs that offer tutorials, project ideas, and crafting tips. A quick search will reveal a treasure trove of information. |
| Local Craft Classes | Consider signing up for a local workshop to learn hands-on techniques from experienced crafters. |
| Social Media Groups | Join Facebook or Instagram groups focused on plaster crafts—share your projects, get feedback, and connect with fellow crafters! |
So gather your materials, unleash your creativity, and most importantly, have fun with it! Happy crafting!


