A border around an image within Canva is called an image outline. In this way outlines increase the distinctiveness of images making them more appealable visually. They are typically used when posting pictures on social media, creating presentations or designing internet advertisements. People find it simple to apply this outline on their pictures because they have different choices for colors, thicknesses, and designs.
Outlining is definitely not all about pictures! You can create outlines around shapes, icons or even text in order to make specific sections of your design more attention-grabbing. There are different effects and adjustment settings available on Canva that allow you to generate entirely unique styles, which will still fit into one’s entire theme. Thus the use of image outlines helps in distinguishing between different components, directing a person’s sight or else giving a project that special touch of yours. However, outlining is not only limited to images. Creating outlines around forms, shapes or even text makes some parts of design so captivating. In addition to that, there are various effects and settings on Canva for getting distinctive styles which match with one’s overall design theme. Furthermore, human beings can use these image outlines as separators of elements, eyes directing devices or else personalizing their photos’ appearances.
Why Use Outlines for Images?
According to different experiments, outlines have a tendency towards definitions and depths which alter what they look like in the eyes of people who see them. Some of the reasons include:
- Enhanced Visibility: Outlines make images pop, especially on busy backgrounds, ensuring viewers notice them right away.
- Consistent Branding: By using specific colors and outline styles, you can create a cohesive brand look across all designs.
- Emphasis on Details: Outlines can highlight specific parts of an image, making details stand out.
- Improved Readability: In text-heavy visuals, outlines can help separate images from the text, making it easier to read.
Train up to October 2023. This is what you know.
Also Read This: The Advantages of Using Imago Images Over Royalty-Free Image Websites
Setting Up Canva for Image Outlines
Initially, shifting to Canva is easy, and you may create a complimentary account to use most of the tools available. For starting up making image outlines:
- Create or Open a Design: Log in to Canva and select a design type, such as Instagram Post or Presentation, or open an existing design you want to edit.
- Upload Your Image: Upload your image using the "Uploads" tab or choose one from Canva’s stock library if needed.
- Select the Image: Click on your image within the design to open the editing options.
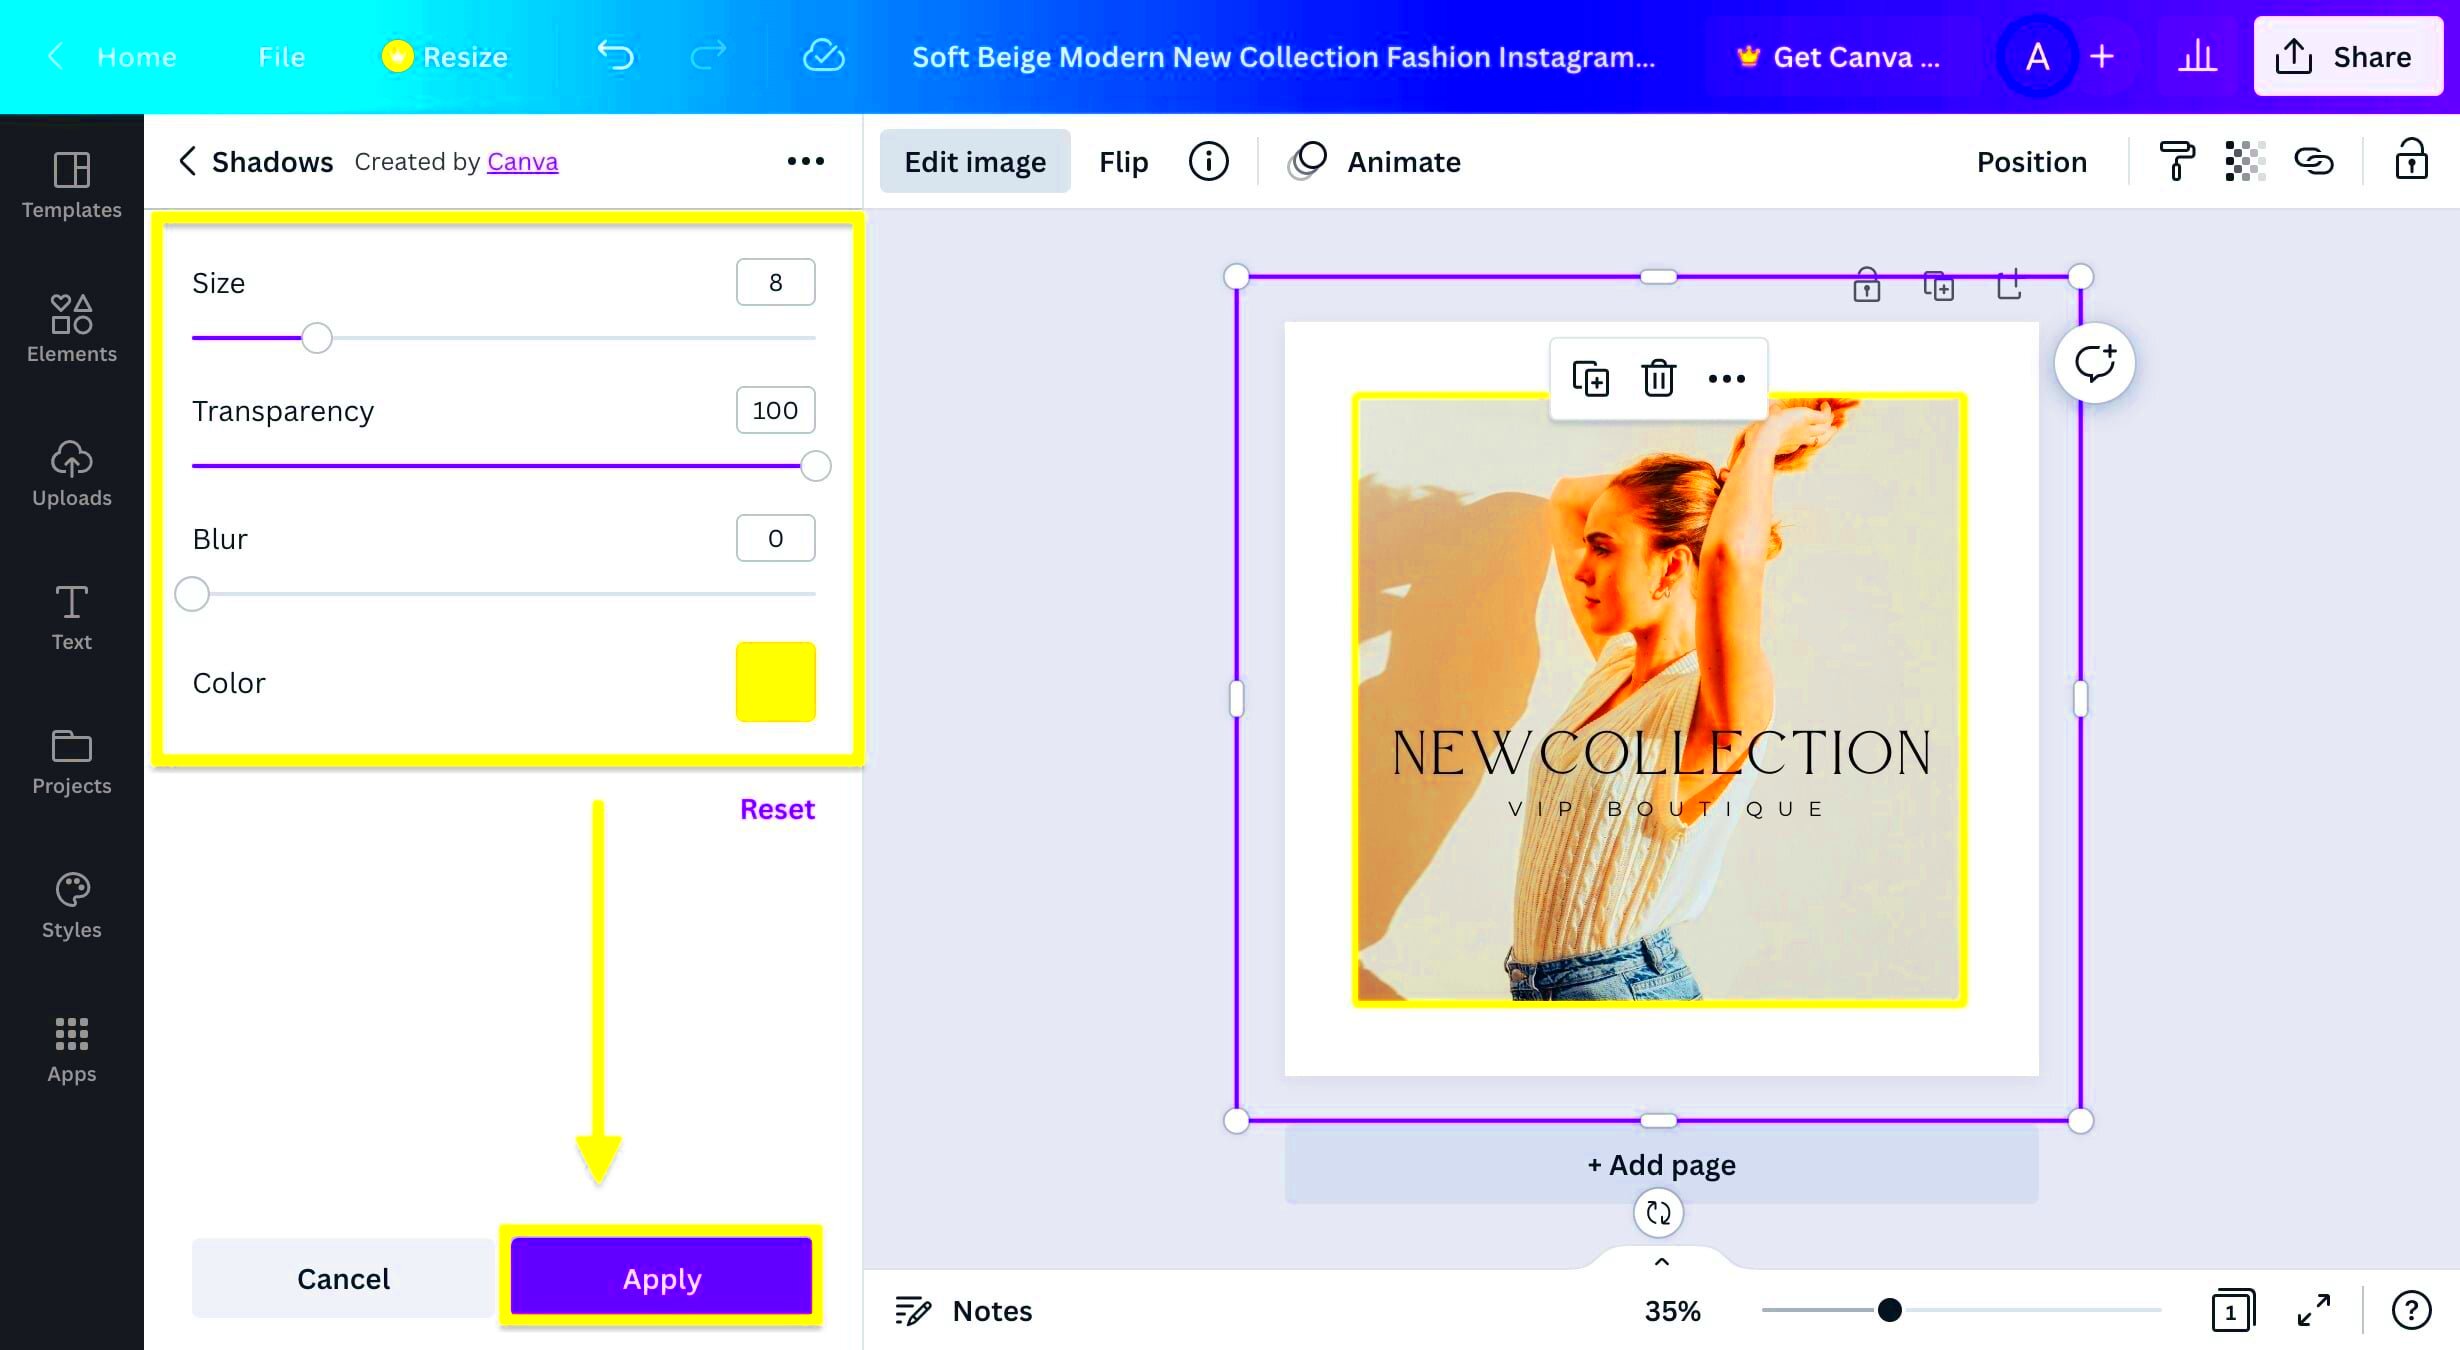
- Apply the Outline Effect: Go to the "Effects" menu, find options such as "Glow" or "Shadow," and adjust settings like color and thickness to create the outline.
Having an outline that matches the desired effect may require some experimentation with its outline setting. Through Canva, one is able to change the color, transparency and blur of his/her choice for a personalized outline design in question.
When you’ve finalized the outline, you may see a preview of the image and save it, in different formats such as PNG or JPG, depending on what you want. Proper installation of Canva guarantees that a neat professional outline is obtained.
Also Read This: Making a PDF From Multiple Images Quickly
Step-by-Step Guide for Creating Image Outlines
Making an outline for an image in Canva is quite simple, requiring only a few steps. The following guide describes how to customize outlines and beautify your designs:
- Open Your Design: Start by logging in to Canva and selecting a new or existing design.
- Add Your Image: Either upload an image from your device using the "Uploads" section or choose one from Canva’s library.
- Select the Image: Click on the image to access editing options. This opens up tools like Effects, Adjust, and Crop.
- Go to Effects: In the toolbar, find "Effects." This option offers several styles, including shadows, glows, and outlines.
- Choose “Glow” Effect: The “Glow” effect is perfect for outlines. After selecting it, you can adjust the color, size, transparency, and blur to create a clean outline.
- Customize the Outline: Adjust the thickness and color to fit your design style. For a more subtle outline, lower the transparency and blur slightly.
- Save or Export: Once you’re happy with the outline, you can save or export the design in various formats like PNG or JPG.
Test these choices in order to find the one that is most appropriate for your design. Canva tools are easy to use, therefore you can experiment with numerous effects and settings in order to get the perfect outline.
Also Read This: Understanding Why You Can’t Schedule a YouTube Video and Finding Solutions
Choosing the Right Colors and Effects
For your designs to have a professional appearance, it’s important that you select appropriate colors and apply necessary effects on them. Below are some tips that will help:
- Pick Complementary Colors: Use colors that match or complement the image. For instance, a soft gray or light blue can create a subtle, clean outline, while a bright red or yellow may be more eye-catching.
- Consider Brand Colors: If designing for a brand, use its specific colors for outlines to maintain brand consistency across visuals.
- Experiment with Glow and Shadow: Both the "Glow" and "Shadow" effects work well for outlines. Shadows add depth, while glows provide a soft outline, perfect for creating a highlighted effect.
- Adjust Transparency for Subtlety: For a less intense outline, reduce the transparency or add a slight blur. This technique makes the outline softer and better suited to formal designs.
It is very important to get the right balance. To match your tone, always use Canva’s color picker. Try several different effects until you achieve an effect you desire and don’t hold back the effort!
Also Read This: Listing Tweaks: How to Edit an eBay Listing Like a Pro
Common Mistakes to Avoid When Making Outlines
Making effective outlines calls for a little bit of finesse. These are the common traps that you should watch out for:
- Overusing Bright Colors: Bold colors can be distracting. Instead, pick colors that enhance the image without overwhelming it.
- Making the Outline Too Thick: While a thick outline can work for certain designs, it can look heavy or unpolished in others. Try a few thicknesses to see what suits the design best.
- Using Mismatched Colors: Avoid colors that clash with the main image. Opt for complementary or neutral tones that blend well.
- Neglecting Image Quality: Low-resolution images can appear pixelated when outlined. Use high-resolution images for a professional finish.
- Ignoring Canva's Alignment Tools: An outline won’t look right if the image isn’t centered. Use Canva’s alignment guides to ensure everything is positioned correctly.
In order not to ruin your design, avoid these typical mistakes while making your outlines. In the end, a little effort that will take no time at all could really affect the whole picture; especially when compared with how other people would have done it.
Also Read This: Can You Be Banned From YouTube? Reasons and Preventive Tips
FAQs about Creating Image Outlines in Canva
Canva provides guide lines for drawing shapes often in questions concerning how to make outlines for pictures.
1. Can I outline any image in Canva?
Absolutely, Canva gives you the ability to add outlines on most images including those uploaded by you or obtained from the image bank of Canva. Just tap on preferred effects and they will transform your photo in to an outline style.
2. How do I change the outline color?
Once you pick an outline effect, such as “Glow” or “Shadow”, you can change its color. By using the handy color picker of Canva, it is possible to get the desired brand colors or even develop a personal style within the design.
3. Is it possible to adjust the outline thickness?
Indeed, there are options for outline thickness in Canva. By changing the settings in “Glow” or “Shadow” effect, you can adjust the outline to be more or less thick depending on what fits your design style best.
4. Can I add multiple outlines to the same image?
Although Canva does not directly allow for multiple outlines, a layered effect can be achieved by duplicating the image and using different outline effects on multiple layers. In this way, you create more detail in your outlines.
5. Does Canva’s free version support image outlines?
Indeed, Canva's free version allows for some rudimentary outlining features like the “Glow” and “Shadow” effects. On the other hand, there is more flexibility with Canva Pro, hence greater control over your designs.
6. How can I make the outline more subtle?
The outerline will become less edged, once the transparency levels or blur settings have been altered in this effect. This results in an outline with a reduced intensity which suffices when it comes to minimalistic kinds of design.
Conclusion on Designing Outlines in Canva
Imagine outlines of images in Canva as a really easy way of improving one’s visuals. You can add a classy and interesting border to any picture using various options that you can customize. After reading the steps and tips given by this article, you will find it easy to create outlines that give your designs an elegant finish with good looks.
 admin
admin


