Storage device copies that are as accurate as an image in a mirror are called disk images. All data, parameters, and settings are saved in them. Disk images serve many purposes such as data backup and system recovery. With a disk image, your files are safe hence easy to restore in case of failure or if you want to shift them to another computer.
Look at that disk image as if it was a picture of your whole system. It retains everything: from the operating system to applications down to personal files. Therefore, when any issues arise such as a hardware malfunction or a virus invasion, you can quickly revert back to an earlier state of your computer.
Just a few motives disk photographs are highly significant:
- Data Recovery: Easily recover files after accidental deletion or corruption.
- System Migration: Transfer your entire setup to a new computer without hassle.
- Backup Solution: Keep a complete backup of your system to prevent data loss.
- Testing and Experimentation: Create copies for testing software without affecting your primary system.
Types of Disk Images Available
According to various circumstances, you can create many different disk images. Consequently, it is essential to know all these types well enough so as to select the best for your case. Therefore, below are common varieties:
- ISO Images: Typically used for CDs and DVDs, they capture the entire contents of the disk.
- DMG Files: Common on Mac systems, these are used for software distribution.
- IMG Files: Generic disk image files used across various operating systems.
- VMDK Files: Used primarily for virtual machines, allowing for easy migration and management.
Choosing the right type depends on what you are looking for. For instance, if you wish to back up a physical drive, an ISO or IMG might be the most appropriate. When dealing with virtual machines, however, you should stick to using VMDK.
Choosing the Right Disk Image Software

Selecting an appropriate Disk Image Software from a multitude of options available could be confusing but it can be made easier by taking into account some essential factors. Below are some common examples:
- Clonezilla: A free, open-source tool that's great for disk cloning and imaging.
- Acronis True Image: A paid software known for its user-friendly interface and powerful features.
- Macrium Reflect: Offers a free version with essential features, perfect for home users.
- EaseUS Todo Backup: A comprehensive solution for backup and recovery tasks.
It is essential to consider the following factors when selecting software:
- Ease of Use: Look for a user-friendly interface that simplifies the process.
- Compatibility: Ensure the software works with your operating system.
- Features: Check for features like scheduling, incremental backups, and recovery options.
- Support: Reliable customer support can be helpful if you run into issues.
Take time to look into and select a program which will be most suitable for your requirements, as well as for the amount of technical expertise you possess.
Step by Step Guide to Creating a Disk Image
At first glance making a disk image seems like rocket science, but believe me; it is not that complicated. Regardless of whether you use Acronis true image or Clonezilla as your software of choice for creating disk images, the procedures involved will be pretty much the same. For this reason, below is a step by step guide for easy creation of disk images:
- Choose Your Software: Pick a disk imaging software that suits your needs. Make sure it’s compatible with your operating system.
- Install the Software: Download and install the chosen software on your computer.
- Connect External Storage: If you’re backing up your data, connect an external hard drive or USB stick to store the disk image.
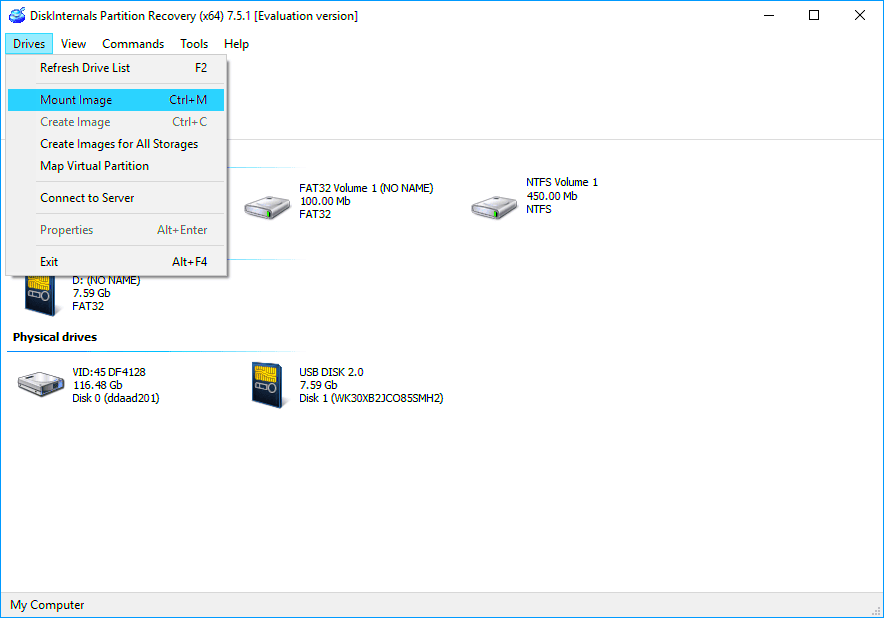
- Open the Software: Launch the application and navigate to the option for creating a disk image.
- Select the Source: Choose the drive or partition you want to create an image of. This could be your main drive or a specific partition.
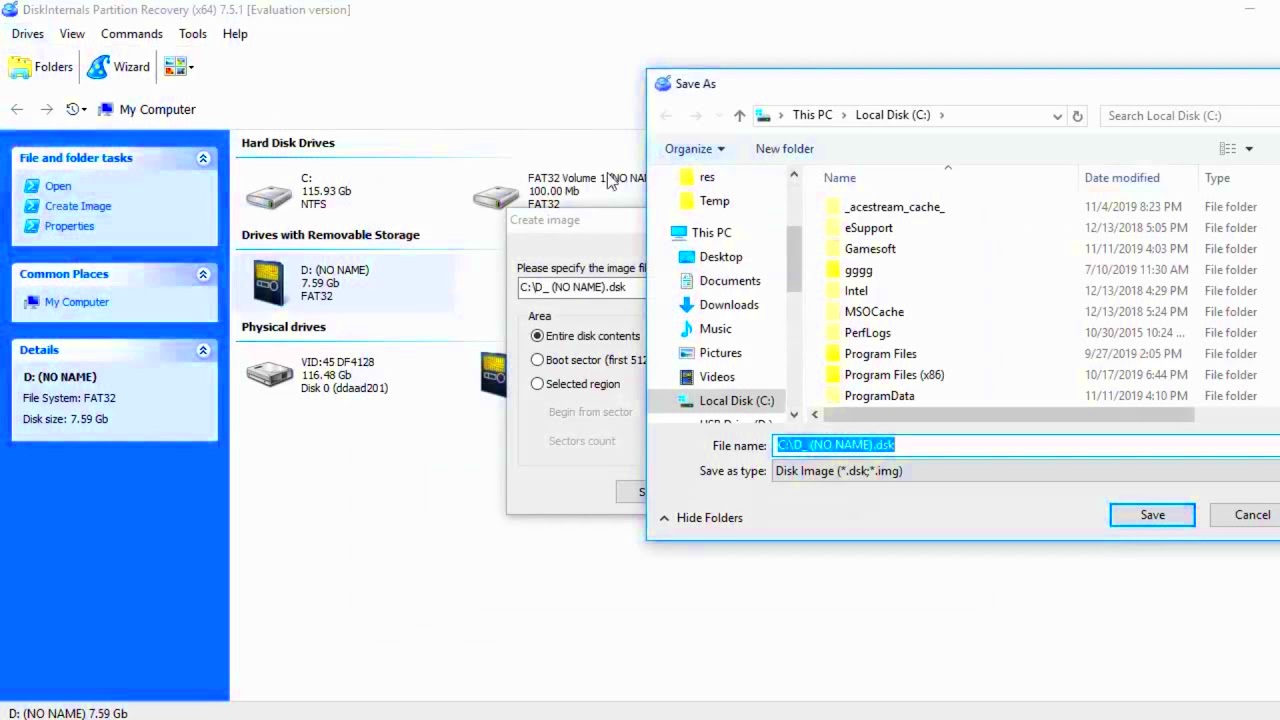
- Choose Destination: Select where you want to save the disk image (your external drive or another location on your computer).
- Adjust Settings: Some software allows you to tweak settings like compression and encryption. Adjust these according to your needs.
- Start the Process: Click the button to create the disk image. Depending on the size of the data, this might take some time.
- Verify the Image: After creation, check the image file to ensure it was created correctly. We'll cover this in detail in the next section.
There you go! You can now create images of disks like an expert if you follow these steps.
Common Mistakes to Avoid When Creating Disk Images
While creating disc images appears easy at first sight, there exist some offshoots which could lead to snags. Below are some of the mistakes that are easily avoidable:
- Not Verifying the Image: Failing to check that your disk image was created correctly can lead to problems when you need to restore it.
- Ignoring Software Updates: Using outdated software can lead to bugs or compatibility issues. Always keep your disk imaging software updated.
- Not Choosing the Right Destination: Make sure to select a reliable external storage device for your disk image. Avoid using your main drive for backup.
- Skipping Compression: If your software offers compression options, use them! This helps save space without losing data quality.
- Overwriting Existing Images: Be cautious when naming your disk images to avoid accidentally overwriting important backups.
- Neglecting Scheduling Backups: Set a regular schedule for creating disk images. It’s easy to forget if you don’t have a reminder.
Such that you will have a smoother procedure in case of creation and restoration of disk images, these mistakes should be avoided.
How to Verify Your Disk Image
One of the most important steps after image disk is created is to check its consistency, so as to ascertain that the backup will be available when needed. In this section, you will learn how to do that:
- Check File Size: Compare the size of the created image file with the estimated size from the software. If it’s significantly smaller, something might have gone wrong.
- Use Built-in Verification Tools: Many disk imaging software packages include a verification feature. Use it to check the integrity of your disk image.
- Test Restore: If possible, test restoring the disk image to a separate drive or a virtual machine. This confirms that the image works as intended.
- Check File System: If your software allows, run a file system check on the disk image. This can catch any errors or corruption.
It is an important action which can help you know your backup disk really contains correctly made copies of a file or files that are on the original hardware. Always keep in mind this fact: better to prevent than to be regretting!
Frequently Asked Questions about Disk Images
In reference to disk images, a significant amount of people have similar inquiries. These are some frequently asked questions that might assist in clearing doubts:
What is a disk image?
A disk image is a precise replication of a storage device, containing the O.S, programs, and every of your private files. It is an all-encompassing picture that can be utilized for storage backup, restoration or transference.
How do I create a disk image?
Disk images can be created through different kinds of software. Typically, you select the source drive, select where you would like to put this image and then begin making it. For detailed information, refer to above sections.
Can I use a disk image to restore my system?
Most certainly! You can use a disk image to return your system to the exact state it was at the time when the image was generated. This can help in cases of hardware failure, malware infection or accidental file deletion.
How long does it take to create a disk image?
[How long does it take to create disk images and what are some factors that can influence that?]Different factors like size of data being imaged as well as speed of storage devices affect how long it takes to create a disk image, but you could expect anywhere between some minutes to few hours for that to happen.
Is it safe to store disk images on an external drive?
Independently one ranks as unclear and alters quite as much, on an external hard drive disk images should be stored because it is a secure and fruitful way of advancing such regimen. It is always advisable to have dependable drives and regularly check your disk images.
What if my disk image is corrupted?
Always check your disk images after creating them; otherwise you will not be able to restore it effectively if something goes wrong with the disk image. Make sure to also have several copies and that they are kept at various places.
Conclusion and Final Thoughts
Generating and administering disk images is an important aspect of preserving your virtual existence. If you visualize the way how things work and steer clear of possible issues, the safety of your information is assured; therefore it can be retrieved without problems when need arises. Whether you want to back up significant files or transfer a system to new hardware, having a dependable disk image can help save time, anxiety and maybe prevent data loss altogether. Always remember to generate as well as check your disk images regularly in order that your information remains safe.
 admin
admin


