Have you ever wanted to showcase your favorite photos in a unique way? Creating a picture frame with paper is not only a fun craft project, but it also allows for a personal touch that store-bought frames can't match. In this guide, we’ll walk you through the simple steps to craft a beautiful paper picture frame that you can customize to fit any décor or occasion. Let’s dive right in!
Materials Needed for Your Paper Picture Frame
Before we get started, let’s gather everything you need to create your picture frame. The great thing about this project is that the materials are usually easy to find and inexpensive! Here’s a comprehensive list:
- Cardstock or Construction Paper: Choose a color or pattern that you love. This will be the main material for your frame.
- Scissors: A pair of sharp scissors will help cut your paper accurately.
- Glue or Double-Sided Tape: This will secure the different parts of your frame together.
- Ruler: For measuring and ensuring your cuts are straight and even.
- Pencil or Pen: Use this for marking measurements on your paper.
- Decorative Items (optional): Think washi tape, stickers, or embellishments that can add a personal flair.
- Picture or Artwork: Don’t forget the star of the show! Choose a photo or piece of art you want to frame.
Now that you have all your materials ready, you're well on your way to creating a stunning picture frame. Make sure to set up a comfortable workspace; you’ll want enough room to spread out your materials and work without feeling cramped. It can get a little messy, especially if you get into decorating your frame, so don’t hesitate to lay down some newspaper or a craft mat to protect your work surface.
In the next steps, we’ll explore how to measure, cut, and assemble your frame. Trust me, this is going to be a fun and satisfying project! Let's get crafting!
Also Read This: Exploring Dailymotion’s Free Usage Options: Is It Really Free to Use?
3. Step 1: Preparing Your Paper
Before diving into the fun part of crafting your picture frame, it's essential to prepare your paper properly. This step sets the foundation for a sturdy and visually appealing frame. Here's how to get started:
- Choose Your Paper: Decide on the type of paper you'd like to use. You can go for colored cardstock, patterned scrapbook paper, or even recycled paper. The options are endless, so pick something that complements your photo!
- Gather Your Materials: You will need sharp scissors, a ruler, a pencil, and a cutting mat if you have one. It’s also handy to have a craft knife or a paper trimmer for more precise cuts.
- Measure and Mark: Once you’ve selected your paper, measure the size of the photo you plan on framing. Add some extra space around the edges for the frame itself (usually around 1 to 2 inches depending on your design). Use a ruler to mark the dimensions on the paper with a pencil.
- Choose a Background: If you’re planning to add a decorative background behind your frame, you can choose another sheet of paper for this. Make sure its dimensions are slightly larger than your frame pieces to create a lovely mat effect.
Preparing your paper is all about ensuring you have everything in place to make the cutting process smooth. Take your time here, as a little patience will pay off big time in the next steps!
Also Read This: How to Improve Urdu Handwriting with Easy Techniques
4. Step 2: Cutting the Frame Pieces
Now that your paper is prepped and ready, it’s time to cut your frame pieces! This is where your design starts to take shape. Follow these steps to achieve clean and accurate cuts:
- Cutting the Outer Frame: Using your ruler and pencil marks, carefully cut the outer edges of your frame. If your frame width is 1 inch, your outer frame size will be the size of your photo plus 2 inches on each side. Use sharp scissors or a craft knife for precision. If you're using a craft knife, make sure to apply even pressure as you go.
- Creating the Inner Opening: For the inner opening where your photo will fit, measure in from each edge of the outer frame piece the width of your frame (1-2 inches). Use your ruler to mark a smaller rectangle in the center. This part can be tricky, so take it slow! Cut carefully around the inner rectangle to create the opening.
- Repeat for Additional Frame Pieces: If you’re planning to add layers to your frame or want a double-matted look, repeat these cutting steps for any additional frame pieces. Remember, you can mix and match colors and patterns to make the frame uniquely yours!
- Inspect Your Cuts: After cutting, take a moment to inspect all your edges. If you find any rough spots, you can use fine-grit sandpaper to smooth them out or trim them with scissors. A good finish makes all the difference!
And there you have it! You’ve successfully cut your frame pieces, and now you're one step closer to completing your beautiful paper picture frame. In the next steps, we'll see how to assemble everything and add those finishing touches to make your item truly special. Stay tuned!
Also Read This: How to Make Crochet Baby Frocks with a Fun DIY Tutorial
5. Step 3: Assembling the Picture Frame
Now that you've cut all your pieces to size, it's time to put everything together! This part is where your creativity begins to shine as you assemble your unique picture frame.
Before diving in, gather your materials:
- Adhesive (liquid glue, glue sticks, or double-sided tape)
- Scissors (for any small adjustments)
- Your well-prepared cut pieces for the frame
- Optional: a ruler and pencil for accuracy
Follow these simple steps to assemble your frame:
- Lay Out Your Pieces: Start by laying out the cut pieces of your frame flat on a clean, sturdy surface. Make sure the shapes and sizes match perfectly. This will help you visualize how your finished frame will look.
- Start with the Sides: Take two of the longer pieces (the vertical sides) and apply a small amount of adhesive along one edge. Press them together at a right angle to form a corner. Hold for a few seconds to ensure they stick well.
- Attach the Top and Bottom: Now, take the shorter pieces (the horizontal sides) and repeat the process. Attach the top piece first, making sure it’s flush with the edges of the vertical sides. Then do the same for the bottom piece. Don't rush—ensure each corner is secure. You can use clips or rubber bands to hold them in place while the glue dries.
- Check Your Frame: Once all pieces are assembled, take a moment to check if everything is even and aligned. If you notice any gaps or shifts, carefully adjust the pieces while the adhesive is still wet.
- Let it Dry: Follow the instructions on your adhesive for drying times. It’s usually best to leave your frame undisturbed for at least an hour to ensure a solid hold.
And just like that, you have the basic structure of your picture frame! You might want to give it a gentle shake to make sure everything is solid before moving on. Sounds simple, right? A little patience goes a long way in this step.
Also Read This: Enhance Your Appearance by Growing Strong Nails Naturally
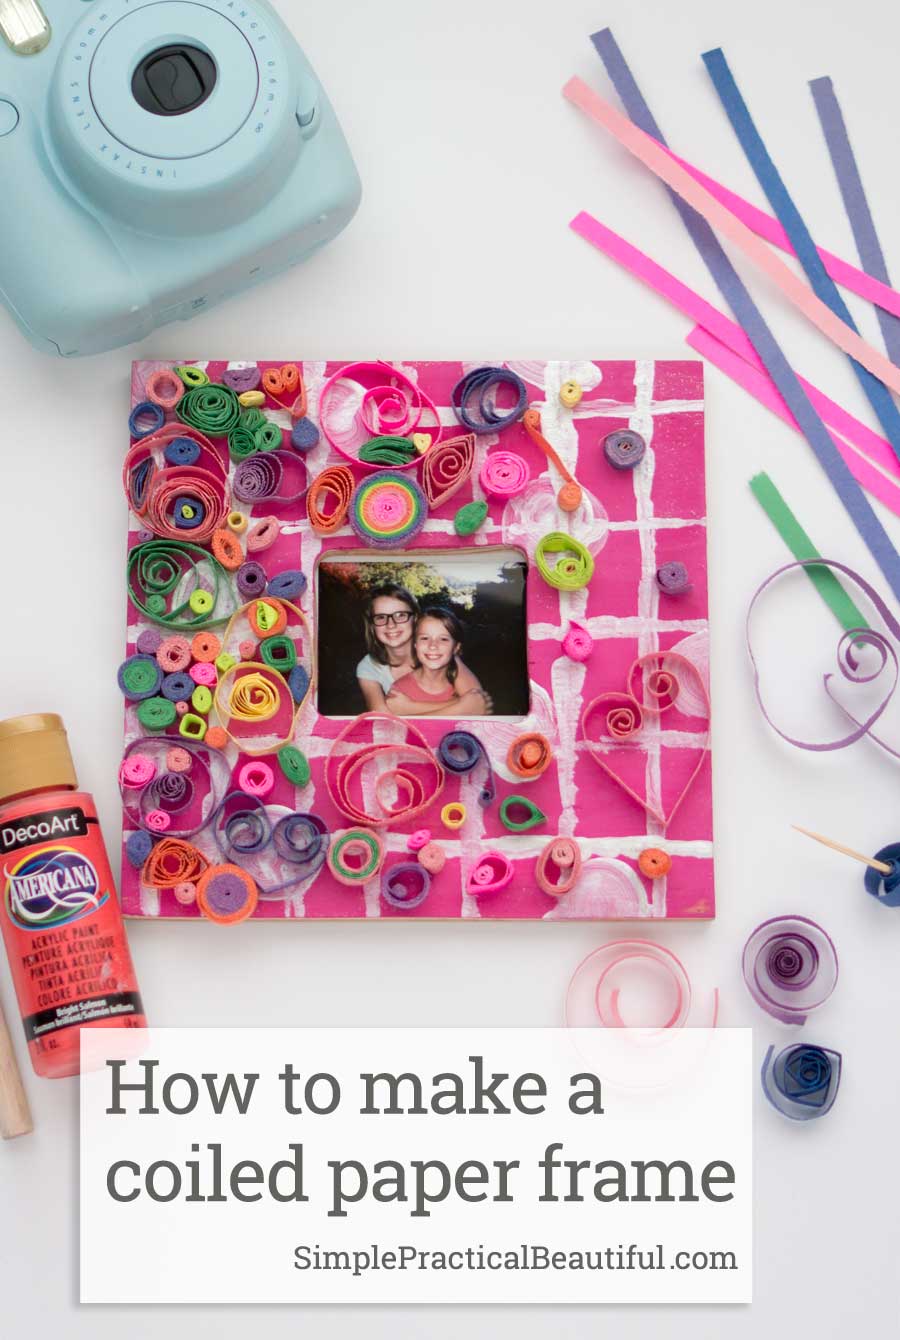
6. Step 4: Decorating Your Frame
Congratulations! Your frame is assembled, and now it’s time to make it truly yours. Decorating your frame is where you can let your personality shine through. Here are some creative ideas to get you started:
1. Paint It!
One of the easiest ways to personalize your frame is to give it a fresh coat of paint. Choose a color that complements your décor or matches the photo you plan to display. Use acrylic paint for a smooth finish. Just remember to paint in even strokes and allow it to dry completely.
2. Add Patterns with Paper
If you love patterns, consider decoupaging the frame with decorative paper. Cut out shapes or strips from patterned scrapbook paper, and use a glue medium to adhere them to your frame. This is a perfect way to incorporate designs like floral prints or geometric patterns!
3. Use Natural Elements
For a more rustic look, think about adding natural elements like twigs, leaves, or dried flowers. You can glue these carefully to the corners or along the edges of your frame. It gives your frame an earthy, organic feel that’s perfect for nature lovers.
4. Embellish with Other Materials
Consider using buttons, beads, or yarn to add texture and interest. Glue these decorations around the edges of the frame or create a unique design. Mix and match materials for a playful touch!
5. Write a Quote or Message
If you want to make your frame even more special, consider painting or writing a meaningful quote or message directly onto the frame. This adds a personal touch and can evoke fond memories every time you see your picture.
Once you’ve finished decorating, allow everything to dry again. Now, find a beautiful photo to display, insert it into your frame, and find the perfect spot on your wall or desk. With all your hard work, you’ve created a stunning piece of art that showcases your cherished memories! So, what are you waiting for? Grab your supplies and start decorating! The possibilities are endless!
Also Read This: Step-by-Step Guide on How to Upload a Linked Video to Dailymotion
7. Step 5: Adding Your Picture
Now that you have your beautiful paper frame ready, it’s time to add your picture! This is where all your hard work pays off, and you get to showcase your favorite memories or artwork. Here’s how to do it smoothly:
- Choose Your Picture: Pick a photograph, artwork, or even a piece of decorative paper that you want to display in your frame. Make sure it complements the colors and design of the frame you’ve created.
- Trim If Necessary: If your picture doesn’t fit perfectly into the frame, don’t worry! Use scissors to trim down the picture to size. Always cut a little bit at a time—you can always trim more, but you can’t add back what’s already cut!
- Secure the Picture: Place the picture face down on a clean surface. Apply double-sided tape or glue to the back of the picture, then carefully position it where you want it inside the frame. Press down gently but firmly to ensure it sticks well.
- Attach the Frame Back: If your frame has a backing, put it back on and secure it in place. If you’re using a frame without a backing, you can consider using a piece of clear contact paper to keep your picture secure.
- Final Touches: Take a moment to step back and admire your work. Check to make sure everything is aligned nicely. If you see any imperfections, you can adjust them now before you hang it up or place it on display.
And there you have it—your picture is now beautifully framed and ready to shine! Whether it’s a cherished family photo or a piece of your child’s artwork, it’s bound to bring smiles to everyone who sees it.
Also Read This: How to Do Splits on Dailymotion: Step-by-Step Flexibility Guide
8. Conclusion
Creating a picture frame with paper is not just a fun craft—it’s a wonderful way to personalize your space and showcase your favorite memories. By following these simple steps, you’ve turned a few materials into a stunning piece of art that reflects your creativity and style.
Remember, the beauty of DIY projects like this one is that you can customize your frame however you like! This is a fantastic opportunity for creativity, so don’t be afraid to experiment with different colors, patterns, and embellishments. Here are a few tips to keep in mind:
- Experiment with Textures: Try using different types of paper, such as cardstock, wrapping paper, or even old book pages for a vintage look.
- Embellishments: Add ribbons, stickers, or even small decorations to give your frame a unique touch.
- Gift It: Handmade frames make great gifts! Personalize a frame for a friend or loved one, and fill it with a special photo that holds sentimental value.
So gather your materials, channel your inner artist, and enjoy the process! Whether you're crafting alone or with friends and family, making a picture frame can be a delightful experience. Happy crafting!
Also Read This: How to Download Password-Protected Videos from Dailymotion
9. Tips and Tricks for a Perfect Paper Frame
Creating a picture frame from paper is a fun and rewarding craft, but it does come with its own set of challenges. Here are some tips and tricks to help you achieve a flawless finish:
- Choose the Right Paper: Opt for thicker paper, like cardstock, for a sturdier frame. This will ensure that your frame holds its shape and can support the weight of the pictures.
- Use a Cutting Mat: If you're using a craft knife, protect your surfaces by cutting on a mat. This not only keeps your workspace neat but also gives you cleaner cuts.
- Measure Twice, Cut Once: Before making any cuts, double-check your measurements. This old adage is golden! Accurate measurements prevent wasting materials.
- Embrace Double-Sided Tape: When assembling your frame, double-sided tape can be a lifesaver. It provides a clean, mess-free adhesion that glues without the risk of showing signs of traditional glue.
- Decorate Your Frame: Don’t stop at just making the frame! Consider adding embellishments like washi tape, stamps, or even stickers. These additions can bring a personal touch that makes your frame unique.
- Ventilation is Key: If you're using any spray adhesives or sealants, make sure you work in a well-ventilated area. Safety first!
- Secure It Well: When placing your picture in the frame, ensure that it’s held securely. Use corners or tabs inside the frame to keep your picture in place.
- Get Creative with Shapes: While squares and rectangles are classics, don’t be afraid to try circular or even heart-shaped frames. They can add a fun twist to your decor!
- Practice Patience: One of the art's most important aspects is taking your time. Enjoy the process; crafting is as much about the journey as it is about the final product.
With these tips in mind, you’ll be well on your way to crafting stunning paper frames that not only showcase your favorite photos but also your creativity!
10. Where to Find More Crafting Ideas
If you're feeling inspired and ready to dive into more creative projects, the good news is that resources are plentiful! Here are some great places to find more crafting ideas that will keep your artistic juices flowing:
- Pinterest: This platform is a treasure trove of DIY ideas. Simply search for “paper crafts” or “DIY picture frames” to explore countless tutorials and inspiration boards.
- Instagram: Following crafty accounts and hashtags like #PaperCrafts can expose you to innovative designs and methods shared by fellow enthusiasts.
- Craft Blogs: Websites like Craft Gawker or Creativebug offer a range of craft ideas, from beginner to advanced levels.
- YouTube: Video tutorials can be incredibly helpful, especially for visual learners. Channels dedicated to crafting often provide step-by-step guides to various projects.
- Local Craft Stores: Many stores host workshops or classes. Participating in these can not only expand your skills but also connect you with like-minded individuals.
- Facebook Groups: There are many crafting communities where members share their projects, tips, and even challenges to inspire one another.
By exploring these platforms, you’ll discover a variety of creative ideas that can spark your imagination and keep your crafting passion alive. Whether it’s a rainy day or you’re looking for a weekend project, you’ll always have something fun to create!
 admin
admin


