Contouring is an art that can beautifully enhance the natural structure of your face, and if you have a square face shape, you’re in luck! This guide will walk you through simple and effective techniques tailored specifically for square faces. From the basics of face shape understanding to the best products and techniques, you’ll soon be mastering the contouring game. Let’s dive into what makes a square face unique and how to work with it for stunning results!
Understanding Square Face Shapes

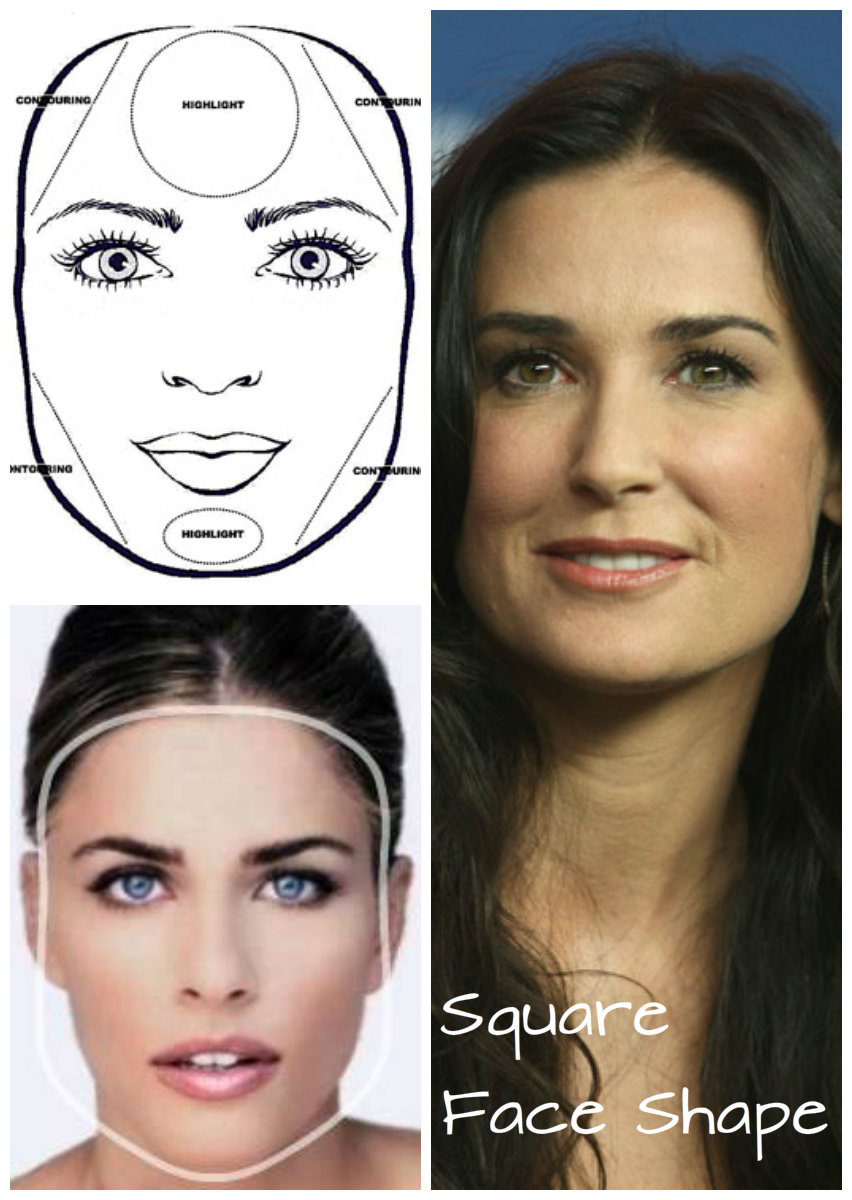
First things first, let’s break down what defines a square face shape. Square faces are typically characterized by:
- Strong Jawline: The jawline is prominent and angular, creating a squared appearance.
- Equal Width and Length: The forehead, cheeks, and jawline are generally about the same width, giving a balanced look but lacking softer curves.
- Flattened Cheekbones: While square faces have good volume in the cheeks, they don’t tend to protrude as much as in other face shapes.
Because of these features, square faces can sometimes appear more angular, making contouring all the more important to add dimension and softness. With the right techniques, you can enhance your natural beauty while softening the intense angles of your face.
When contouring a square face, the goal is to create the illusion of length and reduce the prominence of the jawline. Think of it like sculpting: by using darker shades to create shadows and lighter shades to highlight, you can achieve a more oval-shaped appearance. Ready to explore the essentials of contouring? Let's get started!
Also Read This: Using Getty Images Images on YouTube: Guidelines for Incorporating Copyrighted Content
Essential Makeup Tools for Contouring

Before diving into the artistry of contouring, it's crucial to have the right tools in your makeup kit. Using the appropriate tools not only makes the process easier but also ensures a polished finish. Here’s a detailed list of essential makeup tools you’ll need for contouring your square face:
- Contour Stick or Powder: Choose a contour product that suits your skin type. Cream-based products are great for a more blended look, while powders can add depth and structure.
- Highlighter: A good highlighter is key to bringing light to your features. Look for one that complements your skin tone—whether that’s frosty, golden, or something in-between.
- Makeup Brushes: You’ll need a range of brushes for different uses. A flat brush for applying contour, a fluffy brush for blending, and a fan brush for highlighter are excellent starters.
- Beauty Blender or Sponge: This little tool works wonders for blending out cream products seamlessly. Dampen it for a more natural finish.
- Mirror: A good, well-lit mirror is essential for detailed work, allowing you to see what you’re doing from different angles.
Having the right makeup tools will not only enhance your contouring game but will also make the experience enjoyable. It’s like having a toolbox filled with everything you need—you wouldn’t go to a job without them!
Also Read This: How to Create 1×1 Images
Step-by-Step Contouring Techniques

Now, let’s get to the fun part—contouring your square face! Below is a straightforward, step-by-step guide that breaks down the process for you:
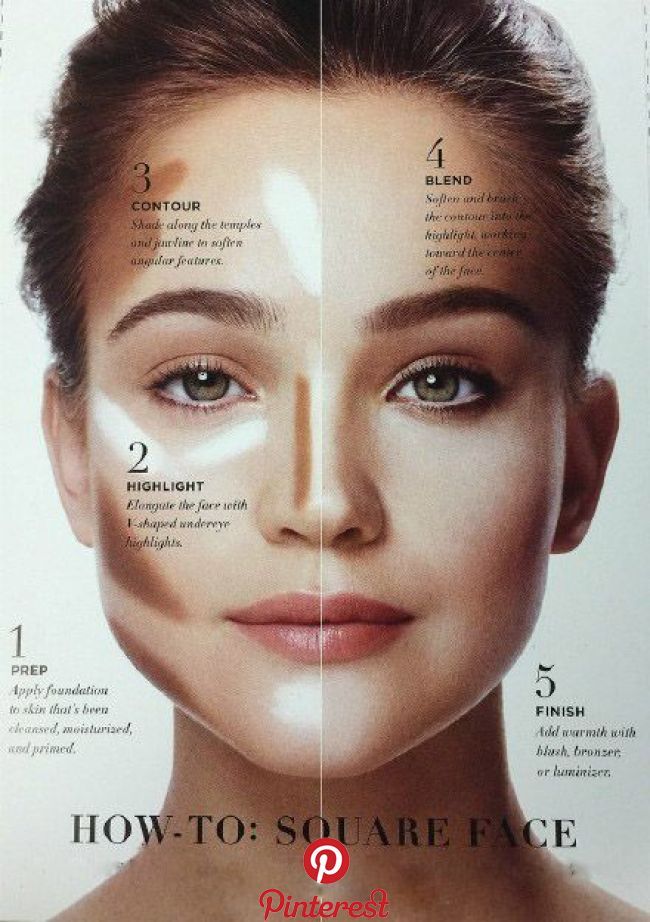
- Prep Your Skin: Start with a clean, moisturized face. Apply a primer to ensure that your makeup goes on smoothly and lasts longer.
- Choose Your Contour Product: Decide whether you’ll use cream or powder based on your preference. For beginners, cream can be easier to blend.
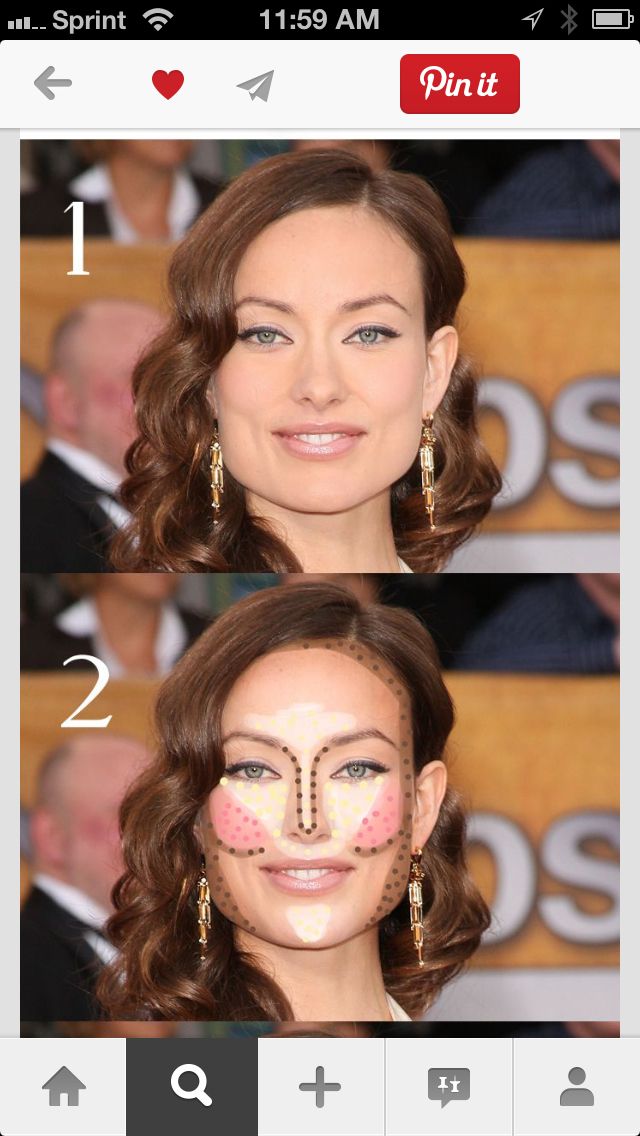
- Identify Key Areas: For a square face, focus on softening the jawline and the forehead. It helps to contour along the temples and under the jawline to create a more oval appearance.
- Apply Contour: Using your contour product, draw lines along your jawline, along the sides of your forehead, and down the sides of your nose if desired. Use a light hand; you can always build up more if needed.
- Blend, Blend, Blend: Use your beauty blender or a fluffy brush to blend the contour lines so that they seamlessly merge with your skin. Avoid harsh lines!
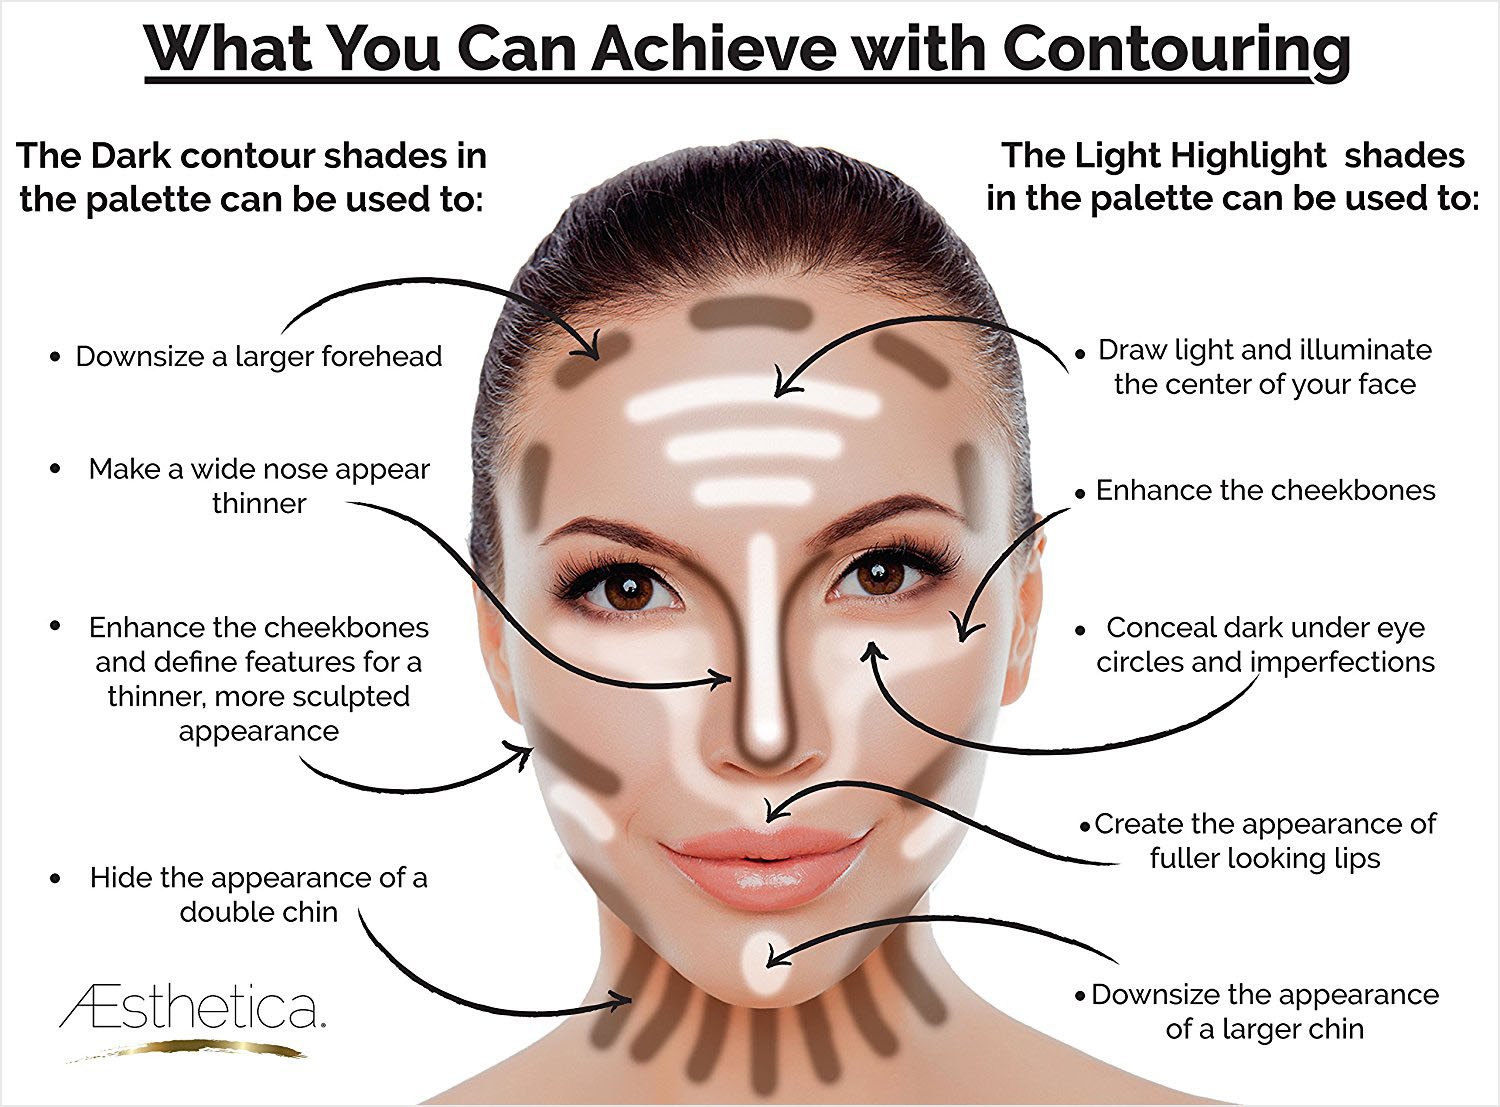
- Highlight: Apply your highlighter on areas you want to bring forward—this could be the tops of your cheekbones, the bridge of your nose, and the center of your forehead.
- Finish with Blush: To add some color back to your face, add a dab of blush on the apples of your cheeks and blend it towards your temples.
Contouring can take a bit of practice, so don’t be discouraged if it doesn’t turn out perfectly right away. With these steps, you'll be on your way to mastering the contour on your square face!
Also Read This: How to Upload a YouTube Banner
Choosing the Right Products

When it comes to contouring a square face, selecting the right products is key to achieving that flawless look. With so many options out there, it can be a bit overwhelming, but fear not! Let’s break it down.
First off, you want to consider the *formulation of your products:
- Creams: Great for dry skin, creams offer a dewy finish and blend seamlessly into the skin.
- Powders: Ideal for oily skin types, powders help control shine and provide a matte finish.
- Sticks: Super convenient for on-the-go touch-ups and easy application, suitable for all skin types.
Next, don’t forget to focus on the shades you choose:
| Purpose | Contouring Shade | Highlighting Shade |
|---|---|---|
| Sculpting Jawline | Cool-toned brown or taupe | Soft peach or champagne |
| Emphasizing Forehead | Warm bronzer | Bright beige with shimmer |
| Defining Cheeks | Mid-toned, neutral brown | Light pink or cream |
Lastly, ensure that the products are long-lasting and blendable. Remember, well-blended makeup spells the difference between a harsh line and a beautiful contour!
Also Read This: Creative Visual Tips for Adding Notebook Images to Your LinkedIn Posts
Blending and Highlighting Tips
Once you've selected your contouring and highlighting products, the next crucial step is mastering the art of blending. Blending can make or break your makeup look, especially when contouring a square face. Here are some tips to make blending a breeze:
- Use the Right Tools: A good makeup sponge or brush can be your best friend. Sponges are great for cream products, while brushes work wonders for powders.
- Work in Sections: Don’t try to blend everything at once. Focus on one area at a time, like your cheeks or jawline. This approach helps avoid muddying your makeup.
- Start Light: Apply your contour or highlight lightly at first; you can always build up to your desired intensity. Remember, less is more!
When highlighting, think about the areas you want to pop:
- Cheekbones: Apply highlighter to the top of your cheeks.
- Persistent Brow Bone: A dab here can lift your features.
- Nose Bridge: For a slimmer appearance, highlight down the center of your nose.
The key to seamless blending and highlighting lies in patience and practice. Don't rush the process; take your time to ensure everything melds together for that stunning, sculpted look.
Also Read This: How to Wrap Text Around an Image in Canva
7. Common Mistakes to Avoid
When it comes to contouring a square face, even seasoned makeup lovers can make a few blunders. Avoiding these common mistakes will help you achieve that perfect, sculpted look and boost your confidence. Here are some pitfalls to steer clear of:
- Over-Contouring: It’s easy to go overboard, especially when you’re trying to define those angles. Remember, subtlety is key! Focus on blending your contour thoroughly to ensure a more natural appearance.
- Ignoring the Jawline: A square face often has a strong jawline. Failing to contour this area can make your face look less defined. Lightly contour the jawline to soften its appearance.
- Choosing the Wrong Shades: Selecting contour and highlighter shades that are too dark or too light for your skin tone can lead to an unnatural look. Stick to shades that are one to two tones darker or lighter than your natural complexion.
- Skipping Blush: Some people focus solely on contouring and neglect blush. Adding a pop of color to your cheeks not only livens up your face but also detracts from any harsh lines left by contouring.
- Not Blending Properly: Harsh lines from contouring products scream “I’m wearing makeup!” Investing time in blending helps to create a seamless transition between your contour, blush, and highlighter.
- Forgetting to Set: Even if you spend time perfecting your contour, skipping the setting powder or spray can lead to makeup that wears off throughout the day. Always set your makeup for longevity!
Also Read This: how to knit images
8. Final Touches and Setting Your Makeup
Alright, you’ve done the hard work of contouring and highlighting your square face. Now it’s time for those all-important final touches! This is when everything comes together and you can ensure your makeup lasts all day. Here’s what to do:
- Blend, Blend, Blend: Once you’re happy with your contouring, take a clean beauty sponge or brush to go over your features again. Ensuring everything is well-blended will give you that flawless finish.
- Add the Perfect Lip Color: Choose a lip color that complements your look. Neutral nudes or bold reds can both work beautifully, depending on your mood and the occasion.
- Apply Highlighter Strategically: Use a finer applicator to apply highlighter to areas where you want a brightened effect: the tops of your cheekbones, the bridge of your nose, and your cupid's bow.
- Set the Makeup: To lock in your hard work, use a setting spray or a translucent powder. A setting spray can provide a natural glow, while powder is great for keeping shine at bay.
- Check Your Makeup in Different Lights: Natural lighting can be the most revealing. Step outside or near a window to check how your makeup looks. Adjust any areas if necessary!
In the end, the goal is to feel beautiful and confident. With these final steps, you’ll be ready to rock your gorgeous contour look all day long!
Complete Makeup Guide to Contouring a Square Face
Contouring is a powerful makeup technique that enhances the natural structure of your face. For individuals with a square face shape, contouring can soften the angles and add dimension, creating a more balanced appearance. This guide provides you with all the essential steps and tips to master contouring for a square face.
Understanding Square Face Shape
A square face is characterized by a strong jawline, broad forehead, and equal width at the forehead, cheeks, and jaw. Your goal in contouring is to create the illusion of length, soften the strong features, and bring attention to the eyes and lips.
Essential Tools and Products
- Contouring Cream or Powder: Choose 1-2 shades darker than your skin tone.
- Highlighter: Opt for a pearlescent or shimmering finish to add brightness.
- Blending Brush or Sponge: For seamless blending.
- Foundation*: Your regular foundation to create a smooth canvas.
Step-by-Step Contouring Process
| Step | Technique |
|---|---|
| 1 | Apply foundation all over your face for an even base. |
| 2 | Use contour cream/powder to define the jawline and temples. |
| 3 | Lightly contour the sides of your forehead to reduce width. |
| 4 | Apply highlighter to the center of your forehead, the tops of your cheekbones, and the bridge of your nose. |
| 5 | Blend well for a natural finish and add blush to the apples of your cheeks. |
Final Touches
Finish your look by applying a bold lipstick to draw attention to your lips, complementing your stunning contoured face. Remember, the key to effective contouring is blending well for a flawless look.
Conclusion: Contouring a square face involves strategic application of products to soften strong angles and elongate the overall appearance. With the right techniques and tools, you can achieve a beautifully sculpted look that enhances your natural beauty.
 admin
admin


