Clipping an image to a shape in Photoshop is a powerful technique that allows you to creatively display an image within any shape you desire. Whether you're working on a logo, design project, or simply want to add a unique touch to your photo, this method provides endless possibilities. The process involves using a clipping mask, which lets the
Understanding the Basics of Clipping Masks

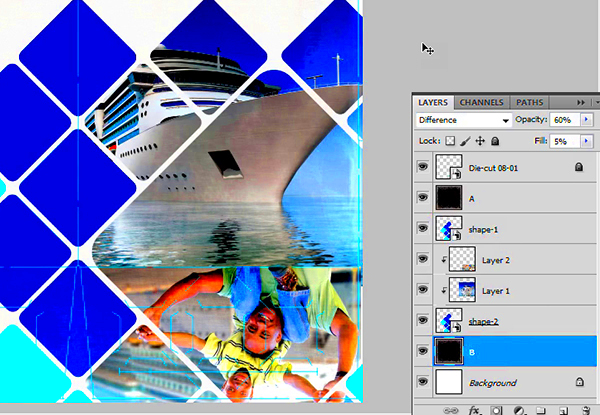
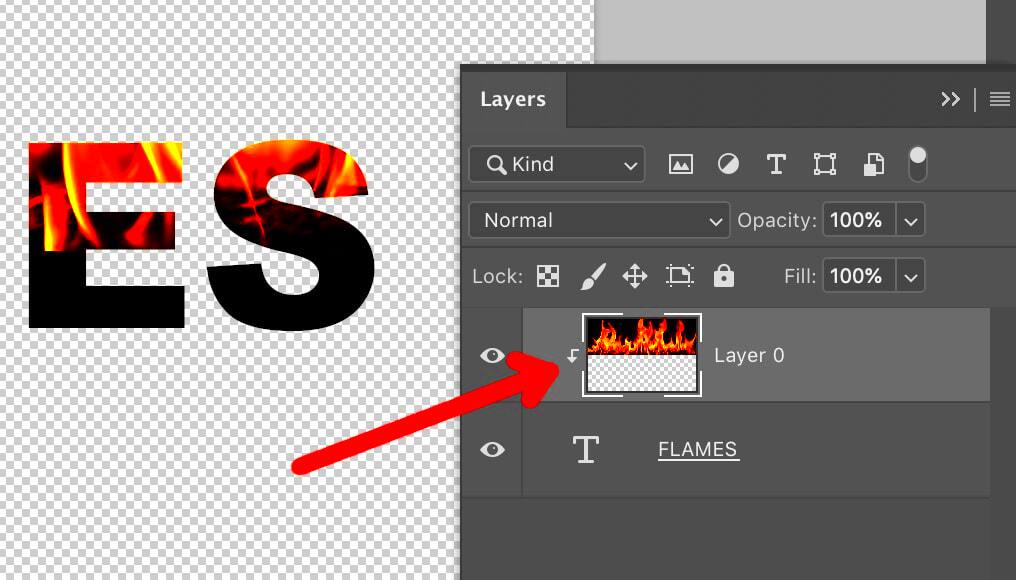
Clipping masks are one of Photoshop’s most useful tools when it comes to working with layers. The basic idea behind a clipping mask is simple: one layer is clipped to the shape of the layer beneath it. This means the top layer will only be visible in the areas where the bottom layer (the shape) is present. You can use any layer as the "mask," but typically, you’ll use a vector shape or text as the mask. The image will conform to the boundaries of that shape, creating a clean, professional result.
To use a clipping mask, you’ll need two layers: one for the image you want to clip and one for the shape you want the image to fit into. When applied correctly, clipping masks allow for non-destructive editing, meaning you can adjust the
- Top Layer: The image or content you want to clip.
- Bottom Layer: The shape or object that will serve as the clipping mask.
Also Read This: How to Prove Licensing for Adobe Stock Images
Steps to Create a Clipping Mask in Photoshop

Creating a clipping mask in Photoshop is a straightforward process. Follow these simple steps to clip an image to a shape:
- Step 1: Open your image and shape layers. Ensure the shape you want to use for the clipping mask is positioned below the image layer.
- Step 2: Select the image layer (the top layer) in the Layers panel.
- Step 3: Right-click on the image layer and choose "Create Clipping Mask" from the dropdown menu.
- Step 4: Your image will now be clipped to the shape beneath it, and it will only appear within the boundaries of the shape.
Now you can adjust the position of the image, resize it, or even change the shape without affecting the clipping mask. This method is highly flexible and allows for easy edits in your design process.
Tip: If you want to release the clipping mask, simply right-click on the image layer and select "Release Clipping Mask." This will return the image to its original state.
Also Read This: How to Sell Your Images on Getty
Choosing the Right Shape for Your Image
Choosing the right shape for your image is a crucial step in the clipping process. The shape you use will not only determine the visual appeal of your design but also guide the overall look and feel of your project. Whether you want to clip your image into a circle, square, heart, or any other custom shape, the choice should align with your creative vision.
Here are some things to consider when choosing the right shape:
- Purpose of the Design: Think about what message you want to convey. A clean, simple shape like a square or circle is often best for professional designs, while more complex or creative shapes might be better suited for fun, casual projects.
- Image Size: The shape should complement the image’s aspect ratio. For example, a wide landscape image works well with a rectangular or oval shape, while a portrait photo fits neatly into a circle or square.
- Branding: If you're working on branding or a logo, consistency is key. Choose shapes that match the tone of your brand. Simple geometric shapes like circles, squares, or triangles may be ideal for a modern, minimalistic brand, while something more intricate could work for a creative, playful brand.
- Visual Appeal: Some shapes are more eye-catching than others. Consider using unique or creative shapes to make your image stand out, but make sure it still looks balanced and visually pleasing.
Once you’ve considered these factors, experiment with different shapes in Photoshop to see what works best for your image and project.
Also Read This: How to Create a YouTube Short Video on Your iPad
Adjusting the Image After Clipping
After clipping an image to a shape, there are still several ways you can adjust the image to enhance the overall result. The clipping mask preserves the image's integrity, so you can modify it without affecting the shape. Here are some useful adjustments you can make:
- Move the Image Within the Shape: To reposition your image, select the image layer and use the move tool. You can drag the image within the clipped area to better fit the shape's boundaries.
- Resize the Image: If you need the image to cover more or less of the shape, use the transform tool (Ctrl + T on Windows or Command + T on Mac) to resize the image. Hold the Shift key while resizing to maintain the aspect ratio.
- Adjust Image Opacity: You can make your image more transparent by adjusting its opacity. This works well if you want to create a subtle effect or layer your image behind other design elements.
- Apply Image Effects: Use filters, such as Gaussian Blur or sharpening effects, to change the image’s look. These effects can help you match the style of your design or add emphasis to specific parts of the image.
- Change the Image’s Color: Use adjustment layers like Hue/Saturation, Brightness/Contrast, or Color Balance to tweak the colors of your image, allowing it to fit the tone of your design.
These adjustments give you full control over how your clipped image fits within the shape and help you achieve the desired look.
Also Read This: Explore How to Post on 9GAG from iPhone with This Simple Method
Tips to Enhance Your Clipped Images
Once you've clipped your image to a shape, there are several ways to enhance it further. These tips will help you take your design to the next level and ensure your clipped image stands out.
- Use Layer Styles: Layer styles, such as drop shadows, inner shadows, and strokes, can add depth and make your clipped image pop. Adding a subtle shadow effect can make the image appear more three-dimensional.
- Experiment with Gradients: Apply a gradient overlay to the clipped shape for a smooth transition between colors. This can give your image a more dynamic look and draw attention to certain parts of the design.
- Add Texture: To make your clipped image more visually interesting, consider adding textures like grain, paper, or fabric overlays. Textures can add richness to the image and make it feel more tactile.
- Combine Multiple Clipped Images: Use several clipped images together to create a collage or montage. This technique works well for mood boards or creative compositions, where different elements come together to tell a story.
- Use Masks for Fine-Tuning: If certain parts of the image don’t align well with the shape, you can use a layer mask to hide unwanted areas. Simply add a mask to the image layer and use a soft brush to erase or reveal parts of the image.
- Ensure Proper Contrast: Make sure your image stands out against the shape. Adjust the contrast, brightness, and saturation if needed to ensure the clipped image doesn’t blend too much into the background.
By applying these enhancements, your clipped image will not only look polished but also have a greater impact on your overall design.
Also Read This: Learn How to Add 9GAG Watermark to Your Videos
Common Mistakes to Avoid While Clipping Images
Clipping images in Photoshop can be a fantastic way to enhance your design, but like any tool, it's easy to make a few missteps. Avoiding these common mistakes can help you achieve a smoother and more professional result. Here are some of the pitfalls to watch out for:
- Incorrect Layer Order: One of the most common mistakes is not having the right layer order. Remember, the image should always be on top of the shape in the layer stack. If the order is wrong, the clipping mask won’t work as intended.
- Not Using the Right Shape: Using a shape that doesn't complement your image can lead to awkward results. Make sure the shape you choose fits well with the aspect ratio of your image, or adjust the image to fit the shape better.
- Forgetting to Adjust Image Position: After clipping the image, you may need to move it to ensure it fits perfectly inside the shape. Forgetting to reposition your image can result in a poorly cropped or misaligned image within the shape.
- Over-Resizing the Image: When resizing the image after clipping, be careful not to distort it. Holding the Shift key while resizing will maintain the aspect ratio, but resizing too much can lead to pixelation or loss of quality.
- Leaving Unwanted Backgrounds: If your image has an unwanted background, it can interfere with the final result. Make sure to clean up any stray pixels or backgrounds before applying the clipping mask.
- Not Saving in the Right Format: After completing your design, always save it in the appropriate format. If you need transparency, save the image as a PNG, and avoid using formats that may compress or degrade image quality.
By being aware of these common mistakes and taking steps to avoid them, you’ll ensure your clipped images look polished and professional every time.
Also Read This: Here’s How to Download Video from Facebook Reels
FAQ
1. What is a clipping mask in Photoshop?
A clipping mask in Photoshop is a technique that allows you to clip one layer to the shape or contents of another. The top layer will only be visible where the bottom layer (usually a shape) is located, allowing for creative designs without modifying the original image.
2. Can I clip an image to any shape?
Yes, you can clip an image to almost any shape in Photoshop. Common shapes include circles, squares, triangles, and even custom shapes that you create using the Pen Tool or Shape Tool.
3. How do I move the image inside the clipped shape?
To move the image inside the clipped shape, simply select the image layer and use the Move Tool. Drag the image to reposition it within the shape while maintaining the clipping mask.
4. Will clipping an image degrade its quality?
No, clipping an image does not degrade its quality. Photoshop uses non-destructive editing, meaning the image is only masked and not permanently altered. You can always adjust the image or shape without losing quality.
5. Can I change the shape after clipping the image?
Yes, you can change the shape even after clipping the image. If you modify the shape, the image will automatically adjust to the new boundaries of the shape.
Conclusion
Clipping an image to a shape in Photoshop is a simple yet powerful technique that can enhance your designs and give them a professional edge. By understanding the basics of clipping masks, choosing the right shape, and making thoughtful adjustments, you can create visually stunning compositions. Avoiding common mistakes and knowing how to tweak your image after clipping will help you achieve the best results. Whether you’re working on a personal project or a professional design, this technique is a must-have tool in your Photoshop toolkit.
So, experiment with shapes, get creative, and start clipping images to create beautiful designs today!

 admin
admin


