When creating a PowerPoint presentation, adding images can make your slides more engaging and visually appealing. However, it's important to give credit where it's due by citing the images properly. Citing images ensures that you're respecting copyright laws and acknowledging the work of creators. It's not just about following the rules; it's also about maintaining the integrity of your presentation and showing professionalism. In this section, we will cover the basic concept of image citation in PowerPoint and why it's essential for your presentations.
Why Citing Images is Important in PowerPoint Presentations

Citing images in PowerPoint presentations is more than just a legal requirement—it's a way to show respect for the original creators of the visual content. Here are some reasons why citing images is crucial:
- Legal Compliance: Many images are copyrighted, and using them without proper attribution can lead to legal consequences.
- Respect for Creators: By citing images, you give credit to photographers, designers, and other artists who put effort into their work.
- Professionalism: Proper citations reflect a high level of professionalism and attention to detail in your presentation.
- Transparency: Citations help your audience understand where the images come from, adding credibility to your presentation.
Even if you're using royalty-free images or stock photos, citing them helps ensure you follow the terms of the image's license. So, it's always better to include citations to avoid any confusion or misuse.
Also Read This: Making an Image 300 DPI: A Guide for High Quality
Different Ways to Cite Images in PowerPoint

There are several ways to cite images in PowerPoint, depending on the type of image and where it was sourced from. Here are some common methods:
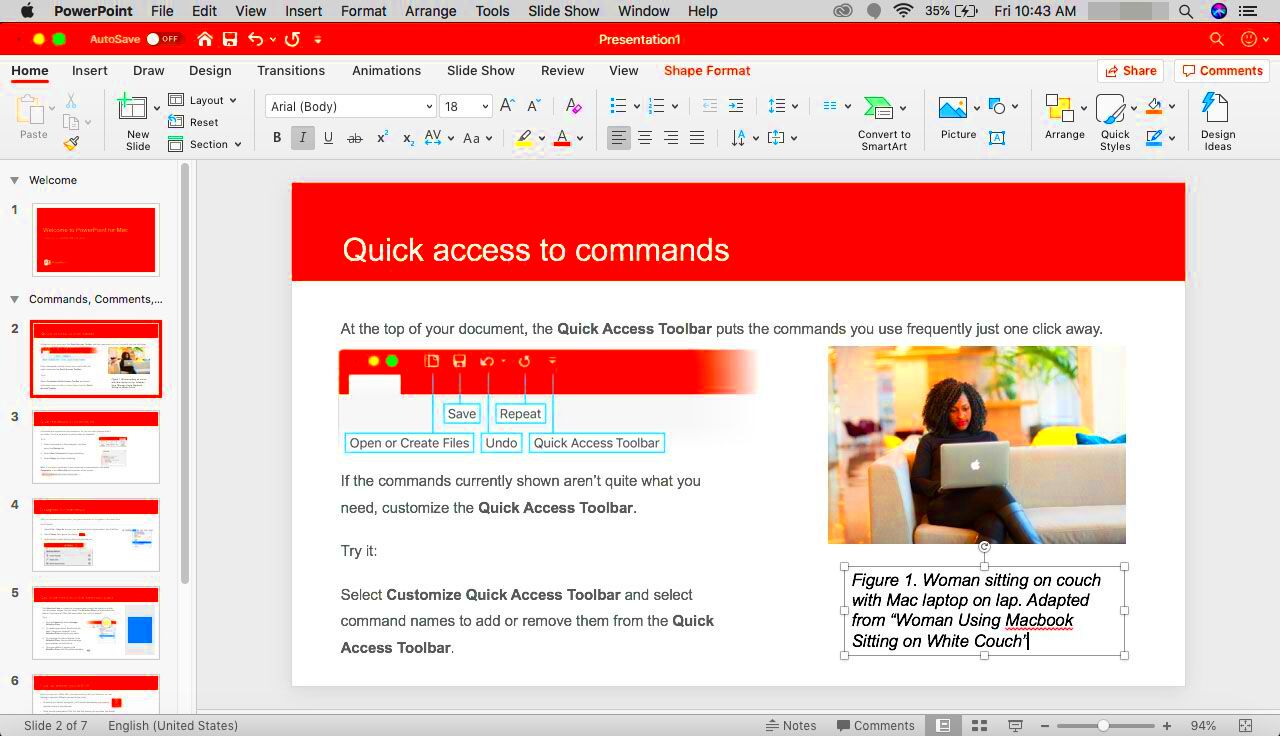
- Image Caption: One of the most common ways to cite an image is by adding a caption directly below the image. The caption typically includes the image's source and any necessary licensing information.
- Slide Footer: You can also add image credits in the footer of the slide. This method works well if you have several images on a slide and want to keep the design neat.
- Notes Section: For more detailed citations, you can include the image credits in the Notes section of your PowerPoint. This allows you to keep your slides clean while still providing full attribution.
- Hyperlinking: If you sourced the image from an online platform, you can add a hyperlink directly to the image or its source website. This method is especially helpful for images with creative commons licenses.
Here’s an example of how to format a citation in a PowerPoint slide:
| Method | Example |
|---|---|
| Image Caption | Photo by John Doe, used under CC BY 2.0 / Cropped from original. |
| Slide Footer | Image courtesy of Pixabay. |
| Notes Section | Image: “Sunset View” by Jane Smith, licensed under CC BY 4.0. |
Choosing the right method depends on your audience and the type of presentation you're creating. Remember, consistency is key when citing images throughout your slides.
Also Read This: Why OK.ru Is More Than Just a Social Media Platform
How to Add Citations for Images in PowerPoint Slides
Adding citations for images in PowerPoint is a straightforward process, but it's essential to ensure that you're doing it correctly. Citations should be clear and visible so your audience knows where the image comes from. Here's a step-by-step guide to help you add citations in a way that keeps your slides neat and professional:
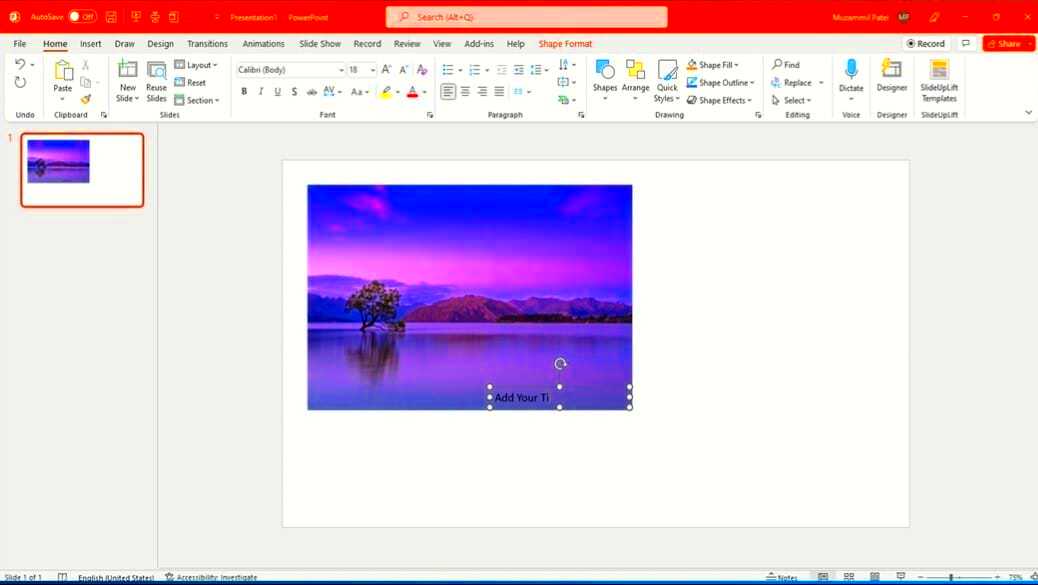
- Step 1: Insert your image into the slide. You can do this by going to the "Insert" tab and selecting "Pictures" to add the image from your device or from an online source.
- Step 2: Once your image is added, click on it to select it. Then, go to the "Insert" tab again and choose "Text Box" to add a citation text box below or beside the image.
- Step 3: In the text box, write the necessary citation details. Include the creator's name, image title, and license type, such as "Image courtesy of [Creator's Name], used under [License Type]."
- Step 4: Adjust the font size and positioning of the citation to ensure it's readable but doesn't distract from the content of your slide.
Adding citations this way helps keep your slides clean while also ensuring that you give proper credit. If you have multiple images on a slide, you can add one citation in the footer or at the bottom of the slide to keep the presentation organized.
Also Read This: Monetize Your Rumble Account and Start Earning Money from Your Videos
Using Image Attribution Links in PowerPoint
Image attribution links are a great way to provide direct credit to the source of an image while keeping your PowerPoint slides clean. Instead of writing long citations in the text box, you can hyperlink the
- Step 1: After inserting the image, select it. Then, click on the "Insert" tab and select "Link" or right-click and choose "Hyperlink."
- Step 2: In the link dialogue box, enter the URL where the image can be found. This could be the website or the image’s license page, depending on the source.
- Step 3: You can also add a text link below the image, such as "Image courtesy of [Website Name]." Highlight the text and use the hyperlink option to link to the original source.
Using hyperlinks for image attribution helps maintain the professional look of your slides without compromising the legal requirement of crediting the image creator. Just make sure the link works and leads to the correct page where the image was sourced.
Also Read This: Explore What Shutterstock Editor and Editor Pro Are
Adding Image Credits in the Notes Section
If you want to keep your slides neat and avoid clutter, adding image credits in the Notes section of your PowerPoint is an excellent option. This method allows you to provide full citation details without taking up space on the slide itself. Here’s how to add image credits in the Notes section:
- Step 1: Click on the slide where the image is located.
- Step 2: At the bottom of the PowerPoint window, you'll find the Notes section. If it's not visible, click on the "View" tab and select "Notes Page."
- Step 3: In the Notes section, write the full citation for the image. This can include the creator’s name, the image title, and the license type or usage terms.
- Step 4: When presenting, the notes will not be visible to the audience, but you can refer to them as you speak. This allows you to provide a detailed citation without affecting the slide design.
Adding image credits in the Notes section is particularly useful for more detailed presentations where image citation needs to be thorough but doesn’t fit within the design constraints of the slide. It’s an ideal choice when you need to provide legal attribution while keeping the slide content focused.
Also Read This: How to Create a Powerful Image Using Rhythm
Common Mistakes to Avoid When Citing Images in PowerPoint
Citing images in PowerPoint is important, but there are several common mistakes that people often make when adding citations. These errors can lead to confusion or even legal issues, so it's essential to avoid them. Let’s explore some of the most common mistakes and how to steer clear of them:
- Skipping Citations: One of the most common mistakes is forgetting to cite an image altogether. Even if the image is free to use, proper attribution is usually required. Always remember to include citations for every image you use.
- Using Incorrect Citation Format: Different types of images, such as those from stock photo websites or Creative Commons platforms, may require different citation formats. Make sure you're following the correct format based on the source of the image.
- Placing Citations in Hard-to-Find Areas: Citations should be placed where they are easily visible. Placing them too far from the image or in tiny text can make it hard for your audience to identify the source.
- Using Low-Quality Citations: A citation that’s too vague or lacks necessary details (such as the creator’s name, title, or license type) can be problematic. Always provide clear and complete information to avoid any confusion.
- Overcrowding the Slide: While it's important to cite images, you should avoid overcrowding your slides with too much text. If you have multiple images, consider placing citations in the footer or Notes section instead of on the slide itself.
By avoiding these common mistakes, you'll ensure your PowerPoint presentation remains professional, legally compliant, and easy for your audience to follow.
Also Read This: Curving Images for Unique Designs
Conclusion: Best Practices for Citing Images in PowerPoint
Properly citing images in PowerPoint is essential for both legal reasons and professional presentation. Following best practices ensures you're respecting copyright, adding credibility to your work, and maintaining a clean, organized slide design. Here are some key takeaways:
- Be Consistent: Consistency is key when citing images. Choose a citation method and stick with it throughout your presentation.
- Use Clear and Readable Fonts: Ensure that your citations are easy to read by using legible fonts and appropriate sizes. Avoid using tiny text that’s hard to spot.
- Provide Full Attribution: Always include the creator’s name, image title, and licensing information. If applicable, link to the original image or the source website.
- Choose the Right Citation Location: Consider placing citations in the footer or Notes section if you want to keep your slides clean. For a detailed presentation, the Notes section can be a great option.
- Check for Image License Requirements: Ensure you are following the specific rules associated with the image's license, especially if it’s a Creative Commons or stock image.
By following these best practices, you'll not only stay on the right side of copyright laws but also create a professional presentation that reflects well on you and your work.
Frequently Asked Questions About Citing Images in PowerPoint
If you're new to citing images in PowerPoint, you may have some questions. Here are a few common ones, along with their answers, to help clear up any confusion:
- Do I need to cite every image I use in PowerPoint?
Yes, it's important to cite every image you use, whether it's royalty-free, Creative Commons, or paid. Proper citation respects the work of the creator and avoids legal issues. - Where should I place my image citations?
You can place image citations either directly below the image, in the footer of the slide, or in the Notes section. Choose the method that keeps your slides clean and readable. - Can I use images from Google without citation?
Not without checking the usage rights. Many images on Google are copyrighted. Always check the usage rights and provide proper attribution if required. - What if the image doesn’t have clear attribution information?
If the image doesn’t have clear attribution information, it’s best not to use it or contact the creator for permission to use it. If you're using stock images, always follow the terms and conditions provided by the platform. - What’s the difference between fair use and public domain images?
Fair use allows limited use of copyrighted images without permission, but it must meet specific criteria. Public domain images are free to use without any restrictions or attribution required, though giving credit is still appreciated.
By addressing these frequently asked questions, we hope to make the process of citing images in PowerPoint as clear and easy as possible. Don’t hesitate to consult the original image source for further clarification if you're ever unsure about proper citation methods.

 admin
admin


