When working on presentations, adding images can enhance the overall look and feel of your slides. However, sometimes images need to be adjusted to fit the design or to make text stand out more clearly. Changing image transparency is a simple yet effective way to achieve this. Transparency helps in blending images seamlessly into the background or allowing other elements to shine through. In Google Slides, the process of adjusting transparency is quick and easy, and it can significantly improve the visual appeal of your slides without needing to use complex image-editing software.
Why Change Image Transparency in Google Slides
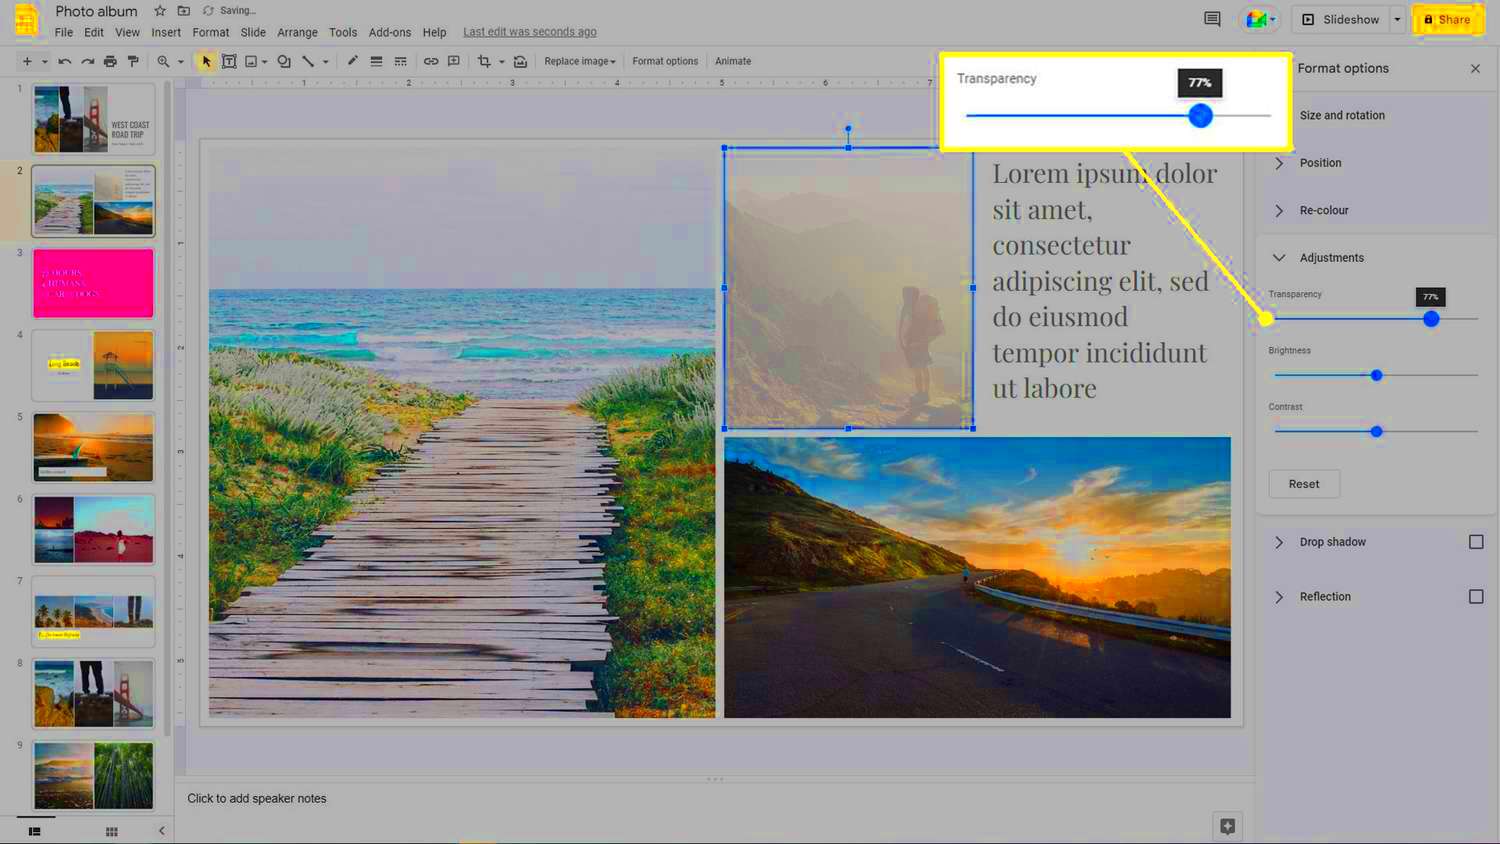
Changing image transparency can serve various purposes in your presentations. Here are a few reasons why you might want to adjust the transparency of an image:
- Improved Design: Transparent images can help create a layered effect, making the design more dynamic and visually interesting.
- Highlight Key Information: Lowering the transparency of an image allows text or other elements to stand out more clearly over the image.
- Less Distracting Background: Sometimes, images can overpower the content on your slide. Adjusting transparency can make the background less distracting.
- Creative Effects: You can use transparency to create artistic visuals or soft visual effects in your presentation.
Ultimately, adjusting transparency allows for greater control over the visual flow of your presentation, helping you communicate more effectively.
Also Read This: Crediting 123RF Images: Understanding Attribution Requirements
Steps to Adjust Image Transparency in Google Slides
Changing the transparency of an image in Google Slides is a straightforward process. Follow these simple steps:
- Select the Image: First, click on the image you want to adjust. This will bring up the options for editing.
- Open Format Options: With the image selected, right-click and choose "Format options" from the dropdown menu.
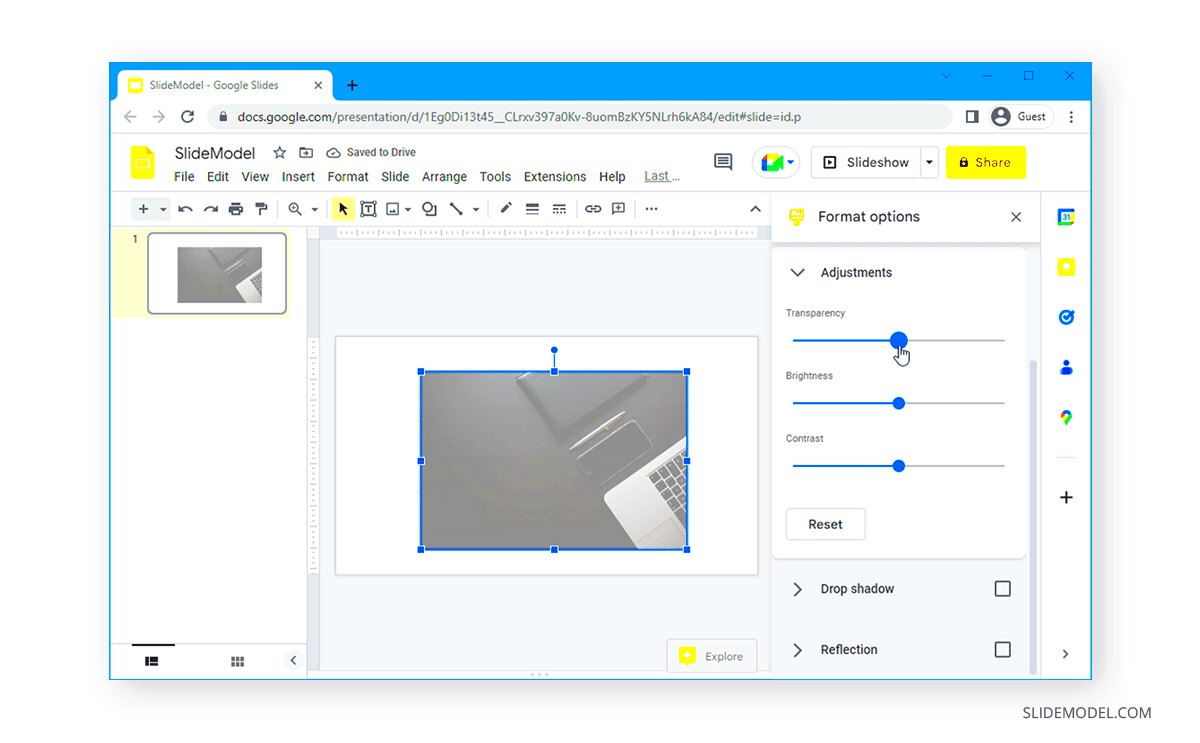
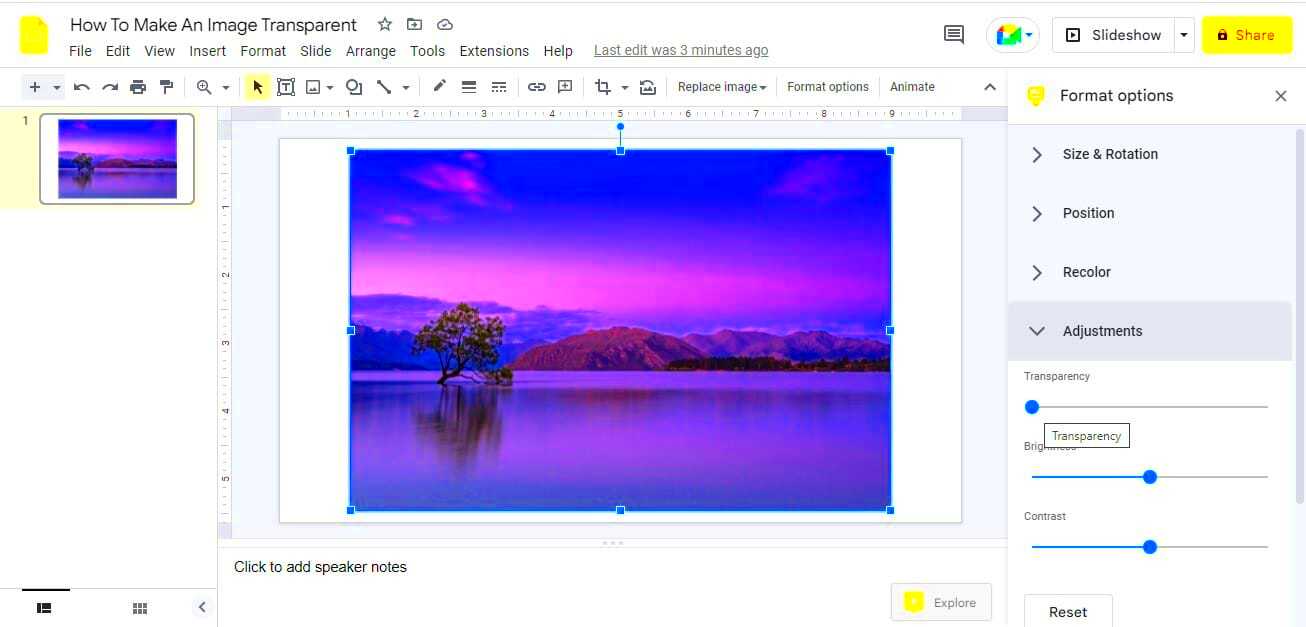
- Find the Adjustments Section: In the Format Options panel that appears on the right, look for the "Adjustments" section.
- Adjust Transparency: Under Adjustments, you will find a slider for "Transparency." Move the slider left to reduce transparency (make the image more visible) or right to increase transparency (make the image more see-through).
- Preview and Fine-tune: As you adjust the transparency, keep an eye on the slide to see how the image blends with the other elements. Make adjustments until you’re happy with the result.
- Click Done: Once satisfied with the transparency, click "Done" to apply the changes.
By following these simple steps, you can easily control the transparency of any image in Google Slides and create the perfect look for your presentation.
Also Read This: how to change image name on iphone
Using the Format Options Panel to Change Transparency
One of the simplest ways to adjust image transparency in Google Slides is by using the Format Options panel. This tool gives you direct control over various aspects of the image, including transparency, without needing any external software. The Format Options panel is easy to access and allows you to make precise adjustments to fit your slide design perfectly.
To use the Format Options panel to change transparency:
- Click on the Image: First, select the image you want to adjust.
- Right-click and Open Format Options: Right-click the image and choose the “Format options” from the dropdown menu. This opens the panel on the right side of the screen.
- Locate the Transparency Slider: In the Format Options panel, scroll down to find the “Adjustments” section. Here, you will see the transparency slider.
- Adjust Transparency: Slide the transparency slider left or right to increase or decrease the transparency level. You’ll notice the changes in real-time on the image.
- Fine-Tune the Adjustment: You can fine-tune the transparency by making slight adjustments until the image blends perfectly with other elements on the slide.
Using the Format Options panel is a quick and easy way to get the transparency just right, helping your images enhance your presentation without distracting from the main content.
Also Read This: Embedding Images in Adobe Illustrator: A Beginner’s Guide
Adjusting Transparency with the Image Editor Tool
In addition to the Format Options panel, you can also adjust transparency using the built-in Image Editor tool in Google Slides. This tool is ideal for when you want more control over the image’s appearance and need to fine-tune its look before adjusting transparency.
Follow these steps to use the Image Editor to change transparency:
- Select the Image: Click on the image you want to edit.
- Open the Image Editor: Once the image is selected, click on the “Format” menu in the top toolbar, then choose “Image” and select “Image options” from the dropdown.
- Adjust the Transparency: In the “Image options” window, look for the “Transparency” slider. Slide it left to make the image more opaque or right to make it more transparent.
- Preview the Changes: As you adjust the slider, preview how the transparency affects the image. Make sure the image does not overpower other elements on the slide.
- Apply the Changes: Once you’re happy with the adjustment, click “OK” or close the window to apply the changes.
The Image Editor tool gives you another option for adjusting transparency, offering a slightly different interface but similar results. This tool is especially useful if you want to make detailed changes to the image’s visual properties in combination with other effects.
Also Read This: How to Create Glitch Subtitles on Dailymotion for a Fun Editing Experience
Tips for Using Transparent Images Effectively in Presentations
Using transparent images in Google Slides can help your presentations look polished and professional, but it’s important to use them wisely. Here are some tips for making the most of transparent images:
- Use Transparency to Create Layers: Transparent images work well when you want to create a layered effect. For example, you can use a semi-transparent image as a background to allow text to stand out on top.
- Don’t Overuse Transparency: While transparency can be powerful, too much of it can make the image or slide look cluttered. Use it sparingly to avoid overwhelming your audience.
- Match Transparency with Your Design: Ensure the transparency level matches the overall design of the slide. For a sleek, modern look, you might want a subtle transparency effect. For a creative or artistic presentation, higher transparency might work better.
- Use Transparent Images for Watermark Effects: Transparent images are ideal for adding a watermark to your slides. This could be a company logo or any other brand-related image placed with low transparency.
- Test on Different Screens: If you’re presenting on a projector or large screen, test how your transparent images look. Sometimes, images that look fine on your laptop screen might be hard to see on bigger displays.
- Ensure Readability: Make sure that any text or elements you place on top of a transparent image are still easy to read. Adjust the contrast if necessary.
By following these tips, you can use transparent images effectively, enhancing your presentations and making them more engaging without distracting from the main content.
Also Read This: How to Do FTP on Alamy: A Comprehensive Guide for Photographers
Common Issues with Image Transparency in Google Slides
While adjusting image transparency in Google Slides is a straightforward process, there are a few common issues that users often encounter. Understanding these challenges can help you troubleshoot and ensure your images look their best in your presentations.
Here are some common problems with image transparency in Google Slides:
- Transparency Not Showing Correctly: Sometimes, the transparency effect might not be visible as expected. This can happen due to the background color or the image being too opaque to notice a change. Try adjusting the transparency further or using a different background to see the effect more clearly.
- Image Not Responding to Transparency Slider: In some cases, the transparency slider might seem unresponsive. This issue can often be fixed by refreshing the slide or restarting the application. Also, ensure you’re using the most updated version of Google Slides.
- Loss of Image Quality: Overusing transparency, especially at high levels, can sometimes make the image appear pixelated or blurry. Try reducing the transparency slightly to maintain image quality while still achieving the desired effect.
- Images Clashing with Text: Transparent images can sometimes clash with text, making it hard to read. To avoid this, use contrasting colors for text and adjust the transparency so the image doesn’t overpower the message.
- Unexpected Results on Different Devices: The transparency effect might look different depending on the device or screen size. Make sure to test your presentation on various devices to ensure the image transparency looks as intended.
By being aware of these potential issues, you can adjust your approach and create better-looking slides without frustration.
Also Read This: Exploring the YouTube Channel Renowned for RKO Edits
FAQ about Changing Image Transparency in Google Slides
If you're still unsure about how to adjust image transparency in Google Slides, here are answers to some frequently asked questions that can help clear things up.
- Can I adjust the transparency of text in Google Slides?
Currently, Google Slides does not have a built-in feature for changing text transparency. However, you can adjust the transparency of the background or images behind the text to make the text stand out more clearly.
- Why can't I see the transparency effect after adjusting the slider?
If you're unable to see the transparency change, it could be due to the image's solid color or high contrast with the background. Try reducing the opacity of the image or changing the background color to ensure the effect is visible.
- How do I reset the transparency of an image in Google Slides?
If you want to reset the transparency of an image, simply open the Format Options panel again and move the transparency slider back to 0%. This will return the image to its original, fully opaque state.
- Can I use a transparent PNG file in Google Slides?
Yes, Google Slides supports transparent PNG files. These images already have transparent areas, and you can further adjust their opacity in the Format Options panel if needed.
- Can I apply transparency to shapes in Google Slides?
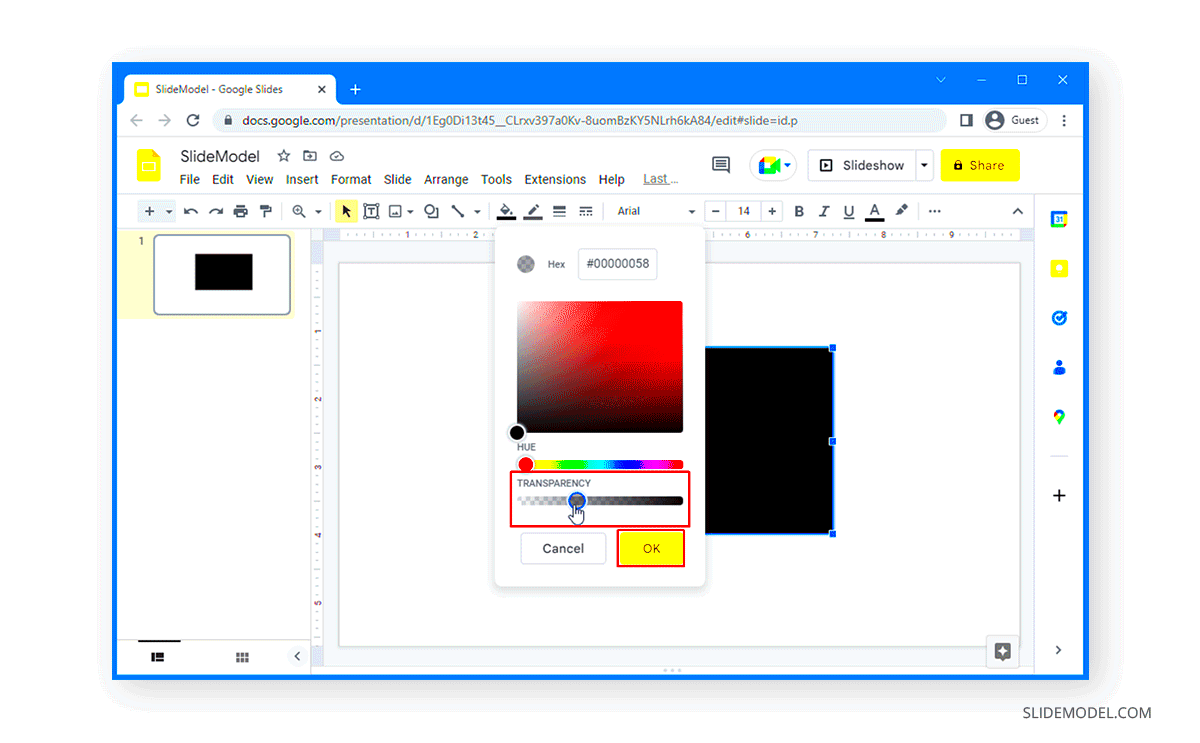
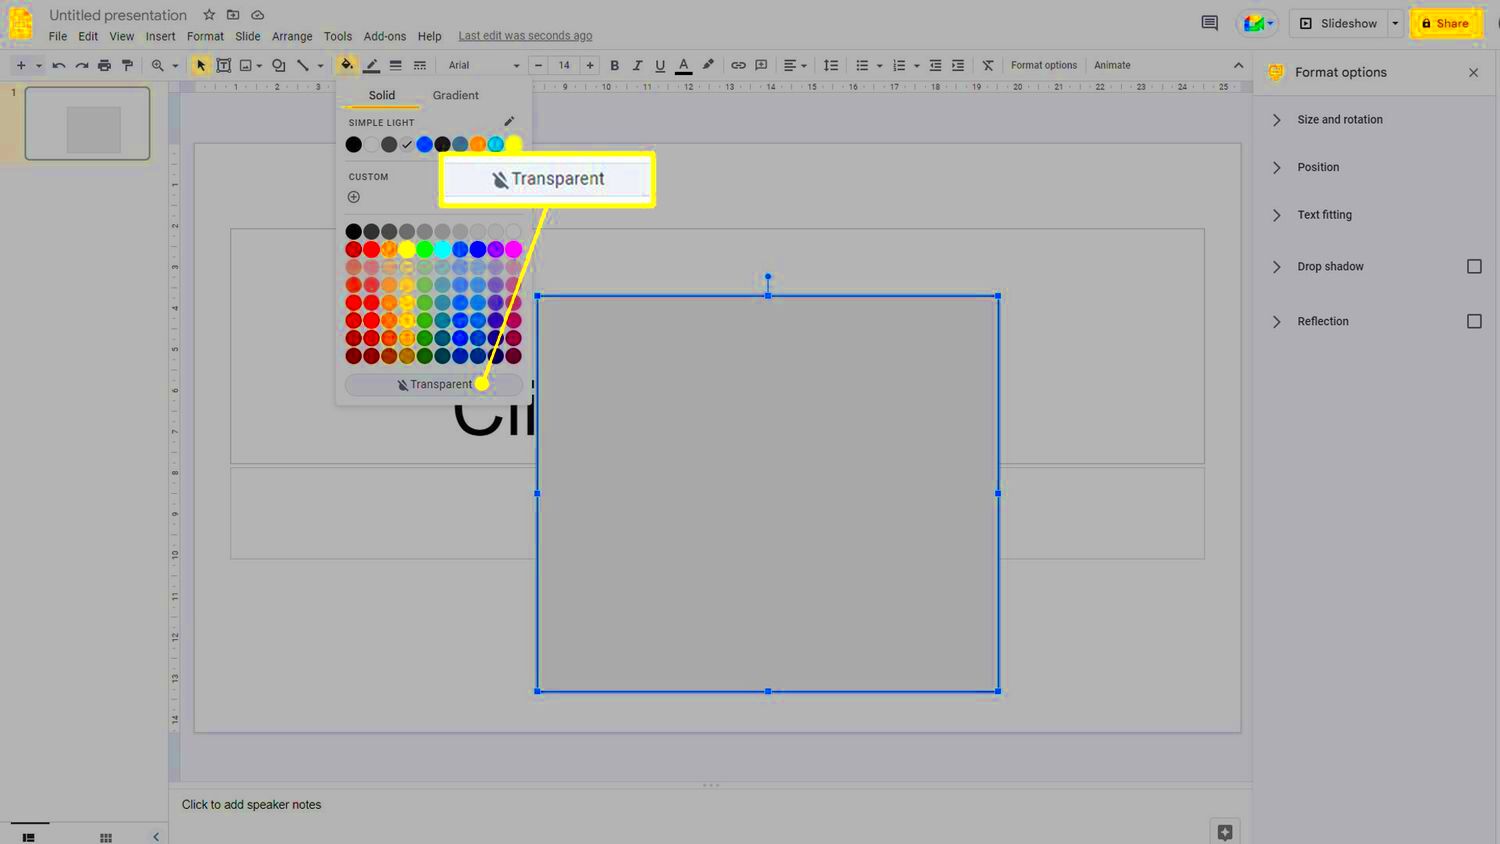
Yes, you can adjust the transparency of shapes, such as rectangles and circles, by selecting the shape, opening the Format Options panel, and adjusting the transparency slider in the "Fill color" section.
Conclusion on Changing Image Transparency in Google Slides
Adjusting image transparency in Google Slides is a simple but powerful tool to enhance the design and clarity of your presentations. Whether you’re aiming for a professional background effect or ensuring your text stands out over an image, transparency can help you achieve a polished and engaging look. By using the Format Options panel or Image Editor tool, you have all the flexibility you need to create stunning slides that communicate your message effectively.
However, it’s important to keep in mind some common challenges, such as issues with image quality and visibility across different devices. Testing your slides on various screens and ensuring that the transparency levels suit your overall design will help you avoid these issues.
With these tips and troubleshooting advice in mind, you’re ready to make the most of transparency in Google Slides. So, experiment with transparency levels to see how it can enhance your presentations and make them more visually appealing and professional.
 admin
admin


