Centering an image in Photoshop is a simple yet essential skill for anyone working with design, photography, or graphic creation. Whether you're preparing an image for print or just making sure your design looks balanced, centering can make a significant difference. In Photoshop, there are several ways to center an
Why Centering an Image is Important

Centering an image in Photoshop is more than just a cosmetic choice; it's about creating balance and focus within your design. Here are a few reasons why centering an image is crucial:
- Improved Aesthetics: A centered image naturally draws attention and makes your composition feel more cohesive and organized.
- Professional Look: Centered images are often seen as more polished and well-composed, which is especially important for professional design work.
- Consistency: Keeping a consistent layout with centered images helps maintain a uniform visual style across your project or portfolio.
- Easy to Adjust: Centering provides a solid starting point, making further edits and adjustments to your layout much easier.
When designing for print or online content, whether it’s a flyer, banner, or social media post, centering your image is often a necessary step to achieve a visually pleasing result.
Also Read This: Mastering Adobe Stock Motion Graphics Templates
Steps to Center an Image in Photoshop

Centering an image in Photoshop is straightforward and can be done using a few easy steps. Here’s how you can do it:
- Step 1: Open Your Image – Start by opening the image you want to center in Photoshop. You can do this by going to File > Open and selecting your image.
- Step 2: Select the Image Layer – In the Layers panel, make sure the image layer is selected. If you have multiple layers, click on the image layer to work with it.
- Step 3: Activate the Move Tool – Press the V key or select the Move Tool from the toolbar. This will allow you to move the image around the canvas.
- Step 4: Use the Align Tool – With the image layer selected, go to the top menu and click on Edit > Free Transform. While holding down the Shift key, drag the image to the center of the canvas. You’ll see guide lines appear to help you align the image.
- Step 5: Apply Changes – Once the image is centered, press Enter (Windows) or Return (Mac) to apply the transformation.
By following these steps, your image will be perfectly centered within your canvas, ensuring a balanced and clean look for your project.
Also Read This: How to Apply Eyeliner for Big Eyes
Using the Move Tool to Center Your Image

The Move Tool in Photoshop is one of the most effective and simplest ways to center an image. It allows you to reposition your image quickly and precisely within the canvas. Whether you're adjusting a single image or working with multiple layers, the Move Tool ensures you can align things exactly where you want them. Here’s how you can use it for centering:
- Step 1: Select the Move Tool – Press the V key or click on the Move Tool icon in the toolbar (usually the topmost tool on the left side).
- Step 2: Select the Image Layer – Click on the layer containing your image in the Layers panel. This will activate the layer for movement.
- Step 3: Activate Auto-Select Option (if needed) – If you have multiple layers and want to automatically select the one you're clicking, check the “Auto-Select” box at the top of the screen.
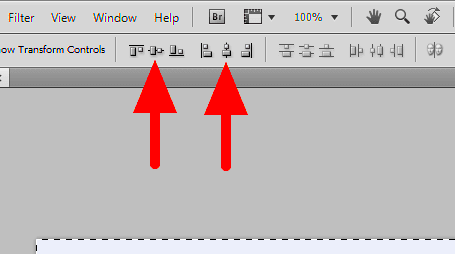
- Step 4: Use the Alignment Tools – With the Move Tool selected and your image layer activated, look at the top of the screen where you'll see alignment icons. These are used to align the image to the canvas or to other layers. Click on the “Align vertical centers” and “Align horizontal centers” icons to center the image on your canvas.
- Step 5: Adjust Manually (Optional) – If you need to fine-tune the positioning, click and drag your image around the canvas. The Move Tool gives you control for manual adjustments if needed.
Using the Move Tool is an efficient and easy method to center your images. It's particularly helpful when you're working with more than one layer and need to ensure that everything aligns properly.
Also Read This: Creative Composition: Putting Two Pictures Together on Photobucket
Aligning Layers for Perfect Centering
When working with multiple layers in Photoshop, it’s crucial to align them properly for a polished design. Aligning layers helps ensure that all elements in your composition are centered, creating a harmonious look. Photoshop offers several tools to align layers easily, saving you time and effort. Here’s how you can align layers to center them:
- Step 1: Select All Layers You Want to Align – Hold down Shift and click on each layer you want to center. You can also press Ctrl (Windows) or Cmd (Mac) while selecting layers to add them to the selection.
- Step 2: Use the Move Tool – With all the layers selected, activate the Move Tool by pressing the V key or selecting it from the toolbar.
- Step 3: Open the Alignment Options – At the top of the screen, look for the alignment icons. These allow you to align layers either horizontally or vertically. For centering, you’ll want to use the “Align horizontal centers” and “Align vertical centers” options.
- Step 4: Apply the Alignment – Once you click on the appropriate alignment icons, all selected layers will automatically be centered on the canvas, ensuring they are evenly spaced and positioned.
- Step 5: Fine-Tune If Necessary – You can always make minor adjustments manually by clicking and dragging the layers into position with the Move Tool if needed.
By aligning layers in Photoshop, you can quickly and efficiently center multiple elements within your design, ensuring your project looks clean and professional.
Also Read This: Create 3D Art with an AI Art Generator: A Complete Guide
Centering Images with Guides in Photoshop
Guides are an excellent way to achieve precise alignment in Photoshop. They help you place your image exactly where you want it on the canvas, giving you visual markers to work with. Using guides to center your image ensures that everything is aligned perfectly without relying on guesswork. Here’s how you can use guides to center your image:
- Step 1: Set Up Guides – First, make sure guides are visible by going to View > Show > Guides. If you don't see any guides, you can add them by dragging from the rulers on the top and left sides of your canvas. If the rulers aren’t visible, press Ctrl + R (Windows) or Cmd + R (Mac) to display them.
- Step 2: Create a Vertical Guide – Click on the ruler and drag a guide vertically. Position this guide in the center of your canvas by making sure it's at the middle point, which should be the width of your canvas divided by two.
- Step 3: Create a Horizontal Guide – Similarly, drag a horizontal guide from the top ruler. Position it in the center of the canvas by ensuring it is at the middle point of your canvas height.
- Step 4: Align Your Image to the Guides – Now, select your image layer and use the Move Tool to drag it toward the center of the canvas. The image will snap to the intersection of the guides, ensuring it's perfectly centered both vertically and horizontally.
- Step 5: Remove the Guides – After you’ve centered your image, you can remove the guides by going to View > Clear Guides. If you want to keep them, simply leave them visible for future reference.
Using guides is one of the most reliable methods for centering images in Photoshop. They provide visual references that ensure your image is perfectly aligned every time.
Also Read This: Can Storyblocks Audio Be Used on Instagram Reels
Using the Canvas Size Tool for Precise Centering
The Canvas Size tool in Photoshop is a powerful option that allows you to adjust your workspace to fit your image, ensuring perfect centering. This tool is ideal when you need to add empty space around your image or when your image is smaller than the canvas and needs to be placed in the exact center. Let’s walk through how to use it for precise centering:
- Step 1: Open Your Image – Begin by opening your image in Photoshop. Make sure it’s the active layer in your Layers panel.
- Step 2: Access the Canvas Size Tool – Navigate to Image > Canvas Size in the top menu. This will open the Canvas Size dialog box.
- Step 3: Set the Canvas Size – In the dialog box, you can adjust the width and height of the canvas. To center the image, ensure that the relative option is unchecked, and input new dimensions if needed. This is especially useful if your image is smaller than the canvas.
- Step 4: Adjust the Anchor – In the Canvas Size window, there is an anchor grid. Select the center square to ensure that your image remains centered when the canvas is resized. This will automatically add the extra space around the image.
- Step 5: Apply and Confirm – Click OK to apply the new canvas size. Your image will be centered in the new canvas, with extra space added where necessary.
Using the Canvas Size tool is particularly helpful when you need to create a border or leave equal space around your image. It’s an easy and effective way to achieve perfect centering, especially for print-ready designs.
Also Read This: Blurring Text in an Image Using Paint
Common Mistakes to Avoid When Centering Images
Centering an image might seem simple, but there are a few common mistakes that can lead to misalignment or uneven results. Being aware of these mistakes will help you achieve the best possible outcome when centering your images in Photoshop:
- Not Using Guides or Rulers: One common mistake is attempting to center an image without using guides or rulers. Guides are your best friend for precision, so don’t skip them.
- Misaligning Layers: When working with multiple layers, it’s important to align all layers properly. Sometimes, centering one layer without considering the others can lead to uneven results.
- Forgetting to Adjust Canvas Size: If your image is smaller than the canvas, it won’t be centered properly unless you adjust the canvas size. Always make sure your canvas dimensions are suitable for your image.
- Using the Move Tool Without Alignment: While the Move Tool is useful, it’s easy to make small adjustments that throw off the center. Be sure to use Photoshop’s alignment tools for more accurate centering.
- Overlooking Image Resolution: Sometimes, focusing too much on alignment and forgetting about image resolution can lead to blurry or pixelated images, especially if the image is resized.
- Not Checking for Symmetry: If your image contains elements that need to be symmetrical, like text or logos, ensure that all components are properly aligned to maintain visual harmony.
By avoiding these common mistakes, you’ll be able to center your images with more precision and achieve professional-looking results every time.
Also Read This: How to Create Hot AI Images
Frequently Asked Questions (FAQ)
When centering images in Photoshop, many people have similar questions. Below are some of the most frequently asked questions along with helpful answers:
1. How do I center an image on the canvas without changing the canvas size?
To center your image without adjusting the canvas size, simply select the image layer and use the Move Tool. With the image selected, click the Align horizontal centers and Align vertical centers buttons in the top toolbar to center the image perfectly.
2. Can I center an image within a specific area of the canvas?
Yes! You can use guides or adjust the Canvas Size tool to create a specific area for centering. With guides, you can position your image within any section of the canvas, and the image will snap to the guides when you move it.
3. How do I make sure my image remains centered when I resize it?
When resizing your image, use the Transform tool (Ctrl + T or Cmd + T). Hold down the Shift key while resizing to maintain proportions. To keep the image centered, use the Align options in the top toolbar or manually adjust with the Move Tool.
4. Can I center multiple layers at once?
Yes! You can select multiple layers in the Layers panel by holding down Shift (for continuous layers) or Ctrl/Cmd (for non-continuous layers). Once selected, use the Align options to center all the layers simultaneously.
5. What if my image is smaller than the canvas?
If your image is smaller than the canvas, it may not appear centered by default. To correct this, either resize the image using Free Transform or use the Canvas Size tool to add space around the image. Make sure to select the center anchor point to keep it aligned.
Conclusion: Centering Images with Ease
Centering images in Photoshop doesn’t have to be a complicated task. By understanding and utilizing the various tools available, such as the Move Tool, Canvas Size tool, and alignment options, you can easily ensure that your images are positioned perfectly on the canvas. Whether you're working with a single image or multiple layers, there are several methods to achieve precision and balance in your design.
By following the step-by-step instructions outlined in this guide, you’ll find that centering your images becomes a straightforward process. You can also avoid common mistakes by keeping an eye on layer alignment, using guides, and properly adjusting the canvas size. With these tips in hand, you’ll be able to create clean, professional-looking designs that are visually appealing and well-balanced.
Remember, whether you’re designing for print, web, or social media, centering your images enhances the overall aesthetics of your project. So, go ahead and practice these techniques—soon, centering images in Photoshop will become second nature!

 admin
admin


