Canva is a user-friendly graphic design platform that's become a favorite for both beginners and experienced designers. With its drag-and-drop interface, you can create stunning visuals without needing advanced skills. Whether you're designing social media posts, presentations, or marketing materials, Canva has a plethora of features that make your work easier and more enjoyable.
Some of the standout features include:
- Templates: Start with thousands of professionally designed templates tailored for various needs.
- Stock Photos: Access a vast library of free and premium images to enhance your designs.
- Collaboration Tools: Work with team members in real-time, making group projects seamless.
- Customizable Elements: Change colors, fonts, and sizes with ease to match your brand's aesthetic.
Canva's flexibility allows for creativity, whether you’re crafting a simple flyer or a complex infographic. The best part? You can access it from anywhere, making it perfect for on-the-go designing!
Getting Started with Your Canva Project
Ready to dive into your Canva project? Here’s a step-by-step guide to get you started:
1. Sign Up or Log In: If you’re new to Canva, head to the website and create an account. If you already have one, just log in.
2. Choose Your Design Type: Once logged in, you’ll see a dashboard filled with design options. Whether you want to create a social media post, presentation, or poster, simply click on the design type that fits your needs.
3. Select a Template: Browse through Canva’s extensive library of templates. You can filter by category or use the search bar for specific themes. Once you find one you love, click on it to start customizing.
4. Customize Your Design: This is where the magic happens! Change text, adjust colors, and add your own flair. You can upload your images by clicking on the "Uploads" tab on the left side, which allows you to drag and drop files directly into your design.
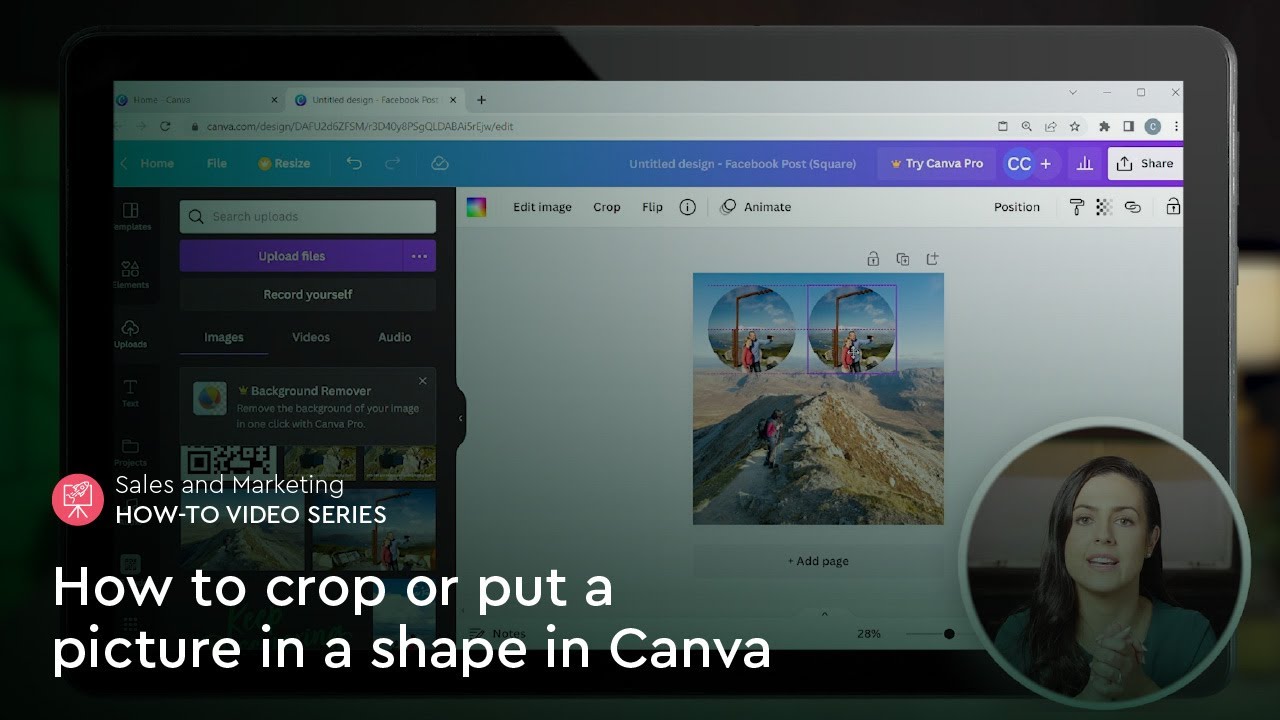
5. Adding Shapes: To place an image inside a shape, first, add a shape by navigating to the Elements tab and selecting a shape that suits your design. Resize it as needed to fit your layout.
6. Insert Your Image: Click on the shape to select it, then right-click and choose “Set Image as Background” or drag your uploaded image into the shape. This will clip the
Remember, experimenting is key! Don’t hesitate to play around with different designs and layouts until you find the perfect one. Canva allows you to undo changes, so feel free to try new things!
Once you're satisfied with your design, simply click Download to save your masterpiece or share it directly on social media!
Also Read This: Using Getty Images Images on Your Website: Guidelines for Incorporating Copyrighted Content
3. Choosing the Right Shape for Your Image
When it comes to placing an image inside a shape in Canva, the first step is choosing the right shape that complements your image and overall design. Shapes are not just decorative; they can convey different emotions and messages. Here are some tips to help you choose the perfect shape:
- Consider Your Brand: If your brand has a playful vibe, opt for fun shapes like circles or stars. For a more professional look, rectangles or squares might work best.
- Match the Content: Think about what the image represents. For instance, if you’re showcasing a product, a rectangle can highlight it effectively. On the other hand, a heart shape might be perfect for a romantic context.
- Use Shapes to Create Contrast: A circular image inside a square shape can create a striking contrast that draws attention. Play with different combinations to see what pops!
- Be Mindful of Size: The shape should not overwhelm the image. Ensure that it enhances rather than distracts from the image content.
Once you have a shape in mind, it’s easier to envision how your image will look within it. Experiment with different options; Canva makes it easy to swap shapes until you find the one that resonates with your design vision!
Also Read This: Discover How to Generate AI Images for Free with This Simple Tool
4. Steps to Insert an Image into a Shape
Now that you’ve chosen the right shape, let’s dive into the steps to insert your image into that shape. It’s a straightforward process, and I promise you’ll get the hang of it quickly. Here’s how:
- Open Your Canva Design: Start by logging into your Canva account and opening the design where you want to insert the image.
- Select Your Shape: From the left sidebar, click on the “Elements” tab. Here, you’ll find a variety of shapes. Click on the shape you want to use and drag it onto your canvas.
- Adjust the Shape: Resize the shape as needed by clicking and dragging the corners. You can also center it or position it wherever you want on your canvas.
- Upload Your Image: Next, click on the “Uploads” tab on the left sidebar. Here, you can upload an image from your computer or choose one from Canva’s library.
- Insert the Image: Once your image is uploaded, simply drag it over the shape. When you hover over the shape, you’ll see it highlight, indicating that it’s ready to accept the image.
- Adjust the Image: After inserting, you might need to adjust the image’s position within the shape. Double-click on the image to crop or reposition it until it fits perfectly.
- Finalize Your Design: Once you’re satisfied with how it looks, you can adjust the shape’s color, border, and shadow effects to enhance your design further.
And there you have it! Your image should now be beautifully placed inside the shape, ready to grab attention in your design. Don’t hesitate to play around with different shapes and images until you find the combination that speaks to you!
Also Read This: How to Download iStock Videos Without Watermark: A Comprehensive Guide
5. Adjusting Image and Shape for Perfect Fit
Once you’ve placed your image inside a shape in Canva, the fun doesn’t stop there! It’s time to make sure everything fits just right. This is where the magic of adjustments comes into play. Here are a couple of techniques to help you achieve that perfect fit:
- Resize the Image: Click on the image within the shape. You’ll notice small circles at the corners. These are your resizing handles. Drag them to make the image larger or smaller. Keep an eye on the proportions to avoid stretching!
- Crop the Image: If the image doesn’t fit the shape perfectly, you can crop it. Simply double-click the image, and a cropping tool will appear. Adjust the edges to frame your subject nicely. Once you're happy, click on the checkmark to apply the crop.
- Move the Image: Sometimes, it’s not just about size but also about placement. After double-clicking, you can click and drag the image around within the shape. This way, you can focus on the most important parts of the image.
Pro tip: To maintain the aspect ratio while resizing, hold down the Shift key as you drag the corners. This prevents distortion and keeps your image looking crisp and professional.
Once you've got your image fitting nicely inside the shape, take a step back and evaluate. Is the image clear? Does it convey the message you want? If the fit is off, don’t hesitate to go back and readjust until it feels just right!
Also Read This: The Ultimate Guide on Accessing Your Old Flickr Account
6. Exploring Additional Editing Options
With your image snugly fitted into the shape, it’s time to unleash some creative flair! Canva offers a plethora of editing options to enhance your design further. Let’s dive into a few that can elevate your project:
- Apply Filters: Click on the image and then select the "Filter" option from the toolbar. You can experiment with various filters to give your image a unique look. Whether you want a vintage vibe or a sleek modern aesthetic, there’s a filter for that!
- Adjust Brightness and Contrast: Sometimes, a simple adjustment can make a huge difference. Use the "Adjust" tool to tweak brightness, contrast, saturation, and more. Play around until your image pops in just the right way.
- Add a Border: Borders can add a finishing touch to your design. Select the shape, then choose a color and thickness for the border. This can help your shape stand out more against the background.
- Incorporate Text: Don’t forget about adding text! Use Canva’s text tool to overlay a catchy phrase or title on your design. Make sure to choose fonts that complement the image and shape.
Lastly, remember to preview your design often. Click on the "Present" button to see how everything looks together. This lets you catch any adjustments needed before finalizing your work.
With these editing options at your disposal, your design will not only look polished but also uniquely yours. Get creative and have fun experimenting with different styles and effects!
Also Read This: Uploading QuickTime Videos to YouTube Without Conversion Issues
7. Tips for Creating Eye-Catching Designs
Creating captivating designs in Canva isn’t just about placing images inside shapes—it’s about making choices that draw the viewer’s eye and keep them engaged. Here are some tips to elevate your design game:
- Use Contrasting Colors: A strong contrast between your background and the image inside the shape can make your design pop. For instance, if your shape is a dark blue circle, try placing a bright yellow image within it.
- Employ White Space: Don’t be afraid of empty space! It can help your design breathe and guide the viewer’s focus to the key elements. For example, a well-placed image wrapped in a lot of white space can create a sophisticated look.
- Choose the Right Shapes: The shape you choose can convey different feelings. Circles often feel friendly and inclusive, while sharp triangles can evoke a sense of action or urgency. So, think about your message when selecting shapes.
- Incorporate Texture: Adding textures can give your design depth. Canva offers various patterns; consider layering a textured background behind your shape to create more dimension.
- Keep It Simple: Sometimes less is more. A clean, straightforward design can often be more effective than something overly complicated. Stick to one or two images and a cohesive color palette.
- Test Different Layouts: Don’t shy away from experimenting! Try different placements for your shape and image. Sometimes, a simple shift can dramatically change the impact of your design.
Lastly, always remember your audience. Think about what will resonate with them and tweak your designs accordingly. The more you practice, the better you’ll get at intuitively knowing what works!
8. Conclusion and Further Resources
In conclusion, placing an image inside a shape in Canva is a straightforward process that can significantly enhance your design aesthetics. By leveraging the tools available in Canva and applying the tips we discussed, you can create striking visuals that capture attention and convey your message effectively.
If you’re looking to dive deeper into design principles or want more inspiration, here are some resources you might find helpful:
- Canva Design School - A great place to learn design basics and get tips directly from Canva.
- Adobe's Graphic Design Resources - While not Canva-focused, it offers excellent insights into graphic design fundamentals.
- Skillshare Canva Classes - Find various classes that cater to all skill levels, from beginner to advanced design techniques.
- YouTube Tutorials - A treasure trove of video tutorials that can visually guide you on specific design tasks.
Remember, the best designs come from a mix of creativity and practice. So, keep exploring and experimenting with Canva, and let your imagination run wild!
 admin
admin


