Are you tired of missing your favorite shows on YouTube TV? Recording them for later can be a game changer! YouTube TV offers a convenient way to capture live broadcasts, ensuring you never miss a moment of the action, drama, or comedy. In this blog post, we’ll dive into how you can easily record shows and make the most of your viewing experience. Let’s get started!
Understanding YouTube TV's Cloud DVR Feature

YouTube TV's Cloud DVR feature is a fantastic tool that enhances your streaming experience. Unlike traditional DVRs, which require physical storage and setup, YouTube TV's Cloud DVR operates entirely online. This means you can access your recordings from any compatible device. Here’s a deeper look into what makes this feature so appealing:
- Unlimited Storage: One of the standout features of YouTube TV's Cloud DVR is the unlimited storage. You can record as many shows as you want without worrying about running out of space. This is perfect for binge-watchers or sports fans who don’t want to miss a game.
- Hassle-Free Management: Managing your recordings is simple. You can easily access your library of recorded shows, delete old recordings, or pause them. The user interface is designed to be intuitive, making navigation a breeze.
- Stream Anywhere: With Cloud DVR, your recordings are accessible from any device with the YouTube TV app. So whether you’re at home, on the go, or visiting friends, your favorite shows are just a tap away!
To start using the Cloud DVR feature, follow these steps:
- Sign In: Log into your YouTube TV account. If you don’t have one, you’ll need to create it first.
- Find Your Show: Browse through the guide or search for the show you want to record.
- Record: Click on the show and select the record option. You can choose to record a single episode or the entire season!
- Access Your Recordings: Head to the Library section, where you can view all your recorded content.
Another great aspect of the Cloud DVR is the ability to keep your recordings for up to nine months. After that, they’ll automatically be deleted unless you choose to record them again. This ensures your library stays fresh and relevant.
In summary, YouTube TV's Cloud DVR feature offers a modern and flexible way to record your favorite shows. With its unlimited storage, ease of use, and accessibility, it’s a must-have tool for anyone looking to enhance their streaming experience. So, grab your remote, start recording, and enjoy your favorite shows whenever you want!
Also Read This: How to Add the Tennis Channel to YouTube TV: Complete Instructions
3. Steps to Record Shows on YouTube TV
Recording your favorite shows on YouTube TV is a breeze! Let’s walk through the steps so you can catch all those episodes you never want to miss.
Step 1: Sign In to Your Account
First things first, make sure you’re signed in to your YouTube TV account. If you don’t have an account yet, you’ll need to create one. It’s simple and just takes a few minutes!
Step 2: Navigate to the Show You Want to Record
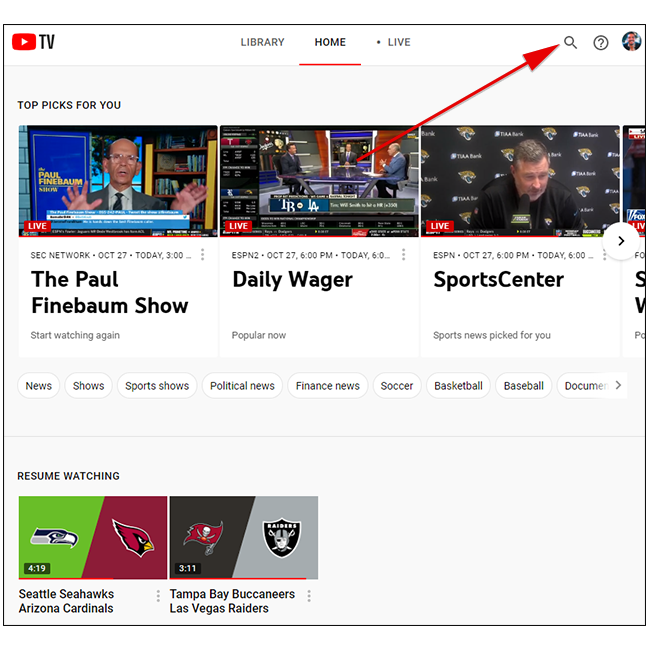
Once you’re logged in, use the search bar at the top of the screen. Type in the name of the show you want to record. You can also browse through the available channels, or check out the “Library” section for suggestions.
Step 3: Click on the Show
After you find the show, click on it. You’ll be taken to the show’s page where you can see upcoming episodes, past seasons, and more.
Step 4: Hit the "+" Icon to Record
On the show’s page, look for the big, bright “+” icon that says “Add to Library.” Click on that! This will start recording all future episodes of the show automatically. You don’t have to worry about missing a single moment!
Step 5: Customize Your Recording Settings (Optional)
If you want to get a little more specific, you can adjust recording settings. For instance, you can choose to record just new episodes or all episodes. This option is great for shows that have reruns or special episodes!
Step 6: Start Watching!
Now that you’ve set everything up, you can sit back, relax, and enjoy your shows whenever you want! YouTube TV will save them for you, so no need to stress about scheduling.
Also Read This: Why Is My YouTube Keyboard Not Working? Solving Keyboard Input Problems on Mobile
4. Accessing and Managing Your Recorded Content
So, you've recorded your favorite shows—great job! Now, let’s talk about how to access and manage that content effortlessly.
Accessing Your Recorded Shows
To find your recorded content, navigate to the “Library” section on the main menu. All your recorded shows will be neatly organized here. Click on the show you want to watch, and you’ll see a list of available episodes.
Managing Your Recordings
Managing your recordings on YouTube TV is just as simple. Here’s how:
- Delete Episodes: If you’ve seen an episode and want to free up space, just click on the episode and select “Remove.” This will delete that particular episode from your library.
- Modify Recording Settings: If you want to change how you record a show (like switching from recording all episodes to just new ones), go back to the show’s page and click on the settings icon next to the “+” icon.
- Organize Your Library: You can also create a system that works for you. For example, consider sorting shows into categories or creating playlists for binge-watching.
Storage Space
YouTube TV offers unlimited storage for recorded content, but there is a limit on how long they keep it. Typically, recordings are saved for up to nine months, so be sure to catch up before they disappear!
Now, you’re all set to enjoy your recorded shows seamlessly! Happy watching!
Also Read This: How to Insert a YouTube Video into Keynote for Easy Presentation Integration
5. Best Practices for Recording on YouTube TV
When it comes to recording your favorite shows on YouTube TV, a few best practices can help ensure a seamless experience. Here are some tips to maximize your recording potential:
- Plan Ahead: Before you start recording, take a moment to check out the schedule of your desired shows. Make use of the Library feature to add them to your recording list. This way, you won't miss an episode!
- Use the Search Function: YouTube TV has a powerful search tool. Use it to quickly find shows or movies you want to record. Just type in the title or genre, and you're on your way!
- Set Series Recordings: For shows you love, be sure to set up series recordings. This ensures you capture every episode without needing to remember each week.
- Manage Storage Wisely: YouTube TV comes with unlimited storage, but only recordings expire after nine months. Regularly check and manage your recordings to keep your favorites handy.
- Check Internet Connection: A strong and stable internet connection is crucial for smooth recording. Consider using a wired connection if you're experiencing issues.
By following these best practices, you’ll enjoy your recorded content without any hitches, making your viewing experience all the more delightful!
6. Common Issues and Troubleshooting Tips
Even with the best intentions, recording on YouTube TV can sometimes run into hiccups. Here’s a rundown of common issues you may encounter and how to troubleshoot them:
- Recording Not Starting: If you notice that a recording didn't start as expected, first check your internet connection. If it’s stable, ensure the show is actually airing at the set time. Sometimes, shows get rescheduled.
- Missing Recordings: If a recording isn’t showing up, it could be due to time zone settings. Make sure your account is set to the correct time zone under the settings menu.
- Quality Issues: If your recorded video appears pixelated or choppy, check your internet speed. YouTube TV recommends at least 3 Mbps for HD streaming. Consider upgrading your plan or moving closer to your router.
- Storage Problems: Even though YouTube TV offers unlimited storage, you may still run into limits if your recording list is extensive. Review your recordings and delete less important ones to free up space.
- Device Compatibility: If you’re using a third-party device, ensure it’s compatible with YouTube TV. Sometimes, simply updating the app or device firmware can resolve playback issues.
If you continue to have issues, don’t hesitate to reach out to YouTube TV support. They have a wealth of resources and can provide guidance tailored to your specific problem.
 admin
admin


