In a world filled with countless YouTube channels, it’s not uncommon to come across content that doesn’t resonate with you. Whether it’s due to personal taste, unwanted ads, or simply wanting a cleaner feed, blocking certain channels can enhance your viewing experience. In this guide, we’ll explore why you might want to block channels and how to manage your preferences effectively, ensuring your YouTube journey is as enjoyable as possible.
Understanding Why You Might Want to Block Channels
Have you ever found yourself scrolling through your YouTube feed, only to be bombarded with videos that just don’t appeal to you? Blocking channels can be a game-changer in tailoring your experience. Let’s dive into some key reasons why you might consider this option:
- Content Mismatch: Sometimes, a channel simply doesn’t align with your interests anymore. Perhaps you followed a cooking channel but now prefer travel vlogs. Blocking helps you focus on content you genuinely enjoy.
- Repetitive or Irrelevant Content: If a channel keeps promoting the same type of video or content that no longer feels relevant, it can clutter your feed. By blocking, you reduce unnecessary repetition and make space for fresh ideas.
- Negative Influence: Some channels might promote harmful or misleading content. Blocking these channels not only protects your viewing experience but also allows you to take a stand against misinformation.
- Ad Overload: If you find certain channels are overly commercialized, with endless ads that disrupt your viewing, blocking them can help keep your experience ad-free.
- Personal Growth: As we evolve, so do our interests. What once fascinated us may no longer hold our attention. Blocking channels reflects our journey and growth, allowing us to curate a feed that aligns with our current selves.
Understanding why you might want to block channels is the first step in creating a more enjoyable and personalized YouTube experience. By identifying your preferences and acting on them, you can transform your feed into something that truly inspires and entertains you.
Also Read This: How to Watch Full Are You Being Served Episodes on YouTube
3. Step 1: Logging into Your YouTube Account
Before you can start blocking channels on YouTube, you'll need to log into your account. It’s a straightforward process, but let’s walk through it to ensure you’re ready to go.
First, open your preferred web browser and navigate to the YouTube homepage. If you're already logged in, you should see your profile icon in the top right corner. If not, here’s what you should do:
- Click on the Sign In button located at the top right corner of the page.
- A pop-up will appear prompting you to enter your email or phone number associated with your Google account. Go ahead and type it in.
- Click Next.
- Now, enter your password and click Next again.
- If you have two-factor authentication enabled, you’ll need to verify your identity as well. Just follow the on-screen prompts!
Once you’re logged in, take a moment to check out your homepage. You’ll see personalized recommendations based on your viewing history, and your profile icon will confirm that you’re logged in properly. Now you’re all set to start managing your preferences, including blocking channels that no longer fit your interests!
Also Read This: Using Keyboard Shortcuts to Skip Ads on YouTube: A Guide
4. Step 2: Finding the Channel You Want to Block
Now that you’re logged into your YouTube account, it’s time to find that pesky channel you want to block. It’s easy to get lost in the sea of content available, but here’s how to pinpoint the channel you’re looking for:
1. *Search for the Channel: Use the search bar at the top of the YouTube page. Type in the name of the channel you wish to block and hit Enter.
2. Access the Channel Page: In the search results, look for the channel name; it typically appears in bold. Click on the channel name, and you’ll be directed to their channel page.
3. Check the Channel URL: Another quick way to find a channel is by directly typing the URL if you know it. Most channels follow this format: https://www.youtube.com/c/ChannelName. Just replace ChannelName with the actual name of the channel.
4. Explore the Channel’s Content: Once on the channel page, take a moment to review their videos. You may remember why you wanted to block this channel in the first place! Getting to know their content can also help you confirm your decision.
5. Look for the 'About' Section*: If you want more information about the channel, click on the About tab. This section often provides details about the channel's content, its creation date, and links to social media.
Now that you’ve located the channel you want to block, you’re one step closer to customizing your YouTube experience. Remember, it’s all about creating a space that feels good for you, free from content that doesn’t resonate! Ready to take the next step? Let’s move on to how you can block that channel.
Also Read This: How to Check If a YouTube Channel Is Monetized
5. Step 3: Blocking the Channel
Now that you’ve identified the channel you want to block, it’s time to take action. Blocking a YouTube channel is a straightforward process, and you can do it in just a few clicks. Here’s how:
- Go to the Channel Page: Navigate to the channel you wish to block. You can do this by clicking on the channel name from any of their videos.
- Access the About Section: Once you’re on the channel page, look for the “About” tab, usually located at the top of the page. Click on it to see more details about the channel.
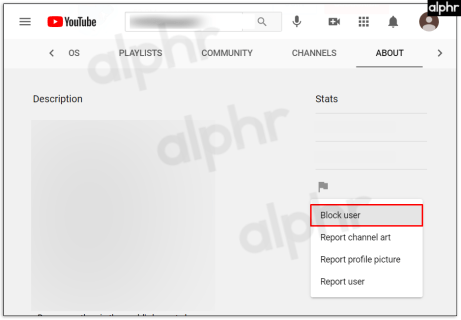
- Find the Block Option: In the About section, look for the three dots (⋮) menu icon on the right-hand side. This is often where you’ll find additional options for managing your preferences.
- Select “Block User”: Click on the three dots, and a dropdown menu will appear. Choose the “Block User” option to initiate the blocking process.
- Confirm the Block: A prompt may appear asking you to confirm your choice. This is an important step to avoid accidentally blocking the wrong channel. Ensure you’re blocking the right one, then click “Submit” or “OK.”
Once you’ve completed these steps, the channel will be blocked, and you won’t see any of their videos or comments on your feed. It’s a great way to curate your YouTube experience to match your preferences. If you ever change your mind, you can always unblock the channel by following similar steps.
Also Read This: Don Stewart YouTube Channel: Discovering the Work and Impact of Don Stewart on YouTube
6. Step 4: Confirming the Block
After you’ve blocked a channel, it’s essential to confirm that it’s been successfully blocked. This ensures you’re not still receiving unwanted content or notifications from that channel. Here’s how to check:
- Return to Your YouTube Home Page: Start by navigating back to your YouTube home page to see your personalized recommendations.
- Check Your Subscriptions: If the blocked channel was previously subscribed to, it should no longer appear in your subscriptions list. You can verify this by going to the “Subscriptions” tab on the left sidebar.
- Look for Missing Videos: Check your feed for any new videos from the blocked channel. If you’ve done everything correctly, their content should not show up.
- Manage Your Blocked Channels: To see a list of channels you’ve blocked, go to your YouTube settings. Click on “Privacy” and then look for “Blocked users.” Here, you can see all channels you’ve blocked and manage them if needed.
By following these steps, you can ensure that your YouTube experience remains enjoyable and tailored to your interests. Remember, blocking channels is just one way to manage your preferences. Regularly check and adjust your settings as new channels pop up, ensuring your feed stays clean and relevant!
Also Read This: Which YouTuber Are You Quiz? Fun Ways to Discover Your Creator Match
7. Managing Your Blocked Channels List
Once you've started blocking channels on YouTube, it’s essential to keep track of which ones you’ve added to your blocked list. Managing this list can enhance your viewing experience by ensuring you don’t inadvertently stumble upon content you’d prefer to avoid.
To manage your blocked channels, follow these simple steps:
- Access Your Settings: Click on your profile icon in the top right corner of YouTube and select Settings from the dropdown menu.
- Navigate to Privacy: In the settings menu, look for Privacy on the left-hand side. This section will help you manage your preferences and blocked channels.
- View Blocked Channels: Scroll down until you find the Blocked Users section. Here, you can see a list of channels you've blocked.
- Unblock If Needed: If you change your mind about a channel, simply click the Remove button next to the channel name to unblock it.
Remember, blocking a channel not only stops their content from appearing in your feed, but it also keeps their comments from showing up on your videos. This can create a more tailored and enjoyable experience, especially if certain channels tend to post content that doesn’t resonate with you.
Another tip is to regularly review your blocked channels list. As your preferences change, you might find that you want to unblock some channels or add new ones. It’s all about creating a YouTube environment that feels right for you!
8. Tips for Customizing Your YouTube Experience
Customizing your YouTube experience goes beyond just blocking channels. Here are some helpful tips to enhance your time spent on the platform:
- Utilize the 'Not Interested' Feature: If a video pops up that doesn’t appeal to you, simply click on the three dots next to the video title and select Not Interested. This helps YouTube understand your preferences better.
- Curate Your Subscriptions: Regularly review and manage your subscriptions. Unsubscribe from channels that no longer align with your interests to keep your feed fresh.
- Create Playlists: Use playlists to organize your favorite videos. This not only helps you find content easily but also allows you to share your interests with friends.
- Use Keywords: When searching for content, include specific keywords related to your interests. This will help YouTube recommend more relevant videos in the future.
- Engage with Content: Like, comment, and share videos you enjoy. This activity informs the algorithm about your preferences, leading to better suggestions.
Additionally, consider exploring YouTube’s Settings for more personalized options. You can adjust playback settings, notifications, and even language preferences, creating a more tailored experience.
Lastly, don’t hesitate to explore new channels! YouTube is vast, and there’s always something new to discover. By following these tips, you can create an engaging and enjoyable YouTube journey that suits your unique tastes. Happy watching!
 admin
admin