Google Slides allows you to organize your slides with images, text, and other elements. Sometimes, when you layer images, one image may get hidden behind another. This can make your presentation look cluttered or unprofessional. Fortunately, Google Slides has an easy-to-use feature that helps you manage the order of these layers, called "Bring Forward." This feature allows you to move an image to the front of your slide, making it more visible and ensuring it doesn't get covered by other objects. Let’s dive into how this feature can be used and when it’s most helpful.
Why You Might Need to Bring Images Forward

There are several situations where bringing an image forward can help improve the quality and clarity of your presentation. Here are a few examples:
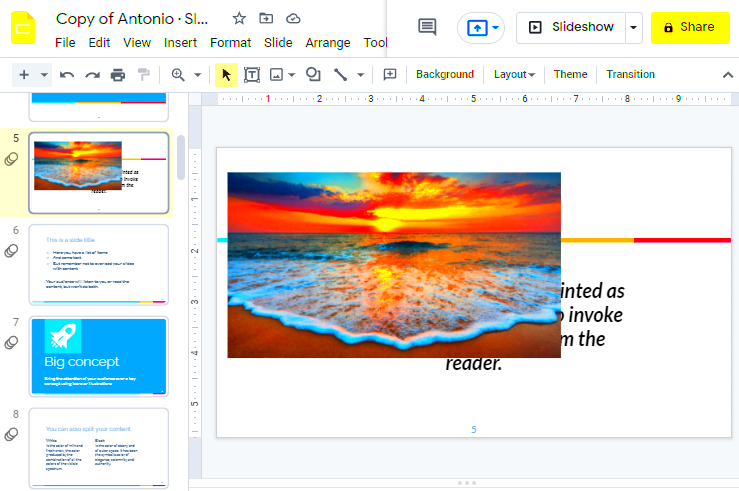
- Image Visibility: If an image is hidden behind a shape or text box, you might need to bring it forward to ensure it’s clearly visible to your audience.
- Layering for Design: When designing slides with multiple elements, you might want certain images to appear in front of others for visual emphasis or artistic effect.
- Enhancing the Focus: Bringing a key image forward can help focus the audience's attention on the most important part of your slide.
- Aligning with Other Objects: Sometimes, images may overlap with text boxes or other images. Bringing one image forward helps prevent confusion and makes the slide look well-organized.
In short, using the "Bring Forward" option is a useful tool to control the appearance of images in your Google Slides presentation, making sure everything is in the right place.
Steps to Bring an Image Forward in Google Slides

Now that you understand why it's important to bring images forward, let’s go over the simple steps to do it in Google Slides. Follow these instructions:
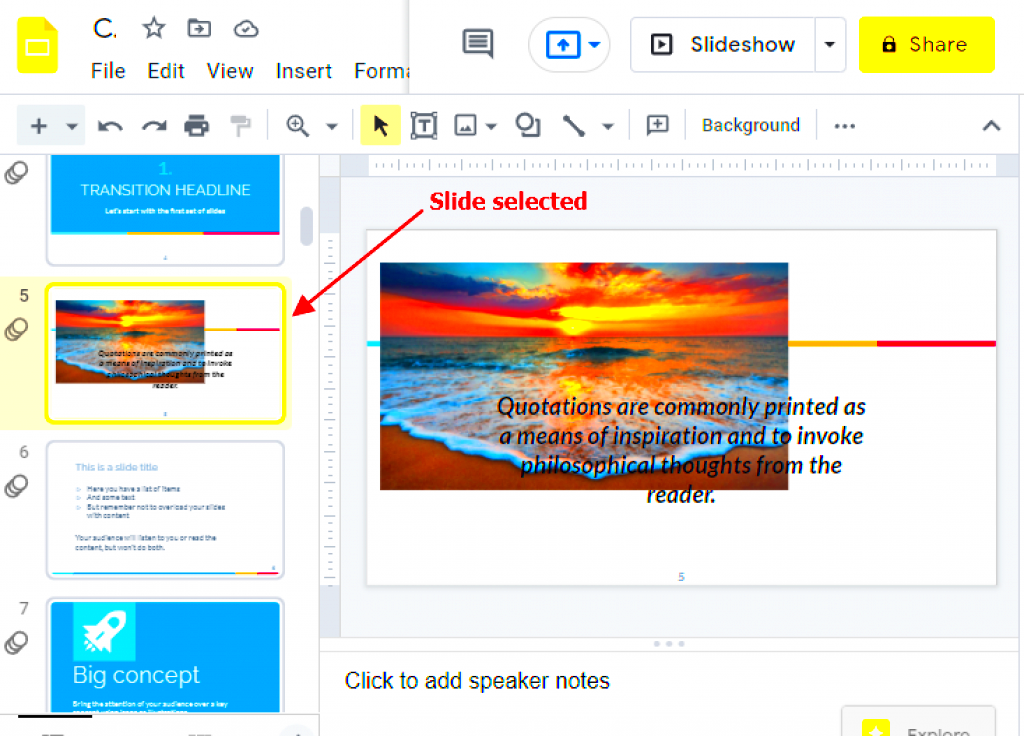
- Select the Image: Click on the image you want to bring forward. It will be highlighted with blue handles around it.
- Open the Right-click Menu: Right-click on the image (or use two-finger click on a trackpad) to open the context menu.
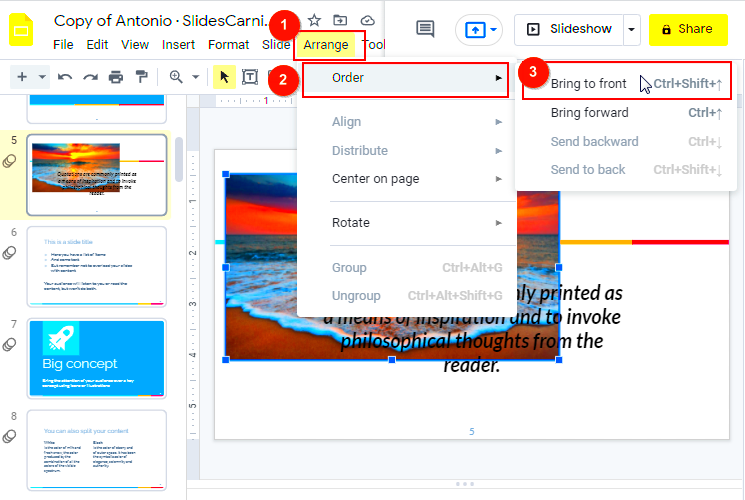
- Choose "Order": From the menu that appears, hover over the “Order” option. A sub-menu will appear with several options for layer adjustment.
- Select "Bring to Front" or "Bring Forward": If you want the image to be at the very top, choose “Bring to Front.” If you only need to move it one layer forward, select “Bring Forward.”
Once you complete these steps, your image will be placed above other objects on the slide. You can repeat this process as many times as needed to adjust the layering order until you’re happy with the result.
Alternatively, if you prefer a quicker method, you can use keyboard shortcuts:
| Action | Shortcut |
|---|---|
| Bring Image Forward | Ctrl + Up Arrow (Windows) / Command + Up Arrow (Mac) |
| Bring Image to Front | Ctrl + Shift + Up Arrow (Windows) / Command + Shift + Up Arrow (Mac) |
Using these shortcuts can speed up your workflow, especially when working with multiple images.
Using Keyboard Shortcuts to Bring Images Forward

If you're someone who enjoys working faster and more efficiently, keyboard shortcuts are a game-changer when it comes to bringing images forward in Google Slides. Instead of going through the menu every time, you can use a quick key combination to bring an image to the front or move it forward one step. This can save you a lot of time, especially when you're working with multiple elements on a slide.
Here are the keyboard shortcuts to help you get the job done:
| Action | Shortcut |
|---|---|
| Bring Image Forward | Ctrl + Up Arrow (Windows) / Command + Up Arrow (Mac) |
| Bring Image to Front | Ctrl + Shift + Up Arrow (Windows) / Command + Shift + Up Arrow (Mac) |
To use these shortcuts, simply click on the image you want to adjust, then press the appropriate keys. If you only need to bring the image forward one step, use the first shortcut. If you want the
Adjusting the Layer Order for Multiple Images

When working with multiple images on a slide, adjusting their layer order is essential to ensure everything is displayed properly. Sometimes, images overlap, or one might be hidden behind another, making the slide look messy. By controlling the layer order, you can position each image exactly where you want it, creating a clean and organized design.
Here are some tips for adjusting the layer order of multiple images:
- Bring Image Forward: If one image is hidden behind another, select the image you want to bring forward, right-click, choose “Order,” and select “Bring Forward.”
- Send Image Backward: If an image is too prominent and needs to be pushed behind other elements, right-click the image, go to “Order,” and choose “Send Backward.”
- Send Image to Back: If an image needs to be completely behind all other elements, select “Send to Back” in the same menu.
- Use Layer Order to Create Depth: Layering images at different levels can help create a sense of depth and make your design more visually appealing.
Remember, layer order isn’t just for images. You can also use it for text boxes, shapes, and other elements to ensure your slide looks polished and professional.
Fixing Image Position After Bringing It Forward
After bringing an image forward, it may shift from its original position. This can happen if the image was initially placed behind other elements that were in a specific location. Don’t worry, it's easy to fix the position of the image after moving it forward, and here’s how you can do it:
- Manual Adjustment: Simply click and drag the image to the desired position. This gives you full control over the placement on your slide.
- Using Alignment Tools: Google Slides has built-in alignment tools to help you position images precisely. Select the image, then click on the "Arrange" option in the top menu. From there, you can choose to align your image left, center, or right.
- Using Arrow Keys: For more detailed adjustments, you can use the arrow keys on your keyboard to nudge the image in small increments. This is useful when you need to move the image slightly without losing its alignment with other objects.
- Snap to Grid: If you want even more precision, enable the “Snap to grid” option. This feature helps you align your image perfectly with the grid lines on your slide for consistent positioning.
Fixing an image’s position after bringing it forward is a simple task, but it makes a huge difference in ensuring your presentation looks clean and organized. With these tips, you can easily move images into the perfect spot without disrupting the overall design.
Common Issues When Bringing Images Forward and How to Solve Them
While the "Bring Forward" feature in Google Slides is quite straightforward, there are a few common issues that users face when working with images. These problems usually arise when dealing with multiple layers, misaligned objects, or unexpected image behavior. Let’s go over some of these challenges and how you can fix them to keep your slides looking neat and professional.
Here are a few common issues you may encounter:
- Images Not Moving: Sometimes, when you try to bring an image forward, it might not move. This could be because the image is already on the top layer or is locked in place. To fix this, ensure the image is selected and not locked. If you’re working with a group of objects, make sure you’re selecting the correct image before using the "Bring Forward" option.
- Overlapping Text Boxes: If your image moves to the front but overlaps with text, it can make your slide look cluttered. You can solve this by either adjusting the image size or repositioning the text boxes. Use the alignment tools in the "Arrange" menu to ensure everything is neatly placed.
- Accidental Layering of Images: When working with multiple images, they may accidentally overlap in a way that hides key visuals. If this happens, use the "Send to Back" option to push certain images behind others, keeping the important ones visible.
- Image Becoming Distorted: Occasionally, when bringing an image forward, it may become distorted or stretched. To fix this, resize the image by holding the shift key while dragging the corner handles to maintain its aspect ratio.
By being aware of these potential issues and knowing how to resolve them, you can ensure your Google Slides presentation looks polished and professional without any hitches.
FAQ
Here are some frequently asked questions related to bringing images forward in Google Slides:
- Can I bring multiple images forward at once? No, Google Slides only allows you to adjust one image at a time. However, you can select multiple images and group them to make adjustments together.
- What if I accidentally send an image to the back and can't find it? You can always bring the image back to the front by right-clicking it and selecting "Bring to Front," or using the keyboard shortcut (Ctrl + Shift + Up Arrow on Windows or Command + Shift + Up Arrow on Mac).
- Does bringing an image forward affect its quality? No, adjusting the layer order doesn’t impact the image’s resolution or quality. It only changes its position relative to other objects.
- Can I bring images forward using a tablet or mobile device? Yes, you can bring images forward on mobile devices by using the app’s interface. However, the method may vary slightly depending on the device.
- Why can’t I move the image even after selecting "Bring Forward"? This may be due to the image being locked or placed within a group. Ensure the image is unlocked and ungrouped to allow adjustments.
Conclusion on Bringing Images Forward in Google Slides
Bringing images forward in Google Slides is a simple yet powerful tool to help you organize and enhance your presentations. Whether you’re creating a visual design or emphasizing key content, adjusting the image order allows for greater control and presentation flow. With the steps and tips provided, you should be able to confidently manage layers and ensure your slides look polished and professional.
Remember to utilize keyboard shortcuts, make adjustments to the layer order, and address common issues as they arise. By mastering this feature, you’ll be able to create more dynamic and visually appealing presentations that stand out. So, next time you’re working in Google Slides, try bringing your images forward and see how it improves the overall look of your slides!

 admin
admin


