Blending two images in Canva is an exciting way to create stunning visual content. Whether you're designing social media posts, marketing materials, or even personal projects, blending images can bring a unique touch to your designs. Canva makes this process easy, even for beginners, with its intuitive interface and powerful tools. In this post, we'll walk you through the basics of blending images in Canva, and show you how to take advantage of its features to make your designs pop.
Why Choose Canva for Image Blending?

Canva is a top choice for blending images because it provides a variety of easy-to-use tools that anyone can use, from complete beginners to seasoned designers. Here’s why Canva stands out when it comes to image blending:
- User-Friendly Interface – Canva’s drag-and-drop editor makes it easy for you to select and arrange images without needing any prior design experience.
- Free Access to Powerful Tools – With Canva’s free version, you get access to all the essential tools needed for image blending, such as transparency, filters, and effects.
- Templates for Inspiration – Canva provides tons of templates that already use blended images. These can serve as inspiration or even as a starting point for your projects.
- Cloud-Based Platform – You can access your Canva projects from any device, whether it’s your laptop, tablet, or smartphone. This makes it easy to work on your designs wherever you are.
- Collaboration Features – Canva allows you to collaborate with others in real-time, which is perfect for teams working on blended designs.
Overall, Canva’s simple yet effective features make it an excellent choice for blending images, especially for those who don’t have advanced graphic design skills.
Also Read This: How to Create Your Own Foundation at Home
Step-by-Step Guide to Blending Two Images in Canva

Now that you know why Canva is a great tool for blending images, let’s dive into a step-by-step guide. Follow these easy instructions to create your own stunning blended images:
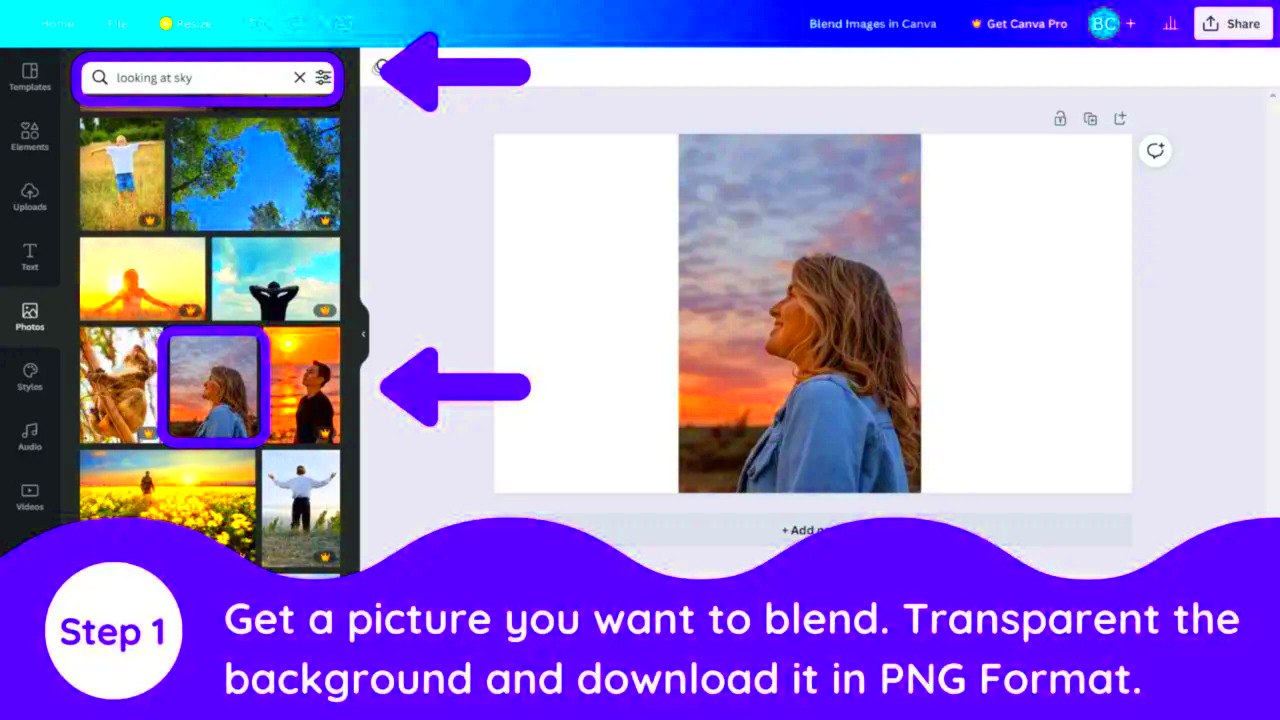
- Start a New Project: Open Canva and select a template or create a custom design size. You can start with a blank canvas or choose one of the pre-designed templates.
- Upload Your Images: Click on the “Uploads” tab on the left panel to upload the images you want to blend. You can upload images from your computer, or even directly from social media platforms like Instagram.
- Position Your Images: Drag and drop your first image onto the canvas. Position it where you want it to appear. Then, drag the second image and position it over or beside the first image, depending on your design.
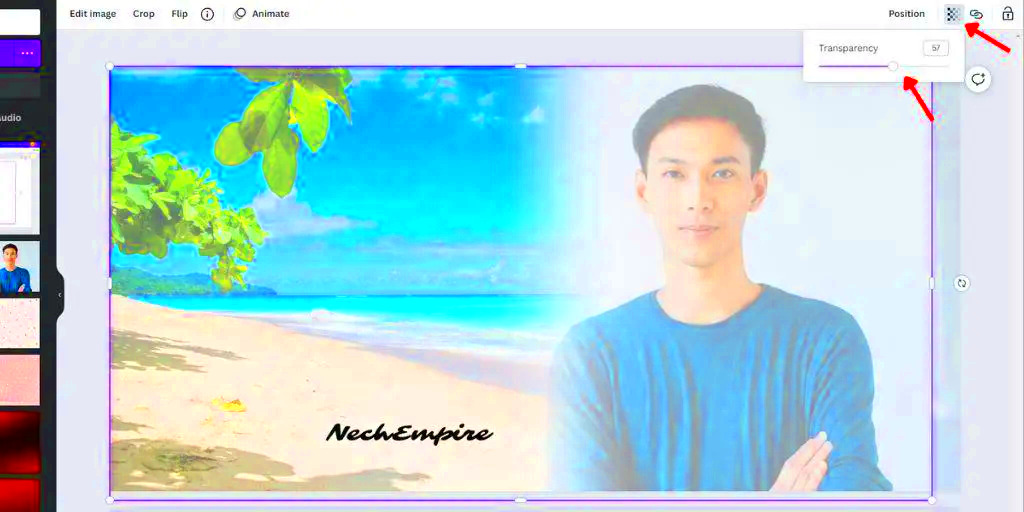
- Adjust Transparency: Click on the second image to select it. Then, click the “Transparency” button in the top-right toolbar. Lower the opacity of the second image until you get the desired effect. This creates the blending effect, where both images show through each other.
- Fine-Tune Your Blend: Adjust the positioning, size, and transparency of the images until they look perfectly blended. You can also use Canva’s "Effects" tab to apply filters or make more advanced adjustments like brightness, contrast, and saturation.
- Add Any Extra Touches: If needed, add text, shapes, or additional effects to complete your design. Canva offers a variety of elements to enhance your image blending.
- Download or Share: Once you're happy with your blended image, click the "Download" button at the top right corner. Choose your preferred file format (PNG, JPG, etc.), or share your design directly to social media.
And that's it! You've successfully blended two images in Canva. The process is simple and can be done in just a few clicks. With some creativity, you'll be able to produce beautiful, professional-looking designs in no time.
Also Read This: Invert Image Colors on Canva
Using Canva’s Transparency Tool for Blending

One of the simplest yet most effective ways to blend images in Canva is by using the Transparency tool. This tool allows you to make an image semi-transparent, letting the background or other elements shine through. It’s perfect for creating smooth blends or overlays without making drastic changes to the images themselves. Let’s explore how you can use this feature to make your designs stand out.
Here’s how to use Canva’s transparency tool for blending images:
- Select Your Image: After uploading your images to Canva, click on the image you want to blend. This will highlight the image and open the editing options.
- Open the Transparency Tool: In the top-right corner of the editor, you’ll find an icon that looks like a checkerboard. Click on it to open the transparency slider.
- Adjust the Transparency: Move the slider left or right to make the image more or less transparent. Lower the opacity to create a more subtle blend with the background or the other image.
- Fine-Tune the Blend: Keep adjusting the transparency until you achieve the desired effect. You can blend images with one another or allow the background to show through without overpowering your design.
The beauty of using the Transparency tool is its simplicity. By adjusting the opacity, you can create professional-looking blends without needing advanced graphic design skills. Plus, this method works great for layering images or making subtle adjustments that add depth to your design.
Also Read This: Quick and Effortless Beauty Tips for Everyday Makeup
Adding Effects and Adjustments to Enhance the Blend
Once you’ve blended your images using transparency, it’s time to take things a step further by adding effects and making adjustments to improve the overall look. Canva offers a variety of tools to enhance your blend and create a more polished design. These effects and adjustments can help create a seamless and visually appealing result, even when you’re blending two very different images.
Here are some options you can use to enhance your image blend:
- Filters: Canva provides a range of filters that can instantly change the mood of your image blend. Whether you want to add a vintage feel, increase the contrast, or soften the tones, filters can make your design pop.
- Brightness and Contrast: Adjusting the brightness and contrast of your images can help them blend more naturally. If one image is too dark or too bright, tweaking these settings can balance them out and make the blend look smoother.
- Saturation: If you want the colors in your blended images to stand out more, you can adjust the saturation. Increasing saturation makes colors more vibrant, while decreasing it can create a more muted, harmonious look.
- Blur: Sometimes, applying a subtle blur to one of the images can create a soft, dreamy effect. This works especially well if you want the background image to be less distracting while keeping the focus on the foreground image.
- Vignette: A vignette effect darkens the edges of the image, drawing the viewer’s eye to the center. It can be a great way to enhance the focus of your blended design, especially when layering images.
These adjustments can make a world of difference when it comes to blending images seamlessly. By experimenting with these tools, you’ll be able to elevate your designs and give them a more professional and polished look.
Also Read This: How to Create a Banner in Photoshop CS5 Comprehensive Guide
Creative Ideas for Blending Two Images in Canva
Blending two images in Canva isn’t just about technical skills – it’s also about creativity! With the right approach, you can create eye-catching designs that capture attention and tell a story. Whether you’re designing for social media, a website, or personal projects, here are some creative ideas to inspire your image blending:
- Double Exposure Effect: A popular design trend, double exposure involves blending two images so that they overlap in a way that tells a story. For example, you can blend a portrait with a nature scene, creating a surreal and artistic look.
- Collage Style: Combine multiple images to form a collage. Use transparency and positioning to blend the edges of the images together, creating a seamless effect. This style works great for creating mood boards or promotional graphics.
- Overlay with Text: Blend images into the background and overlay them with bold text. This is perfect for creating posters, social media graphics, or inspirational quotes. The transparency effect can help the text stand out without competing with the images.
- Nature and Architecture Blend: Combine natural landscapes with architectural elements. For example, blending a cityscape with a landscape image can create a striking contrast and allow you to merge the two worlds seamlessly.
- Layering with Patterns: Blend an image with a textured background or pattern. This could be a geometric pattern, watercolor texture, or abstract design. Using the transparency tool helps the image blend with the pattern, making the design feel cohesive.
These ideas are just the tip of the iceberg. The possibilities are endless when it comes to blending images creatively in Canva. Experiment with different combinations, adjust the transparency, and use filters to explore new effects. With a little practice, you'll be able to create stunning and unique designs that will stand out.
Also Read This: Using Getty Images for Free and Legally Without Copyright Infringement
Common Mistakes to Avoid When Blending Images
While blending images in Canva is a fun and creative process, it’s easy to make a few common mistakes along the way. These mistakes can result in a design that feels off or doesn’t quite hit the mark. To help you avoid these pitfalls, we’ve compiled a list of some of the most common mistakes people make when blending images and how to steer clear of them.
- Using Clashing Images: One of the biggest mistakes is blending images that don’t complement each other. It’s important to choose images that have a similar color palette, lighting, and overall vibe. When the images clash, it can make the design look disjointed and unprofessional.
- Overusing Transparency: While transparency is a great tool, using too much of it can make your images look faded and blurry. Always make sure that the transparency level doesn’t reduce the visibility of key details in your design.
- Ignoring Image Resolution: Using low-resolution images for blending can result in pixelated or blurry results. Make sure both images are high-quality to ensure a clean and sharp design. Canva recommends using images that are at least 72 dpi for optimal results.
- Unbalanced Image Placement: The positioning of your images is key to a successful blend. Placing images too close together or misaligning them can cause the design to look unbalanced. Pay attention to the space between your images, and use Canva’s alignment tools to keep everything neat.
- Not Adjusting Colors: Sometimes, even if two images are perfectly blended, their colors may not match. Adjusting the brightness, contrast, and saturation of each image ensures they complement each other and help the blend feel natural.
By being mindful of these common mistakes, you’ll be able to create more polished and professional-looking designs. Taking the time to choose the right images, adjust settings carefully, and balance your composition will make all the difference.
Also Read This: Printing Large Images on Multiple Pages in Canva
Frequently Asked Questions about Blending Images in Canva
If you're new to blending images or working with Canva’s features, you might have some questions. Here are some frequently asked questions to help clarify common doubts and provide more insights into using Canva for image blending:
- Can I blend more than two images in Canva?
Yes, Canva allows you to blend multiple images. You can layer as many images as you need, adjust the transparency of each, and fine-tune their positions to create a more complex blend. - How do I maintain high image quality when blending?
To maintain high-quality images, make sure you upload high-resolution photos. Canva works best with images that are at least 72 dpi. Avoid using overly compressed images that might lose their sharpness when edited. - Can I use Canva’s transparency tool for other effects?
Yes, you can use the transparency tool for various design effects. For example, you can use it to create faded backgrounds, subtle overlays, or layer text and images in unique ways. Experiment with the transparency slider for different results. - How do I undo a mistake while blending images?
If you make a mistake, simply use the "Undo" button in Canva (the arrow icon at the top left of the screen). You can also use "Ctrl + Z" (Windows) or "Cmd + Z" (Mac) to quickly undo any changes. - Can I download my blended images in different formats?
Yes, Canva allows you to download your designs in various formats, including PNG, JPG, and PDF. For images with transparent backgrounds, use the PNG format.
These FAQs should help you navigate some common challenges when blending images in Canva. Whether you’re a beginner or an experienced user, Canva makes it easy to blend images and create stunning visuals with a bit of practice.
Conclusion and Final Thoughts
Blending images in Canva is an enjoyable and accessible way to take your design projects to the next level. Whether you’re working on social media graphics, posters, or personal projects, the ability to combine images creatively can help you produce eye-catching and professional-looking visuals. By using tools like transparency, effects, and thoughtful positioning, you can create seamless blends that elevate your design work.
Remember to avoid common mistakes like clashing images, poor image resolution, or overuse of transparency. By taking the time to experiment and fine-tune your designs, you’ll build confidence and develop your unique style.
Canva provides all the tools you need to get started with image blending, and with a little practice, you’ll be able to produce designs that truly stand out. So go ahead, try blending your images today, and let your creativity shine!

 admin
admin


