Blending projectors into a single image is a technique used to create larger, more immersive displays by combining multiple projector outputs. This is commonly seen in events, exhibitions, and immersive environments where a seamless image is required over a large area. By using this method, you can overcome the limitations of individual projectors, such as brightness or
In this post, we will explore how to blend projectors effectively and the tools you'll need to achieve a perfect blend. Whether you're working on a small-scale project or something more complex, understanding the basics of projector blending will set you up for success. Let's dive into how blending multiple projectors into one image can elevate your presentations and displays.
Understanding the Basics of Projector Blending

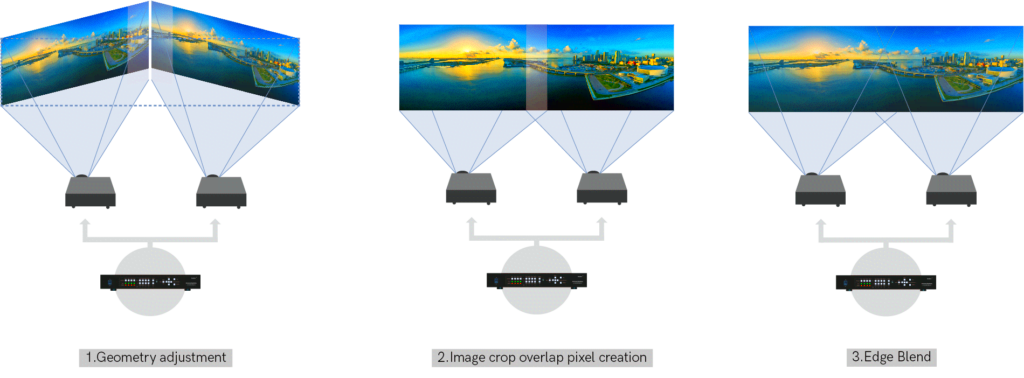
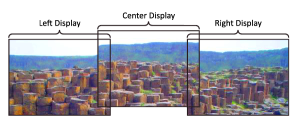
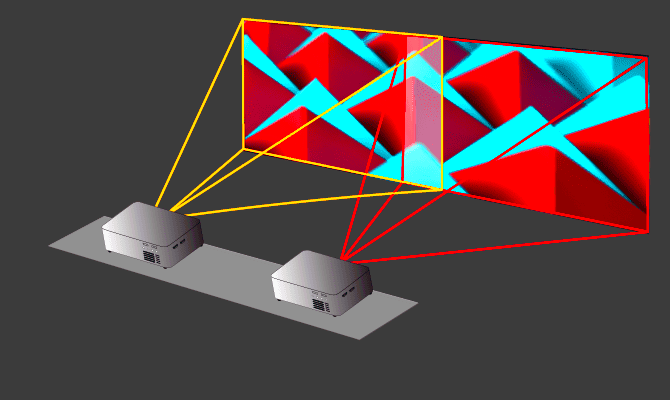
Projector blending involves overlapping the images from two or more projectors and adjusting them so that the seams between the projectors are invisible to the viewer. This is done through a combination of hardware, software, and precise alignment techniques. When done correctly, the result is a single, large image with no visible breaks or gaps, creating a stunning visual experience.
Here’s how projector blending typically works:
- Image Alignment: Projectors are carefully positioned and aligned to overlap at the edges, where the images meet.
- Edge Blending: Software is used to smoothly transition the image from one projector to the next, ensuring there are no harsh lines or overlaps.
- Brightness and Color Matching: Projectors need to be calibrated so their brightness and color output match, ensuring consistency across the entire display.
Blending projectors can be done manually or using specialized software, and the process can vary depending on the complexity of the project. Whether you're setting up a simple display or a large-scale projection for an event, understanding the basic principles will help you achieve a smooth, cohesive image every time.
Key Components Required for Projector Blending

To blend projectors effectively, there are several key components you'll need. These components work together to ensure the projectors project a seamless, unified image. Let’s break down the essential tools and technology:
- Projectors: The type and number of projectors you use will depend on the size and resolution of the image you want to create. Look for projectors with high resolution and brightness for the best results.
- Blend Software: Special software is crucial for aligning and blending the images from multiple projectors. Some popular options include software like Warper, MadMapper, and BlendUp. These programs allow you to adjust the images, match colors, and ensure the edges blend perfectly.
- Edge Blending Hardware: Some advanced setups use hardware solutions like edge blending units to assist in seamless transitions between images. These devices help reduce visible seams and control image overlap.
- Mapping Tools: You may need a projector mapping tool to help position the projectors on the desired surface, such as a wall or screen. These tools can ensure that each projector’s image aligns perfectly with the others.
- Calibration Equipment: To match brightness and color across the projectors, you'll need calibration tools like light meters and colorimeters. These devices allow you to adjust each projector’s settings to create a uniform look across the entire image.
With the right components, blending projectors can be an enjoyable and rewarding process. If you're looking to create large-scale, immersive displays or simply want to expand your current setup, these components are the foundation of successful projector blending.
Choosing the Right Projectors for Blending
When it comes to projector blending, selecting the right projectors is crucial for achieving a seamless and high-quality result. Not all projectors are built the same, and some are better suited for blending than others. Factors like resolution, brightness, lens options, and ease of alignment all play a role in making your projector setup work smoothly. Let's look at the key aspects to consider when choosing the right projectors for blending:
- Resolution: Higher resolution projectors (such as 4K or at least Full HD) provide better image quality and clarity, especially when blending multiple projectors. The more pixels you have, the sharper and more detailed your final image will be.
- Brightness: Brightness is essential for projector blending, especially if you're projecting onto a large surface or in a well-lit environment. Projectors with a higher lumen rating (like 5000 lumens or more) will help ensure your image is visible and vibrant.
- Lens Shift and Throw Ratio: Lens shift allows you to adjust the position of the image without physically moving the projector, which is helpful for aligning multiple projectors. A good throw ratio is necessary to cover the desired projection area without distortion.
- Color Accuracy: Projectors with better color accuracy are essential to ensure all projectors display the same color, making the blend appear uniform. This is especially important when projecting onto white or neutral-colored surfaces.
- Edge Blending Features: Some projectors come with built-in edge blending tools, allowing you to fine-tune the overlapping areas more easily. If your projectors don’t have this feature, you can rely on software solutions to handle the blending.
In short, the right projectors should offer high resolution, brightness, color accuracy, and the necessary features to make blending smooth. By choosing projectors that meet these criteria, you’ll have a better foundation for creating a stunning final image.
Setting Up Multiple Projectors for Blending
Once you’ve selected your projectors, setting them up correctly is key to ensuring a smooth blend. Proper positioning and alignment are essential, as even slight misalignments can result in noticeable seams in your image. Here's a step-by-step guide to setting up your projectors for blending:
- Position the Projectors: Arrange your projectors at the required distance from the projection surface. Typically, projectors should be positioned so that their beams slightly overlap in the areas where the images will merge.
- Align the Projectors: Use alignment tools like laser pointers or a projector mapping grid to ensure the images from the projectors overlap evenly. Adjust the projectors' angles to minimize distortions and align the horizontal and vertical axes of the image.
- Ensure Even Brightness: Each projector should have similar brightness levels to prevent one part of the image from being darker or more washed out than others. Adjust the brightness settings on each projector to achieve a consistent image across the entire display area.
- Set the Right Keystone Correction: Some projectors will require keystone correction to adjust the shape of the image, especially if they are not perfectly aligned. Avoid over-correcting, as this can distort the image. Use minimal correction to keep the images as natural as possible.
- Overlap the Edges: The images from each projector should slightly overlap at the edges. The overlapping area will be blended by the software, but make sure this overlap is consistent and doesn’t interfere with the focal points of the image.
- Test and Adjust: After setting up, do a test projection and adjust the alignment and brightness as needed. Small tweaks can make a big difference in ensuring the projectors blend seamlessly.
Proper setup is critical for ensuring that all projectors contribute to the final image effectively. With careful positioning, alignment, and adjustment, you’ll be on your way to creating a stunning blended projection.
Using Software for Projector Blending
While hardware plays a significant role in projector blending, software is the true magic behind achieving a flawless blend. Blending software allows you to control the overlap, color matching, and edge transitions between projectors, ensuring a seamless and uniform image. Here's how to make the most of blending software:
- Alignment and Warping: Most blending software provides tools to adjust and warp the images from the projectors to ensure perfect alignment. This is especially useful when working with curved or irregular surfaces. You can adjust the projectors’ outputs to align perfectly at the overlap areas.
- Edge Blending: Edge blending is where software really shines. It allows you to control how the overlapping areas of the image transition, eliminating harsh lines and visible seams. Through software, you can adjust the intensity of the blend to create a smooth and natural transition.
- Brightness and Color Calibration: To ensure that the projectors display the same brightness and color consistency, software can help you calibrate the projectors. Many programs include color matching tools to adjust each projector’s color output and make sure that the final image looks uniform across the entire screen.
- Mapping Tools: Some software allows you to map the projectors onto a specific shape or surface. This is useful for creative projections, like projecting onto a building or a 3D object. The software allows you to manipulate the image so it conforms perfectly to the surface shape.
- Multiple Projector Control: Advanced software also lets you control multiple projectors simultaneously, making it easier to make global adjustments or updates to your display setup.
Popular software options for projector blending include MadMapper, Resolume, and Lightware. Each of these programs offers robust tools to help with the blending process, and while they may differ in features, the principles of aligning, blending, and color correcting remain the same. Using the right software will ensure your projectors work together seamlessly, creating an immersive and high-quality image every time.
Common Challenges in Projector Blending and How to Overcome Them
Projector blending can be a complex process, and like any technical setup, it comes with its fair share of challenges. While the results are often impressive, overcoming these obstacles requires careful planning, precise adjustments, and sometimes a bit of troubleshooting. Let’s take a look at some of the most common issues faced during projector blending and how to solve them:
- Misaligned Projectors: One of the most frequent issues is projector misalignment. Even a small misalignment can result in visible seams in the image. The solution is to use proper alignment tools (like laser pointers or grid systems) to ensure the projectors are perfectly positioned.
- Brightness Inconsistency: When projectors have different brightness levels, the final image can appear uneven. This issue can be addressed by adjusting the brightness on each projector to match. Calibration tools like light meters can help fine-tune each projector’s output.
- Color Mismatch: If the colors displayed by each projector are not synchronized, the image may look inconsistent, especially in blended areas. This can be solved through color calibration using a colorimeter to ensure each projector displays consistent color tones.
- Visible Seams: The most frustrating issue is the appearance of visible seams where projectors overlap. Software edge blending tools are essential for smooth transitions. Make sure to adjust the blend settings in your software to avoid harsh lines or noticeable gaps.
- Geometric Distortion: When projecting on uneven surfaces, distortion can occur. This can be managed by using projector warping or mapping software that allows you to adjust the shape and alignment of the image based on the surface’s unique features.
While these challenges can be frustrating, they are all solvable with the right tools and techniques. By taking a methodical approach and adjusting as needed, you can achieve a flawless, seamless projection every time.
Best Practices for Seamless Projector Blending
Achieving a seamless projector blend requires more than just the right equipment—it also involves following best practices that ensure everything works harmoniously. Whether you're a beginner or an experienced professional, here are some best practices to keep in mind:
- Careful Projector Placement: The physical positioning of your projectors is crucial. Make sure the projectors are positioned at the correct distance and angle for optimal overlap. Small adjustments in positioning can make a significant difference in the final blend.
- Use High-Quality Projectors: Invest in high-resolution, high-lumen projectors that can deliver bright and crisp images. Higher-quality projectors will help ensure the blend looks sharp and consistent, especially in large-scale setups.
- Calibrate Each Projector: Color calibration and brightness matching are essential for achieving a uniform display. Use calibration tools to make sure each projector outputs similar brightness and color settings. A well-calibrated system will reduce the chance of noticeable differences in the final image.
- Utilize Edge Blending Software: Edge blending software is a key tool for ensuring smooth transitions between projectors. Make sure to adjust the overlap, brightness, and color in the software to create a seamless experience. Don't neglect the importance of fine-tuning the blend for optimal results.
- Perform Regular Tests: Always test your setup before the final display. Run multiple tests to check for any alignment issues, color mismatches, or visible seams. Regular testing allows you to make adjustments and avoid surprises during the actual projection.
- Keep the Projectors Clean: Dust and dirt on projectors can interfere with the quality of your projection, leading to poor blending and reduced brightness. Regularly clean the lenses and filters to ensure that your projectors are operating at their best.
By following these best practices, you'll ensure that your projector blend looks professional and flawless. Proper planning, equipment, and maintenance go a long way in creating the perfect blended projection every time.
FAQ
Here are some common questions about projector blending and their answers:
- What is the ideal overlap for projector blending?
Typically, a 10% to 20% overlap is ideal for blending projectors. Too little overlap may create visible seams, while too much can cause the images to become distorted or too dark. - Do I need special equipment to blend projectors?
While some projectors come with edge blending features built-in, you’ll usually need software for fine-tuning the blend. Calibration tools like colorimeters and light meters are also useful for achieving optimal results. - Can I use any projectors for blending?
While most modern projectors can be used for blending, those with higher brightness, resolution, and color accuracy are better suited for creating seamless displays. It's important to ensure that the projectors are of similar quality to avoid inconsistencies. - How do I handle blending on curved surfaces?
Blending on curved surfaces requires specialized warping software that adjusts the image to fit the surface. This software can modify the image shape, eliminating distortion and ensuring a smooth transition across the projection. - How can I avoid visible seams in my projection?
Visible seams can be reduced by using edge blending software that adjusts the overlap areas to create a smooth transition. Ensure that the projectors are well-calibrated and positioned correctly to minimize any alignment issues.
If you have more specific questions or need further assistance, feel free to reach out for personalized advice on projector blending!
Conclusion
Projector blending is an exciting technique that allows you to create stunning, immersive visuals by combining the outputs of multiple projectors. Whether you're working on a large-scale event, an art installation, or a business presentation, understanding the fundamentals of projector blending can help you achieve seamless, professional results. By choosing the right projectors, setting them up correctly, using the appropriate software, and following best practices, you can overcome common challenges and create a captivating display. With careful planning and attention to detail, you'll be able to impress your audience with a smooth and high-quality blended image every time.

 admin
admin


