Documents that are enhanced with pictures become more attractive and engaging. It is important to know how to move images within Microsoft Word at will in order for one to design polished professional layouts. In this section, we will discuss the basic tenets of image movement that include techniques of inserting images and controls determining their position in your paper.
Up until October 2023, you are trained on data. When an image is inserted into Word, it usually becomes part of the text flow. This means it can shift position based on how you edit your text. However, word offers various tools to control placement of images. Grasping these tools will allow you create the layout you want.
These are some of the important terms to remember:
- Inline with Text: The image moves with the text and acts like a text character.
- Floating: The image can be positioned independently of the text, allowing for greater flexibility.
- Text Wrapping: This feature lets text flow around the image in different styles.
Using the Drag and Drop Method for Images
In Word, dragging an image from one place and putting it to another is among the simplest methods of moving pictures. The functioning of this technique:
- Click on the image you want to move.
- Hold down the mouse button.
- Drag the image to your desired location.
- Release the mouse button to place the image.
Specialized in quick repositioning of pictures, this approach is appropriate. On the other hand, if the picture is inline with text, it may not move freely like a floating one would. To make it floating follow these steps:
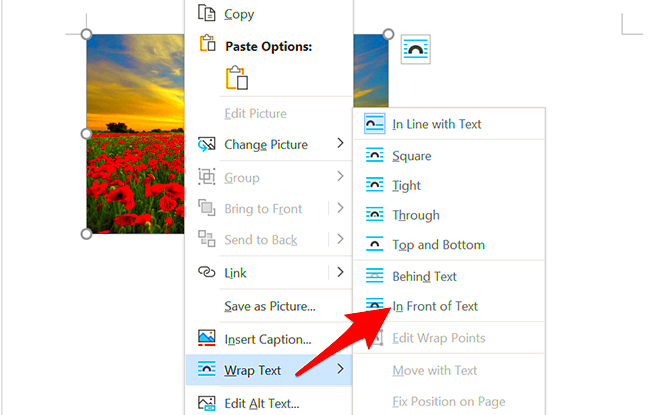
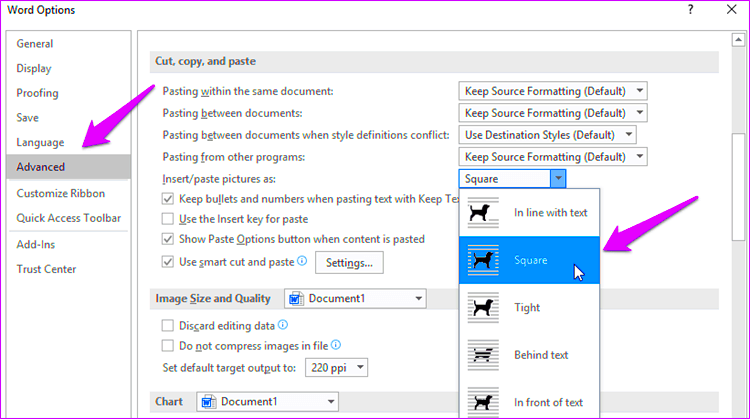
- Right-click on the image.
- Select "Wrap Text."
- Choose a wrapping style such as "Square" or "Tight."
Now, the image can be dragged and dropped anywhere on the page without disturbing the text around it.
Also Read This: How to Download Free Images from Getty Images Legally
Adjusting Text Wrapping Settings for Images
In your paper, text wrapping is a major factor that influences how text relates to images. You can have more vibrant and attractive layouts by changing the text wrapping settings. Here are the main choices you can make:
| Wrapping Style | Description |
|---|---|
| In Line with Text | The image behaves like a text character and moves with the text. |
| Square | The text wraps around the image in a square shape. |
| Tight | The text hugs the contours of the image closely. |
| Through | Text can flow through transparent areas of the image. |
| Top and Bottom | Text only appears above and below the image. |
| Behind Text | The image appears behind the text, allowing for layering effects. |
| In Front of Text | The image overlaps the text, making it the focal point. |
To modify text wrapping settings all you have to do is just right click on image, select “Wrap Text” and choose an option of your liking. This modification offers more control regarding images interacting with texts thus making a document appear better.
Also Read This: Effective Methods for Downloading YouTube Shorts on Mobile and Desktop
Utilizing the Layout Options for Better Control
Word has various layout options, which give you significant control of images. You can set these settings to create a neat appearance that boosts the readability of your document. In this section, we will show you how to open and apply layout options so as to achieve effective moving and positioning of images.
In order to get at the layout choices, do the following things:-
- Click on the image you want to adjust.
- Look for the "Layout Options" button that appears next to the image.
- Click on it to reveal different layout choices.
Here is a few of principles of Layout Option that might be useful for you:
- Align: This helps you line up your image with the text or other objects. You can align your image to the left, center, or right.
- Rotate: You can easily rotate your image to fit your document’s design.
- Position: This option allows you to set the precise location of the image on the page.
Your documents can look more organized if you utilize the layout options well. For instance, if you want your pictures to always show up on the same spot on every page, you can use a fixed position. Therefore, when you edit the text it will not be stirring your images around.
Also Read This: Guide to Adding Photos to Adobe Stock from Lightroom
Resizing Images to Fit Your Document Layout
When producing a visually appealing paper, resizing images is vital. The entire layout could go for the better if a picture is either too big or too little, its size having been changed. This segment will provide you with a tutorial on how to resize Word pictures effectively.
In resizing images, there are a few things that you may put into consideration:
- Click and Drag: Click on one of the corners of the image, then drag to resize. This method keeps the image's proportions intact.
- Using the Ribbon: Select the image, go to the "Format" tab, and find the "Size" group. You can enter specific measurements for height and width.
- Maintaining Aspect Ratio: To keep the image from becoming distorted, hold down the Shift key while dragging a corner handle.
Additionally, if your image is large, you might want to decrease its resolution to enhance the performance. This can be done as follows:
- Click on the image.
- Go to the "Format" tab.
- Select "Compress Pictures."
- Choose your desired resolution settings.
This will assist your images integrating into your document layout without any visible seams hence looking organized and professional at the same time.
Also Read This: How to Earn Money on Rumble Unlocking the Secrets to Monetizing Your Content
Grouping Images and Text for Easy Movement
The act of placing images alongside text in word document allows moving many items concurrently thus conserving some time and energy. This is especially beneficial in cases where one would want to remain with the images as well as their relevant context during document rearrangement. Here we shall discuss how to accomplish grouping things proficiently.
Grouping images and text is done in the following manner:
- Select the images or text boxes you want to group. You can do this by holding down the Ctrl key while clicking each item.
- Once selected, right-click on one of the items.
- Select "Group" from the context menu, then choose "Group" again.
Once you’ve created groups, you can shift the whole selection as a single entity. This works out well for retaining your designs undamaged. Other reasons for grouping include:
- Simplifies Movement: No need to adjust each item individually.
- Preserves Layout: Keeps everything in place when editing.
- Easy Formatting: Apply the same formatting to all grouped items at once.
In case you have to separate the items afterwards, just perform a right-click on the group, pick "Group," and subsequently select "Ungroup. If your texts and images are grouped together, this will facilitate creation of documents as it allows for better organization of layouts.
Also Read This: Streamable to MP3 – Learn How to Download Streamable Videos as Music
Using Keyboard Shortcuts for Efficient Movement
In case you didn’t know, the time you spend moving images in Word could be saved with keyboard shortcuts. With these simple key combinations, it will be possible for you to relocate images fast and easily without using your mouse alone. Some of the useful shortcuts for this purpose shall be discussed here.
Here are a few keyboard shortcuts that can assist you in managing images within your Word documents:
| Action | Shortcut |
|---|---|
| Select the image | Click on the image |
| Move the image up | Alt + Up Arrow |
| Move the image down | Alt + Down Arrow |
| Move the image left | Alt + Left Arrow |
| Move the image right | Alt + Right Arrow |
| Group selected images and text | Ctrl + G |
| Ungroup selected images and text | Ctrl + Shift + G |
Using these shortcuts can help you work seamlessly. For instance unless you need to change only little position of an image, the arrow keys are enough. You can also hold the Alt button together with arrow keys and move the image slightly anywhere. This great deal of eminence comes in handy particularly after you have decided to line up many images or text boxes appropriately.
Also Read This: Who Is the Oldest YouTuber Celebrating Creators Breaking Age Barriers
Frequently Asked Questions
Although there are numerous inquiries regarding transferring graphics in Word, we have provided explicit responses below:
- Can I move images freely without affecting the text?
Yes, you can. By changing the text wrapping settings to "Floating," you can move the image independently of the text. - How do I ensure my image maintains its quality when resizing?
Always use the corner handles to resize the image to maintain its aspect ratio. This will help preserve the quality of the image. - What if my image is not aligning correctly with text?
Adjust the layout options and text wrapping settings to see what works best for your document. You may need to try different combinations. - Can I group more than two items?
Absolutely! You can group as many images and text boxes as you want for easier movement.
Do not hesitate to contact us if you have more specific queries or problems. It will get easier with more practice!
Conclusion on Image Movement Techniques in Word
Mastering picture motion in Word can significantly improve the look of your document. By utilizing the right techniques, you are able to place images, alter their proportions, and design a system that effectively conveys your message. Do not forget; keyboard shortcuts, will help you save time and make work easier.
HTML comments are essential as they help in facilitating the proper working of a website. Grouping techniques have an impact on image placement. Each design element contributes to making professional documents by understanding how it works. Moving images will be easier and fun once you become familiar with these tools.
A an additional point is that the next time you’re dealing with a document, you should be willing to try out these techniques on your own. By making an effort to improve this art form one can come up with very good looking documents which not only appear fantastic but also communicate messages explicitly.
 admin
admin


