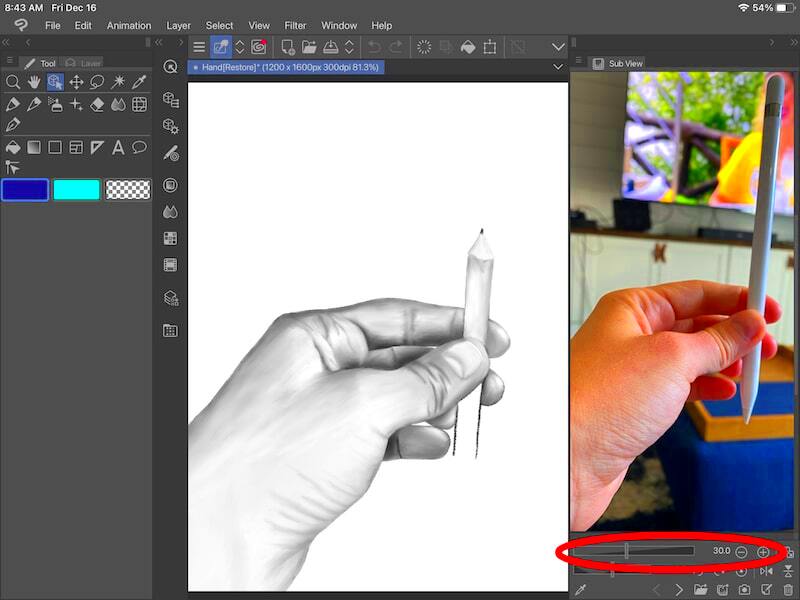
Adding reference images in Clip Studio Paint is a great way to enhance your artwork. Whether you're a beginner or an experienced artist, using reference images can help you achieve more accurate proportions, colors, and overall composition. By integrating reference images into your workspace, you can quickly access visual guides without interrupting your creative flow. This feature is particularly useful when working on complex projects or when you need visual inspiration for specific details like poses, textures, or background elements. In this guide, we'll show you how to add reference images and use them effectively in your art.
What Are Reference Images and Why Use Them?

Reference images are external images that you can use as a visual guide while creating your artwork. These images can come from various sources, such as photos, concept art, or sketches, and can serve as a reminder for specific details, like anatomy, light sources, or color palettes. The main goal is to make the process of drawing or painting more efficient and accurate by having clear visual examples at hand.
Here are a few reasons why reference images are useful:
- Proportions and Anatomy: Helps you get the correct scale and body structure, especially in figure drawing.
- Composition: Assists with arranging elements on the canvas and setting the right perspective.
- Color Palette: Provides a visual reference for matching or experimenting with colors.
- Lighting and Shadows: Helps you understand how light interacts with objects, making your artwork more realistic.
By incorporating reference images into your workflow, you avoid starting from scratch each time and ensure that your art is both accurate and visually compelling.
Also Read This: Uploading Custom Images in ESPN Fantasy Football
Steps to Add Reference Images in Clip Studio Paint
Adding reference images in Clip Studio Paint is simple and can be done in just a few steps. Whether you're working on a new project or refining an existing piece, follow these steps to easily incorporate reference images into your workspace:
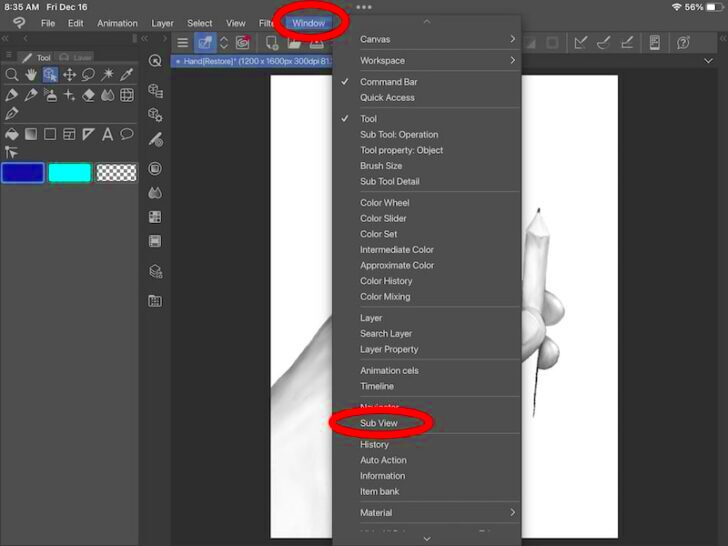
- Step 1: Open the Material Palette - Go to the Window menu and select Material. This will open the Material Palette, where you can browse for different materials, including reference images.
- Step 2: Import Your Reference Image - In the Material Palette, click the + (Plus) icon to add a new material. You can import an image from your computer or drag it directly into the Material Palette.
- Step 3: Place the Image on Your Canvas - Once the image is in the Material Palette, simply drag and drop it onto your canvas. The reference image will appear on a new layer, allowing you to move and resize it as needed.
- Step 4: Adjust the Image - Use the selection tool to resize and position the image to fit your artwork. You can also adjust the opacity of the reference image if you need to make it less intrusive.
- Step 5: Lock the Layer - Once you're satisfied with the position and size of your reference image, lock the layer to prevent accidental changes. This ensures the image stays in place while you work on your main artwork.
With these simple steps, you can quickly add reference images to your project in Clip Studio Paint, helping you stay organized and focused as you work.
Also Read This: How to Open an Image Plane in Fusion 360 for 3D Design Projects
Using the Material Palette to Add Reference Images
In Clip Studio Paint, the Material Palette is your go-to tool for adding reference images quickly and easily. This feature allows you to manage various materials, including images, textures, and brushes, all in one place. Whether you're importing a reference photo, a color palette, or a texture, the Material Palette ensures that everything you need is right at your fingertips. By dragging and dropping images from the Material Palette, you can integrate reference materials seamlessly into your artwork without interrupting your creative process.
Here’s how you can use the Material Palette to add reference images:
- Access the Material Palette: From the top menu, select Window, then choose Material. This will open the Material Palette, where you can see your available materials.
- Import Your Image: If your reference image isn’t already in the Material Palette, you can import it. Simply drag the image file from your computer into the Material Palette window.
- Use Existing Materials: Clip Studio Paint also offers a wide range of pre-installed materials. You can search the library for images that suit your project.
- Drag and Drop: To add your image to the canvas, just click on the reference image in the Material Palette and drag it onto your workspace.
By using the Material Palette, you can keep all your reference images organized in one place. It makes your workflow more efficient and keeps your canvas clutter-free.
Also Read This: How to Put Two Images Side by Side
Placing and Resizing Reference Images in Your Canvas
After adding a reference image to your workspace, you’ll want to ensure it’s placed and resized to fit your project needs. Clip Studio Paint offers easy-to-use tools for positioning and scaling images so they seamlessly integrate with your artwork. Whether you’re using the image for composition, color inspiration, or anatomy references, knowing how to adjust your reference
Here’s a simple guide on how to place and resize reference images in your canvas:
- Position the Image: Once the reference image is on your canvas, select the Selection tool (or press Ctrl + Shift + R to move the image). Drag the image to the desired position on your canvas.
- Resize the Image: To resize the reference image, click on one of the corner handles of the bounding box. Hold Shift while dragging to maintain the image’s proportions. If you want to adjust it freely, just drag any corner without holding the Shift key.
- Adjust Opacity: If the reference image is too bold or distracting, adjust its opacity. Select the reference image layer in the Layer Palette, then reduce the opacity to make it more transparent and less intrusive.
- Lock the Image: Once you're satisfied with the size and position, consider locking the reference image layer. This prevents accidental movement while you continue working on your artwork.
These steps ensure that your reference image is positioned correctly and doesn’t interfere with your workflow. By resizing and adjusting the opacity, you can tailor the reference image to suit your needs without cluttering the workspace.
Also Read This: How to Embed a YouTube Video on Behance for Video Creators
Layer Management for Reference Images
Layer management is an essential aspect of using reference images in Clip Studio Paint. Proper organization helps keep your canvas clean and your workflow smooth, especially when working with multiple reference images or layers. You can easily control visibility, position, and interaction with each layer, ensuring that your reference images don’t get in the way of your actual artwork.
Here’s how you can manage layers effectively for your reference images:
- Use Separate Layers for Reference Images: It’s best to place each reference image on its own layer. This way, you can move, hide, or adjust them independently of your artwork layers.
- Label Your Layers: Naming your layers helps you stay organized. For instance, label reference image layers as "Reference 1" or "Pose Reference" to easily identify them later.
- Lock the Reference Layers: Once you’ve positioned and resized your reference images, lock their layers to avoid accidental modifications. This ensures that you don’t move or alter the reference images while working on the main artwork.
- Group Your Layers: If you have multiple reference images, consider grouping them together. To do this, select the layers and press Ctrl + G to create a folder. This keeps your reference images organized and separate from your drawing layers.
- Adjust Layer Visibility: If your reference images become too overwhelming, you can toggle the layer visibility on and off by clicking the eye icon next to the layer. This allows you to see your artwork clearly while still having easy access to your references when needed.
By managing layers effectively, you’ll be able to keep your workspace clean, organized, and easy to navigate. Proper layer management also ensures that you can work on your artwork without distractions, while still having your reference images readily available.
Also Read This: How to Share TikTok Videos on YouTube Without Losing Quality
Common Mistakes to Avoid When Using Reference Images
While reference images are incredibly useful, it’s easy to make mistakes when using them. These errors can affect your workflow and the quality of your artwork. By being aware of common pitfalls, you can make the most of your reference images and improve your creative process. Here are some mistakes to avoid:
- Over-reliance on Reference Images: While reference images are great for accuracy, relying too much on them can stifle your creativity. It's important to use reference images as guides, but try to inject your personal style into your artwork as well.
- Using Low-Quality Reference Images: Always use high-quality reference images. Low-resolution or blurry images can lead to inaccurate details in your artwork, making it harder to capture the essence of your reference.
- Forgetting to Resize or Position Images Properly: Sometimes, artists forget to adjust the size and position of their reference images on the canvas. This can lead to clutter and confusion, making it harder to focus on your main artwork. Always ensure the reference image is properly sized and placed where it won’t interfere with your drawing space.
- Not Adjusting the Opacity: Reference images should not dominate your workspace. If they’re too visible, they can distract you. Make sure to adjust the opacity to make them more subtle, allowing you to focus on your drawing without losing sight of the reference.
- Ignoring Layer Management: Not organizing reference images into separate layers can lead to a messy workspace. Always create distinct layers for your reference images to keep them separate from your actual artwork, making it easier to move, lock, or hide them when necessary.
Avoiding these common mistakes will help you make better use of reference images, improving both your workflow and the quality of your artwork in Clip Studio Paint.
Also Read This: How to Reflect an Image in DaVinci Resolve for Mirror Effects
FAQ: Frequently Asked Questions About Reference Images in Clip Studio Paint
As you incorporate reference images into your work in Clip Studio Paint, you may have a few questions. Here are some of the most common ones answered:
- How do I adjust the opacity of a reference image?
To adjust the opacity of a reference image, select its layer in the Layer Palette. Then, move the opacity slider until the image becomes more subtle and doesn’t distract you while you work. - Can I use multiple reference images at once?
Yes, you can use as many reference images as you need. Just import each image onto its own layer, which will allow you to move and adjust them independently. - How do I keep my reference images organized?
Use the Layer Palette to organize your reference images into separate layers. You can also group them into folders or name each layer for easier identification. This will help you stay organized and make your workflow smoother. - Can I make my reference images more transparent?
Yes, adjusting the opacity of a reference image is simple. Select the layer with the reference image, and use the opacity slider in the Layer Palette to reduce its visibility as needed. - Why is my reference image not showing up on the canvas?
There are a couple of reasons this might happen. First, ensure that the reference image layer is visible by checking the eye icon in the Layer Palette. If it’s still not visible, try adjusting its opacity or re-importing the image.
If you have other questions or need further clarification, the Clip Studio Paint community and official documentation are excellent resources for more detailed guidance.
Conclusion: Enhancing Your Artwork with Reference Images in Clip Studio Paint
Using reference images in Clip Studio Paint is an incredibly effective way to enhance your artwork. They provide a visual guide for proportions, colors, textures, and composition, allowing you to create more accurate and polished pieces. By properly managing your reference images—whether it’s through the Material Palette, adjusting opacity, or organizing layers—you can streamline your workflow and improve your overall art process.
Remember that reference images are there to support your creativity, not to replace it. They should help guide your hand without limiting your artistic expression. With the right approach and by avoiding common mistakes, reference images can become an invaluable tool in your Clip Studio Paint toolkit. Happy drawing!

 admin
admin


