Adding links to images on Google Slides is a powerful way to make your presentations more interactive and engaging. It’s a simple yet effective way to direct your audience to other resources, web pages, or even other slides within the same deck. Whether you’re giving a professional presentation or sharing a creative project, clickable images can make your slides more dynamic and informative.
In this post, we’ll walk you through how to easily add links to images, why it’s beneficial, and best practices for keeping your links organized. Let’s dive into how you can enhance your Google Slides presentations with this simple technique.
Why Add Links to Images on Google Slides

Linking images in Google Slides offers a variety of advantages. Here are a few reasons why you should consider adding clickable links:
- Increased interactivity: Adding links makes your presentation more interactive by allowing users to click on images to get more information or navigate to other resources.
- Better audience engagement: A clickable image can grab attention and encourage your audience to explore content further, which is especially useful for tutorials or educational content.
- Streamlined navigation: You can link images to other slides in your presentation, helping create a smoother flow without needing to jump back and forth between slides.
- Direct traffic: By linking images to external websites, you can drive traffic to your business, blog, or any other relevant content.
- Clear and focused content: Instead of overcrowding a slide with text, you can add an image that links to more detailed content elsewhere, keeping the main presentation simple and focused.
Incorporating links into your images not only enhances the user experience but also adds another layer of depth to your presentation. It’s a small change that can make a big impact.
Also Read This: How to Mirror an Image in PowerPoint for a Unique Presentation
Step-by-Step Guide to Adding Links to Images

Now that you understand the benefits, let’s walk through the process of adding links to images in Google Slides. Follow these easy steps:
- Step 1: Select Your Image
First, click on the image that you want to add a link to. If you haven’t inserted an image yet, simply go to the "Insert" menu, select "
- Step 2: Open the Link Menu
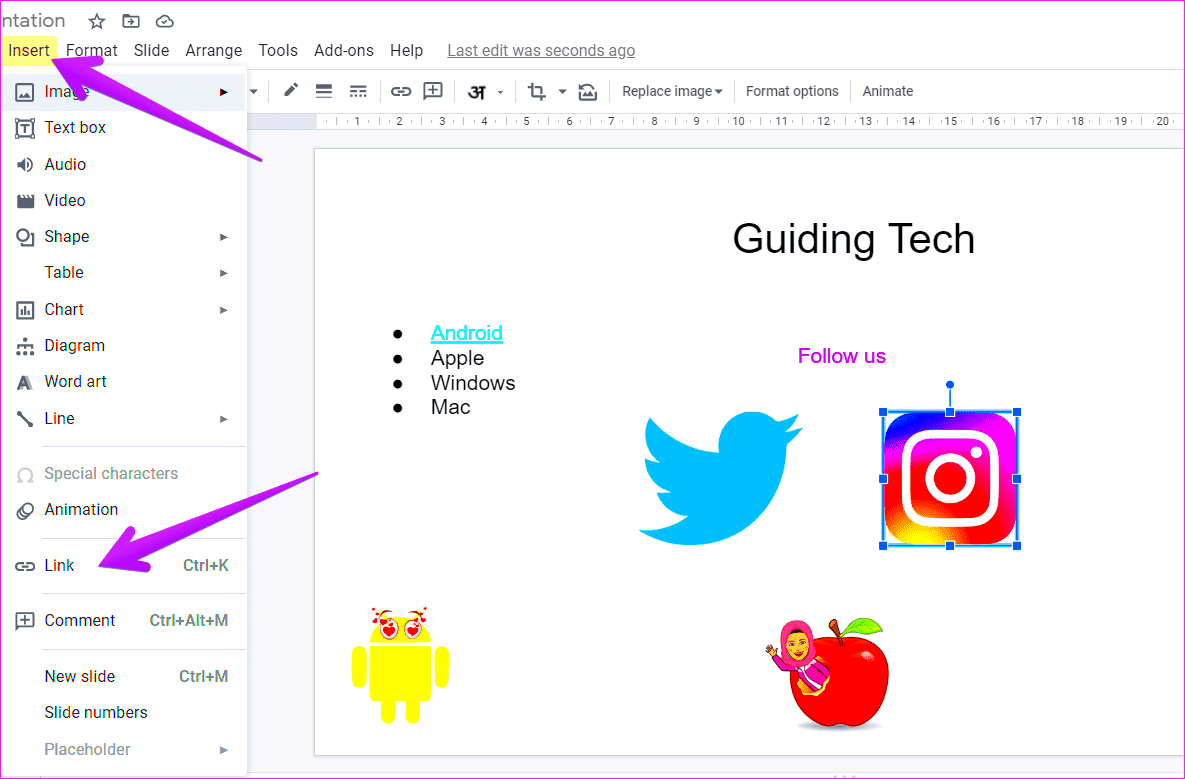
Once the image is selected, click on the "Insert" menu at the top of your screen and choose "Link" from the dropdown. Alternatively, you can right-click on the image and select "Link" from the context menu.
- Step 3: Enter the Link URL
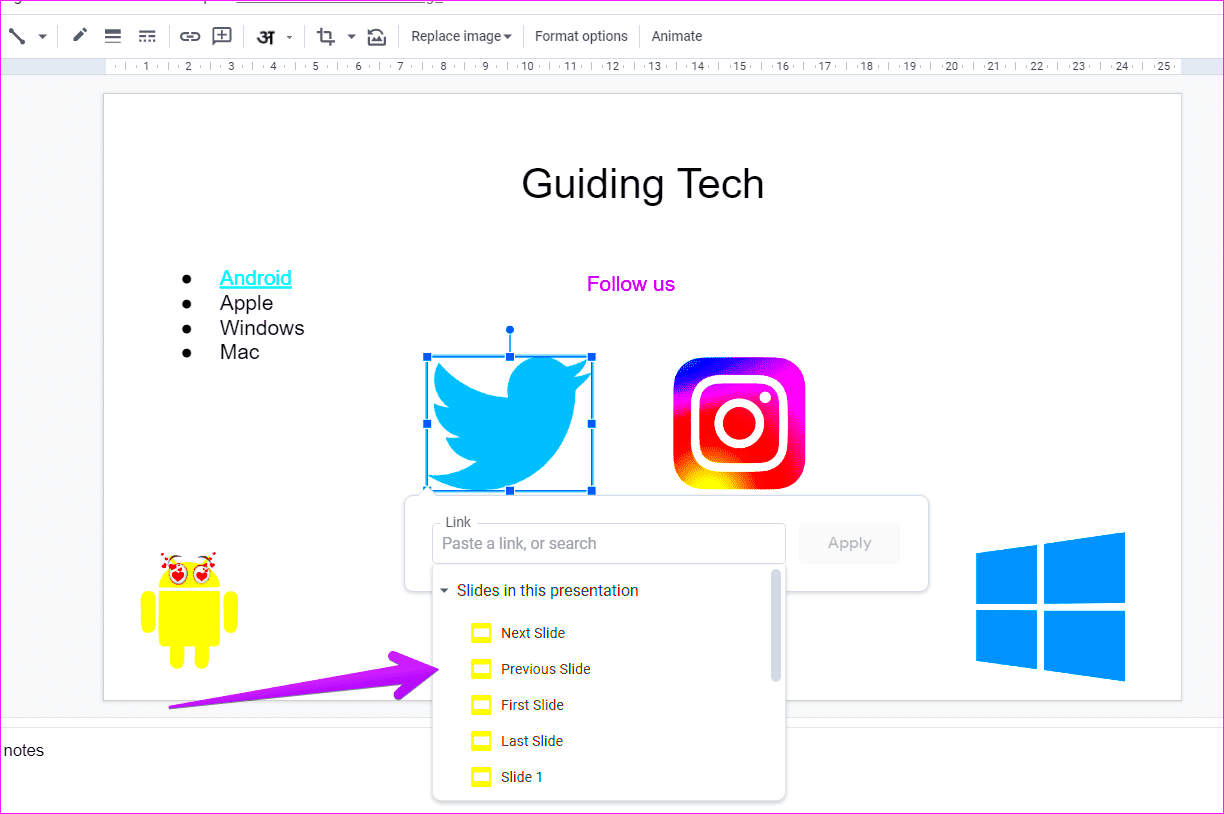
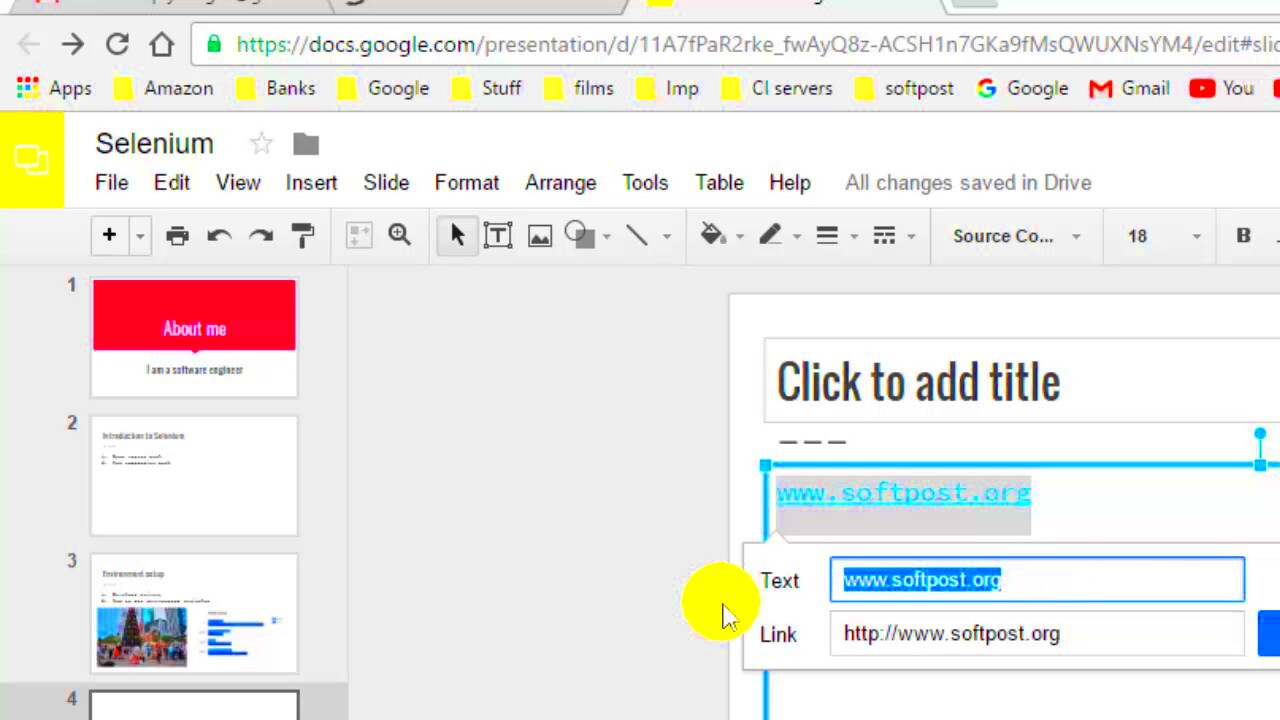
In the pop-up box that appears, type or paste the URL of the website, another slide, or any other destination you want to link to. If you want to link to another slide within the same presentation, click on the "Slides in this presentation" option and select the specific slide you want to link to.
- Step 4: Apply the Link
Once you've entered the link, click "Apply." Your image is now linked, and anyone who clicks on it will be directed to the URL or slide you specified.
- Step 5: Test the Link
To make sure your link is working properly, enter presentation mode (click on the "Present" button at the top-right). Click on the image, and check that it directs you to the correct destination.
It’s that simple! Adding links to your images takes just a few steps, and it can significantly improve the functionality and interactivity of your Google Slides presentation.
Also Read This: MOV vs MP4 Which Format Is Better for Uploading YouTube Videos
How to Link to External Websites or Slides
Linking to external websites or specific slides within your Google Slides presentation is a fantastic way to make your content more dynamic and informative. Whether you want to direct your audience to a product page, a relevant article, or another slide in your deck, the process is straightforward. Here’s how you can link to both external websites and slides in just a few simple steps:
- Link to External Websites:
To link an image to an external website, follow these steps:
- Click on the image you want to link.
- Click "Insert" in the top menu and select "Link."
- In the link dialog box, type or paste the full URL of the website you want to link to (e.g., https://www.example.com).
- Click "Apply" to save the link.
- Link to Specific Slides in the Same Presentation:
If you want to link to another slide within your current presentation, follow these steps:
- Select the image you want to add the link to.
- Click on "Insert" in the menu and choose "Link."
- In the link dialog box, click on the "Slides in this presentation" dropdown.
- Select the slide you want to link to from the list of slides.
- Click "Apply" to confirm the link.
Both methods are easy and quick. By adding these links, you can create a more interactive presentation that guides your audience to other important information seamlessly.
Also Read This: How to Import an Image Sequence into DaVinci Resolve
Tips for Organizing Links on Google Slides
As you add more links to your images and slides in Google Slides, it’s important to stay organized. Links can easily clutter your presentation if not handled properly, so here are a few helpful tips to keep everything neat and efficient:
- Use Descriptive Link Text:
Instead of using vague phrases like “Click here,” use descriptive text that tells the viewer what the link is about. For example, "Visit our product page" is much more informative than just "Click here."
- Group Related Links:
If you’re linking multiple images to the same website or page, group them together visually. This keeps your presentation clean and makes it clear that the images are connected.
- Use Color or Shapes:
Visually distinguish clickable images by using color coding or adding shapes around the image that indicate it's a link. This can help draw attention and make links more noticeable.
- Limit the Number of Links Per Slide:
Too many links on one slide can overwhelm your audience. Keep it to a few essential links per slide and only add more if absolutely necessary.
- Test Links Regularly:
Before presenting, test all links to make sure they’re working as expected. Broken links can be frustrating for your audience and may reduce the effectiveness of your presentation.
By following these tips, you can ensure that your links are easy to use and contribute to the overall effectiveness of your presentation without cluttering it.
Also Read This: How to Edit Job Alerts on LinkedIn
How to Edit or Remove Links from Images
Sometimes, you might need to make changes to existing links or remove them entirely. Whether it’s a typo, a change in destination, or a decision to remove a link from an image, here’s how to edit or remove links in Google Slides:
- Editing a Link:
To edit an existing link on an image, follow these steps:
- Click on the image that has the link you want to edit.
- Click the "Insert" menu and select "Link" (or right-click on the image and select "Link").
- In the pop-up box, edit the URL or slide link as needed.
- Click "Apply" to save the changes.
- Removing a Link:
If you want to completely remove a link from an image:
- Select the image with the link you want to remove.
- Click "Insert" and then "Link" (or right-click and choose "Link").
- In the link dialog box, you’ll see an option to remove the link.
- Click "Remove link" and then "Apply" to confirm the change.
Editing or removing links is a quick and simple process, ensuring that your presentation is always up to date and accurate. Whether it’s to fix a mistake or change direction, these options give you full control over your linked content.
Also Read This: Learn How to Use This LinkedIn Picture Downloader to Download Any Image
Common Issues and Troubleshooting Tips
While adding links to images in Google Slides is usually straightforward, sometimes issues can arise. It’s essential to troubleshoot these problems to ensure that your links work smoothly and your audience has a seamless experience. Let’s go over some of the most common issues and how to fix them:
- Broken Links: One of the most frustrating problems is when a link doesn’t work. This could be due to an incorrect URL or a missing slide reference. To fix it:
- Double-check the URL to make sure it’s typed correctly.
- If linking to another slide, ensure the slide number or title is correct.
- Links Not Responding in Presentation Mode: Sometimes, links work fine in edit mode but stop responding when you switch to presentation mode. To resolve this:
- Test the link in presentation mode before finalizing your slides.
- If it still doesn’t work, try removing and re-adding the link.
- Invisible Links: If your links seem invisible or unclickable, it may be because the clickable area is too small or not obvious. Try these solutions:
- Make the clickable area larger by adjusting the size of the image or adding a transparent shape over it.
- Change the color or add a border around the image to make the link more noticeable.
- Multiple Links on One Image: Google Slides does not support multiple links on a single image. If you need multiple destinations, consider splitting the image into separate clickable sections or using buttons to represent different links.
These troubleshooting tips should help you resolve most issues. If the problem persists, try refreshing your browser or clearing the cache, as sometimes the issue may be browser-related.
Also Read This: how to download image with transparent background
Best Practices for Using Links in Google Slides
Links are a great way to make your Google Slides presentations more interactive, but to make sure they enhance the user experience instead of distracting from it, follow these best practices:
- Keep Links Relevant: Always ensure that the links you add are relevant to the content of the slide. Irrelevant or excessive links can confuse or overwhelm your audience.
- Limit the Number of Links per Slide: Too many links on a single slide can make your presentation feel cluttered. Stick to one or two essential links per slide to avoid overwhelming your audience.
- Be Clear About Link Destinations: Use clear and descriptive text or image cues to show where your links will take the viewer. For example, instead of just saying "Click here," use "Visit our homepage" or "View the next section."
- Test Links Before Presenting: Always test your links before you present. This ensures that they are working as expected and leads your audience to the right place.
- Make Links Stand Out: You can make links more visible by changing the color of the image border, adding a shape around the link, or using text boxes that indicate clickable areas.
- Avoid Overloading Slides with External Links: It’s tempting to link to a lot of external resources, but too many links to external sites can distract your audience. Limit them to only the most important or valuable links.
By following these best practices, you can create a smooth, organized, and effective experience for your viewers, making the most of the interactive potential that links offer in Google Slides.
Also Read This: Promoting Your Shutterstock Portfolio: Effective Strategies to Increase Visibility and Sales
Frequently Asked Questions
Here are some of the most frequently asked questions about adding links to images in Google Slides. If you’re still unsure or facing issues, these answers may help:
- Can I link to a file stored on Google Drive?
Yes, you can link to files stored on Google Drive. Just click on the "Insert" menu, select "Link," and paste the shareable link to your Drive file. Ensure the file is set to "Anyone with the link can view" to ensure accessibility.
- Can I link an image to an email address?
Yes, you can link an image to an email address. When adding the link, type "mailto:[email protected]" in the URL box. This will create a link that opens the user’s default email client.
- Why isn’t my image link working in presentation mode?
Sometimes the link may not work in presentation mode if there is a browser issue or a temporary glitch in Google Slides. Try reloading the page or using a different browser to see if the issue persists.
- Can I add multiple links to one image?
Unfortunately, Google Slides doesn’t allow multiple clickable links on a single image. You’ll need to use different images or shapes for each link or create a transparent shape over the image with multiple links.
- Can I link images to another Google Slides presentation?
Yes, you can link to another Google Slides presentation. Simply copy the URL of the presentation and paste it into the link box when adding the link to your image.
These FAQs cover some of the most common questions, but if you have any other concerns, feel free to explore Google’s Help Center or ask for further assistance!
Conclusion
Adding links to images in Google Slides is a simple yet powerful way to enhance your presentations. Whether you're linking to external websites, other slides, or files, clickable images can make your content more interactive and engaging. By following the steps outlined above, you can easily incorporate links into your slides while ensuring they are organized and effective. Remember to test your links, keep your slides clean, and use best practices to maintain clarity and user engagement. With these tips in mind, you'll be able to create professional, interactive presentations that captivate your audience from start to finish.

 admin
admin


