Adding images to your Anki flashcards can significantly improve your learning experience, especially when dealing with complex topics or languages. By embedding images directly into your flashcards, you can create more visually engaging and memorable study materials. This approach helps reinforce information and makes learning more interactive. In this guide, we will explore how to add images to CSV files, which can be imported into Anki to enhance your flashcards.
Why Add Images to Anki Cards

Adding images to Anki cards can boost your memory retention and improve your ability to recall information. Images are a great way to break down abstract concepts, learn new vocabulary, or even memorize anatomy, geography, or historical events. Here’s why you should consider adding images to your Anki cards:
- Visual Memory: People tend to remember images better than words alone. Pairing an image with text makes it easier to recall information during reviews.
- Improved Understanding: Some subjects, like languages or science, are easier to learn when you can visualize concepts or items.
- Engagement: Images make your flashcards more interactive and engaging, which can keep you motivated to study consistently.
- Speed of Learning: Visual learning speeds up the process as it adds another layer of context to the material you are studying.
By adding images to your flashcards, you engage more of your senses, making your study sessions more effective and efficient.
How to Prepare Images for Anki Flashcards

Before adding images to your Anki flashcards, it's important to prepare them properly. Here are some essential steps to ensure everything runs smoothly:
- Choose the Right Image Format: Anki supports popular image formats like PNG, JPG, and JPEG. Make sure your images are in one of these formats for compatibility.
- Resize Your Images: Large images can slow down the loading time in Anki. Resize images to a smaller resolution while maintaining quality, especially if you’re dealing with many flashcards.
- Organize Your Images: Keep your images in a separate folder and name them clearly, so they’re easy to link to the correct flashcards in your CSV file. For example, name your images “image_001.jpg” or “word_001.png” for easy reference.
- Optimize Image Quality: If you’re including detailed images (like diagrams or text-heavy pictures), make sure the image is clear and readable. Low-quality images might reduce your learning experience.
Once your images are prepared, it’s time to add them to your CSV file. By following these steps, you’ll ensure a smooth process when importing your cards into Anki.
Steps to Add Images to CSV Files for Anki
Adding images to your CSV files for Anki is a straightforward process once you understand the steps involved. Below are the key steps to follow when preparing your CSV file with images:
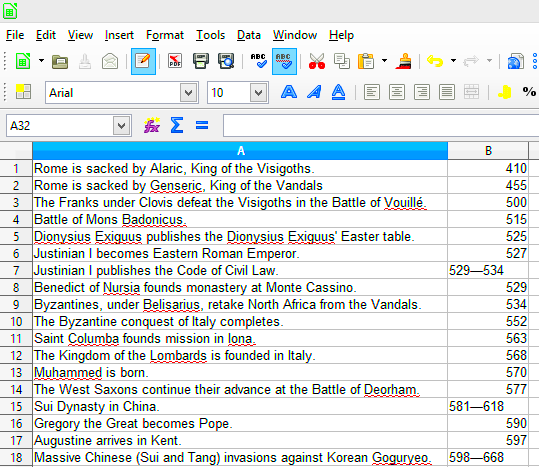
- Step 1: Prepare Your CSV File - Your CSV file should have two or more columns: one for the text (such as a question or term) and one for the corresponding answer (which can include an image). If you plan to add more fields, like audio or additional text, add more columns as needed.
- Step 2: Link the Images in the CSV - Instead of pasting images directly into the CSV file (which isn’t possible), link to the images saved on your computer. You’ll use relative paths to the images in the file. For example, if your image is stored in a folder called "Images," the link would look like this:
Images/image001.jpg. - Step 3: Save the Images in a Separate Folder - Make sure all images are stored in a dedicated folder within your Anki collection. This makes it easier to manage your resources. When Anki imports the CSV, it will automatically fetch the images from the folder using the paths you specified.
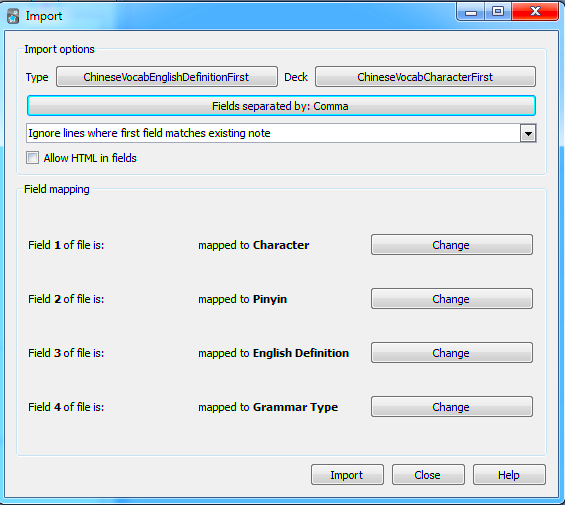
- Step 4: Import the CSV into Anki - Open Anki, select "Import," and choose your CSV file. Make sure to map the columns correctly—one column for the text, another for images. Anki will automatically display the images linked in your cards.
Once imported, Anki will display the images alongside your text, making your flashcards more interactive and engaging.
Common Mistakes to Avoid When Adding Images to Anki
While adding images to Anki flashcards can enhance your learning experience, there are a few common mistakes that you should avoid to ensure everything works smoothly:
- Incorrect Image Paths: If the image paths are wrong or the images aren’t stored in the correct folder, Anki won’t be able to display the images. Double-check the paths in your CSV file and make sure they match the folder where your images are stored.
- Large Image File Sizes: Large image files can slow down Anki’s performance, especially if you’re adding hundreds of images. Resize your images to a reasonable resolution to avoid unnecessary delays when loading or reviewing cards.
- Missing Image Files: If you forget to include an image file in the folder, Anki will display a broken image icon instead. Always make sure all images referenced in your CSV file are present in the designated folder before importing.
- Not Using Relative Paths: Always use relative paths instead of absolute paths (e.g., C:\Users\YourName\Pictures). This ensures your images will work on other devices or when you move your Anki collection.
- Forgetting Image Formatting: If your images are too large or not properly formatted (e.g., text too small to read), they may be hard to use. Optimize image quality to ensure they are clear and easy to understand when reviewing your flashcards.
By avoiding these mistakes, you can ensure that your Anki flashcards are functional, fast, and easy to use with images.
Tips for Managing Image Files in Anki
Managing images efficiently is key to maintaining an organized and effective Anki deck. Here are some tips for handling images in Anki:
- Use a Consistent Folder Structure: Organize your images into specific folders within your Anki collection. For example, create separate folders for different subjects (e.g., "English Vocabulary," "Science Diagrams," etc.). This makes it easier to locate and manage your files.
- Resize and Compress Images: If you're working with many images, consider resizing them to a smaller resolution. You can use image compression tools like TinyPNG or ImageOptim to reduce file size without sacrificing quality.
- Label Images Clearly: Use descriptive filenames for your images, such as "dog.jpg" or "heart_diagram.png." This way, you won’t confuse similar images or forget what each image represents.
- Backup Your Image Files: It’s a good idea to back up your images along with your Anki collection. You can use cloud storage services like Google Drive or Dropbox to ensure your images aren’t lost if something happens to your computer.
- Use HTML to Customize Image Display: You can customize how images appear on your flashcards using HTML. For instance, you can resize the images on the card by adjusting their width or height in the HTML code. This can be useful if you want to make sure your images fit neatly on the screen without taking up too much space.
By following these tips, you can keep your Anki collection organized and ensure that your images are optimized for the best learning experience.
How Using Images Can Improve Your Anki Learning Experience
Images are a powerful tool when it comes to studying with Anki. By incorporating visual elements into your flashcards, you not only make your study sessions more engaging but also enhance your memory retention. Here’s how images can elevate your Anki learning experience:
- Boosts Memory Recall: Visuals are easier to remember than text alone. When you pair information with an image, you create a mental association that makes it easier to recall facts during your review sessions. Studies show that our brains process images 60,000 times faster than text.
- Improves Learning Speed: Images provide context and clarity, speeding up the learning process. Complex topics like anatomy, geography, and foreign language vocabulary can be understood much quicker with a visual reference.
- Enhances Understanding: For subjects like medicine or history, images such as diagrams, maps, or historical photographs make concepts clearer and more concrete. This can lead to a deeper understanding of the material.
- Encourages Active Learning: When you use images in your cards, you’re more likely to engage with the material. You’ll start making connections between the image and the information, which helps strengthen long-term memory.
- Creates Visual Flashcards: If you're a visual learner, adding images to your flashcards will make Anki a more effective tool for you. It transforms the flashcards into something that appeals to your learning style.
Incorporating images into your Anki flashcards doesn’t just make learning more interesting—it also helps you retain and recall information better, giving you a more efficient study tool for various subjects.
FAQ About Adding Images to CSV Files for Anki
If you’re new to adding images to your Anki cards via CSV files, you may have a few questions. Here are some common FAQs to help guide you:
- Can I add multiple images to one card? Yes, you can. To add multiple images, simply link each image to a separate field in your CSV file. Anki will display them in the order specified.
- Do I need to host my images online? No, you don’t need to host images online. Images can be stored locally on your computer. Just make sure to use relative paths when linking to them in your CSV file.
- Can I use animated images (GIFs)? Yes, you can use GIFs in Anki. Just ensure the GIF is appropriately sized for your flashcards and is stored in the correct folder.
- Why are my images not showing up in Anki? This could be due to incorrect image paths, missing images, or not importing the images correctly into Anki. Double-check the paths in your CSV file and ensure the images are stored in the right folder.
- How do I add images to Anki if I'm using the mobile app? If you’re using Anki on your phone, make sure your images are stored in the correct folder on your device. When syncing your desktop collection with AnkiWeb, the images should sync across to your mobile device as well.
- Can I resize the images in Anki? Yes, you can resize images directly within Anki using HTML tags or CSS. This can be helpful to ensure images fit well on your cards and are easy to view.
These FAQs should help clear up some common doubts and make the process of adding images to your Anki cards easier and more efficient.
Conclusion
Adding images to your Anki flashcards is a great way to make learning more engaging, interactive, and effective. Whether you’re learning a new language, studying for exams, or memorizing complex concepts, incorporating visuals can help you retain information better and recall it faster. By following the steps outlined in this guide, you can easily add images to your CSV files and enhance your Anki learning experience.
Remember to avoid common mistakes, keep your image files organized, and use proper formatting to ensure everything runs smoothly. With the right approach, images can transform your study sessions, making them more enjoyable and productive. So, start adding images to your Anki cards today and see the difference it makes in your learning journey!

 admin
admin


