Adding images to your Word documents can bring life to your content, whether you're preparing a report, creating a newsletter, or designing a brochure. Images make your documents more engaging and visually appealing. They help explain your ideas better, break up long text, and grab your reader's attention. Luckily, inserting an image in Word is simple and can be done in just a few clicks. Let’s explore how you can easily add images to your Word document and enhance its overall design.
Steps to Insert an Image in a Word Document

Inserting an image into a Word document is an easy process. Follow these simple steps to do it:
- Open Your Document: Start by opening the Word document where you want to add the image.
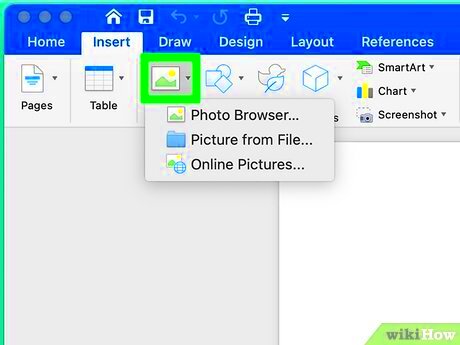
- Click on the "Insert" Tab: In the top menu, click on the "Insert" tab. This will bring up various options, including inserting pictures, shapes, tables, and more.
- Select "Pictures": In the "Insert" tab, click the "Pictures" button. You’ll have two main options: From This Device or Online Pictures.
- Choose Your Image: If you select "From This Device," browse your computer files to find the image you want. If you select "Online Pictures," search for an image through Bing or another online service.
- Click "Insert": After selecting the image, click "Insert." The image will appear in your document.
That's it! Now you’ve successfully added an image to your Word document. From here, you can adjust its size, format, and position to fit your needs.
How to Resize the Image After Insertion
Once you’ve inserted your image into the document, you may want to resize it to fit the layout. Resizing is quick and simple. Here's how:
- Select the Image: Click on the image to select it. You will see small squares (called handles) around the edges of the image.
- Use the Resize Handles: Move your cursor to one of the corner handles. When the cursor changes to a diagonal arrow, click and drag to resize the image proportionally. If you only want to resize the width or height, use the side or top handles.
- Maintain Proportions: To keep the image’s proportions intact (avoid stretching it), hold the Shift key while dragging a corner handle.
- Resize Using the Ribbon: If you prefer more precise control, you can also resize the image from the "Picture Tools" format tab. Enter the exact height and width you want in the "Size" group.
Resizing your image allows you to adjust it to fit the document’s design without distorting it. It’s a great way to ensure your image fits nicely within the layout, whether it’s for a header, a section break, or just as a visual aid.
Formatting the Image in Word
Formatting images in Word allows you to customize how your pictures appear in your document, making them blend perfectly with your text and layout. Word offers a variety of formatting options that let you adjust the image's look, from brightness and contrast to applying stylish borders or effects. Whether you want to make the image stand out or subtly complement your content, formatting is key.
Here’s how you can format images in Word:
- Access Picture Tools: Click on the image to select it, and the "Picture Tools" tab will appear in the ribbon. Under this tab, you’ll find several options like "Format," "Corrections," and "Picture Styles."
- Apply Artistic Effects: You can apply various artistic effects like blurring, sharpening, or even turning your image into a sketch. These options are available in the "Artistic Effects" section.
- Adjust Brightness and Contrast: In the "Corrections" menu, you can adjust the brightness and contrast to enhance your image’s appearance. Use the presets or fine-tune it manually for the perfect look.
- Add a Border: To make your image stand out, you can add a border. Go to the "Picture Styles" group and choose from different border styles, or customize the color and thickness.
- Apply a Shape Effect: You can also add a shadow, reflection, or glow to your image. These effects are great for making your image pop and draw attention.
By using these formatting tools, you can ensure your image is both professional and visually appealing in your document.
Positioning the Image in a Document
Positioning an image correctly within your Word document is crucial to maintaining a clean, organized layout. Word gives you various tools to ensure your image is placed exactly where you want it. You can position your image relative to the page, text, or margins, and align it in any direction you prefer.
Here are the different ways you can position your image:
- Click and Drag: The simplest way to position an image is by clicking on it and dragging it to the desired location. Word will allow you to place it anywhere on the page.
- Use the "Position" Tool: Go to the "Picture Tools" > "Format" tab, and click "Position." From there, you can choose a preset position such as "Top Left," "Center," or "Bottom Right." This helps you automatically place your image in your preferred spot.
- Align the Image: To align the image with text or other objects, select the image, then click "Align" under the "Picture Tools" tab. Options like "Align Left," "Align Center," and "Align Right" are available for precise positioning.
- Use the Layout Options: You can fine-tune the positioning by clicking the "Layout Options" button that appears next to the image. Here you can choose different text-wrapping settings and position the image in relation to the text.
Positioning is important for creating professional documents. It ensures that your text and images work together harmoniously, making your document both functional and visually appealing.
Using Image Wrap Text Options
The "Wrap Text" feature in Word is one of the most powerful tools for working with images. It controls how text flows around the image, allowing you to integrate images seamlessly into your content. Whether you want the text to flow around the image, be placed beside it, or even underneath it, Wrap Text gives you full control over your document layout.
Here’s how to use the Wrap Text options:
- Choose "Wrap Text" from the Layout Options: After selecting the image, click the "Layout Options" button next to the image. You’ll see several wrap text options, including:
- In Line with Text: The image behaves like a text character and moves with the text as you type.
- Square: Text wraps around the image in a square shape, allowing for tight integration between the image and the text.
- Tight: Text wraps closely around the edges of the image, which is ideal for irregularly shaped images.
- Through: Similar to "Tight," but text will also flow through any transparent areas in the image (useful for logos or icons).
- Top and Bottom: The image is placed between the text, with no text appearing on either side. It’s great for a clean look when you don’t want text around the image.
By mastering the Wrap Text feature, you can create more dynamic and professional-looking documents where your images don’t just sit idle—they interact with your content to create a visually appealing layout.
Saving and Exporting the Document with Images
After adding images and formatting them in your Word document, it's important to save and export the file correctly, especially if you need to share or print it. Saving your document ensures that all your changes are preserved, while exporting is useful for creating a version that's compatible with other programs or devices.
Here are some options for saving and exporting your document with images:
- Save Regularly: To save your work, simply click on the "Save" icon in the upper-left corner or press Ctrl + S (Windows) or Cmd + S (Mac). This ensures all your edits, including images, are stored in the Word file.
- Save As PDF: If you need a version of your document that can be easily shared or printed, you can save it as a PDF. To do this, go to "File" > "Save As" and choose "PDF" from the list of file types. PDFs preserve your images and formatting exactly as you see them in Word.
- Export to Different Formats: Word also allows you to export your document to other formats like "Rich Text Format (RTF)" or "HTML." Simply go to "File" > "Export" and choose the format you need. Images will be included in most formats, but some may lose certain formatting.
- Save for Web: If you plan to share the document on a website, saving as a web-compatible file might be necessary. This will compress the images to reduce the file size, making it easier to upload and view online. Choose "File" > "Save As" and select the "Web Page" option.
Remember to always save a backup of your work, especially when dealing with documents containing images. This will help you avoid losing any important content or formatting.
FAQ about Adding Images to Word Documents
Here are some frequently asked questions that might help you with adding images to your Word documents:
| Question | Answer |
|---|---|
| Can I resize an image after inserting it? | Yes, you can resize an image by clicking on it and dragging the corner handles. For precise adjustments, you can also use the size options in the "Picture Tools" ribbon. |
| How do I adjust the quality of the image? | While Word does not directly adjust image quality, you can use the "Compress Pictures" option in the "Picture Tools" to reduce the image size for faster loading or to fit it better within the document. |
| Why is my image blurry after resizing it? | Resizing an image can sometimes cause it to lose quality, especially if you enlarge it too much. To avoid this, use high-resolution images and avoid stretching them beyond their original size. |
| Can I add captions to my images? | Yes! To add captions, right-click the image, select "Insert Caption," and type your text. Captions are useful for referencing images in academic or professional documents. |
| How can I remove an image from my document? | Simply click on the image to select it and press the "Delete" key on your keyboard to remove it. |
If you have other questions or need further help, feel free to consult Word’s built-in help feature or search online for more detailed tutorials.
Conclusion and Final Tips
Adding images to your Word document is a straightforward process that can significantly enhance the appearance and effectiveness of your work. By following the steps to insert, format, position, and resize your images, you can create professional-looking documents that are visually engaging and easy to read.
Here are a few final tips to keep in mind:
- Use High-Quality Images: Always try to use high-resolution images for better clarity, especially if your document will be printed.
- Don’t Overcrowd Your Document: Avoid filling your document with too many images. Keep it balanced by combining text and visuals thoughtfully.
- Check File Size: If your document contains large images, the file size can get very big. You can reduce this by compressing the images or saving the document as a PDF.
- Use Text Wrapping Wisely: Make sure to use the wrap text options to control how text flows around your images. This will make your document look neat and professional.
With these tips, you’ll be able to create visually appealing documents that make a great impression. Don’t hesitate to experiment with different formatting options to find the best layout for your images. Happy writing!

 admin
admin


