The first time I came across
Adobe Stock, I was flabbergasted with the immense wealth of images and videos for creators such as us. Picture this; you have a really big library of high-quality pictures that you can access any time when you need them at hand.You can find everything in terms of captivating media by selecting
Adobe Stock Libraries. It does not matter if one is just interested in being a filmmaker or if one has really been around for some years, these libraries provide an opportunity to take their aspirations to another level.
Benefits of Using Adobe Stock in Premiere Pro

Within Premiere Pro, one can unlock an array of visual creativity through
Adobe Stock. A few distinct advantages are listed below:
- Quality and Variety: You have access to millions of images, videos, and templates that cater to diverse themes and styles. This means your project can always find the perfect fit.
- Time-Saving: Instead of searching through countless free sites, Adobe Stock lets you find what you need quickly. Less time searching means more time creating.
- Seamless Integration: Adobe Stock is built to work smoothly with Premiere Pro. This means you can easily drag and drop assets directly into your timeline.
- Consistent Licensing: With Adobe Stock, you know that all assets come with clear licensing, so you can use them confidently in your projects without worrying about copyright issues.
Based on experienc I have had, I find that if I use such stocks in my videos they become more professional and make it possible for my audience to identify with the narrative.
How to Access Adobe Stock Libraries

Just a few steps lead to the straightforward process of accessing
Adobe Stock Libraries. Here’s an easy starter’s guide:
- Open Premiere Pro: Launch your Premiere Pro application. Ensure you are logged into your Adobe account.
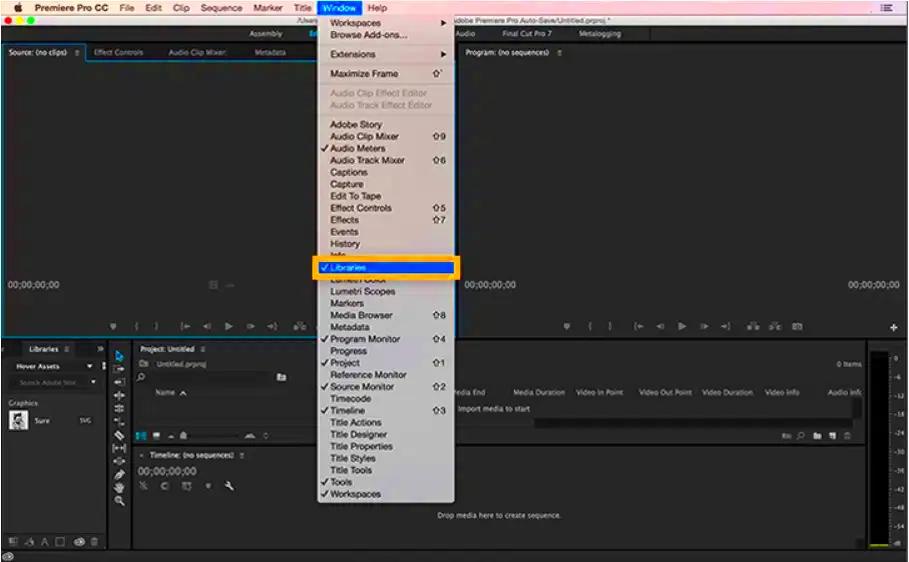
- Navigate to the Libraries Panel: Look for the Libraries panel on the right side of your workspace. If you don’t see it, go to Window > Libraries.
- Browse or Search: Within the Libraries panel, you can browse featured collections or use the search bar to find specific assets.
- Preview Assets: Click on any asset to see a preview. Adobe Stock allows you to view how it will look in your project.
- Add to Your Project: Once you find the right asset, simply drag and drop it into your timeline. It’s that simple!
Each time I visit the libraries, I am reminded of how way simpler it is for me to edit my work. Somehow, it feels as if there is a creative partner next to me who is always willing to help in any way possible.
Steps to Add Adobe Stock to Your Premiere Pro Project
Use of
Adobe Stock in Premiere Pro can seem hard at first, but it is actually easy. The steps are simple and enjoyable as well, so allow me guide you through them.
- Open Your Project: Start by opening the Premiere Pro project you’re working on. Ensure that your workspace is set up for editing.
- Access the Libraries Panel: If it’s not visible, go to Window > Libraries to bring it up. This is your gateway to all the stock content.
- Search for Assets: Use the search bar to find images or videos. I often type in specific keywords related to my project theme. For instance, if I’m working on a travel video, I might search for “beaches” or “sunsets.”
- Preview and Select: Click on the asset to preview it. If it fits, simply drag and drop it into your timeline. I love how easy it is to see how an image looks against my footage.
- License the Asset: Once you’ve added it, you’ll need to license the asset. Just click on the asset in the timeline, and follow the prompts to purchase it if needed. It’s a small step that gives you peace of mind.
The following steps show how swiftly
Adobe Stock can be integrated into your creative process. You’ll feel as if you have an enormous collection of art inside your own suite!
Managing Your Adobe Stock Assets
Managing fantastic resources on Adobe Stock could seem challenging after you make your first purchase. My experience shows that if you remain organized, it will help you avoid many sorrows in the future.
- Create Folders: In the Libraries panel, create folders based on projects or themes. For example, I have folders for travel videos, wedding shoots, and corporate projects. This way, I can find what I need in a flash.
- Use Tags: Tag your assets with relevant keywords. This can make searching much easier. I often use tags like “high-energy” or “emotional” to quickly find the right footage.
- Regular Cleanup: Periodically review your assets. Delete any that you no longer need. It’s like cleaning out your closet—you’ll feel lighter and more focused!
- Utilize the 'Add to Favorites' Feature: If you frequently use certain assets, marking them as favorites can save time. I have a favorites section for my go-to visuals.
Your examining practice course as well as workflow can be improved through proper management of your stock assets. It’s important to note that it takes very little effort in organizing oneself for big changes to happen!
Tips for Using Stock Images Effectively
Sometimes, it’s easy to feel that using stock images is very general; but if you take the correct step, you can make them feel personal. Here are some tricks that I have used before which worked miraculously:
- Match the Tone: Choose images that align with the mood of your project. For example, for a light-hearted travel vlog, I pick bright, cheerful visuals, while a corporate video might need something more subdued.
- Blend with Your Own Footage: Don’t hesitate to mix stock images with your own footage. This creates a cohesive look and feel. I often overlay stock clips with my shots to add depth.
- Consider Color Grading: Adjust the colors of stock images to match your project's palette. A little color correction can make a huge difference. I often apply the same LUTs (Look-Up Tables) to stock images as I do to my clips.
- Be Mindful of Composition: Pay attention to how stock images fit within your frame. Sometimes, cropping or repositioning is all it takes to make an image feel more integrated.
If you want to make average stock images look extraordinary, follow the guidelines below. It is crucial that your pictures relate to you in order to connect with your audience.
Common Issues and Solutions
Even the most experienced editors have to deal with problems while working on Adobe Stock. And through my own journey, I have faced some challenges too but in the end, everything ends well provided you remain patient and have some solutions at hand.
- Asset Not Loading: Sometimes, assets can take a while to load in Premiere Pro. If this happens, try refreshing the Libraries panel or restarting the software. It’s a simple fix that often works wonders.
- Licensing Confusion: It can be unclear when you need to license an asset. To avoid surprises, always check the licensing options before you start using an image or video in your project. Keeping a note of the licensing terms can help you stay compliant.
- Quality Concerns: There might be occasions when a stock image appears pixelated or low quality. Always preview assets at full resolution before adding them to your project. If the quality isn’t up to par, keep searching until you find something that meets your standards.
- Search Overwhelm: With millions of assets available, narrowing down your options can feel overwhelming. I recommend starting with very specific keywords or using filters to help streamline your search.
It is within the voyage that one conquers these predicaments. Every adversative situation that I encountered enhanced my capability in directing the steps involved in creativity, thus producing improved pieces of writing every time.
Frequently Asked Questions
Being a frequent user of Adobe Stock, this time around I’ve come across shared inquiries. To put it like that let me share some of those questions:
Can I use Adobe Stock assets in commercial projects?
- Yes, once you’ve properly licensed the assets, you can use them in commercial projects. Just make sure to adhere to the licensing terms.
What happens if I don’t license an asset?
- Using assets without proper licensing can lead to copyright issues. It’s always best to ensure you have the right to use any material in your project.
Are there any free assets available?
- While Adobe Stock primarily focuses on paid assets, you might find occasional free offerings or trial credits. Keep an eye out for promotions!
How can I improve my search results?
- Use specific keywords, and consider the subject matter and style you’re looking for. Filtering by image type or orientation can also help narrow down choices.
Benefits of using Adobe Stock include time-saving through proper information in addition to improving your overall experience. It is mainly about adapting and understanding as you move forward.
Conclusion
Introduction-made for what is expected from stock imagesAs far as I can tell, Adobe Stock has taught me that if you want to change something from ordinary into extraordinary, then your choice of visuals matters. With its simple interface and high-quality content that easily integrates into Premiere Pro, it has become an essential tool for creators everywhere. Whether your aim is to narrate a tale, send out some form of communication or simply enhance the visual appeal of project, Adobe Stock libraries hold immense possibility.In your artistic processes, do not forget to welcome difficulties and be glad for achievements. You will eventually come up with a distinct individuality plus methodology concerning how you make use of stock photographs and films after a while, hence go ahead, enjoy yourself, and just imagine!
 Within Premiere Pro, one can unlock an array of visual creativity through Adobe Stock. A few distinct advantages are listed below:
 Just a few steps lead to the straightforward process of accessing Adobe Stock Libraries. Here’s an easy starter’s guide:
 admin
admin


