Are you looking to expand your YouTube channel team? Whether it's to share the workload or bring fresh ideas, adding an administrator can be a game-changer. This step-by-step guide will walk you through the process of adding an administrator to your YouTube channel effortlessly. By the end, you’ll have a better understanding of the various roles and how to manage them effectively. Let’s dive in!
Understanding YouTube Channel Roles
Before we jump into the how-to, it’s essential to grasp the different roles available on your YouTube channel. Understanding these roles will help you decide who to add and what responsibilities they will have. Here’s a breakdown of the key roles:
- Owner: This person has full control over the channel. They can manage permissions, delete the channel, and have access to all the features.
- Manager: A Manager can add or remove others, edit the channel, and upload videos. However, they can’t delete the channel or change ownership.
- Editor: Editors can manage video content and playlists, and edit channel information, but they cannot manage users or change channel permissions.
- Viewer: A Viewer has the least permissions. They can only watch and engage with the channel’s content without making changes or uploading videos.
When you're considering adding an administrator, it's crucial to match the right role with the right person. Here are some tips to help you make that decision:
Identifying the Right Fit
Think about what tasks you want your new administrator to handle:
- If they’re going to manage uploads and perform editing, a Manager role might be appropriate.
- If they will focus more on content management without the need for handling user settings, consider an Editor.
- For someone whom you trust entirely with all channel functions, you might want to give them Owner permissions.
It’s also worth considering the skills that the person you’re adding brings to the table. Perhaps they have experience in video editing, social media management, or audience engagement, which can enhance your channel’s growth and presence.
Communication is Key
Before finalizing who to add as an administrator, maintain open communication. Discuss the expectations and responsibilities associated with their role. Here are some points you might want to cover:
- What specific tasks they will be responsible for.
- How often you will meet to discuss progress and feedback.
- Any tools or resources they may need to help them succeed.
By ensuring everyone is on the same page, you’ll set a solid foundation for collaboration and success on your channel. Now that you’re equipped with a better understanding of the different roles, you’re ready to learn how to add an administrator to your YouTube channel. In the next section, we’ll guide you through the steps to make it happen!
Also Read This: Switching YouTube Accounts on Your Browser: Troubleshooting Login Problems
3. Preparing to Add an Administrator
Before you dive into adding an administrator to your YouTube channel, it’s essential to get your ducks in a row! Proper preparation can save you time and ensure the process goes smoothly. Here’s what you need to do:
- Verify Your Channel: Make sure your YouTube channel is verified. This step is crucial because only verified channels can manage multiple users. If you haven’t done this yet, you can easily verify your channel by going to the Settings section of YouTube and following the instructions.
- Identify the Right Person: Think carefully about who you want to add as an administrator. This person should be someone you trust since they will have access to your channel and its content. Make sure they have a good understanding of what it takes to manage a YouTube channel.
- Decide on their Role: Are you looking to add someone as a full administrator or just a manager who can upload content? Knowing what responsibilities you want your administrator to have will help you configure their access correctly.
- Gather User Info: You will need the email address associated with the Google account of the person you want to add. Double-check with them to avoid typos!
- Check Your Channel’s Goals: Consider how having an administrator will impact your channel’s goals. Will they help you reach new audiences, or do you want them to assist with engagement strategies? This foresight will guide your decision-making.
By taking the time to prepare, you’ll not only streamline the process of adding an administrator but also ensure that the person you choose is right for the job. It’s about building the right team to help your channel thrive!
Also Read This: How to Disable YouTube Ads on Android: Easy Solutions to Remove Annoying Ads
4. Accessing YouTube Studio

Now that you’re ready to add an administrator to your YouTube channel, the next step is accessing YouTube Studio. It’s the central hub for managing your channel’s content, analytics, and settings. Here’s how to get there:
- Sign In to Your Google Account: Before you can access YouTube Studio, make sure you’re signed in to the Google account that’s linked to your YouTube channel. It’s a simple step, but it’s crucial.
- Navigate to YouTube: Visit YouTube from your web browser. You’ll land on the homepage where you can enjoy the vast array of videos!
- Access YouTube Studio: In the top right corner, look for your profile icon. Click on it, and you'll see a dropdown menu. Select YouTube Studio from the options. This will take you to your channel's management dashboard.
Once you’re in YouTube Studio, you’ll see various options on the left sidebar where you can manage your videos, check analytics, and access channel settings.
At this point, you’re just a few clicks away from adding your chosen administrator! Remember, YouTube Studio is designed to be user-friendly, so don't hesitate to explore the different features available to you. You’re in good hands, and soon your channel will have the additional support it needs!
Also Read This: Why YouTube Disables My Comments and How to Fix Comment Section Issues
5. Navigating to Permissions Settings
Alright, so now that you understand the importance of having multiple administrators for your YouTube channel, it's time to dive into the settings. Navigating to the permissions settings can feel daunting if you’re not familiar with the YouTube Studio interface, but don’t worry—I’m here to guide you through it.
First off, you need to make sure you’re logged into the YouTube account associated with the channel you want to manage. Once you’re in, follow these simple steps:
- Go to YouTube Studio: Click on your profile icon in the top right corner of the YouTube homepage. From the dropdown menu, select YouTube Studio.
- Access Settings: In the left sidebar, look for the gear icon (this represents Settings). Click on it to open up the settings menu.
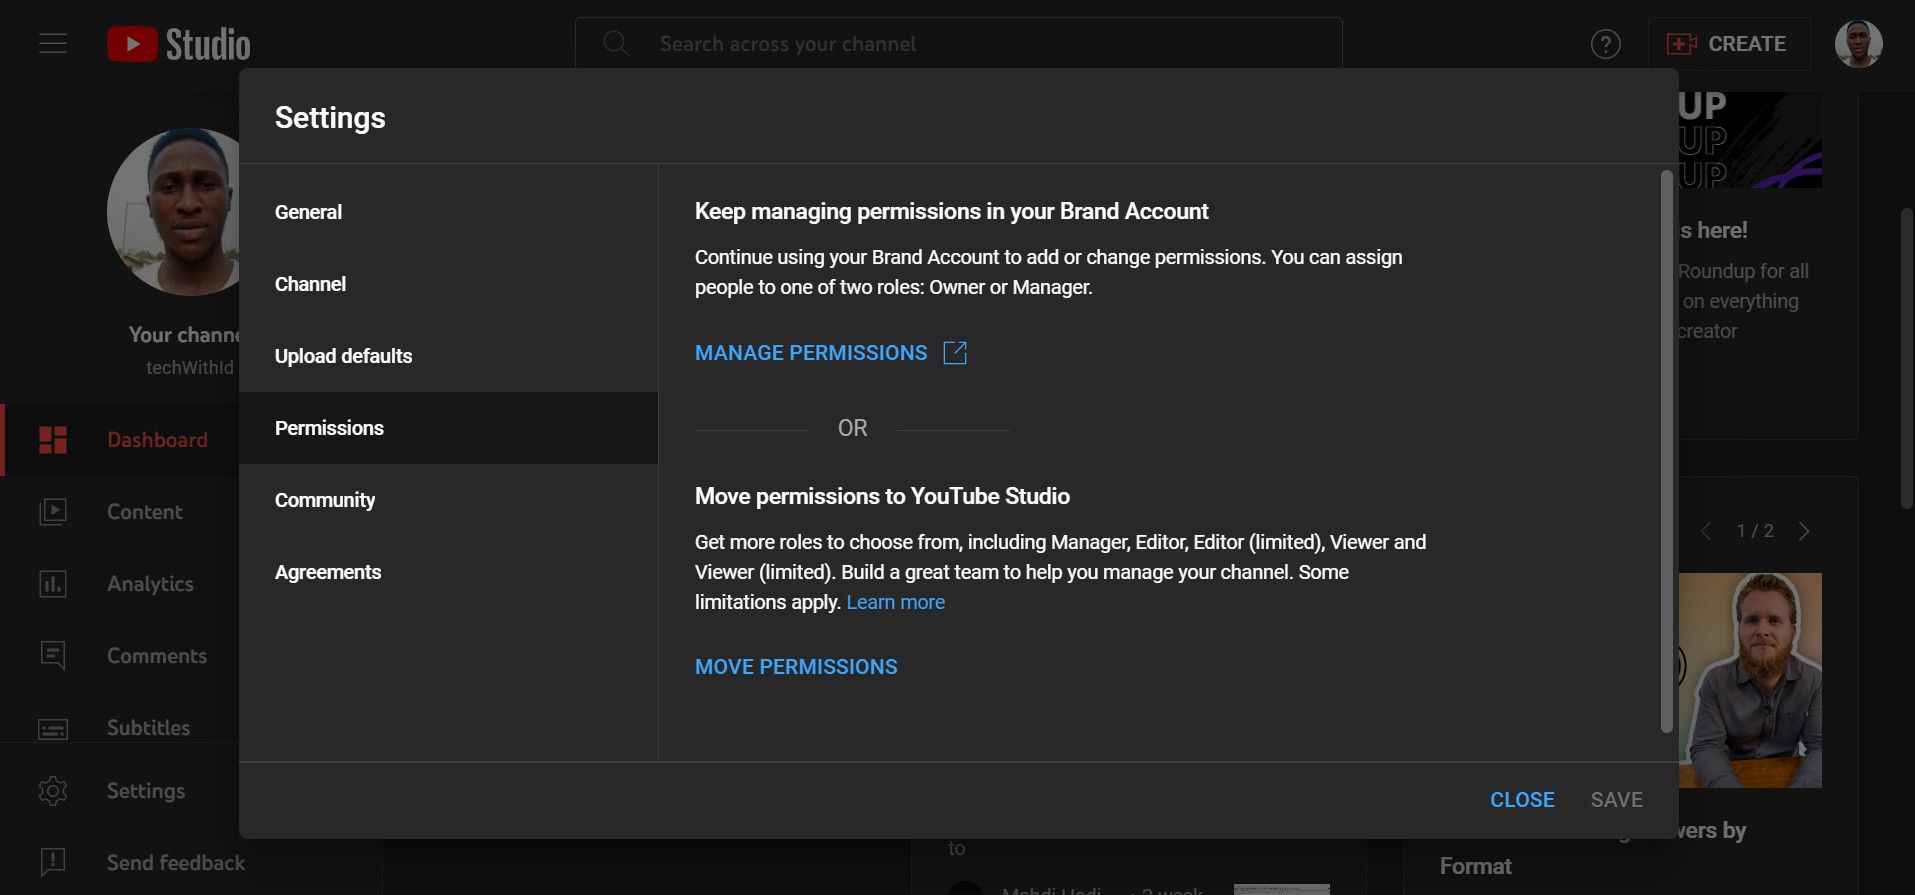
- Select Permissions: In the settings window, find and click on Permissions from the list of options. This is where the magic happens when it comes to managing users!
Once you’re in the permissions section, you’ll see a list of all current users associated with your channel. This is a great moment to evaluate who currently has access and to check if there are any changes you’d like to make.
Remember, to add new administrators or modify existing ones, you’ll need to have the necessary permissions yourself, so make sure your account has full access!
In summary, navigating to the permissions settings is straightforward, and once you’ve mastered this step, you’re well on your way to expanding your channel’s management team.
Also Read This: How to Get 500 Subscribers on YouTube: Tips and Strategies for Growing Your Channel
6. Inviting a New Administrator
Now comes the exciting part—inviting a new administrator to your YouTube channel! Having someone reliable to help manage your channel can take a weight off your shoulders, allowing you to focus on creating amazing content.
So, without further ado, let’s get right into the process:
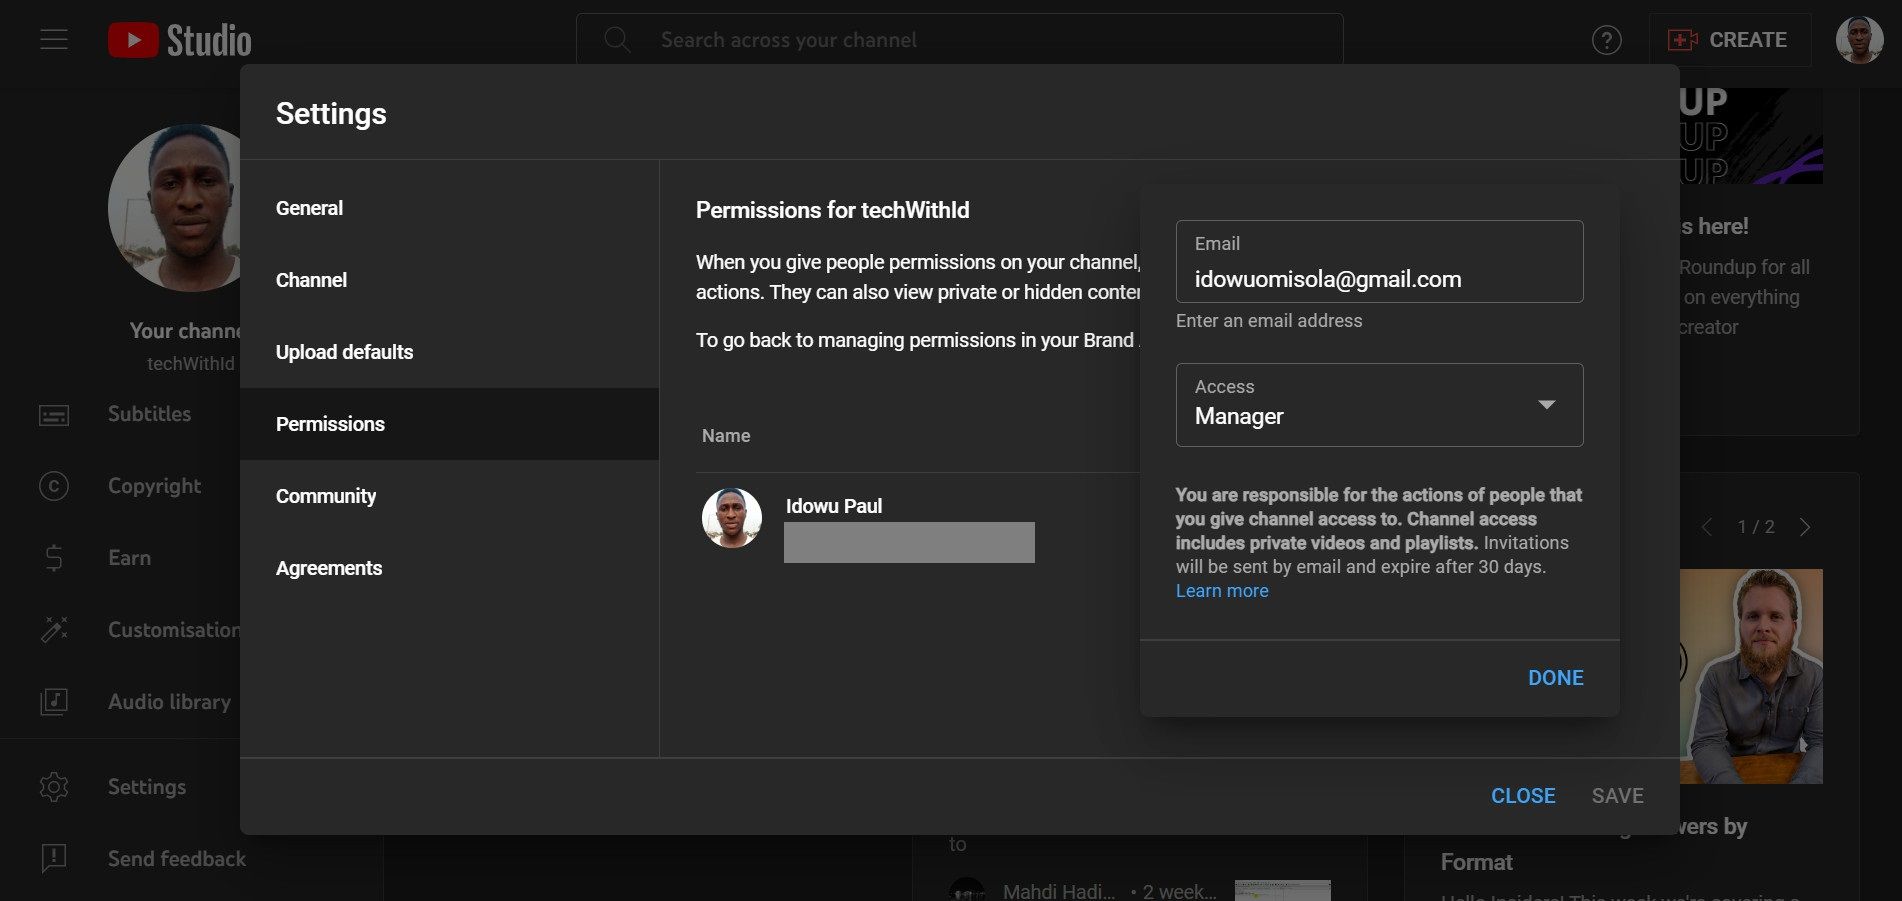
- Click on the Invite: In the permissions section we just navigated to, you’ll see an option to Invite new users. Go ahead and click that button to start the process.
- Enter Their Email Address: You’ll be prompted to enter the email address of the person you’d like to make an administrator. Make sure it’s the email they use for their Google account, as this is how they’ll gain access.
- Select Their Role: After entering the email, you’ll need to assign a role. Choose Manager for an administrator role. This will provide them with the ability to manage videos, comment moderation, and other essential tasks. If you want to give someone more control, you can also designate them as an Owner.
- Send the Invitation: Once you’ve filled out the necessary details and selected the role, click on the Send Invitation button. They’ll receive an email alerting them that they’ve been invited to manage your channel!
After sending the invitation, your new administrator will need to accept it to gain access. They should check their inbox (and spam folder just in case) for the invitation email from YouTube. Once they accept, they’ll be on board to help you out!
And just like that, you’re expanding your team! Remember, clear communication with your new administrator about responsibilities and expectations is key to a successful collaboration. Happy managing!
Also Read This: Why Is My Video Uploading So Slow on YouTube? Understanding Upload Speed Issues
7. Confirming the Invitation
Once you've sent an invitation to your new administrator, the next step is the confirmation of that invitation. This part is crucial because if your new admin doesn't accept the invite, they won’t have access to the channel. So, how does this process work?
After you’ve entered their email address and selected “Invite,” your invited administrator will receive an email from YouTube. Here’s what they need to do:
- Check Email: The invited admin should check their inbox for an email from YouTube. It might be in the main inbox or even in the spam/junk folder, so remind them to look there if it's missing.
- Open the Invitation: They need to click on the link in the invitation email. This link will direct them to a sign-in page where they can either log into their existing Google account or create a new one if they don’t have one yet.
- Accept the Invitation: Once logged in, they will see an option to accept the role. They simply need to confirm by clicking the “Accept” button.
After acceptance, it can take a few moments for the changes to reflect on your YouTube channel. So, don’t worry if everything doesn’t update instantly. You can follow up with your new administrator to ensure they’ve received and accepted the invitation.
It's also a good idea to inform them about the scope of their responsibilities. You want them to understand what they can and cannot do. Communication is key, and being clear about expectations will help avoid any confusion down the line.
Also Read This: How to Make Money from Other People’s YouTube Videos Legally
8. Managing Permissions and Roles
Now that your new administrator is on board, it’s time to discuss how to manage permissions and roles effectively. Understanding the various roles on YouTube can help you maintain control over your channel while delegating tasks efficiently.
YouTube allows for several different roles within a channel, each with varying levels of permissions:
- Owner: The owner has full control over the channel, including the ability to add or remove other users, delete the channel, and manage content.
- Manager: A manager can edit the channel, manage uploads, moderate comments, and view analytics, but they cannot delete the channel or manage user roles.
- Editor: Editors can upload videos, edit titles and descriptions, but they cannot delete videos or manage users and permissions.
- Viewer: This role can only view content and analytics without any editing capabilities, making it suitable for those who need limited access.
To manage permissions, follow these simple steps:
- Access YouTube Studio: Sign into YouTube and go to YouTube Studio.
- Navigate to Settings: Click on the “Settings” gear icon usually found in the lower-left corner of the screen.
- Select Permissions: Click on “Permissions” from the settings menu.
- Adjust Roles: Here, you can see a list of current users. To adjust their roles, click on the dropdown menu next to their name and select the appropriate role.
- Save Changes: Make sure to save your changes before leaving the settings page.
Managing permissions is not just about delegating tasks; it’s about protecting your content and ensuring that your channel remains secure. Regularly review the roles assigned to your team members and adjust them as necessary. This way, you can ensure that each team member has the right access to help your channel grow without compromising security.
If you're ever unsure about changes, don't hesitate to communicate with your team. Keeping everyone on the same page can lead to better collaboration and more fruitful results for your channel.
Also Read This: Can You Pause and Rewind Live TV on YouTube TV? A Guide to Controlling Live TV on YouTube TV
Troubleshooting Common Issues
Adding an administrator to your YouTube channel should be a straightforward process, but sometimes things don’t go as planned. If you encounter issues, don’t worry! Here are some common problems and how to solve them:
- Invitations Not Received: If the person you’re trying to add hasn’t received the invitation email, check the following:
- Confirm that you’ve entered the correct email address associated with their Google Account.
- Ask them to check their spam or junk folder.
- If they have multiple Google accounts, make sure they are checking the one you invited.
- Certain Roles Not Available: If you're trying to assign a role that doesn't seem to be showing up, remember that:
- The person must have a Google account to be added.
- You can’t assign roles like “Manager” unless the user is linked to the same Brand Account.
- Error Messages: You might encounter various error messages during the process. Here are a few tips to troubleshoot:
- Log out and back into your Google account, then attempt the process again. Sometimes, a simple re-login can clear up issues.
- Try using a different browser or clearing your cache and cookies to see if that resolves the issue.
- Channel Not Available: Ensure that you are using the correct Google Account that has access to the YouTube channel. If you’re accessing the wrong account, you won’t be able to manage channel settings.
If you’ve tried all these solutions and the problems persist, don’t hesitate to check out the YouTube Help Center. They have extensive resources that can guide you further based on specific error codes or issues you've encountered. Sometimes, all it takes is a little extra digging to find the answer!
Conclusion
Congratulations! You’ve just learned how to add an administrator to your YouTube channel step by step. By following these instructions, managing your channel can become so much easier, especially if you're collaborating with others or delegating tasks. Remember to:
- Choose the right roles for each administrator based on their expertise and what you need help with.
- Communicate clearly with your administrators about their responsibilities and expectations.
- Keep track of any changes to access or roles within your channel to maintain security and functionality.
Collaborating with others not only relieves some of the pressure but also brings fresh perspectives and ideas to your channel. Whether you’re sharing the load of content creation, managing comments, or analyzing performance, having trusted administrators can greatly enhance your channel’s growth.
Finally, always keep an eye on YouTube's evolving policies and features. YouTube regularly updates their platform, and staying informed will ensure that you’re making the best use of all available tools. Happy YouTubing!
 admin
admin


