Flipping images in PowerPoint is a simple yet powerful technique to enhance your presentation's visual appeal. Whether you're looking to create a mirrored effect, change the direction of an image, or add creative flair to your slides, flipping can help you achieve all of these. The best part is that flipping an image in PowerPoint doesn’t require advanced design skills – it’s a quick and easy task that can instantly transform your slides.
In this guide, we’ll walk you through the process of flipping images in PowerPoint, explaining when and how to use the feature effectively to make your presentations more dynamic. Whether you’re presenting a corporate report or a creative project, flipping images can add that extra touch to keep your audience engaged.
Why Flip Images in PowerPoint?

Flipping images in PowerPoint serves several purposes, making it a useful tool for both professional and creative presentations. Here are a few reasons why you should consider flipping images in your slides:
- Improved Visual Appeal: Flipping an image can give your presentation a unique look, helping to break the monotony of static slides.
- Better Alignment: Flipping can help in aligning images with the text or other design elements on your slide. This creates a balanced and clean look.
- Emphasize Key Points: Sometimes, flipping an image can draw attention to specific areas or add emphasis, making your message clearer.
- Mirrored Effects: In some designs, mirrored images work well to create a more polished or symmetrical layout.
- Highlight Contrast: Flipping images can also help create a striking contrast, making them stand out more on the slide.
By using image flips, you can make your slides more engaging and appealing, ensuring that your audience remains focused on your message.
Types of Image Flips in PowerPoint

In PowerPoint, there are two primary ways to flip an image: horizontal and vertical. Both types of flips have their specific uses, depending on the effect you're trying to achieve. Let’s break them down:
Horizontal Flip
A horizontal flip mirrors the image along its vertical axis. It’s like turning the image around to create a reflection. This flip is often used when you want to show symmetry or create a visual balance in your slides.
- Use cases for horizontal flip:
- Creating a symmetrical design with mirrored images.
- Flipping a photo of a person or object to present them from the opposite direction.
- Enhancing graphic designs or illustrations with a mirrored effect.
Vertical Flip
A vertical flip mirrors the image along its horizontal axis. The top and bottom of the image are swapped, which can give the
- Use cases for vertical flip:
- Creating artistic, abstract designs with flipped images.
- Flipping images vertically to show a reflection of the original image, often used for water reflection effects.
- Giving a new perspective or making images stand out by flipping them upside down.
Both horizontal and vertical flips are simple but effective tools to add variety to your presentation. When combined with other design techniques, they can help in delivering a visually engaging presentation.
Steps to Flip Images Horizontally in PowerPoint
Flipping an image horizontally in PowerPoint is a straightforward process that can be done in just a few clicks. This action mirrors the image along its vertical axis, which can add a professional touch to your slides. Here’s a simple guide on how to flip your images horizontally:
- Insert the Image: First, ensure that you’ve inserted the image you want to flip onto your slide. To do this, go to the “Insert” tab and select “Pictures” to choose an image from your computer.
- Select the Image: Click on the image to select it. Once selected, you’ll see sizing handles appear around the image.
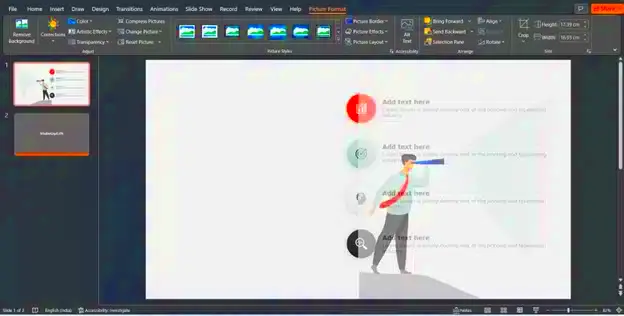
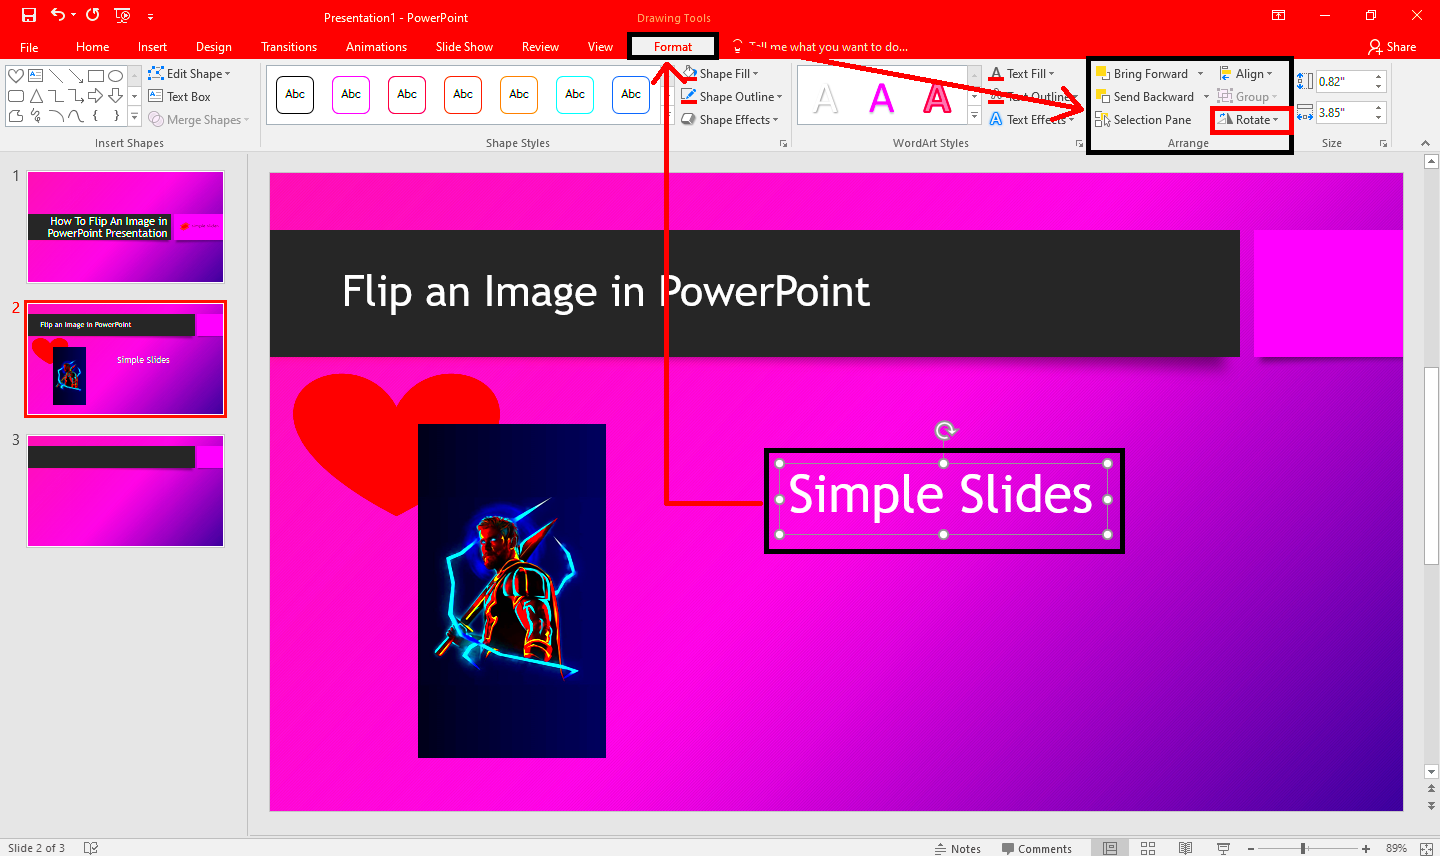
- Open the Format Tab: Go to the “Picture Format” tab that appears when you select an image. This tab contains various image editing tools, including the flip options.
- Click on Rotate: In the Format tab, locate the “Rotate” button. Click on the dropdown arrow next to it.
- Choose Flip Horizontal: From the dropdown menu, select the “Flip Horizontal” option. Your image will instantly flip along its vertical axis, creating a mirrored effect.
That’s it! Your image is now flipped horizontally. This technique can be applied to any image and can be used to create symmetry, reflections, or simply adjust the direction of an image to better fit your slide design.
How to Flip Images Vertically in PowerPoint
Flipping an image vertically in PowerPoint is another quick and easy technique that allows you to mirror your image along its horizontal axis. This can create a dramatic effect or help you design interesting layouts. Follow these steps to flip your image vertically:
- Insert the Image: As with the horizontal flip, start by inserting the image you want to flip onto your slide. Use the “Insert” tab and choose “Pictures” to add your image.
- Select the Image: Click on the image to select it. The image will be surrounded by resize handles.
- Open the Format Tab: With the image selected, go to the “Picture Format” tab that appears in the toolbar.
- Click on Rotate: In the Format tab, click the “Rotate” button. A dropdown menu will appear with various rotation options.
- Choose Flip Vertical: From the dropdown, select the “Flip Vertical” option. Your image will flip upside down, creating a mirror effect along the horizontal axis.
Flipping images vertically is particularly useful when you want to create water reflection effects or add an abstract touch to your presentation. It's a simple trick that can make a big difference in how your slides look.
Advanced Tips for Using Flipped Images Effectively
Flipping images can be a powerful design tool, but knowing how and when to use it is key to making your presentations look professional and polished. Here are some advanced tips for using flipped images effectively:
- Combine Horizontal and Vertical Flips: Don’t limit yourself to just one type of flip. By combining horizontal and vertical flips, you can create unique and dynamic visual effects. For example, you can flip an image horizontally for symmetry, then flip it vertically for a reflection effect.
- Use Flips for Mirrored Layouts: When you need balance or symmetry in your slide design, flipping images horizontally can help. You can place flipped images on either side of a slide, creating a mirror effect that’s visually appealing and professional.
- Align Flipped Images with Other Design Elements: After flipping your images, ensure they are aligned properly with the text, shapes, and other elements on your slide. Use PowerPoint’s alignment tools to make sure everything lines up neatly. This will give your presentation a clean, organized look.
- Apply Flips to Photos for Emphasis: Flipping an image can help draw attention to certain areas or create visual interest. For example, flipping a photo of a person or object can make it seem like it’s interacting with something else on the slide. This technique is great for creating engaging visuals that guide the audience’s focus.
- Experiment with Reflection Effects: A vertical flip is perfect for creating a reflection effect on the bottom of the image, like a reflection in water. After flipping vertically, you can add a gradient or a soft edge to the reflection for a realistic effect. This adds depth and dimension to your slides.
Flipped images are more than just a visual effect – they can help you tell a story, create symmetry, and make your presentation stand out. Experiment with these techniques and see how they can elevate your PowerPoint slides.
Common Mistakes to Avoid When Flipping Images
While flipping images in PowerPoint can be a simple task, it’s easy to make a few mistakes along the way that can negatively impact the overall look of your presentation. Here are some common mistakes to avoid when flipping images:
- Ignoring Image Proportions: One common mistake is flipping an image without considering its proportions. Flipping an image can distort it if the proportions aren’t kept intact. Always ensure the aspect ratio is maintained, especially if you’re using flipped images for design purposes.
- Overusing Flips: Although flipping can be a great tool, overusing it may make your slides look cluttered or chaotic. Use flips sparingly and only when they enhance your presentation’s message or design.
- Flipping Images Without Purpose: Every flip should have a reason behind it. Don’t flip an image just for the sake of doing it. Ask yourself: Does this flip add to the clarity or aesthetic of the slide, or is it just a random effect?
- Not Adjusting Image Alignment: After flipping an image, it’s important to check its alignment. A flipped image may look awkward if it’s not placed properly on the slide. Be sure to adjust the position and alignment so that the image complements other elements like text or shapes.
- Forgetting to Add Reflection or Shadows: A flipped image can look flat or unrealistic without some visual enhancement. If you're using a vertical flip for reflection, adding a shadow or soft gradient can make the effect more convincing and polished.
By avoiding these mistakes, you can ensure that flipped images enhance your presentation without detracting from its overall design. Make sure you flip images with intention, and always check their alignment and proportion to maintain a professional look.
How to Resize and Align Flipped Images in PowerPoint
After flipping an image in PowerPoint, it’s important to resize and align it properly to ensure it fits seamlessly into your presentation. Here’s how to resize and align flipped images effectively:
Resizing Flipped Images
Resizing flipped images is similar to resizing any image in PowerPoint. Once you’ve flipped your image horizontally or vertically, follow these steps:
- Click on the Image: Select the flipped image by clicking on it. This will activate the sizing handles around the image.
- Resize by Dragging Handles: To resize the image, click and drag one of the corner handles. To maintain the image’s aspect ratio, hold down the Shift key while resizing. If you want to stretch the image, drag the side handles.
- Use the Format Tab: You can also enter specific dimensions in the “Size” group under the “Picture Format” tab. This allows for precise resizing based on your slide layout.
Aligning Flipped Images
Proper alignment is crucial for ensuring your flipped image fits neatly with the rest of the slide elements. Here’s how to align your flipped image:
- Use PowerPoint’s Alignment Tools: Select the flipped image and go to the “Picture Format” tab. Click on the “Align” button to see options like align to the left, center, or right. You can also choose “Align to Slide” for better overall alignment.
- Manual Adjustment: Sometimes, a manual adjustment is necessary. Click and drag the image to position it exactly where you want it on the slide. Make sure it doesn’t overlap with any important text or shapes.
- Check for Consistency: If you have multiple images or elements on your slide, align them consistently to create a balanced and polished look. Use the “Distribute” option to space elements evenly across the slide.
By following these steps, you can ensure that your flipped images are resized and aligned correctly, helping your presentation look clean and professional.
FAQ
Here are answers to some common questions about flipping images in PowerPoint:
1. Can I flip an image multiple times in PowerPoint?
Yes, you can flip an image as many times as you like. However, keep in mind that if you flip an image horizontally and then flip it vertically, the image will return to its original position. Always experiment with the flips to see what works best for your slide design.
2. Will flipping an image affect its quality?
Flipping an image in PowerPoint doesn’t degrade its quality. However, if you resize the image after flipping it, you may lose some quality if the image is stretched too much. To preserve the resolution, try to use images that are large enough for your slide dimensions.
3. How do I undo a flip if I change my mind?
If you accidentally flip an image and want to undo it, simply press Ctrl + Z (Windows) or Cmd + Z (Mac) to undo the action. Alternatively, you can right-click the image and select “Undo” from the context menu.
4. Can I add a reflection effect to a flipped image?
Yes, you can add a reflection effect to a flipped image in PowerPoint. After flipping the image, go to the “Picture Format” tab and choose the “Picture Effects” dropdown. Select “Reflection” to add a reflection below the flipped image for a more polished look.
5. Are flipped images better for certain types of presentations?
Flipped images are ideal for creative presentations or those that require visual balance and symmetry. They work well in graphic-heavy slides, such as portfolios or marketing presentations, where you need to add some visual interest and variety.
Conclusion
Flipping images in PowerPoint is a simple yet effective technique that can enhance the visual appeal and creativity of your presentations. Whether you're using horizontal or vertical flips, the ability to mirror your images can help you create balance, symmetry, and more engaging slide designs. By following the steps and avoiding common mistakes, you can seamlessly integrate flipped images into your slides without compromising quality or alignment. With the right approach, flipped images can significantly elevate your presentation, adding a professional and dynamic touch to your content. Remember, moderation and purpose are key when using this technique, so make sure every flip serves a clear design or message. Happy presenting!


