Welcome, talented artists and photographers! If you're contributing to iStock, it's crucial to stay updated on their requirements, especially when it comes to DPI (Dots Per Inch). Recent changes mean it's time to revisit what DPI really means for your submissions. In this post, we’ll unpack the essentials of DPI, why it's important, and how it affects your images and submissions to iStock. Let's dive into the nitty-gritty of making sure your work stands out and meets the platform's expectations!
Understanding DPI and Its Importance in Image Quality

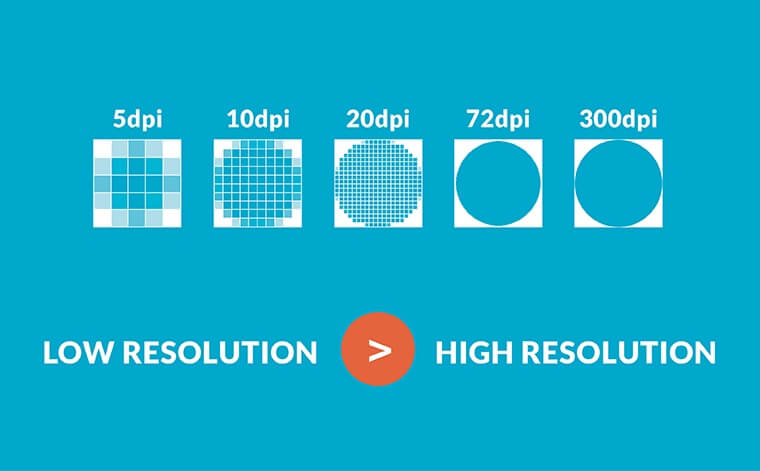
Before we dive deeper, let’s clarify what DPI really means. DPI stands for Dots Per Inch, a measurement that refers to the resolution of an image when printed. In simple terms, it tells us how many dots fit into one inch of printed material. Higher DPI means more detail and clarity in your images, which is crucial for printing. But how does this play into the realm of digital submissions like those to iStock?
Here’s why understanding DPI is essential for your contributions:
- Image Clarity: Higher DPI translates to higher resolution, which results in clearer and crisper images. This is particularly important for photos that clients may want to print at large sizes.
- Client Expectations: iStock serves a diverse clientele, from graphic designers to advertisers. They often require high-quality images that can maintain clarity even when enlarged.
- Market Competitiveness: With so many contributors in the field, having high-DPI images can give you a competitive edge. It’s not just about quantity but quality!
So, what is the current DPI requirement for iStock contributors? As of the latest update, iStock requires images to be submitted at a minimum of 300 DPI for standard submissions. This ensures that all images have the potential to be used for both print and digital formats.
If you’re wondering how to achieve this, here are some key tips:
- Camera Settings: If you’re shooting photos, adjust your camera settings to ensure high resolution. Most modern cameras have options to set the image quality; make sure it's set to the highest available.
- Editing Software: When editing images, check the dpi settings in your software of choice. Programs like Adobe Photoshop allow you to adjust DPI easily. Just remember, increasing DPI on an already low-resolution image won’t add detail; it can only maintain it.
- File Formats: Choose appropriate file formats that support high DPI. TIFF and PNG are excellent choices for maintaining image quality during the upload process.
In summary, understanding DPI is crucial not only for meeting iStock's requirements but also for ensuring that your work shines in the competitive world of stock photography. By adhering to these standards, you're not just respecting guidelines—you’re enhancing the quality of your contributions and appealing to a broader audience. So, ready to gear up for your next submission?
Also Read This: Does iStock Accept AI-Generated Images? Exploring Contributor Guidelines
3. Recent Changes to iStock DPI Requirements

iStock has consistently aimed to maintain high-quality standards for the images and videos available on its platform. Recent updates to the DPI (dots per inch) requirements reflect this ongoing commitment to quality. So, what changes can contributors expect?
Firstly, iStock has increased the minimum DPI requirement for images submitted to the platform. Previously, the requirement was set at *72 DPI for many images, but contributors are now expected to submit images at a minimum of 300 DPI. This upgrade is particularly significant for contributors who often focus on high-resolution photography. Consider how this change may impact your workflow—higher DPI means better detail and clarity, making your work more appealing to buyers.
Secondly, the specification for video files has also been updated. Contributors must now ensure that their videos meet specific resolution standards, which include a minimum of 1080p for HD videos. For 4K videos, the requirement is to provide content at a resolution of at least 3840 x 2160 pixels*. This move is in line with the current trends in video consumption, aiming for sharp, vibrant visuals that catch the eye of potential clients.
In addition to these DPI and resolution changes, iStock has also implemented a new review process for submissions. This process involves a more comprehensive evaluation of the quality of submissions, focusing on factors such as:
- Sharpness and clarity of images
- Overall composition
- Color accuracy and exposure
- Relevance and originality of content
These adjustments can initially feel daunting. However, they ensure that the marketplace is filled with top-notch, high-resolution content that buyers are actively seeking. As contributors adapt to these changes, it’s essential to embrace the opportunity to refine your skills and enhance the quality of your portfolio.
Also Read This: Are iStock Images Copyright-Free? What Every User Needs to Know
4. What This Means for Contributors
So, how do these recent updates in DPI requirements affect you as a contributor? While it may seem like a hassle at first glance, these changes can actually open up new avenues for creativity and marketability.
Firstly, the shift towards higher DPI standards means that you will need to invest more time in preparing your images and videos. But this also means your work has the potential to stand out significantly in a crowded marketplace. Higher quality submissions tend to garner more attention, which is a win-win for both contributors and buyers. Think about it: clearer, sharper images are more appealing, and this could lead to increased sales!
This change may also prompt you to upgrade your equipment or refine your techniques. If you're used to shooting at lower resolutions, this could be the perfect time to experiment with different settings and styles. Consider adjusting your workflow to focus on:
- Camera settings that maximize DPI
- Post-processing techniques that enhance image quality
- Utilizing software that allows effective enhancement without loss of quality
Moreover, these DPI requirements can lead to new opportunities in niche markets. For example, businesses looking for high-quality images for advertising, print media, or high-end websites are likely to prefer your high-resolution offerings over standard submissions.
Lastly, as contributors, it’s essential to stay connected with iStock's updates and community forums. Engaging with fellow creators will not only help you adapt better to these changes, but it may also inspire new ideas and approaches in your work. Don't shy away from seeking feedback and sharing your experiences. By collaborating and learning from each other, you'll likely find success in this evolving landscape.
Also Read This: Using iStock Photos as Headers for Blogs and Websites
5. How to Adjust Your Images to Meet New Requirements
So, you've embraced the latest iStock DPI requirements, and now you're wondering, "How do I adjust my images to fit this new standard?" Don’t worry; you’re not alone! Adjusting images can seem daunting, but with a few straightforward steps, you'll have your images ready in no time.
1. Understand DPI: DPI, or Dots Per Inch, is crucial for print quality. Higher DPI means better resolution. For iStock, you typically want images at least 300 DPI. Don’t just check the pixel dimensions; ensure your printing size can accommodate this DPI for optimal clarity.
2. Use Editing Software: Tools like Adobe Photoshop, Lightroom, or even free programs like GIMP can help. Here’s how to adjust DPI in Photoshop:
- Open your image in Photoshop.
- Go to Image > Image Size.
- Uncheck Resample to maintain quality.
- Adjust the DPI value to 300 while ensuring the pixel dimensions are appropriate.
3. Consider Cropping or Resampling: If your image doesn’t meet the required DPI without distorting its quality, you may need to crop or resample. Cropping can help focus the subject while removing unnecessary elements. Resampling is trickier; always aim to add pixels rather than delete them to maintain quality.
4. Save in the Correct Format: Ensure your images are saved in the recommended formats like JPEG or TIFF, maintaining the high-quality settings specified by iStock. Save your images at their highest quality to avoid compression artifacts.
Lastly, do a final check! Zoom in to evaluate your images. Look for blurriness or pixelation—if you see it, it might be time to revert to your original and adjust again. Remember, everyone has to start somewhere, and practice will only help you improve. Now that you've got your images adjusted, let’s dive into how to submit high-quality content to iStock!
Also Read This: How to Download iStock Images Without Watermarks: Legal Solutions
6. Tips for Submitting High-Quality Content to iStock
Submitting to iStock? Fantastic! Here are some insider tips to ensure your content meets their standards and stands out among the crowd.
1. Research the Market: Before submission, take some time to explore what’s trending. Review the categories that interest you, and pay attention to the types of images that are performing well. This research can guide your shooting and editing process.
2. Focus on Composition: Good composition can dramatically enhance your images. Use the Rule of Thirds, leading lines, and other compositional techniques to create visually engaging images. Images with strong storytelling often catch the eye of buyers.
3. Ensure Proper Lighting: Lighting can make or break a photo. Natural light is often preferred, but be mindful of harsh shadows and overly bright highlights. If you're shooting indoors, invest in a softbox or other lighting setups to achieve a more professional look.
4. Edit with Care: After shooting, put some time into editing your images. Adjust color balance, contrast, and sharpness to enhance the quality without overdoing it. Subtle edits often yield the best results.
5. Add Metadata Thoughtfully: When you upload your images, metadata is key! Use accurate keywords, descriptions, and titles that reflect your content. Think like a buyer—what words would they use to search for your image? This step is crucial for discoverability.
Finally, remember to maintain a portfolio of diverse content to appeal to broad audience demands. Consistency in quality and creativity will help you thrive as a contributor—instead of just following the trends, try to set them! Happy shooting, and best of luck with your submissions to iStock!
Conclusion
In summary, understanding and adhering to the updated DPI requirements at iStock is crucial for contributors aiming to maximize their submissions' visibility and sales potential. By ensuring that your images meet the new standards, you not only enhance your chances of acceptance but also improve the overall quality of the iStock library. Remember the following key points:
- DPI Standard: Always submit images with a minimum of 300 DPI for print quality.
- Testing Your Images: Use reliable software to confirm your DPI settings before uploading.
- Adapt to Feedback: Pay attention to any rejection notes from iStock and make adjustments as needed.
As the digital media landscape evolves, so do the requirements for successful contributions. Staying informed and adaptable is the best strategy for any contributor looking to thrive within the competitive stock photography market. Embrace these updates as an opportunity to refine your craft and enhance your portfolio, ensuring that your work stands out and flourishes on platforms like iStock.
 admin
admin


