Curling your hair at home can seem daunting, especially if you're just starting out. But fear not! With the right tools and techniques, you can achieve beautiful, bouncy curls that look salon-fresh without ever stepping outside. In this guide, we'll walk you through everything you need to know to master curling your hair with a curling iron. Whether you're prepping for a special occasion or just want to switch up your everyday look, curling your hair can be a fun and rewarding experience.
Choosing the Right Curling Iron for Your Hair Type
When it comes to curling irons, one size definitely does not fit all! Choosing the right curling iron is crucial for getting the best results, and it largely depends on your hair type and the style of curls you desire. Here’s a breakdown to help you make the best choice:
1. Consider Your Hair Type:
- Fine or Thin Hair:
- Barrel Size: Go for a smaller barrel (3/8-inch to 1-inch) to create tighter curls.
- Heat Setting: Use lower heat settings (around 250-300°F) to prevent damage.
- Medium Hair:
- Barrel Size: A medium barrel (1-inch to 1.5-inch) is perfect for bouncy curls.
- Heat Setting: Medium heat settings (300-350°F) will work well.
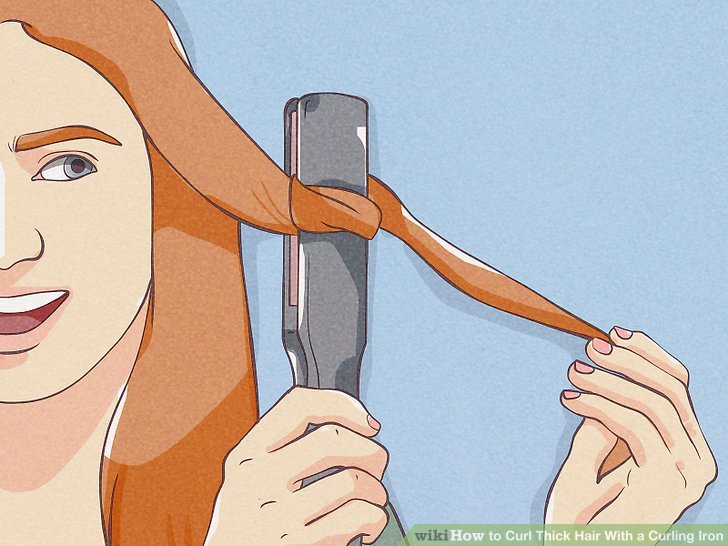
- Thick or Coarse Hair:
- Barrel Size: Larger barrels (1.5-inch to 2-inch) will give you loose, beachy waves.
- Heat Setting: Utilize higher heat settings (350-400°F) to penetrate the thicker strands.
2. Features to Look For:
- Material: Ceramic or tourmaline curling irons are great for even heat distribution and reduce frizz.
- Clamp vs. No Clamp: If you’re a beginner, a clamp might be easier to handle. A no-clamp or wand style can create more natural-looking waves once you get the hang of it.
- Adjustable Heat Settings: This feature allows you to customize the temperature based on your hair type, which is essential to avoid heat damage.
3. Additional Tips:
- Ion Technology: Irons that feature ionic technology can help to minimize frizz and static.
- Quick Heat-Up Time: If you're always in a hurry, consider a curling iron that heats up quickly.
- Safety Features: Look for curling irons with auto shut-off features for peace of mind.
In summary, the right curling iron can make all the difference in achieving beautiful curls. Take the time to consider your hair type, the features you value, and soon you'll be well on your way to becoming a curling iron pro! So, let’s get those curls started!
Also Read This: How to Make Electricity at Home with Water: Simple Science Tutorial on Dailymotion
3. Essential Tools and Products for Curling Hair
Before diving into the world of curling your hair, it’s crucial to have the right tools and products at your disposal. This not only helps in achieving the best curls possible but also ensures that your hair remains healthy and beautiful. Here’s a handy list of what you need:
- Curling Iron: Look for a curling iron that suits your hair length and the type of curls you want. Generally, a 1-inch barrel is a good all-around choice for most hair types.
- Heat Protectant Spray: This is essential! It creates a barrier between your hair and the heat from the curling iron, helping to prevent damage.
- Hair Clips: Use these to section off your hair while you curl it. This makes the process much easier and more organized.
- Brush or Comb: A wide-tooth comb is perfect for detangling your hair before you start styling.
- Hairspray: A good hairspray will keep your curls intact throughout the day. Look for a lightweight formula to avoid stiffness.
- Serum or Oil: A finishing product can help add shine and tame frizz once your curls are complete.
With these tools and products in hand, you’re well on your way to creating beautiful curls at home. Remember, investing in quality tools can make a significant difference in the outcome and durability of your curls.
Also Read This: Step-by-Step Guide to Sewing a Collar on a Dress
4. Preparing Your Hair for Styling

Now that you have your essential tools and products, the next step is to prepare your hair for styling. Proper preparation is key to achieving long-lasting curls, and it also ensures that your hair stays healthy throughout the process. Here's how to get started:
- Start with Clean Hair: Wash your hair with a gentle shampoo and conditioner. Clean hair holds styles better and looks more vibrant.
- Dry Your Hair: While you can use a curling iron on damp hair, blow-drying your hair until it's completely dry tends to yield better results. If you must use the iron on damp hair, ensure it's labeled for such use.
- Detangle: Use a wide-tooth comb or your fingers to detangle your hair gently. This helps avoid breakage and makes curling much easier.
- Apply Heat Protectant: Spray a generous amount of heat protectant evenly over your hair, ensuring every strand is coated. Wait a few seconds for it to dry before moving on to the next step.
- Section Your Hair: Divide your hair into manageable sections using clips. Start with the bottom layers and work your way up. This technique allows you to focus on one area at a time, making the curling process smoother.
Lastly, it’s essential to have a positive mindset. Curling your hair can take a bit of practice, so don’t get discouraged if your first attempts don’t turn out exactly as you envisioned. With these preparation steps, you’ll set yourself up for success and feel confident as you start curling your hair!
Also Read This: Is Dailymotion Safe According to Norton Insights into Its Security
5. Step-by-Step Guide to Curling Hair with a Curling Iron
Getting the perfect curls at home might seem intimidating, but it can actually be quite simple! Let’s break it down into easy-to-follow steps. Grab your curling iron, and let’s get started!
- Prepare Your Hair
- Section Your Hair
- Set Your Curling Iron
- Start Curling
- Hold and Release
- Pin Your Curls (Optional)
- Repeat the Process
- Cool and Finish
Before you even touch that curling iron, make sure your hair is clean and dry. If you just washed it, let it dry completely, as wet or damp hair can lead to heat damage. Applying a heat protectant product is essential. This will not only protect your hair from the heat but also help your curls last longer!
Divide your hair into manageable sections. The best way to do this is to create a horizontal parting at the nape of your neck, securing the top half with a clip. Depending on the thickness of your hair, you can split it into two to four sections.
Adjust the temperature of your curling iron according to your hair type. For fine hair, aim for a lower heat setting (around 300°F or 150°C), while thicker hair can handle higher temperatures (up to 400°F or 200°C). Always refer to the manufacturer's instructions.
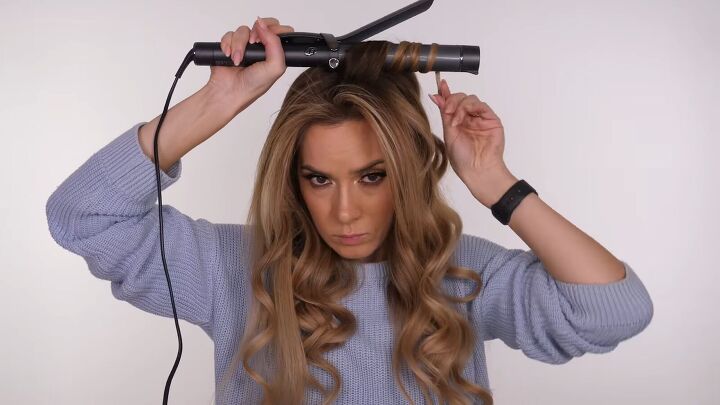
Take a small section of hair (about 1 inch wide) and hold the curling iron vertically. Wrap the hair around the barrel away from your face, starting from the ends and rolling towards your roots. Make sure to leave the ends out for a more relaxed, natural look.
Hold the curl for about 10 seconds, then carefully release it. Don’t pull on the curl; instead, let it slide off the barrel gently. This will help preserve the shape of the curl. If you prefer tighter curls, you can hold it for a few more seconds.
If you want to create long-lasting curls, consider pinning each curl after releasing it. Use a bobby pin or a clip to secure it in place while it cools. This will help the curls maintain their shape longer.
Continue the curling process around your head, section by section. Keep an eye on the direction in which you’re curling—varying it can add texture and volume to your hairstyle.
Once you're done curling all sections, allow the curls to cool completely if you’ve pinned them. Finally, gently separate the curls with your fingers for a more tousled look. You can finish with a light hairspray to hold everything in place without making it stiff!
Also Read This: Effective Methods to Block YouTube on Your Router
6. Different Curling Techniques for Various Styles
Now that you know the basic steps to curl your hair with a curling iron, let’s explore various techniques to achieve different styles. Each technique will give you a unique look, so feel free to experiment!
1. Classic Loose Curls
This style is perfect for a casual day out or even a night on the town. For loose curls, follow the step-by-step guide but increase the size of your hair sections to 1.5 to 2 inches. Wrap the hair around the barrel and hold for around 5-7 seconds for soft, bouncy curls.
2. Tight Ringlets
If you want those defined, classic ringlets, take smaller sections (around half an inch). Wrap the hair tightly around the barrel, hold for longer (around 10-15 seconds), and avoid leaving the ends out. Pin each ringlet as you go, and you’ll have gorgeous, tight curls!
3. Beach Waves
For that effortlessly chic beachy look, use a larger barrel curling iron (1.5 inches or more). Take larger sections and wrap them around the barrel in alternating directions for a more natural texture. Remember, the key is to not hold the hair in place for too long—about 5 seconds should do the trick!
4. Vintage Hollywood Curls
These glam curls are characterized by their smoothness and shine. Use a smaller barrel and curl the hair away from your face, pinning it after each curl. Once you've curled all your hair, brush them out for a soft, romantic vintage wave.
5. Half-Up Curls
If you want a fun, flirty look, consider curling only the bottom half of your hair. Section off the top half, curl the bottom section with your preferred technique, and leave the top half straight or with gentle waves. This style is playful and great for casual outings!
Experimenting with these techniques can help you discover the best styles for your hair type and face shape. Remember, practice makes perfect, so don’t be afraid to try different looks until you find what you love!
Also Read This: Master the Art of Toilet Training Your Cat with Dailymotion
7. Tips for Making Curls Last Longer
So, you’ve spent time curling your hair with that trusty curling iron, and you're wondering how to keep those beautiful waves intact throughout the day? Here are some handy tips to ensure your curls last as long as possible.
- Start with Clean, Dry Hair: Dirty hair can be heavy with oils and products that weigh down your curls. Always start with freshly washed hair that’s completely dry for optimal styling.
- Use the Right Products: Prepping your hair with some heat protectant spray before curling is not only protective but also adds a light hold. After curling, you might want to apply a light mousse or setting spray specifically designed for curls.
- Consider the Size of Your Sections: When curling, smaller sections usually hold curls better than larger ones. Never try to curl too much hair at once—grab sections that are about 1 inch wide for better results.
- Let Curls Cool: Allow your curls to sit and cool down completely before touching them. This can be a game changer in helping them hold their shape. You can even clip your curls up while they cool!
- Use Hair Spray Sparingly: After your curls have cooled down, mist your style with a flexible hold hairspray. Too much hairspray can make curls feel stiff and unnatural, so less is more!
- Don’t Touch Too Much: Once you’ve styled your hair, limit the amount of brushing or running your fingers through your curls. The more you fiddle with them, the more they might fall.
- Sleep Smart: If you want curls to last into the next day, consider sleeping with your hair in a loose braid or a soft bun. A silk or satin pillowcase can also help minimize frizz and breakage.
These tips might seem small, but they can make a significant difference in the longevity of your curls. With a little care and attention, you can rock those bouncy waves all day long!
Also Read This: Downloading Dailymotion Videos Without Software: A Complete Overview
8. Common Mistakes to Avoid When Curling Hair
We’ve all been there—curling hair can seem simple, but it’s surprisingly easy to make mistakes that can lead to frustrating results. Below are some common pitfalls to avoid the next time you pick up that curling iron.
- Using the Wrong Heat Setting: Every hair type is different. Fine hair may need a lower heat setting, while thicker hair may require higher temperatures. Always adjust the heat based on your hair type to prevent damage.
- Not Sectioning Hair: Skipping sectioning can lead to uneven or missed curls. Always section your hair into manageable parts, so every strand gets the attention it deserves.
- Holding the Curl Too Long: While it’s important to hold the curl long enough to set, keeping the iron on for too long can scorch your hair. Typically, 10-15 seconds is sufficient, depending on the curl type you want.
- Forgetting Heat Protection: Always use a heat protectant! It creates a barrier between your hair and the hot iron, helping to prevent damage and keep your curls looking healthy.
- Inconsistent Curl Direction: Curling all sections in the same direction can create a dated look. Mix it up by alternating directions for a more natural, tousled finish.
- Neglecting to Clean Your Curling Iron: Over time, product buildup on your curling iron can be transferred to your hair, affecting how the curls hold. Regularly wipe it down to keep it clean!
- Not Allowing Curls to Cool: This is a big one! If you style and move on without letting your curls cool down, they won’t hold their shape. Give them a few minutes to cool for lasting results!
Avoiding these common mistakes can help you achieve stunning results and keep your curls looking fabulous. Remember, practice makes perfect, so don’t get discouraged if your curls don’t come out perfectly the first time. Happy curling!
Conclusion and Final Thoughts on Curling Hair at Home
Curling your hair at home can be a fun and rewarding experience, especially when you see the style it brings. With the right technique and a bit of practice, you can achieve beautiful curls that enhance your overall look. Here are some key takeaways:
- Preparation is Key: Always start with clean, dry hair. Using a heat protectant can prevent damage and make your curls last longer.
- Choose the Right Tool: Not all curling irons are created equal. Different barrel sizes can create varying curl styles, so choose one that suits your desired look.
- Technique Matters: Whether you opt for loose waves or tight curls, mastering the technique is essential. Experiment with different methods until you find what works best for you.
- Finishing Touches: Use a good hairspray to hold your curls in place, and consider adding some styling cream for a polished finish.
Moreover, don't forget to give yourself a little grace as you learn the art of curling. It might take a few tries to get the perfect curl, but with practice, you'll develop your own routine and style preferences. Remember to have fun with it and express yourself through your hair. Happy curling!
 admin
admin


