Uploading videos to YouTube from your iPhone can be a fun and rewarding experience. Whether you're sharing your latest adventure, creating a tutorial, or showcasing your artistic talents, it's easier than you might think! In this blog post, we’ll take you through the simple steps to upload your videos directly from your iPhone using the YouTube app. Let’s dive in!
Getting Started with the YouTube App
First things first! To upload videos from your iPhone, you need to make sure you have the YouTube app installed. If you haven’t downloaded it yet, here’s how to do it:
- Open the App Store on your iPhone.
- Search for YouTube using the search bar.
- Tap Get or the cloud icon to download the app.
Once the app is installed, follow these straightforward steps to get started:
- Log in to Your Account:
Open the YouTube app and log in with your Google account. If you don’t have an account, you can easily create one by following the prompts on the app.
- Prepare Your Video:
Before uploading, ensure your video is ready. You can shoot a new video directly in the app or use an existing one from your camera roll. Here are a few things to consider:
- Check the video quality; make sure it’s in high resolution.
- Edit your video if needed. There are various editing apps available, such as iMovie or InShot.
- Trim any unnecessary parts to keep your audience engaged.
- Start the Upload:
To begin the upload process, tap the + (plus icon) located at the bottom of the home screen in the YouTube app.
- Select Your Video:
Select either Record a new video or Upload a video from your camera roll. Choose the video you wish to upload.
- Add Video Details:
Once your video is selected, you’ll need to fill out some important details. Here’s what you should include:
- Title: Make it catchy and relevant to attract viewers.
- Description: This is your chance to tell viewers what your video is about. Add links or social media handles if relevant.
- Tags: Use relevant keywords to help your video get discovered.
- Thumbnail: Choose or create an eye-catching thumbnail to draw viewers in.
- Set Privacy Settings:
Decide whether you want your video to be Public, Unlisted, or Private. This choice determines who can see your video, so choose wisely!
- Finalize the Upload:
After filling in all necessary details, tap Upload. The app will process your video, which may take some time depending on your internet connection.
And just like that, you're well on your way to sharing your creativity with the world! Once uploaded, remember to engage with your viewers through comments and feedback to build your channel.
Also Read This: How to Get YouTube on Vizio TV and Start Streaming Your Favorite Content
3. Preparing Your Video for Upload
Before hitting that upload button, it's essential to prepare your video properly. A little bit of preparation goes a long way in ensuring that your content looks professional and reaches your audience effectively. Here are some easy steps to follow:
- Check Your Video Quality: Ensure that your video is recorded in good quality. Ideally, you should shoot in at least 1080p. You can check your video settings directly in the camera app before recording.
- Edit Your Video: Use a video editing app like iMovie or another app available on your iPhone. Trim any unnecessary parts, add music or text overlays, and enhance the footage to make it more engaging. Here are some quick editing tips:
- Cut out any awkward pauses.
- Add background music that complements your video.
- Use transitions for a smooth flow from one scene to another.
- Add Thumbnails: While you can choose a thumbnail later, think about how your video will look on YouTube. Create a custom thumbnail using photo editing apps for maximum impact. This can be a still from your video or a separate image that represents your content.
- Optimize Video Length: Ensure your video length is appropriate for your target audience. Generally, shorter videos (around 5-10 minutes) perform better, especially for informational content. However, longer videos can be beneficial for in-depth content.
- Check for Audio Clarity: Make sure your audio is clear and free from background noise. You can use the editing app to adjust audio levels or add voiceovers if needed. Clear audio is crucial as it keeps your audience engaged.
By taking the time to prepare your video thoroughly, you are more likely to grab attention and retain viewers once it's published. So, dive into editing, tune up your audio, and get ready for the next steps!
Also Read This: ¿Cuál es el Youtuber Más Famoso de Latinoamérica? Una Mirada al Éxito Global
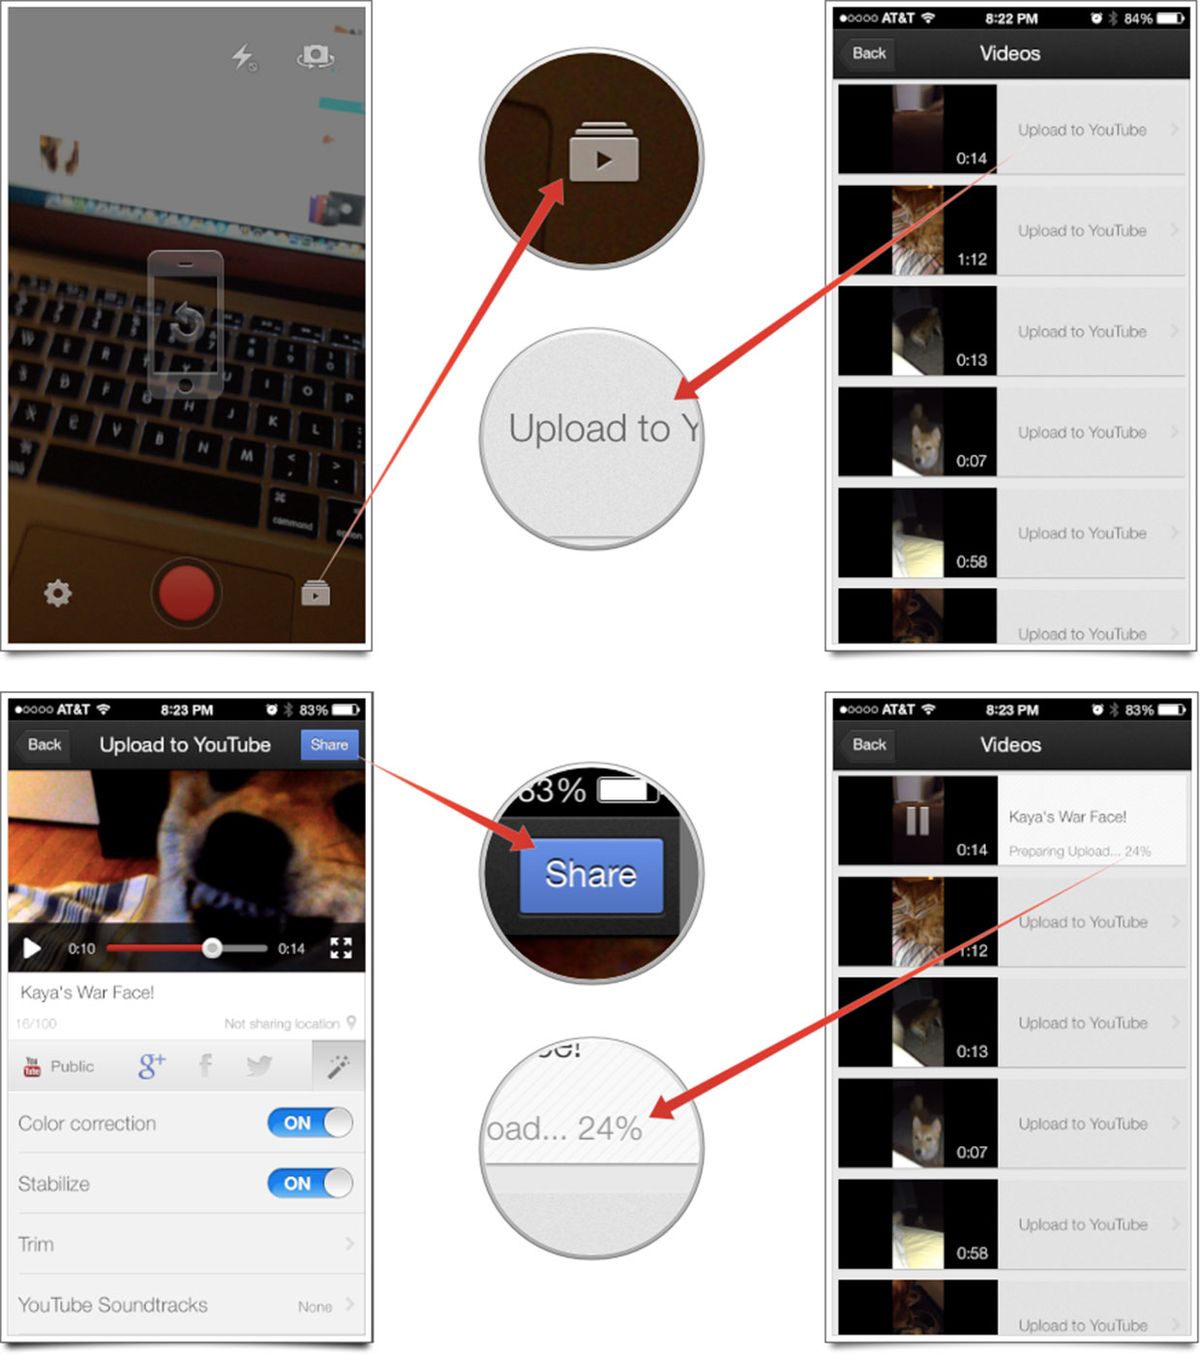
4. Step-by-Step Guide to Upload Videos
Now that your video is prepped and ready, let's go through the step-by-step process to upload your masterpiece to YouTube straight from your iPhone. Follow these simple steps, and you’ll have your video live in no time!
- Open the YouTube App: Launch the YouTube app on your iPhone. Make sure you’re logged into the account where you want to upload the video.
- Tap the '+' Icon: Look for the "+" icon, usually found at the bottom center of the app. This is your gateway to creating content on YouTube.
- Select "Upload a Video": In the menu that appears after tapping the "+", select “Upload a Video.” This will take you to your photo library.
- Choose Your Video: Browse through your video library and select the video you just prepared. You can preview it to ensure it’s the one you want to upload.
- Add a Title and Description: Craft a catchy title that includes relevant keywords to help your video be discovered. In the description box, provide more details, including links, timestamps, or relevant information. This is also where you can add hashtags to increase visibility.
- Select Your Privacy Settings: Decide how you want your video to be viewed. You can choose from:
- Public: Anyone can view.
- Unlisted: Only people who have the link can view.
- Private: Only you can view the video.
- Add Tags and Thumbnails: Tags help YouTube understand your video’s content, so don’t skip this step! Also, set the thumbnail you created earlier for a polished look.
- Upload Video: Finally, tap the “Upload” button, and your video will start processing. Depending on the size, this might take a little while. Just sit back and relax!
And voilà! Your video is now on YouTube for the world to see. Make sure to share it on your social media channels to maximize its reach. Happy uploading!
Also Read This: How to Record Shows on YouTube TV for Offline Watching Anytime
5. Editing Your Video Before Uploading
Editing your video before uploading it to YouTube can make a huge difference in how your content is received. It's your chance to polish the final product, trim down unnecessary parts, enhance audio, and even add some cool effects. Plus, with an iPhone in hand, you’ve got some pretty powerful editing tools at your fingertips!
Here are a few steps to effectively edit your YouTube video using your iPhone:
- Choose the Right Editing App: There are many apps available that cater to different editing needs. Some popular ones include iMovie, InShot, and Adobe Premiere Rush. Pick one that feels intuitive for you.
- Trim and Cut: Start by cutting any mistakes or long pauses. You can use the trimming feature to keep only the best parts. A well-paced video keeps your audience engaged!
- Add Transitions: If you have multiple clips, add transitions between them. This makes your video flow better and gives it a more polished look.
- Enhance Audio: Good audio can be as important as good video. Use your editing app to adjust the volume and reduce background noise. If you have background music, make sure it doesn’t overpower your voice.
- Incorporate Text and Titles: Highlight important points by adding text, titles, or captions. This is particularly useful for emphasizing key messages or providing context.
- Color Correction: Don’t underestimate the power of color correction. Adjusting brightness, contrast, and saturation can dramatically improve the visual appeal of your video.
- Preview Before Exporting: Once you’re finished editing, make sure to preview your video in its entirety. Check for any last-minute changes that need to be made before you export.
Editing might seem daunting at first, but the more you practice, the better you’ll become! And remember, the goal is to create content that reflects your style and resonates with your audience.
Also Read This: Does YouTube Have Adult Content? Understanding Content Guidelines
6. Adding Titles, Descriptions, and Tags
Now that you have your video polished and ready to go, it’s time to focus on the details that ensure it gets seen by your target audience: titles, descriptions, and tags. These elements are crucial for searchability and can significantly impact your video's performance.
Here's how to make the most of these features:
- Crafting a Catchy Title: Your title should be both descriptive and engaging. It should give viewers a clear idea of what to expect while also being enticing enough to make them want to click. Consider using keywords that your audience might search for.
- Writing a Compelling Description: The description provides context and can enhance your video’s searchability. Include key points discussed in the video, any links to resources mentioned, and a bit about you or your channel. Aim for at least a couple of paragraphs, and don’t forget to include a call to action, encouraging viewers to like, share, or subscribe!
- Utilizing Tags: Tags help categorize your video and improve its discoverability. Use a mix of broad and specific tags related to your content. For instance, if your video is about DIY home gardening, you might include tags like “gardening,” “DIY,” “home improvement,” and so on. Keep it relevant!
When you put thought into your titles, descriptions, and tags, you're doing more than providing information; you're also increasing the chance for more views and engagement. Every detail counts, so take your time and make it count!
Also Read This: How to Make YouTube Not Detect Adblock: Simple Methods to Avoid Detection
7. Choosing Privacy Settings for Your Video
Once you've uploaded your video, it’s time to consider who gets to see it. YouTube offers three main privacy settings that you can choose from, each tailored to different needs. Let’s break them down:
- Public: Anyone can view your video. This setting is great for content creators looking to build an audience or share their work widely.
- Unlisted: Only people who have the link can view your video. This option is perfect for sharing videos with a small group without making them public.
- Private: Only you and people you choose can view your video. This setting is ideal for personal videos or videos you’re still refining.
To change your privacy settings, simply tap on the privacy option during the upload process. If you want to change it later, you can do so by going to your YouTube Studio once the video has been uploaded. It's important to choose carefully because it affects who can see your content.
Additionally, consider how these settings might align with your goals. If you're a small business or budding creator aiming to gain traction, going public might be your best bet. Conversely, if you're sharing content with family or colleagues, private or unlisted options serve you well.
Remember, you can also schedule a video to go public at a later date if you have a specific launch plan in mind. This is especially useful for creators who want to build anticipation or align video releases with other content releases.
Also Read This: How to Watch YouTube on TV Using Apple TV for a Bigger, Better Viewing Experience
8. Finalizing and Publishing Your Video
You’ve chosen your privacy settings, and now it’s time for the final steps before hitting the publish button! Here’s how you can ensure everything’s in tip-top shape:
- Title: Craft a catchy and descriptive title. This is what will grab viewers' attention, so make it count!
- Description: Write a detailed description that provides context about your video. Use relevant keywords to help people find your video through search engines.
- Tags: Tags help categorize your content. Use keywords related to your video that potential viewers might search for. However, don’t go overboard—stay relevant!
- Thumbnail: Choose an eye-catching thumbnail! It’s the first thing viewers will see, so select or create a thumbnail that piques interest and reflects your video's content.
Before publishing, preview your video one last time. Double-check for any mistakes in your title, description, or tags. Make sure your video plays smoothly. A well-prepared video is key to making a good impression!
When everything looks good to go, tap on the “Publish” button. Congratulations! You’re officially a YouTube creator! Share your video on social media platforms or with friends to spread the word.
Lastly, keep an eye on the video's performance through YouTube Analytics. This will give you insight into how viewers are interacting with your content and help you understand what works best for your audience in the future. Happy uploading!
Also Read This: How to Download YouTube Audio on Android Without an App: Using Web Tools
Troubleshooting Common Upload Issues
So, you’ve followed all the steps to upload your video but suddenly hit a wall? Don’t worry, you’re not alone! Uploading videos can sometimes come with its fair share of hiccups. Let’s break down some common issues and how to resolve them quickly so you can get back to sharing your awesome content.
1. Slow or Interrupted Internet Connection
One of the most frequent culprits behind trouble with video uploads is a shaky internet connection. If your Wi-Fi isn’t strong or if you’re relying on mobile data, you might face issues. Here’s what you can do:
- Check your signal: Make sure you're in a spot where your Wi-Fi signal is strong.
- Switch networks: If possible, try moving to a different Wi-Fi network or use mobile data if your Wi-Fi is lagging.
- Restart your router: Sometimes resetting your internet connection can clear up issues.
2. Video File Size and Format
YouTube has specific requirements for video formats and file sizes, so you may run into issues if your video doesn’t comply. Here’s how to check:
- File size: Ensure your video is not too large. YouTube allows files up to 256 GB, which is more than enough for most users.
- Supported formats: Check if your file is in an accepted format, such as .MP4, .MOV, or .AVI.
- Using a video editor: If your video is too large, consider using an app to compress it before uploading.
3. App or Device Glitches
Sometimes, the issue might be with the YouTube app or your iPhone itself. Here are some simple fixes:
- Update the app: Ensure you’re using the latest version of the YouTube app. Go to the App Store and check for updates.
- Restart your iPhone: A quick restart can often solve many minor glitches.
- Clear cache: You can also try clearing the YouTube app cache in settings to refresh its performance.
If you continue to have problems, don't hesitate to check the YouTube Help Center for more detailed troubleshooting guides. They have a wealth of information that could help you pinpoint the exact issue!
Conclusion
Uploading videos to YouTube from your iPhone can be a breeze with the right steps in place. Whether you’re sharing your latest travel adventures, cooking tips, or a vlog about your daily life, it’s rewarding to connect with an audience through your content. Remember, the most important part of the process is to enjoy sharing your passions!
Throughout this guide, we’ve covered everything from the basics of uploading videos to troubleshooting common issues. To recap:
- Ensure your video meets YouTube’s file requirements.
- Make use of Wi-Fi for faster uploads.
- Stay on top of app updates and device performance.
- If you hit a snag, there are ways to troubleshoot the issue effectively.
Now, it’s time for you to get creative! Put your ideas into action, make those edits, and hit that upload button. Your audience is waiting to see what you have to share. And remember, the more you upload, the better you’ll get at it. Happy creating!
 admin
admin


