Welcome to the vibrant world of textile design! If you've ever admired intricate patterns on fabrics or marveled at how a simple design can transform a room, you're in the right place. In this guide, we'll explore how to leverage Adobe Photoshop, a versatile tool favored by many designers, to create stunning textile designs. Whether you’re a beginner or looking to refine your skills, this step-by-step journey will help you unleash your creativity and bring your textile ideas to life!
Getting Started with Photoshop for Textile Design
Before diving in, let’s ensure you’re equipped to create amazing textile designs in Photoshop. Here’s how to get started:
1. Install Adobe Photoshop
First things first: you need the software. If you don't have Photoshop yet, you can download it from the Adobe website. They often offer a free trial, perfect for testing out the software’s capabilities before committing to a subscription.
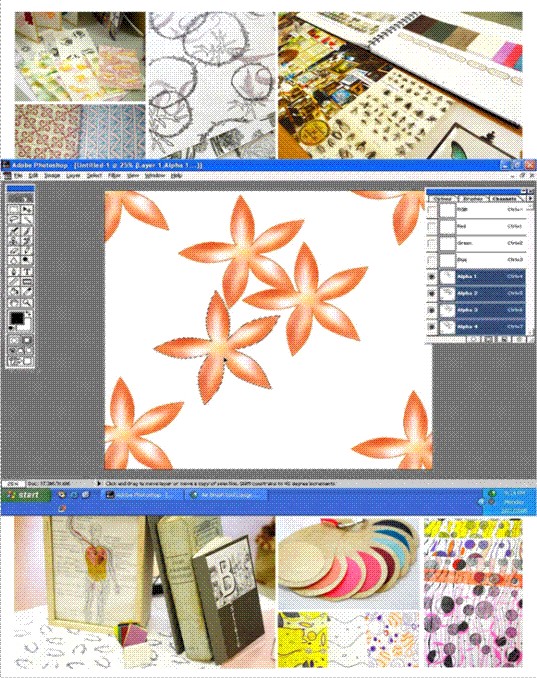
2. Familiarize Yourself with the Interface
Once you have Photoshop installed, take some time to explore the interface. Key areas to notice include:
- The Toolbar: This is where you'll find all the essential tools you'll use for designing.
- The Options Bar: Provides options for the selected tool, allowing you to customize your approach.
- The Layers Panel: Here, you can manage layers, which are crucial for non-destructive editing.
- The Color Picker: Vital for choosing and adjusting colors in your designs.
3. Set Up Your Document
Start by creating a new document. For textile design, a common size is around 12x12 inches or 24x24 inches at 300 DPI (dots per inch) for high-quality prints. Here’s how to do it:
- Go to File > New.
- Enter your desired dimensions (width, height) and resolution (300 DPI).
- Click Create.
4. Choose Your Color Palette
A cohesive color palette can make or break your textile design. Use the Color Picker to select a main color for your design. You can create palettes by:
- Choosing complementary colors.
- Using an online color palette generator.
- Drawing inspiration from nature or art.
5. Start Designing!
Now that you have your document set up and your color palette, it’s time to let your creativity flow. Here are some tools and techniques to consider:
- Using Shapes and Brushes: Create unique patterns using the shape tool and various brush presets.
- Layer Styles: Add depth and dimension with shadows, glows, and other effects.
- Patterns: Explore the Pattern Maker (Edit > Define Pattern) to create repeating textile patterns.
Don’t forget to frequently save your progress! Use File > Save As to save your work in a PSD format so that you can edit layers later.
In the next sections, we'll dive deeper into pattern creation, advanced techniques, and tips for printing your designs. Until then, play around with these basics and get comfortable with the tools. You'll be on your way to becoming a textile design pro in no time!
Also Read This: How to Apply Mascara and Eyeliner for a Bold Look on Dailymotion
3. Essential Tools and Techniques for Textile Design
When diving into the world of textile design using Photoshop, having the right tools and techniques at your disposal can make all the difference. Let’s explore some of the essential elements that will empower your creative journey.
1. Photoshop Brushes: One of the best assets for textile design is the collection of brushes. Photoshop offers a variety of brushes, but you can also download custom brushes that mimic textures like fabric weaves, floral patterns, or abstract designs. You can create your own brushes too, adding a personal touch to your work.
2. Patterns and Textures: Familiarize yourself with Photoshop’s pattern and texture tools. Patterns can be created from images or designs you generate, and textures can add depth and realism to your textiles. Play around with overlays and blending modes to create unique looks.
3. Layers and Layer Styles: Mastering layers is crucial. Using multiple layers allows for more flexibility and easier modifications. Layer styles (like drop shadows and bevels) can provide depth to your designs, making patterns pop visually. Make sure to name your layers for better organization!
4. Color Palettes: Color plays a vital role in textile design. Create your own cohesive color palettes using the Color Picker tool or utilize Adobe Color to explore trending options. Experimentation is key here; don’t hesitate to test different color combinations to see what works best for your design.
5. Selection Tools: Familiarize yourself with selection tools such as the Magic Wand and lasso tools. These will help isolate areas in your designs, allowing you to edit or apply effects more precisely. This precision is essential when working with intricate patterns.
6. Vector Tools: If your design requires clean lines and shapes, using vector tools in Photoshop can be advantageous. These tools ensure your shapes maintain clarity no matter the scale, making them ideal for logos or sharp designs within your textiles.
When you combine these tools and techniques, your textile designs can really come to life! Don’t forget the importance of practice. The more you familiarize yourself with these essential elements, the better your designs will become.
Also Read This: Can Dailymotion Content Be Trusted? Answering Yahoo Answers’ Concerns
4. Step-by-Step Process for Designing Textiles
Alright, let’s get into the nitty-gritty! Designing textiles in Photoshop can seem overwhelming at first, but by breaking it down into manageable steps, you’ll find it’s quite enjoyable. Here’s a simple step-by-step guide to help you through the process.
Step 1: Research and Inspiration
Before jumping into Photoshop, take some time to gather inspiration. Look at existing textiles, patterns, and trends. Pinterest and fabric design websites can be great sources to see what styles resonate with you.
Step 2: Create a Mood Board
Compile your findings into a mood board. This can include color swatches, images of fabrics, and any other visuals that inspire your design. Having a clear direction helps streamline your design process.
Step 3: Set Up Your Canvas
Open Photoshop and set up a new file. Choose a size that fits your project—common dimensions include 8" x 8" or 12" x 12". Don’t forget to set the resolution to at least 300 DPI if you intend to print your textiles; this ensures high-quality output.
Step 4: Sketch Your Ideas
Using the Brush tool, sketch out your design ideas directly on the canvas. Remember, this doesn't have to be perfect; it's just a starting point. You can later refine or change your designs as you see fit.
Step 5: Create Your Patterns
Once you have a design you like, use the rectangular marquee tool to select portions of your design and copy them into a new layer. From there, experiment with transformation tools like scale, rotate, and flip to create seamless patterns.
Step 6: Color Your Design
Now it’s time to apply color! Use your previously assembled color palette to fill in your design the way you envision it. Experiment with gradients and shading for added depth.
Step 7: Final Touches
Add any last details, such as textures or overlays. This is also the stage to tweak your layers, adjust transparency, and refine any elements of your design that need a little extra love.
Step 8: Save and Export
Save your work in Photoshop format (.PSD) to keep layers intact for future editing. When ready to print or share, export it to a suitable format like .PNG or .JPEG.
And there you have it! By following these steps and embracing the creative tools Photoshop has to offer, you can create beautiful textile designs that showcase your unique style. So grab your tablet or mouse, and let your creativity flow!
Also Read This: How to Create Friendship Cards on Dailymotion
5. Adding Patterns and Textures to Your Designs
Now that you have your base design set up in Photoshop, it’s time to get creative by adding patterns and textures. This step can significantly enhance your textile design, making it more visually appealing and giving it depth. Here’s how to do it!
Choosing the Right Patterns
First things first: you’ll want to choose patterns that complement your design. Patterns can range from simple geometric shapes to intricate florals or abstract designs. Here are a few tips:
- Keep It Cohesive: Ensure that the patterns match the theme and color palette of your overall design.
- Opt for Versatility: Some patterns work well in various contexts. Look for scalable designs that can fit different sizes.
- Contrast Wisely: Patterns can be bold or subtle, but they should contrast nicely with the main elements of your design.
Applying Patterns in Photoshop
To apply a pattern in Photoshop, follow these steps:
- Select your design layer.
- Go to Edit in the menu bar, then click on Fill.
- In the Fill dialog box, choose Pattern from the drop-down menu.
- Select the pattern you’d like to use from the pattern picker.
- Click OK to apply the pattern!
Don’t forget to adjust the layer’s opacity to make sure the pattern enhances rather than overwhelms your design. You can even alter the blending modes for more creative effects!
Adding Textures
Textures can add a whole new layer of interest to your designs. You can create a fabric-like finish, add grunge effects, or even simulate a woven appearance. Here’s how:
- Find Textures: You can create your own textures by photographing surfaces like paper, fabric, or wood, or you can download high-quality textures from various online platforms.
- Layer Techniques: Import the texture into your Photoshop document as a new layer. Adjust its size and position to fit your design.
- Blend It: Experiment with different blending modes to see how the texture interacts with your design. Overlay, Soft Light, and Multiply are great starting points.
Lastly, use a mask if you want to show only parts of the texture. This flexibility allows you to fine-tune your design to perfection!
Also Read This: Learn How to Download Dailymotion Videos Using Your Smartphone
6. Exporting and Saving Your Textile Designs
Once you’re happy with your textile design, it’s essential to export and save it properly to retain quality and ensure it’s formatted correctly for its intended use. Here’s a straightforward guide to make this process seamless.
Choosing the Right File Format
Photoshop allows you to export your designs in various formats, but here are the most commonly used ones for textiles:
- JPEG: Ideal for photos and designs with gradient colors. Be mindful, though, that JPEGs are lossy formats, meaning some quality is sacrificed.
- PNG: Great for designs that need transparency. PNG maintains high quality, but files may be larger.
- TIF: Perfect for professional printing. TIF files are high-quality and lossless, but can also be quite large.
- PSD: Save your original Photoshop document to maintain layers for future edits!
Exporting Your Design
To export your design, follow these steps:
- Go to File > Export > Export As.
- Select the format you need from the dropdown.
- Adjust settings as necessary, including quality and size.
- Click Export and choose where to save your design.
Final Touches
Before wrapping it up, double-check the dimensions and resolution. For printing, a resolution of 300 PPI (pixels per inch) is standard for optimal quality. If your design is intended for digital use, 72 PPI should suffice.
And there you have it! With these steps, you’re well on your way to creating stunning textile designs in Photoshop that stand out and impress. Happy designing!
Also Read This: Does Roku Have Access to Dailymotion? Streaming Options and Features
7. Tips for Enhancing Your Textile Designs
Creating beautiful textile designs in Photoshop can be incredibly rewarding, but there are always little tips and techniques that can take your designs from good to great. Here are some practical tips to keep in mind as you elevate your work:
- Use Layers Wisely: Take advantage of Photoshop's layering system. Organizing your elements into different layers makes it easier to edit and experiment with your designs. You can adjust opacity, blending modes, and order to create stunning visual effects.
- Experiment with Patterns: Don’t hesitate to play with pattern making! Use the Pattern Tool to create repeating designs. Remember to test how your pattern looks when tiled to ensure it flows well.
- Add Depth with Shadows: Adding shadows or a slight 3D effect can give your design more life. A subtle drop shadow or inner shadow can enhance elements and make them pop against the background.
- Color Harmonies: Understanding color theory can transform your design. Use Adobe Color or similar tools to find complementary and analogous color schemes that work well together. This will add vibrancy and cohesion to your textiles.
- Textures Matter: Fabrics are known for their textures, so consider adding texture overlays to your designs. Use high-resolution images of fabrics, wood, or other substances to give your textiles a realistic feel.
- Feedback is Gold: Don’t be afraid to share your work with others. Getting feedback from fellow designers or friends can provide you with fresh perspectives and ideas you might not have considered.
- Stay Inspired: Keep a collection of designs that inspire you. Refer to textile trends, Pinterest boards, or even fashion magazines to keep your creativity flowing and spark new ideas.
Remember, enhancing your textile designs is all about experimentation and creativity. Don’t shy away from trying new techniques and step outside of your comfort zone. Your unique perspective is what makes your designs stand out!
Also Read This: Can You Watch Age Restricted Videos on Dailymotion
8. Additional Resources and Video Tutorials
If you're eager to dive deeper into textile design and want to master your skills in Photoshop, there are a plethora of resources available at your fingertips. Here’s a curated list of tools and tutorials that can help you on your journey:
- Adobe Creative Cloud Tutorials: Adobe's own tutorial section provides a wealth of knowledge covering various aspects of Photoshop. You can find specific tutorials on textile design by visiting their Creative Cloud Tutorials.
- YouTube Channels: Many talented designers share their tips on YouTube. Channels like Matt Borchert and Tutorials Monkey focus on textile design and Photoshop techniques. Check out their playlists for in-depth video guides.
- Textile Design Courses: Websites like Skillshare and Coursera offer structured courses on textile design. Look for beginner to advanced classes that include hands-on projects. For instance, you might want to enroll in 'Textile Design Fundamentals' on Skillshare.
- Design Blogs: Follow blogs dedicated to textile design, such as Design*Sponge or The Fabric of Our Lives. They often feature tutorials, case studies, and design inspiration.
- Books on Textile Design: Consider investing in books that cover the principles of textile design. Titles like 'Textiles: The Whole Story' and 'Digital Textile Design' provide comprehensive insights and techniques that can enhance your understanding.
Utilizing these additional resources will not only improve your skills but also inspire your creative process. Keep learning, and don't hesitate to explore various avenues of design to find your unique style!
Conclusion and Final Thoughts
Designing textiles in Photoshop can be an enriching experience, allowing for creativity and innovation in fabric design. By following the steps outlined in this guide, you can create unique patterns that reflect your personal style or meet specific project requirements. Here are some key takeaways:
- Understanding Your Tools: Familiarize yourself with Photoshop's features such as brushes, patterns, and layers to maximize your design capabilities.
- Concept and Planning: Always start with a clear concept and plan your design. Sketching ideas can streamline your creative process.
- Pattern Creation: Utilize the Pattern Maker tool wisely to create seamless patterns that can be repeated without noticeable edges.
- Color Theory: Employ a good understanding of color theory to choose palettes that complement your design and invoke the desired mood.
- Testing and Iteration: Don’t hesitate to test your designs on various mockups and iterate based on feedback or your observations.
By embracing these principles, you’ll be well-equipped to create stunning textile designs that stand out in the industry. Remember, practice makes perfect, so keep experimenting with different techniques and styles until you find what resonates with you. Happy designing!
 admin
admin


