Welcome to the ultimate guide on creating a server in Counter-Strike 1.6! If you’ve ever wanted to host your own games, connect with friends, or even dive into the world of competitive play, you’re in the right place. Setting up a server might sound daunting, but it can be a fun project that enhances your gaming experience. In this guide, we’ll break everything down step by step, ensuring you have all the tips and tricks to get your server up and running smoothly. Let's dive in!
Understanding the Requirements for Server Setup
Before you jump into creating your Counter-Strike 1.6 server, it’s essential to understand the requirements you'll need. Fortunately, setting up a server for this classic game isn't as complicated as it may seem. Here’s what you’ll need to get started:
1. Hardware Specifications
Having the right hardware will ensure your server runs smoothly, especially if you plan on hosting more than just a few friends. Here’s a general guideline for hardware requirements:
- Processor: At least a dual-core CPU. Counter-Strike 1.6 isn’t overly demanding, but a good processor will handle multiple players effectively.
- RAM: A minimum of 1 GB for smaller maps and a maximum of 4 GB for larger servers and mods. Aim for 2-4 GB if you want optimal performance.
- Hard Drive: You only need a small amount of space (around 1 GB), but having an SSD can improve loading times significantly.
- Network: A stable internet connection with at least 1 Mbps upload speed for a smooth gaming experience.
2. Software Requirements
Next, let’s talk about the software. You’ll need the following components to get your server ready:
- Counter-Strike 1.6 Game Files: Make sure you have a legitimate copy of the game. It’s essential for accessing the server files.
- HLDS (Half-Life Dedicated Server): This tool is crucial for hosting your server. You can download it through Steam under the "Tools" section.
- Operating System: Most players use Windows, but you can host your server on Linux as well. Just make sure to choose the version that best suits your setup.
3. Network Setup
Setting up your network properly is vital for player connectivity. Here are a few key steps:
- Port Forwarding: By default, Counter-Strike uses port 27015. You’ll need to forward this port on your router to allow players to connect.
- Static IP: It’s a good idea to set up a static internal IP for your server. This way, you won’t have to change port forwarding settings every time your router reboots.
- Firewall Settings: Ensure that your firewall is configured to allow traffic on the designated ports.
With these requirements in mind, you’re well on your way to setting up a Counter-Strike 1.6 server. The next steps will detail how to actually get your server running and configured just the way you like it. Stay tuned for more tips and tricks in our upcoming sections!
Also Read This: DIY Paper Bracelets Fun Craft Ideas on Dailymotion
3. Step-by-Step Instructions for Creating Your Server
Creating your own server in Counter-Strike 1.6 is an exciting way to customize your gameplay experience. Whether you want to play with friends or host a larger community, setting things up isn’t as daunting as it seems! Let’s break it down into easy-to-follow steps.
Step 1: Download and Install Steam
First things first, you need to have Steam installed on your computer as it’s the primary platform for Counter-Strike 1.6. If you haven’t already done so, visit the Steam website and download the application. Once installed, log in or create a new account.
Step 2: Install Counter-Strike 1.6
If you haven’t purchased Counter-Strike 1.6, go to the Steam store, search for the game, and buy it. Once it’s in your library, download and install it. This is essential because the server files are included in the game installation.
Step 3: Download the Dedicated Server Files
To create a dedicated server, you need to download the dedicated server files. Here’s how:
- Open Steam and go to the Library.
- Click on the Tools section in the sidebar.
- Find Counter-Strike Dedicated Server in the list and install it.
Step 4: Start the Server Setup
Once the dedicated server files are installed, navigate to the installation directory. By default, it is located in:
C:Program Files (x86)SteamsteamappscommonHalf-Life
Here, you’ll find a file called hlds.exe. Double click on it, and a setup window will appear!
Step 5: Configure Basic Server Options
This setup window allows you to configure your server. You’ll see options like:
- Server Name
- Maximum Players
- Map List
- Game Type
- Port Number
Fill in your desired settings. Don’t worry; you can always modify these settings later.
Step 6: Launch Your Server
After configuring your settings, click the Start Server button. Voila! Your Counter-Strike server is up and running. You can check your local IP by typing ipconfig in the Command Prompt, which you’ll need to share with friends joining your server.
That’s it! You're ready to jump into the action. Remember, you’ll need to invite your friends by giving them your IP address, and they will have to enter it in their console to join your game.
Also Read This: How to Make a Monster Tail Loom Band Fun Crafting Tutorial on Dailymotion
4. Configuring Server Settings for Optimal Gameplay
Now that you’ve created your server, it’s time to tweak those settings for optimal gameplay. The right configurations can dramatically enhance the gaming experience for you and your fellow players.
Understanding Configuration Files
Most of the server settings can be modified through a configuration file called server.cfg. This file is located in the server directory and contains a variety of customizable settings.
Key Settings to Modify
Here are some important settings you might consider adjusting:
- hostname: This sets the name of your server.
- maxplayers: Limit the number of players on your server.
- mapcyclefile: Define the maps that rotate during gameplay.
- sv_lan: Set this to
0for internet play and1for LAN. - sv_cheats: Toggle cheats on or off. Keep it
0for standard play. - modification rights: Set
rcon_passwordfor remote control access.
Tweaking Gameplay Settings
For a better gameplay experience, consider the following commands:
| Command | Purpose |
|---|---|
mp_roundtime |
Control the duration of each round. |
mp_timelimit |
Set the total time limit for the match. |
mp_winlimit |
Limit the number of rounds a team can win. |
mp_freezetime |
Set how long players remain frozen at the start of a round. |
These settings will help balance gameplay, making it more enjoyable for everyone. Experiment with different settings to find the sweet spot for your group!
Saving and Applying Your Configuration
After making your changes in server.cfg, make sure to save the file. You can apply the new settings by restarting your server or typing exec server.cfg in your server console.
Now, with the right setup and configurations, you're all set for an awesome gaming experience in Counter-Strike 1.6. Happy gaming!
Also Read This: Learn How to Make Paper Toys at Home with Dailymotion Video Instructions
5. Exploring Server Management Tools and Options
When you’re diving into the world of Counter-Strike 1.6, having a handle on server management tools is essential for a smooth experience. Whether you're a seasoned admin or a newbie, the right tools can make the difference between a chaotic game and a well-oiled machine. Let’s explore some of the key tools and options available!
1. Admin Mod (AMX Mod X)
AMX Mod X is one of the most popular server management tools for Counter-Strike 1.6. It allows you to run plugins that can customize gameplay, provide administration commands, and much more. With a rich community backing, you can find a plethora of plugins for everything from boosting gameplay to managing player behavior.
2. SourceMod
Although originally designed for Source games, SourceMod is becoming increasingly compatible with 1.6. This powerful admin tool can help you manage server settings, control players, and even implement complex scripts for events. Its flexibility makes it a worthy consideration, especially for those looking to expand their capabilities.
3. HLSW (Half-Life Server Watch)
HLSW is an invaluable tool for real-time server monitoring. It allows you to view player stats, chat with users, and change server settings without having to log directly into the game. This is especially useful if you're managing multiple servers; you can keep everything organized from a single interface.
4. Server Console Commands
Familiarizing yourself with server console commands is essential. Commands like mp_restartgame or sv_cheats 1 can drastically change your server's dynamics. Running commands from the console allows for instant changes without needing to restart the server. Here’s a quick list of some essential commands:
mp_limitteams 0- Disable team limits.mp_timelimit 10- Set the time limit for matches.mp_roundtime 3- Define the round time in minutes.
Understanding and utilizing these tools effectively can streamline your server management and enhance the overall gaming experience for players. Make sure to explore community forums for user-generated content and support!
Also Read This: Mastering the Art of Lungi Salwar Creation
6. Common Issues and Troubleshooting Tips
Running a Counter-Strike 1.6 server can be a thrilling experience, but it comes with its share of challenges. Here’s a practical guide to troubleshoot common issues and keep your server running smoothly!
1. Server Lag
Lag can be a game-changer. If players are experiencing lag, the first thing to check is your internet connection. Here are some quick fixes:
- Test your internet speed and ping.
- Limit the number of players to reduce strain on the server.
- Check server settings related to tick rate and frame rates.
2. Plugins Not Working
Sometimes, plugins may not work as intended, which can be frustrating. Here’s how to troubleshoot:
- Ensure all plugins are up to date.
- Read the console logs for any error messages.
- Check for conflicts between different plugins.
3. Connection Issues
Players might have trouble connecting to your server. If this happens, consider the following:
- Verify that the server IP and port number are correctly shared.
- Check firewall settings to ensure they aren’t blocking connections.
- Restart the server to refresh connections.
4. Game Crashes
Crashes can happen, often due to resource overload or corrupt files. To mitigate these:
- Regularly back up your server files to prevent data loss.
- Look for updated patches and install them promptly.
- Monitor server performance and resource usage.
By being aware of these common issues and having a toolkit of troubleshooting tips ready, you’ll be able to provide a more enjoyable gaming experience for everyone involved. Remember, every problem has a solution!
Also Read This: How to Make Friendship Bracelets with Rubber Bands on Dailymotion
7. Finding and Joining Servers in Counter-Strike 1.6
So, you've set up your own Counter-Strike 1.6 server, and now you’re itching to dive into the action? Or perhaps you're simply looking to hop onto some existing servers? Either way, finding and joining servers can be a fun yet overwhelming task. Don’t worry—I've got you covered!
First, let's talk about how to find servers. There are a couple of main methods to discover those virtual battlefields:
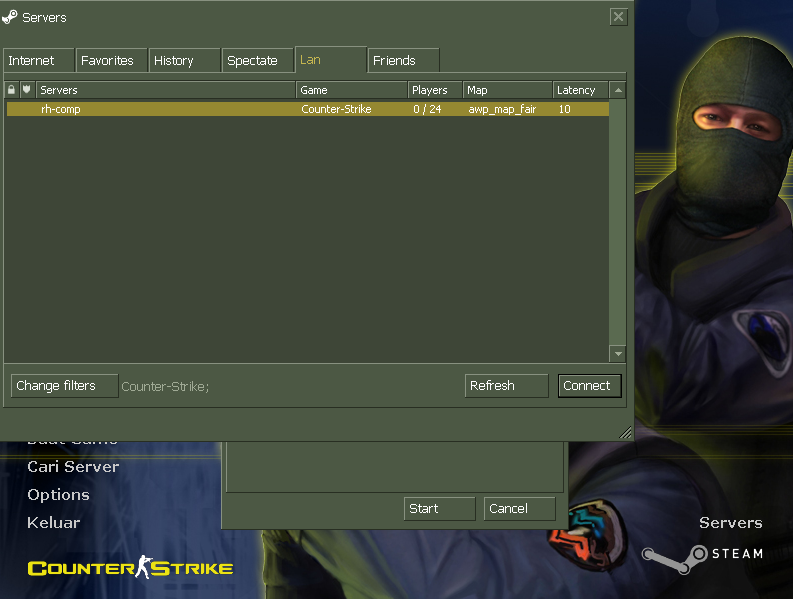
- Using the In-Game Server Browser: One of the easiest ways to find servers is directly through the game itself. Here's how:
- Launch Counter-Strike 1.6.
- From the main menu, click on "Find Servers."
- You’ll see a list of available servers. You can filter them by different criteria such as game type, ping, or even by typing the server name in the search bar.
- GameTracker: A comprehensive tracker that lists active servers along with player counts.
- CS-Servers: A user-friendly platform that allows you to sort servers by game mode, location, or number of players.
- Steam Server List: If you're using Steam, the official server list can be quite helpful as it shows a wide array of games.
Once you’ve found a server that piques your interest, joining is typically a piece of cake. Here’s a quick rundown:
- Click on the server from the server list.
- Check the Map and Game Mode to ensure you’re interested in what’s being offered.
- If it looks good, just press Connect!
Tip: Pay attention to server rules and player count before jumping in; it can make a big difference in your experience.
8. Conclusion and Additional Resources
Congratulations! You've made it to the end of this guide on creating and joining servers in Counter-Strike 1.6. Whether you're creating your very own fortress of fun or exploring the vast array of servers out there, you now have the tools to do it successfully.
As you set foot in the combat zones, keep these reminders in mind:
- Be Respectful: Server etiquette is vital. Treat fellow players with respect, follow the rules, and you’ll make friends along the way.
- Stay Updated: The gaming community is continuously evolving. Keep an eye on updates or changes in server management tools for a smoother experience.
- Participate: Engage with fellow gamers! Join forums or groups dedicated to Counter-Strike. It's a great way to learn and share your experiences.
For those looking to deepen their knowledge, here are some additional resources to check out:
- Reddit's CS:GO Community - A hub for players to share tips, tricks, and news.
- Community Forums - Find discussions and guides related to game environments.
- CS Nation - A site for news and updates on Counter-Strike.
Now, grab your gear, team up with friends, and jump into the action! Happy gaming!
 admin
admin


