Welcome to the wonderful world of bracelet making! If you've ever admired a beautiful bracelet and thought, "I wish I could make that," you're in the right place. Crafting bracelets with string is not only a fun and creative hobby but also a rewarding way to express your personal style. With just a few materials and a little bit of patience, you can create stunning pieces that you can wear or give as thoughtful gifts. Let's dive into what you'll need to get started on your bracelet-making journey!
Materials Needed for String Bracelets
Before you start weaving your beautiful bracelets, it’s essential to gather the right materials. Here’s a handy list of everything you’ll need to create awesome string bracelets:
- String or Cord: The most crucial component! You can use various types of string, such as:
- Embroidery Floss: Soft and comes in a variety of colors.
- Nylon Cord: Durable, great for macramé styles.
- Leather Cord: For a rustic, chic look.
- Scissors: To cut your string to the desired lengths.
- Tape or Clip Board: To hold your work in place while you braid or knot.
- Beads (optional): To add some sparkle and personalize your creation. Choose beads that fit the aesthetic you're going for!
- Measuring Tape: For accurate measurements, ensuring a perfect fit around your wrist.
- Glue (optional): To secure knots if you want that extra assurance in your bracelet's durability.
- Jump Rings and Clasps (for closing the bracelet): If you want to make a more sophisticated design, you'll need these hardware items.
When selecting your string, think about the kind of bracelet you want to make and your personal preference. Do you love vibrant, bold colors? Or do you lean toward earthy, natural hues? Perhaps a mix of both? The options are endless!
Once you have these materials laid out, you’re on your way to creating something beautiful. Don't worry if you're new to bracelet making—every pro started as a beginner. Just take your time to experiment and learn as you go. Next, we’ll discuss some simple techniques to start weaving stunning bracelets from your string!
Also Read This: How to Do Wades Spades on Dailymotion: Learn the Game and Improve Your Skills
3. Choosing the Right String for Your Bracelets
When it comes to making bracelets with string, selecting the right type of string is crucial. Not all strings are created equal, and each has its unique qualities that can affect the look, feel, and durability of your bracelet. Here’s a rundown of some popular options to help you choose wisely:
- Cotton String: This is a great option for beginners. It's soft, easy to work with, and comes in various colors. Cotton also has a nice texture that feels good against your skin.
- Embroidery Floss: Used often in friendship bracelets, this type of string is made of six strands that can be separated for intricate designs. It’s available in an impressive spectrum of colors!
- Nylon Cord: If you’re looking for durability, nylon cord is a fantastic choice. It's strong and resistant to fraying. Plus, it often has a shiny finish that can make your bracelets stand out.
- Leather String: For a more rustic or classy look, consider leather. It's thicker and durable, making your bracelets feel more substantial. Just be mindful of allergies and skin sensitivities.
- Beading Wire: If your design involves beads, beading wire is the way to go. It holds its shape well and adds extra support to your bracelet, ensuring beads stay put.
So, how do you choose? Think about the style you want to achieve and the comfort of the wearer. For casual, fun bracelets, cotton or embroidery floss is perfect. For something a bit more sophisticated or for outdoor activities, nylon or leather might be more suitable. Don’t forget to factor in your skill level too! Experimenting with different types of string can be part of the fun, so feel free to try a few out!
Also Read This: How to Create a Playlist on Dailymotion to Organize Your Favorite Videos Easily
4. Basic Knotting Techniques for Beginners
Knotting is the backbone of bracelet making, and learning a few basic techniques will empower you to create a variety of designs. Here are a couple of essential knots that every beginner should know:
1. Square Knot
The square knot is one of the most common knots used in bracelet making. It’s simple and effective. Here’s how you do it:
- Start with two strings: one on the left (let’s say String A) and one on the right (String B).
- Cross String A over String B, then tuck String A behind String B and pull it through the loop. Tighten.
- Now, cross String B over String A, tuck String B behind String A, and pull it through the loop. Tighten again.
Repeat these steps until you reach your desired bracelet length. The square knot is especially handy for making adjustable bracelets!
2. Lark's Head Knot
The lark's head knot is another beginner-friendly option, perfect for starting off a bracelet project:
- Take a piece of cord and fold it in half to create a loop.
- Place the loop behind the bracelet base (or another string).
- Pull the two ends of the cord through the loop you made and pull to tighten.
This knot is excellent for adding charms to your bracelet or for attaching strings to the main base. Practice makes perfect, so don’t worry if you don’t get it right the first time. Just keep knotting until it feels natural!
As you progress, you can explore more advanced techniques, but mastering these basic knots will provide a solid foundation for your bracelet making journey. Happy crafting!
Also Read This: Is Dailymotion Safe? An Overview of the Platform’s Security and Privacy Features
5. Step by Step Bracelet Making Tutorial
Ready to dive into bracelet making? Let's break it down into manageable steps. Whether you're making a simple knot bracelet or a more intricate design, follow these easy instructions to create your masterpiece!
Materials You'll Need:
- String or nylon thread (choose your favorite colors)
- Scissors
- Tape or a clipboard (to hold your work in place)
- Beads (if you want to add some flair)
- Clasps (if you want your bracelet to be adjustable)
Now, let's get started! Here's a simple knot bracelet as our first project:
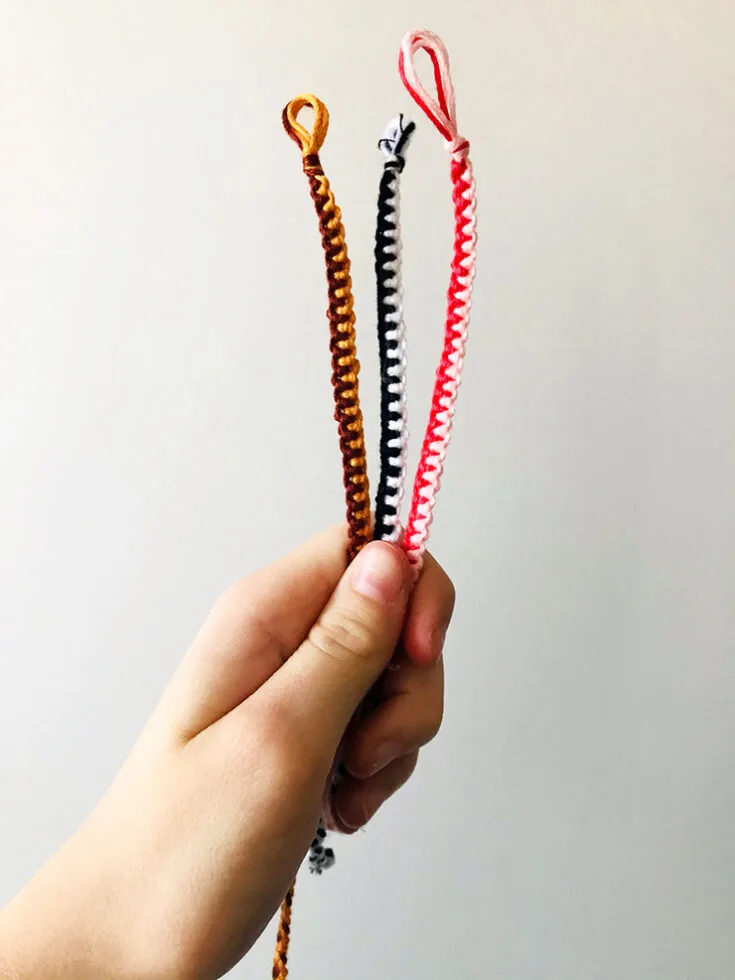
- Cut the String: Start by cutting three pieces of string about 24 inches long. This length will give you enough room to work with and make a comfortable bracelet.
- Secure Your Working Area: Place the string in a straight line on your table. You can use tape to secure the top of the strings to your table or a clipboard to keep it taut.
- Start Knots: Take the left string and make a loose knot around the center string. Pull it tight, but not too tight! Leave some space for the next knot. Repeat this step with the right string, pulling it around the center string just like you did with the left.
- Continue Knotting: Keep alternating between the left and right strings, making sure to keep the knots nice and neat. As you progress, watch your bracelet take shape!
- Add Beads (Optional): If you want to incorporate beads, slide one onto the center string every few knots. This will add a splash of color and some unique flair to your bracelet.
- Measuring Size: Every few double knots, it's a good idea to check the size against your wrist. This gives you a chance to make adjustments before it gets too long.
- Finishing Touches: Once the bracelet is the desired length, tie off the ends securely with another knot. You can trim any excess string if necessary, and if you’re adding a clasp, now is the time to attach it!
- Enjoy Your Bracelet: Put it on and show it off! You've just created your own bracelet.
And there you have it! With patience and practice, you'll get better with each bracelet you make. Don't be afraid to try different techniques and designs as you get comfortable with knotting and stringing.
Also Read This: Creating a Facebook ID Using Gmail on Dailymotion
6. Creative Bracelet Designs to Try
Now that you've learned the basics, why not let your creativity soar? Here are some fun and unique bracelet designs you can try:
- Friendship Bracelets: Use bright, contrasting colors and incorporate simple patterns like stripes or chevrons for a fun twist. These are perfect gifts for your friends!
- Beaded Bracelets: Get a collection of beads—glass, wooden, or even gemstone—and create a striking bracelet by alternating between different bead sizes and colors.
- Charm Bracelets: Add charms that have special meaning to you, whether it’s a star, heart, or anything that resonates. This personal touch makes your bracelet truly one of a kind.
- Woven Bracelets: Experiment with a weaving technique using multiple strands of string. You can create intricate patterns that look complicated but are easy once you get the hang of them!
- Layered Bracelets: Make several simple bracelets and stack them for a trendy layered look. Mixing different textures and colors adds a chic flair.
Let your imagination run wild! Don’t forget that there are countless tutorials available online. You can follow along and pick up new techniques, or try combining styles to create your own unique designs.
Make sure to share your finished creations with friends or online communities. Bracelet making is not just about crafting; it’s about expressing yourself and connecting with others through your art. So grab your supplies, unleash your creativity, and most importantly, have fun!
Also Read This: Simple Steps to Download Dailymotion Videos on Android Phones Without Hassle
7. Tips for Perfecting Your Bracelets
Making the perfect bracelet takes practice, but with these handy tips, you’ll be on your way to creating stunning pieces in no time! Here are some tried-and-true techniques to elevate your bracelet-making skills:
- Choose the Right String: The type of string you use can make a huge difference. Look for durable materials like nylon, cotton, or even elastic, depending on the style you want to achieve.
- Measure Twice, Cut Once: Before you snip your string, always measure your wrist and add a little extra length for knots and adjustments. A good rule of thumb is to add an extra 6-8 inches for flexibility.
- Use Color Theory: Colors can evoke different emotions and styles. Familiarize yourself with the color wheel – complementary colors can create striking contrasts, while analogous colors offer a softer, harmonious look.
- Practice Your Knots: Knots can make or break a bracelet. Practice the basic knots like the square knot, half knot, or lark’s head before you start working on your piece. Perfecting these can lead to sleeker, more professional-looking results.
- Experiment with Patterns: Don’t be afraid to play around with different bead patterns, string colors, and textures. Mixing materials like wood beads with metal charms can add depth and interest to your design.
- Finish It Off with Style: Whether you choose a simple knot, a clasp, or a sliding knot closure, make sure your finishing touches are secure and neat. A good finish can make all the difference in how polished your bracelet looks.
- Seek Inspiration: Don’t hesitate to look for inspiration from online platforms like Pinterest, Instagram, or craft blogs. You can find countless tutorials and ideas to spark your creativity!
By incorporating these tips into your bracelet-making process, you’ll not only improve your skills but also delight in the creative journey. Each piece you create will become a unique expression of your style!
Also Read This: How to Make Cake in Microwave on Dailymotion
8. Common Mistakes to Avoid When Making Bracelets
Even seasoned bracelet makers can run into some common pitfalls. Here’s a list of mistakes to watch out for and how to sidestep them:
- Skipping the Planning Phase: Jumping right into making your bracelet without some initial planning can lead to frustration. Spend a few minutes sketching a design or laying out your materials before you start. It’ll save you time and headaches later!
- Picking the Wrong Size: A bracelet that’s too tight can be uncomfortable, while one that’s too loose might slip off. Always measure your wrist accurately, and remember that materials can stretch over time.
- Neglecting to Secure Knots: A bracelet that falls apart because of weak knots is disheartening. Make sure to double-knot or secure your knots with a dab of glue for added durability!
- Ignoring Material Quality: Cheap strings and beads can lead to quick breakage. Invest a little in quality materials that enhance not just the aesthetics but also the longevity of your creations.
- Overloading on Beads: While it might be tempting to use every bead you love, overloading your bracelet can make it heavy and overwhelming. Opt for a balanced design that highlights your favorite pieces without feeling cluttered.
- Forgetting to Customize: Your bracelets should reflect your personality! Avoid the common mistake of sticking only to trends. Instead, incorporate charms or specific colors that hold meaning for you!
- Being Too Rigid: While having a plan is crucial, allowing room for spontaneity can lead to beautiful, unexpected designs. Don’t hesitate to deviate from your original concept if inspiration strikes.
Avoiding these common mistakes can not only save you time and resources, but it can also enhance your creativity and confidence in crafting beautiful bracelets. Remember, every misstep is just a stepping stone towards mastering your bracelet-making skills!
Also Read This: How to Apply Makeup Like a Pro: A Complete Guide on Dailymotion
9. How to Care for Your Handmade Bracelets
If you've just spent time crafting your beautiful handmade bracelets, you'll want to keep them looking as stunning as the day you made them. Caring for your jewelry doesn't have to be complicated, but it does require a little bit of attention. Here are some practical tips to ensure your bracelets remain in great shape:
- Keep Them Dry: Water can weaken some string materials and damage finishes. Avoid wearing your bracelets while showering, swimming, or exercising.
- Avoid Harsh Chemicals: Lotions, perfumes, and cleaning products can cause discoloration or degradation. Try to apply these products before putting on your bracelets.
- Store Properly: When you're not wearing your bracelets, store them correctly. Keep them in a soft pouch or a dedicated jewelry box to prevent tangling and scratches.
- Gentle Cleaning: If your bracelet gets dirty, clean it gently with a soft cloth. For beaded bracelets, if needed, you can lightly wipe the beads with a damp cloth—just make sure to dry them immediately.
- Inspect Regularly: Check your bracelets for signs of wear. Look for frayed strings or loose beads, and make necessary repairs to extend their lifespan.
By following these simple care tips, your handmade bracelets will continue to shine and impress. Remember, a little preventative maintenance goes a long way in preserving your craft!
10. Conclusion and Inspiration for Future Projects
Now that you've dived into the delightful world of bracelet making, it’s time to explore what comes next! Creating bracelets can quickly become addictive, and there are endless possibilities to experiment with. Here’s a quick recap of what you’ve learned and how to inspire your future projects:
Throughout this guide, you've picked up the skills to:
- Gather materials and tools
- Choose and create various bracelet styles
- Add unique personal touches to each bracelet
But why stop here? Let your creativity flow and think about:
- Explore Different Materials: Try incorporating leather, wire, or even fabric to create mixed-media bracelets. Each material brings its own unique vibe.
- Get Festive: Create themed bracelets for holidays or special events. Adjustable designs can fit any wrist and suit diverse occasions!
- Mix & Match Styles: Combine different techniques—like braiding and beadwork—into one single piece for a stunning, eclectic look.
- Gift Your Creations: Handmade gifts carry a piece of your heart. Make custom bracelets for friends and family, and watch their faces light up!
- Join a Community: Engage with other jewelry makers online or in local crafting groups. Sharing tips and inspiration can spark new ideas you hadn't thought of!
In conclusion, bracelet making is only the beginning of a fabulous journey in creativity. Continue crafting, exploring new techniques, and, most importantly, have fun with it! Who knows? You might discover your hidden talent for designing a whole line of beautiful accessories!
 admin
admin