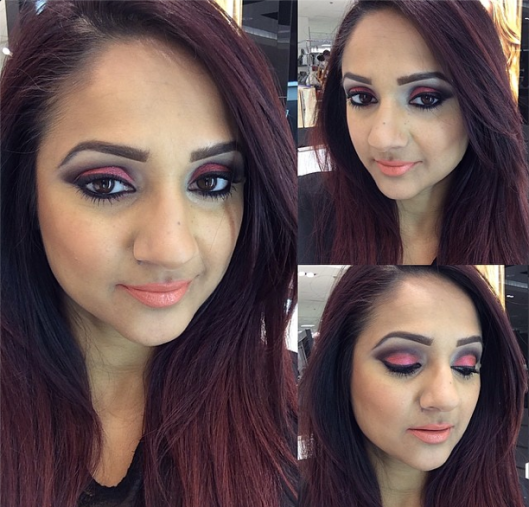
Ah, the smokey eye! It’s a timeless makeup trend that can take your look from ordinary to extraordinary in just a few steps. Whether you’re getting ready for a night out, a special event, or simply want to experiment with your makeup skills, mastering the smokey eye can add depth and drama to your overall appearance. In this blog post, we'll explore everything you need to know about creating that captivating smokey eye, starting with the basics and moving on to the essential tools and products you'll need. Get ready to turn some heads!
Essential Tools and Products for Smokey Eyes
Before diving into the application process, let’s talk about the tools and products that will help you achieve the perfect smokey eye. Having the right equipment not only makes the process smoother but also elevates the overall look. Here’s what you’ll need:
1. Eyeshadow
- Matte Shadows: A matte black or dark gray is essential for defining the crease and outer corners. Try MAC's Carbon or Urban Decay's Blackout.
- Satin or Shimmer Shadows: These will add a beautiful brightness to your eyelid. Look for shades like champagne, soft gold, or silvery taupe.
- Transition Shades: A medium-toned brown or taupe helps blend the darker shades seamlessly and prevents harsh lines.
2. Eyeliner
Choosing the right eyeliner can make or break your smokey eye. Here are some options:
- Pencil Eyeliner: A soft pencil in black or dark brown can be used to create a more blended, softer look.
- Gel Eyeliner: These provide a bold, graphic finish and stay put for hours.
- Liquid Liner: Perfect for that sharp winged effect if you want to add an extra edge to your look.
3. Brushes
You can’t create a smokey eye without the right brushes. Here’s a list of must-haves:
- Fluffy Blending Brush: For blending those transition shades and making everything seamless.
- Flat Eyeshadow Brush: Ideal for packing on color to the eyelids.
- Smudge Brush: Great for applying eyeliner and smudging it out for that desired smokey look.
4. Mascara and False Lashes
To complete your smokey eye, you’ll need to make those lashes pop:
- Mascara: Choose a volumizing formula to lift and darken your lashes. This adds drama to the eyes.
- False Lashes: If you really want to amp up the look, opt for fluffy, dramatic lashes. They can make all the difference!
5. Eye Primer
Lastly, don’t forget to prep your eyelids with a good eye primer to ensure your eye makeup lasts all night long. A good primer not only prevents creasing but also intensifies the color of your eyeshadows.
Now that you have your arsenal ready, you’re well on your way to mastering the smokey eye. Stay tuned for the next sections where we'll discuss step-by-step application techniques to bring your dramatic look to life!
Also Read This: How Dailymotion Stands Out as a Video Streaming Platform
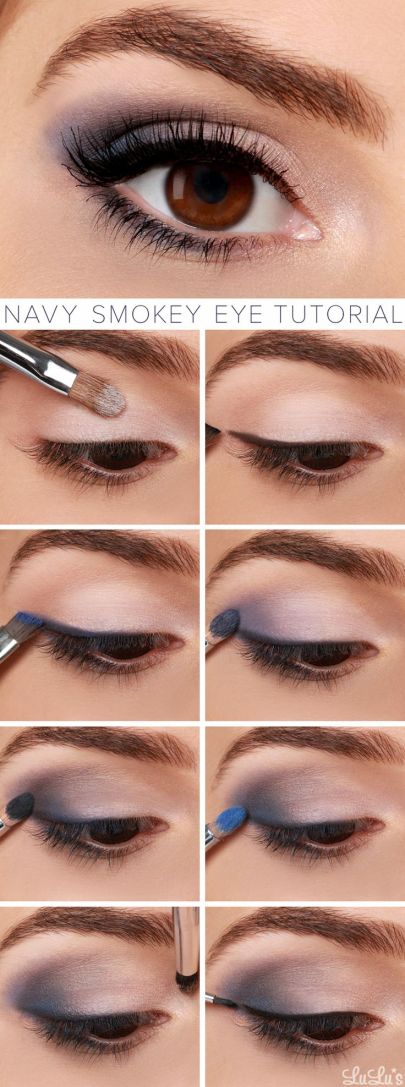
3. Step-by-Step Guide to Applying Smokey Eye Makeup
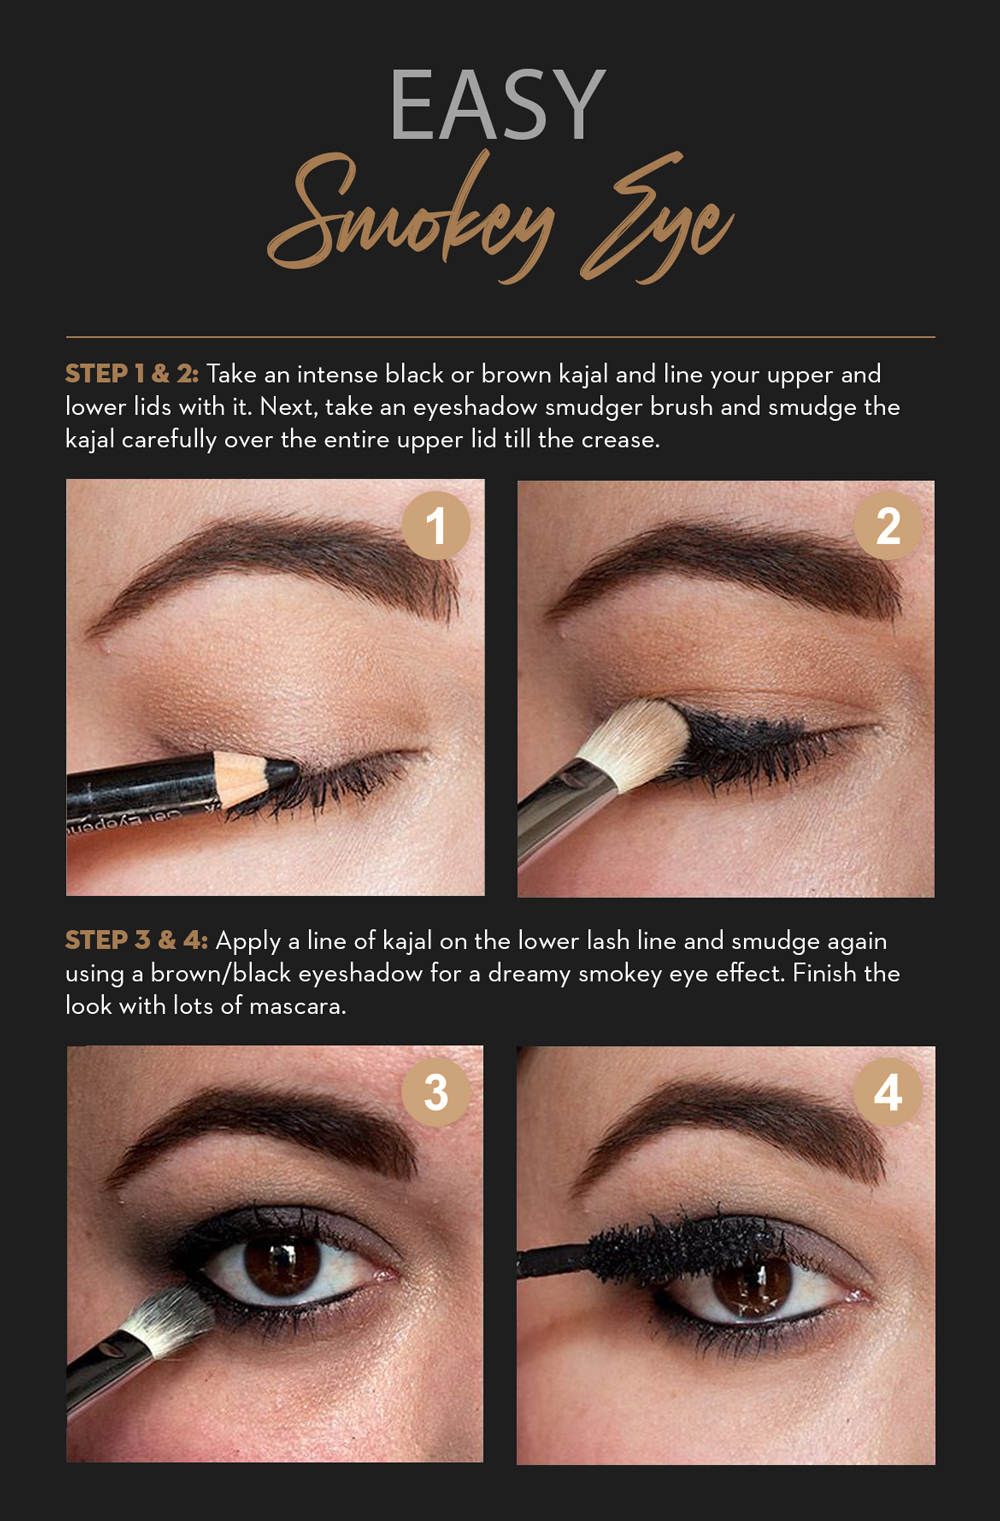
Creating a dramatic smokey eye can seem daunting, but with a little practice, you can master this bold look in no time! Here’s a simple, step-by-step guide to help you achieve that perfect smokey effect.
Step 1: Gather Your Supplies
Before diving in, make sure you have all your tools ready. You’ll need:
- Eyeshadow primer
- Dark eyeshadow (black or dark grey)
- Medium eyeshadow (taupe or brown)
- Highlight shade (champagne or beige)
- Eyeliners (pencil or gel)
- Mascara
- Makeup brushes (flat, blending, and precise)
Step 2: Prep Your Eyes
Start by applying an eyeshadow primer across your eyelids. This step is crucial as it helps your makeup stay in place all night. It also enhances the vibrancy of your eyeshadow colors!
Step 3: Apply the Base Color
Using a flat brush, apply your medium eyeshadow shade all over your eyelid, up to the crease. This will act as your base and help the darker shades blend more easily.
Step 4: Blend in the Dark Shade
Grab a clean blending brush and pick up your dark eyeshadow. Start at the outer corner of your eyelid and gently work your way inwards, creating a V-shape. Remember to blend, blend, blend! The key to a great smokey eye is a seamless transition between shades.
Step 5: Smoke it Out
Take your medium shade once again and go back to the edges where the dark and medium shades meet. This helps to diffuse any harsh lines and creates that smoky effect. Don’t be shy; it’s all about layering and blending until you’re satisfied with the depth of the color!
Step 6: Highlight the Inner Corner
Using your highlight shade, apply it to the inner corner of your eyes and along your brow bone to add brightness and contrast to your smokey eye.
Step 7: Add Eyeliner
To finish off your eye makeup, use a dark eyeliner pencil or gel to line your upper and lower lash lines. For an even smokier effect, you can smudge the liner slightly. This adds more drama and depth.
Step 8: Mascara, the Final Touch
Finally, apply a couple of coats of mascara to your lashes to make your eyes pop. If you want even more drama, consider adding false eyelashes for extra volume and length!
Also Read This: How to Create a Messy Braid with Dailymotion’s Easy Hairstyling Tips
4. Tips for Choosing the Right Colors for Your Smokey Eye

Now that you've got your technique down, let's talk about color selection. The right colors can make or break your smokey eye look. Here are some tips to help you choose the perfect palette:
Consider Your Eye Color
Your eye color can influence the best shades to use:
- Brown Eyes: Almost any color works, but jewel tones like emerald green or purple really stand out.
- Blue Eyes: Warm tones like copper, peach, or bronze will enhance the blue and create a beautiful contrast.
- Green Eyes: Purples, plums, and warm browns can make green eyes pop.
- Hazel Eyes: Rich shades of gold and bronze, along with earthy tones, will magnify the green and brown flecks.
Think about the Occasion
The occasion can dictate your color choices. For a more classic smokey eye, stick to blacks and greys. If you want to add a twist, try colors like navy or deep plum for a stylish update.
Play with Texture
Don’t just stick with matte shades. Mixing in shimmers and metallics can add depth and intrigue to your eye look. Just remember to balance shiny shades with matte ones for a cohesive look.
Experiment and Have Fun!
At the end of the day, makeup is about self-expression. Don’t hesitate to experiment with different colors and combinations. Test out your looks during the day before an event to see what truly works for you.
By keeping these tips in mind, you’ll be well-equipped to create a stunning smokey eye that complements your unique features and style!
Also Read This: Top Tips for Finding What to Watch on Dailymotion
5. Common Mistakes to Avoid When Creating a Smokey Eye
Creating a stunning smokey eye can be a beautiful art, but it's easy to stumble into a few common pitfalls. Let’s talk about some mistakes that might derail your masterpiece and how you can steer clear of them.
1. Skipping Primer: One of the biggest blunders is starting without a good eye primer. A primer not only smooths the eyelid surface but also helps the eyeshadow adhere better and last longer. Without it, your smokey eye may crease and fade faster than you want.
2. Overloading on Black: While black can create depth, using too much can turn your look from sultry to scary. Instead, start with a deep brown and gradually build with black in the outer corners. This will help you achieve that beautiful gradient effect without looking too harsh.
3. Not Blending Enough: Blending is key to a successful smokey eye. If you find harsh lines, it's time to get blending! Use a clean fluffy brush to soften those edges. Remember, blending should take longer than applying shadows; give it time for that seamless transition.
- Pro tip: Use circular motions or windshield wiper motions to blend shadows effectively.
4. Neglecting the Lower Lash Line: For a complete look, don’t forget to smoke out the lower lash line! A bit of color here links your upper and lower lids, drawing attention without looking too overdone. Use the same shades you used above for a cohesive look.
5. Choosing the Wrong Formulation: Matte shadows can be great for depth, but don’t shy away from shimmers or satins! They can provide that glam touch and reflect light beautifully. Just use them sparingly on the center of your eyelid to enhance the look.
Avoiding these common mistakes will help you hone your skills and create a flawless smokey eye. Trust us; practice makes perfect!
Also Read This: Setting Up a Dailymotion Account: Benefits and Best Practices
6. How to Make Your Smokey Eye Last All Day
You’ve put in the time and effort to achieve the perfect smokey eye, but how do you ensure it stays looking fabulous all day? Here are some expert tips to keep your look fresh from morning till night:
1. Start with a Good Base: As mentioned earlier, applying an eye primer is essential. This creates a smooth canvas and prevents creasing. For extra durability, consider using an eyeshadow base in a color close to your skin tone.
2. Use Long-Wear Formulas: Opt for long-lasting eyeshadows and liners. Cream formulations often cling better and offer lasting power, especially in bold looks. Just be sure to blend quickly before they set!
3. Set with a Translucent Powder: After applying your eyeshadow, lightly dust a translucent powder over your eyelids to help set the makeup. This step is especially helpful when using cream products that might otherwise crease.
4. Finish with a Setting Spray: After completing your entire eye look (and face, if you're doing one), a good makeup setting spray works wonders! Give your face a mist (hold it at arm’s length) to lock everything in place and keep it looking fresh.
5. Carry a Touch-Up Kit: Accidents happen, so it’s smart to have a small touch-up kit on hand. A mini eyeliner, a travel mascara, and a blendable eyeshadow (in the shades you used) can be lifesavers for quick fixes throughout the day.
With these tips, your smokey eye will not only be dramatic but also long-lasting. So go out there and confidently rock that look all day long! Happy blending!
Also Read This: How to Watch Dailymotion on Amazon Fire Stick
7. Variations of the Smokey Eye Look
When it comes to the smokey eye, versatility is the name of the game! While the classic charcoal and black look is stunning, there are countless variations that can suit any occasion or personal style. Let’s explore a few fabulous iterations that you might want to try!
- Colorful Smokey Eye: Who says smokey has to be neutral? Experiment with rich jewel tones like emerald green, royal blue, or deep burgundy for a striking effect. These colors can add a fun twist to your look while still keeping it dramatic.
- Soft Smokey Eye: For a more subtle take, use lighter shades such as taupe, soft brown, or even pastels. This hint of smokiness is perfect for daytime wear or casual outings, allowing for a chic, effortless vibe.
- Reverse Smokey Eye: Instead of concentrating the darker shades on the lids, apply them under the lower lash line. This unexpected approach creates a bold statement and elevates your makeup game!
- Glitter Smokey Eye: Add some sparkle to your smokey eye with glitter or shimmer eyeshadows. This look is perfect for parties and special events, as it brings a glamorous edge while still maintaining that dramatic depth.
- Bronzed Smokey Eye: Use warm, bronzy shades to create a look that feels like summer any time of year. Think golds, copper, and warm browns that blend beautifully for a sun-kissed appearance.
Each variation has its own unique flair, and the best part is that you can mix and match techniques! Try combining elements from different styles to find your perfect smokey eye mix. Don't be afraid to play with intensity; the smokey eye should feel personal and tailored to suit your vibe, whether it's a night out or a casual brunch!
8. Conclusion and Final Thoughts on Smokey Eye Makeup
And there you have it! The smokey eye is a timeless makeup technique that can enhance any look, making it essential in every makeup lover's repertoire. It’s a versatile style suitable for all occasions—from romantic dinners to girls' nights out to even a sophisticated office look.
As you dive into creating your smokey eye masterpiece, remember these key points:
- Practice Makes Perfect: Like any skill, mastering the smokey eye takes practice. Don’t get discouraged if your first attempts aren’t exactly what you envisioned. Keep experimenting!
- Tools Matter: Investing in good brushes (like blending and precision brushes) can make a significant difference in your application. A well-blended smokey eye can take your look from ‘meh’ to magical.
- Know Your Eye Shape: Tailor your smokey eye to your eye shape for the best results. Whether you have hooded, almond, or round eyes, there’s a smokey technique that will enhance your features beautifully!
- Balance with Lips: A bold smokey eye often pairs well with more muted lip colors. Think nude, light pinks, or soft peaches to create a balanced, polished look.
So go ahead, get creative, and don’t shy away from the drama of a smokey eye! Whether you choose the classic or a fun variation, let your personality shine through your makeup. Remember, the most important thing is to have fun while expressing yourself. Happy blending!
 admin
admin


