If you're a creative professional, you know how important it is to maintain a polished online presence. Behance is a fantastic platform for showcasing your work, but sometimes, issues can arise that affect how your profile appears to others. One common issue is related to the infamous backslash. Don’t worry! In this post, we’ll explore how to edit your Behance profile to fix these pesky problems and enhance your overall presentation.
Understanding the Backslash Issue on Behance
So, what’s this backslash issue we keep hearing about? Essentially, it’s a formatting problem that can appear in your Behance profile if you’re not careful when inputting certain data, especially URLs or code snippets. Here are some common experiences users have:
- Copy-Paste Problems: Often, when you copy text from another source (like a word processor or another web page), you can inadvertently bring in formatting characters like backslashes.
- Link Errors: If you input links directly into your profile description or project details, a backslash might sneak in, leading to broken links or incorrect displays.
- Profile Display Glitches: A backslash in the wrong place can mess up how your profile is viewed, causing images or text to misalign or not display at all.
Now, why is this backslash so problematic? Below are a few key impacts:
- Professionalism: A messy profile can detract from your work. Prospective clients and collaborators might question your attention to detail.
- Visibility: If links are broken due to formatting errors, your work might not get the exposure it deserves.
- User Experience: An easy-to-navigate profile is crucial for keeping visitors engaged. Any formatting issues can lead to frustration, causing potential admirers to leave your profile.
So, what can you do to resolve these backslash issues? The first step is to go through your profile carefully. Make sure to:
- Double-check all text entries, especially in the project descriptions and any custom sections.
- Test each link to ensure they direct viewers to the correct destination.
- Use plain text where possible, especially when copying from other platforms. This minimizes the transfer of unwanted formatting characters.
Once you’ve identified any instances of the backslash issue, fixing them is straightforward. Just edit the sections that need attention, remove any errant characters, and save your changes. Regular check-ups on your profile can ensure your Behance page remains both functional and visually appealing. A clean profile not only showcases your creativity but also invites more views and connections!
Also Read This: How to Get Featured in Galleries on Behance for Curated Collections
3. Step-by-Step Guide to Editing Your Backslash

Editing your backslash on Behance may sound tricky, but it’s pretty straightforward once you know the steps! The backslash in your profile is essential as it can determine how your work is presented and accessed. Here’s a handy guide to help you navigate this process effortlessly:
- Log into Your Behance Account: Start by visiting the Behance website and logging into your account. Make sure you enter your correct credentials to access your profile.
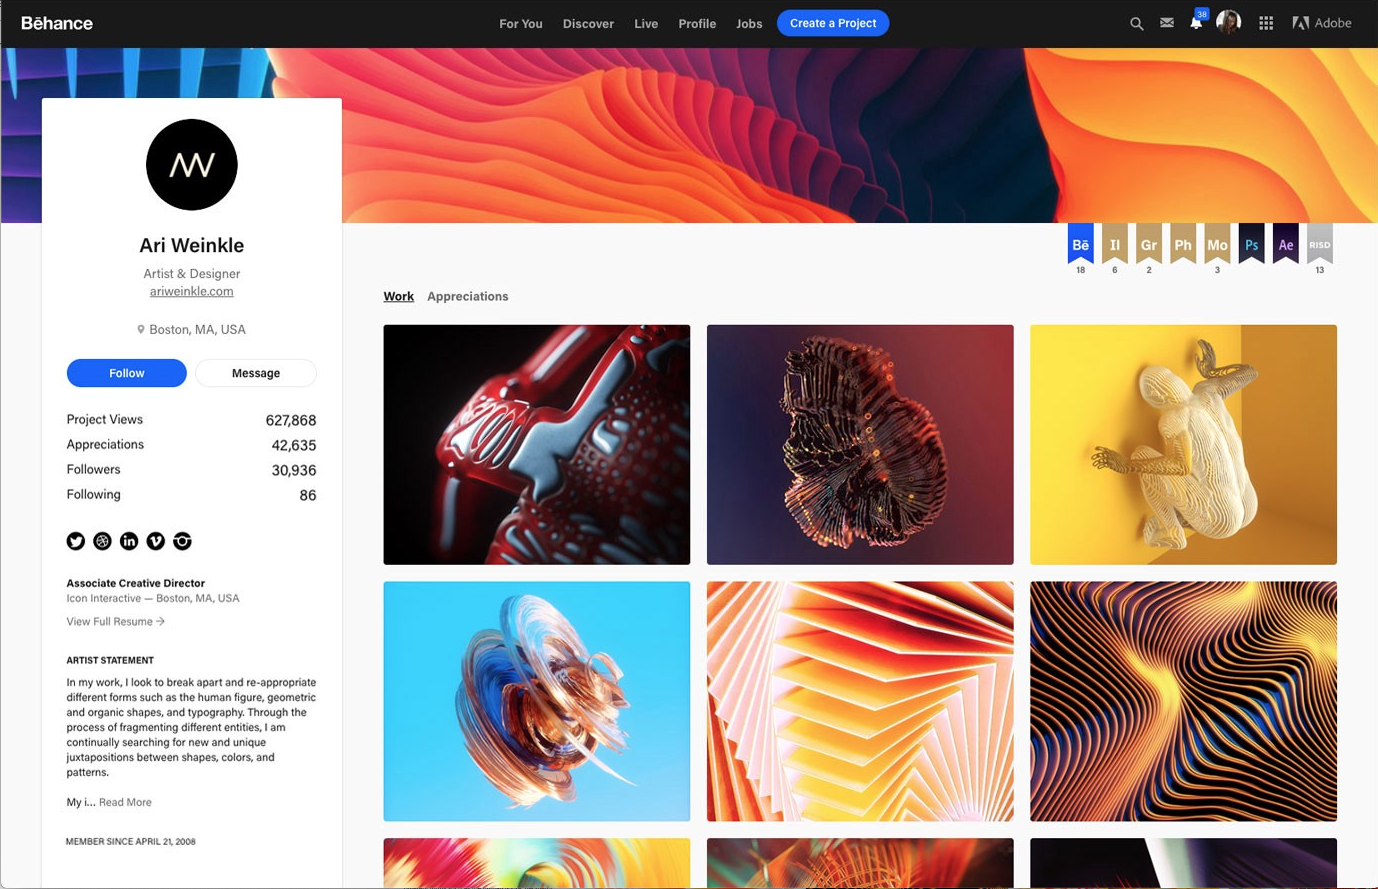
- Go to Your Profile: Once logged in, click on your profile picture or icon at the top-right corner. This will lead you directly to your personal profile page.
- Edit Your Profile: On your profile page, look for the “Edit Profile” button or pencil icon. Click on it to open up the editing interface.
- Locate the Backslash Field: In the editing section, you should see various fields for your information. Find the section specifically labeled for your “backslash.” This may also be identified as your username or URL slug.
- Make Your Edits: Once you’ve located the backslash field, you can make the necessary edits. Keep in mind that your backslash should be simple, relevant to your brand, and easy to remember. Avoid using complex characters or very long strings.
- Save Your Changes: After making your changes, look for the “Save” button, usually at the bottom of the page. Click it to ensure that all your edits are applied and updated on your profile.
- Double Check Your Profile: After saving, navigate back to your profile to verify that the updates have been successfully applied. Ensure that the new backslash is displayed correctly.
And that’s it! You’ve successfully edited your backslash on Behance. Now, your profile is looking sharp, and your work is more easily accessible to viewers. If you follow these steps, you should have no issues. Now, let's move on to some common problems you might run into while editing your profile.
Also Read This: How to Embed YouTube Videos in Your Behance Portfolio
4. Common Problems Encountered When Editing Your Profile
Even with a straightforward process, you might run into a few hiccups when editing your backslash on Behance. Here are some common issues users face, along with tips on how to tackle them:
- Username Already Taken: One of the most frequent problems is finding that your desired backslash is already in use. If you encounter this, try variations of the backslash that maintain your personal brand, such as adding a middle initial or a related keyword.
- Validation Errors: Sometimes, you may receive a message stating your input is invalid. This usually happens if you use prohibited characters or if the backslash length does not meet Behance's requirements. Stick to letters, numbers, and hyphens for the best results.
- Changes Not Saving: If your edits don’t seem to save, check your internet connection. Sometimes, a weak connection can cause changes to fail. If everything seems fine on your end, try logging out and back in, or clearing your browser’s cache.
- Profile Not Updating: Occasionally, even after saving, your profile may not appear updated. Give it some time or refresh the page. If issues persist, you may need to reach out to Behance support for assistance.
- Formatting Issues: You might notice that the way you want your backslash to look doesn’t match what appears on the profile. Double-check the formatting rules and adjust accordingly, focusing on keeping your backslash clean and visually appealing.
When editing your profile on Behance, keep these common issues in mind, and you’ll be well-prepared to tackle any bumps along the way. Remember, a polished profile would not only attract more attention but also reflect the quality of your work, so don’t hesitate to make those necessary adjustments!
Also Read This: Best Hassle Free Bilibili Mp3 Downloader
5. Tips for Optimizing Your Behance Profile
If you're looking to make a splash on Behance, optimization is key! Just posting your work isn't enough; you need to ensure your profile stands out and properly showcases your talent. Here are some practical tips to enhance your Behance profile:
- Update Your Profile Picture: Your profile picture is often the first thing visitors see. Choose a professional, high-quality image that reflects your personality and creativity. It doesn't have to be overly formal—just make sure it gives off a vibe that matches your work style.
- Craft a Compelling Bio: Your bio is your chance to tell your story. Keep it concise but engaging, highlighting your skills, experience, and what makes you unique. Use keywords related to your profession, as this can help you appear in search results.
- Select an Eye-Catching Cover Image: Your cover image should be visually striking and relevant to your work. This is your opportunity to showcase your style right at the top of your profile. Consider using a piece that has received a lot of positive feedback or represents your best work.
- Organize Your Projects: Ensure that your projects are well-organized and easy to navigate. Use clear and descriptive titles, and consider categorizing projects based on your specialties (like graphic design, illustration, or photography). This makes it easier for viewers to find what they’re interested in.
- Engage with the Community: Behance is a community, so don’t just post and ghost! Interact with other creators by leaving thoughtful comments on their work, appreciating their projects, or even collaborating. This can help build your network and increase your visibility.
- Optimize Your Tags and Categories: When uploading projects, use relevant tags and categorize them appropriately. This will help people discover your work when searching for specific styles or content. Be strategic; think about what terms your potential audience might use.
By implementing these tips, you can significantly enhance the attractiveness and professionalism of your Behance profile, drawing in more viewers and potential clients. Remember, your profile is a reflection of you as a creative professional, so invest the time to make it shine!
6. Conclusion: Enhancing Your Presence on Behance
In conclusion, editing your backslash on Behance to fix profile issues is about more than just correcting technical glitches. It’s an opportunity to elevate your entire online presence. As you refine your profile, remember that the goal isn't just to present your work but also to share your narrative and connect with others in the creative community.
Behance can be a powerful platform for showcasing your talents, but it requires effort and attention to detail. Here are a few final thoughts to keep in mind as you enhance your presence:
- Consistency is Key: Make sure your work, messaging, and visuals are consistent across all your projects and your profile. This strengthens your personal brand and makes you easily recognizable.
- Don’t Be Afraid to Update: As you grow and evolve as a creator, so should your Behance profile. Regular updates keep things fresh and showcase your latest projects and skills.
- Seek Feedback: Don’t hesitate to ask for constructive criticism from peers or mentors. Sometimes, an outside perspective can illuminate areas for improvement you might have missed.
- Celebrate Your Unique Style: Authenticity resonates with viewers. Highlight what makes your work uniquely yours, whether it’s a distinct technique, a signature color palette, or a recurring theme.
By focusing on these aspects, you’ll not only fix any existing profile issues but also cultivate a captivating and professional presence on Behance. So, dive in, make those edits, and watch your creative community grow!
 admin
admin


