Have you ever looked at a photo and thought, "This would look incredible with a different background!"? Well, you’re in the right place. Changing backgrounds in Adobe Photoshop CC is not only a valuable skill but also an incredibly fun way to unleash your creativity. Whether you’re sprucing up personal photos, creating engaging graphics for social media, or designing marketing materials, getting the background just right can make all the difference. In this guide, we’ll walk you through everything you need to know to transform your images effortlessly!
Tools You Will Need for Editing
Before diving into the actual process of changing backgrounds, it's essential to ensure you have the right tools at your disposal. Below is a list of the key tools and features within Adobe Photoshop CC that you’ll be using:
- Adobe Photoshop CC: Ensure you have the latest version of Photoshop installed on your computer. New features, tools, and bug fixes are regularly released to enhance your editing experience.
- Selection Tools: Familiarize yourself with a few selection tools, as these will be crucial for isolating the subject you want to keep in the foreground. Key selection tools include:
- Quick Selection Tool: Great for quickly selecting areas by painting over them.
- Magic Wand Tool: Useful for selecting areas of similar color.
- Pen Tool: Ideal for making precise selections, especially for intricate shapes.
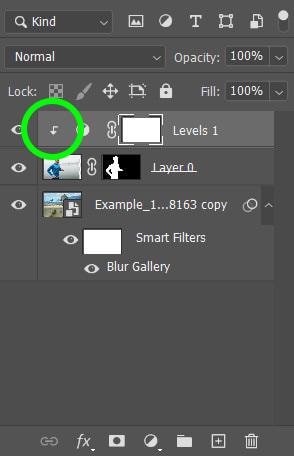
- Layer Panel: This is where you’ll manage all your layers, which is vital for changing backgrounds. Understanding how to work with layers will allow you to keep your edits organized and make changes non-destructively.
- Masking Tools: Learning about layer masks will help you blend the foreground and background smoothly. With masks, you can hide or reveal parts of layers without permanently deleting any crucial elements.
- Adjustment Layers: These come in handy for color correction and adding effects to your new background to ensure it matches the subject. You can easily create adjustment layers for brightness, contrast, levels, and more.
- Background Images: Don’t forget to gather the backgrounds you want to use! Whether it’s solid colors, patterns, or detailed landscapes, having various options ready can inspire your creativity.
Besides the tools mentioned, having a good reference or a tutorial can also be incredibly helpful when learning new techniques. You might want to keep a notepad handy to jot down tips or workflows that you find particularly useful while experimenting in Photoshop.
Once you have your tools lined up, you're all set to dive into the world of background editing! Stay tuned for the next steps where we will get hands-on about selecting subjects, adding backgrounds, and refining your final image.
Also Read This: The Best Dailymotion Channels for Con Man and Other Comedy Series
3. Opening Your Image in Adobe Photoshop CC
First things first, let’s get your image into Adobe Photoshop CC. Don’t worry; it’s a straightforward process! Follow these simple steps:
- Launch Photoshop: Open Adobe Photoshop CC on your computer. You’ll see the familiar workspace awaiting your creative touch!
- Open Your Image: Navigate to the top menu bar and click on File. From the dropdown, select Open. A dialog box will pop up, allowing you to browse through your computer’s files.
- Select Your Image: Find the image you’d like to edit. Once you’ve located it, click on it to select it, and then press the Open button in the bottom right corner of the dialog box.
And just like that, your image should appear in the workspace! If you’re unsure whether you’ve opened the right image, you can always check the Layers panel on the right side. Your image should be listed there as Background.
Let’s celebrate this little victory! Now we can move on to the exciting part—removing that background to make your image shine!
Also Read This: How to Use Dailymotion on Roku Firestick and Other Devices
4. Choosing the Right Selection Tool for Background Removal
Now that your image is open in Photoshop CC, it’s time to dive into the world of selection tools. Choosing the right tool is crucial for effective background removal. Don’t stress; I’m here to help you decide which one fits your project best!
Here are a few popular selection tools you can use:
- Quick Selection Tool: This is a fantastic tool for beginners! It allows you to paint over the area you want to select. Photoshop automatically detects edges, making it easier to select complex backgrounds. Simply click and drag over the background area, and watch it get selected.
- Magic Wand Tool: If your background is a solid color, this tool is a lifesaver. It selects pixels based on color. Just click on the background, and it will select all areas of similar color. Keep in mind, you may need to adjust the Tolerance level in the options bar to select more or fewer pixels.
- Pen Tool: For those seeking precision, the Pen Tool is your best friend! It allows you to create custom paths around the object you’re trying to keep. Although it requires a bit of practice, the results are worth it. You can add curves and corners for a perfect selection.
- Lasso Tools: There are three variations of the Lasso tool: the standard Lasso, Polygonal Lasso, and Magnetic Lasso. If you’re up for some freehand selection, the standard Lasso lets you draw around the area. The Polygonal Lasso is great for straight edges, and the Magnetic Lasso “clings” to edges as you draw, which is pretty neat!
So, which tool should you use? It really depends on your image’s complexity and your personal comfort level. For beginners, I recommend starting with the Quick Selection Tool. As you get more comfortable, feel free to experiment with the others!
Once you’ve selected the background using your chosen tool, you’re ready to move forward in your editing journey. Trust me; you’re doing great!
Also Read This: How to Use Dailymotion on PS4 for Streaming and Watching Videos
5. How to Select the Background Effectively
Choosing the right selection method in Adobe Photoshop CC is crucial for changing backgrounds successfully. You want to ensure that your selections are clean and precise to achieve a professional-looking result. Here are some effective techniques to select your background:
- Quick Selection Tool: This is perhaps the most accessible method for beginners. Simply select the Quick Selection Tool from the toolbar and paint over the area you want to keep or remove. Photoshop will automatically detect edges, making the selection process quicker and easier!
- Magic Wand Tool: If your background is a solid color, the Magic Wand Tool can be a real time-saver. Just click on the background, and it will select areas of similar colors. You can adjust the Tolerance level in the options bar to select more or less color variance.
- Lasso Tool: The Lasso Tool is great for freehand selections. You can draw around the area you want to keep or discard. For more precision, you might want to use the Polygonal Lasso Tool, which allows you to create straight-edged selections.
- Pen Tool: For complex selections, the Pen Tool gives you the most precision. It may have a steeper learning curve, but once mastered, it provides clean paths that can be converted into selections. First, trace around the object; then right-click and choose Make Selection.
- Select and Mask: After making your initial selection, the Select and Mask feature is a handy tool for refining the edges. This feature allows you to adjust feathering, smoothness, and contrast, which can help in blending your new background seamlessly.
Remember, sharpening your selection technique takes practice. Don't hesitate to experiment with different tools until you find which method feels right for you. Once you're comfortable with the selection process, you're one step closer to changing your background successfully!
Also Read This: Can You Make Money with Dailymotion Videos?
6. Removing the Background from Your Image
Now that you've selected the background you want to change, it's time to remove it! Here’s a straightforward step-by-step on how to effectively remove the background from your image:
- Make the Selection: Start by making the selection using one of the tools mentioned earlier. Once your selection is complete, you should see the marching ants surrounding your chosen area.
- Refine Your Selection: Use the Select and Mask tool to refine the edges. Here, you can adjust settings like Radius to smooth out the selection and enhance edges, especially around hair or fine details.
- Inversion (if necessary): If you find that you’ve selected the part of the image you want to keep instead of the background, simply inverse the selection. You can do this by going to Select > Inverse or pressing Shift + Ctrl + I (Windows) or Shift + Command + I (Mac).
- Delete the Background: With your background selected (or inverted, depending on your preference), hit the Delete key on your keyboard. You should now see your subject on a transparent background!
- New Layer: To prevent any accidental changes, you might want to create a new layer for your background. Simply go to Layers > New > Layer or press Shift + Ctrl + N (Windows) or Shift + Command + N (Mac).
- Add Your New Background: Now, drag and drop your new background layer below your subject layer in the Layers panel. Resize if necessary, using the Transform Tool (Ctrl + T on Windows or Command + T on Mac).
Finally, take a step back and review your work. Make any final adjustments to blend the new background seamlessly with the subject. And there you have it! You’ve successfully removed the background and replaced it with something unique and striking.
Keep practicing these techniques, and soon you’ll be changing backgrounds like a pro!
Also Read This: Step-by-Step Guide to Making a Mobile Pouch at Home on Dailymotion
7. Adding a New Background
Now that you've isolated your subject, it’s time to add a new background! This is where your creativity can really shine. Follow these steps to seamlessly integrate a new background into your project:
Step 1: Open the New Background Image
Start by importing the background image you want to use. You can do this by navigating to File > Place Embedded (or Place Linked if you prefer). This will allow you to browse through your files and select the perfect background.
Step 2: Position the Background Layer
Once your new background is in place, it will appear as a new layer in your Layers panel. Make sure it’s below your subject layer to keep your subject visible on top. You can arrange the layer order by clicking and dragging it up or down the layer stack.
Step 3: Resize and Adjust
After positioning your background, you might need to resize it to fit your composition perfectly. With the background layer selected, use the Transform tool by pressing Ctrl + T (or Cmd + T on a Mac). Hold down Shift while dragging the corners to maintain the aspect ratio. Once you're happy with the size, hit Enter to apply the transform.
Step 4: Blending the Background
To ensure your new background looks natural behind your subject, you might want to adjust its colors and brightness. Select the background layer and go to Image > Adjustments where you can play with options like Brightness/Contrast or Hue/Saturation. This will help it match the lighting and overall feel of your subject.
Quick Tip: Use the Eyedropper tool on your subject to pick up color values that can help you adjust the background for a more harmonious look.
Also Read This: How to Change Your Dailymotion Profile Picture
8. Adjusting the New Background for a Seamless Look
Just placing a new background doesn’t guarantee a seamless look. Let's take it a step further by ensuring that your new background fits perfectly with your subject. Here’s how to do that:
Step 1: Apply a Blur Effect (if Necessary)
If your subject is in focus and the background feels too sharp, adding a slight blur can help create depth. Select the background layer and go to Filter > Blur > Gaussian Blur. Start with a low radius (try 1-3 pixels) and adjust until it feels right. This simulates a depth-of-field effect common in photography.
Step 2: Match Colors with Adjustment Layers
To create a cohesive look, use adjustment layers. Click on the New Adjustment Layer icon (a half-filled circle) at the bottom of the Layers panel and experiment with curves, levels, and color balance until your subject and background meld together. For instance, you might want to lower the brightness of the background or adjust its color temperature to align with the lighting on your subject.
Step 3: Create Shadows
Adding shadows can significantly enhance realism. On a new layer below your subject, use a soft brush with low opacity to paint in shadows where the subject meets the background. Think about where the light is coming from and how it would cast shadows onto the new background. This can be especially important if your subject was previously in a differently lit scenario.
Step 4: Final Touches with Layer Masks
If there are any harsh edges or details that need refining, using a layer mask is your best friend. Select your subject layer and click on the layer mask icon. Use a soft brush to gently paint with black on the mask where you want to hide edges and make the subject blend more naturally into the background.
With these adjustments, your background should now look integrated and compelling! Remember, the goal is to create a balance where your subject and background coexist beautifully. Happy editing!
Also Read This: How to Use Photoshop CC 2014: New Features and Tools for Creative Editing
9. Final Touches and Enhancements
Now that your subject is beautifully isolated against the new background, it’s time to fine-tune the image to make everything look cohesive. A few final touches can elevate your edit from just good to stunning!
First, let’s consider color correction. Sometimes, the subject might appear a bit off against the background due to differing lighting or color casts. Here’s how to adjust:
- Use Adjustment Layers: Go to Layer > New Adjustment Layer. You might want to try Curves or Color Balance to create a more harmonious look.
- Match Colors: If you're using multiple images, go to Image > Adjustments > Match Color. This tool helps ensure colors blend naturally.
Next, don’t forget about shadows! Adding shadows can ground your subject and make the image more realistic. Here’s how:
- Create a New Layer: Click on the New Layer icon at the bottom of the Layers panel.
- Select the Brush Tool: Choose a soft brush with low opacity and paint black shadows where appropriate, just beneath your subject.
- Transform the Shadows: Use Free Transform (Ctrl + T on Windows, Command + T on Mac) to shape the shadows as necessary, and lower the opacity to make them look more natural.
Finally, consider applying a slight blur to the background if it’s too sharp. This helps draw focus to the subject:
- Blur the Background: Select your background layer, go to Filter > Blur > Gaussian Blur, and adjust the radius to your liking.
- Masking: If the blur spills over onto your subject, create a mask and paint with a soft brush to refine the edges.
After these refinements, take a step back and look at your composition. It’s always a good idea to let your edit sit for a bit before making final decisions!
Also Read This: How to Make Easy Cake Without Oven: Quick Recipe on Dailymotion
10. Saving Your Edited Image
You’ve put in the work, and now it’s time to save your masterpiece! Adobe Photoshop CC provides various options for saving your files, depending on how you plan to use the image. Here’s a quick guide:
First, if you want to preserve your working layers for future edits:
- Save as a PSD: Go to File > Save As, and choose the Photoshop (.PSD) format. This way, you can revisit your layers and make changes later.
If you’re looking to share your image online or print it, you should consider saving it in a different format:
- For web use: Save as a JPEG. Go to File > Export > Save for Web (Legacy)… Choose JPEG and adjust the quality slider to balance file size and image quality.
- For high-quality prints: Save as a TIFF file. This format retains higher quality and is perfect for printing. Use File > Save As and select TIFF.
Before you hit that final save button, double-check your settings. Make sure that you select the right color profile (like RGB for web and CMYK for print) according to your needs!
And there you have it—a complete guide to changing backgrounds in Adobe Photoshop CC. With practice, these techniques will become second nature, and you'll be creating seamless images in no time!
Also Read This: Your Guide to Finding Hidden Gems and Special Features on Dailymotion
11. Common Mistakes to Avoid When Changing Backgrounds
Changing backgrounds in Adobe Photoshop CC can be a fun and creative task, but it's not without its pitfalls. Here are some common mistakes you should avoid to ensure your final image looks professional and polished:
- Not using the right selection tool: One of the biggest mistakes beginners make is using the wrong tool for the job. For detailed edges, like hair, the Quick Selection Tool or the Pen Tool may yield better results than the Magic Wand.
- Ignoring lighting and shadows: When you place a subject against a new background, ensure the lighting matches. Otherwise, your subject can look disconnected. Pay attention to the direction of shadows and adjust accordingly!
- Overlooking color correction: If the background has different lighting or color tones compared to your subject, make sure to perform some color correction. Use adjustment layers like Curves or Hue/Saturation for a seamless blend.
- Rushing through the selection: Take your time with selections, especially around intricate details. A rushed selection can lead to visible edges where the background changes, which can break the illusion.
- Neglecting to use layers: Always work in layers! This allows you to go back and make changes without losing your original image. If you make a mistake, it’s much easier to fix without starting from scratch.
- Forgetting about the resolution: Ensure that the background image matches the resolution of your subject to avoid a pixelated or blurred appearance. Mixing low-resolution and high-resolution images can detract from the final quality.
- Not saving your work properly: Always save a copy of your work in Photoshop's .PSD format to retain all your layers and adjustments. Additionally, save a final copy in a suitable format like JPEG or PNG for sharing.
By being aware of these common pitfalls, you can streamline your workflow and achieve impressive results in Photoshop. Remember, practice makes perfect, and learning from your mistakes is all part of the process!
12. Conclusion and Additional Resources
Changing backgrounds in Adobe Photoshop CC can seem daunting at first, but with practice and the right techniques, you’ll be creating stunning images in no time! Whether you're enhancing personal photos or working on professional projects, mastering the art of background manipulation is a valuable skill.
To recap, here's a quick checklist of steps you’ve learned:
- Selecting your subject accurately.
- Choosing the right background.
- Making necessary adjustments to colors and lighting.
- Using layers effectively.
- Saving your work properly.
Now that you’re equipped with the basics, consider diving deeper into more advanced techniques. Below are some additional resources that can help you elevate your Photoshop skills:
- Adobe Photoshop Tutorials - Official tutorials that cater to all skill levels.
- LinkedIn Learning - Offers in-depth courses on various aspects of Photoshop.
- Skillshare Classes - Great for learning new techniques in a community-driven platform.
- YouTube Tutorials - A treasure trove of free video tutorials covering everything from basics to advanced techniques.
Don’t forget to experiment and find your unique style. The more you practice, the more confident you’ll become in your design skills. Happy editing!
 admin
admin


