Welcome to your ultimate guide on mastering the art of lipstick application! Whether you're a makeup newbie or a seasoned beauty enthusiast, applying lipstick can be a delightful yet sometimes tricky process. The right techniques can enhance your features and elevate your look in minutes. In this guide, we’ll walk you through the essentials of applying lipstick flawlessly. Plus, don’t forget to check out our video tutorial that takes you step-by-step through the process!
Choosing the Right Lipstick for Your Look

Choosing the perfect lipstick can feel overwhelming with all the shades, finishes, and formulas available today. But don't worry; once you know what to look for, you'll find the perfect shade for any occasion! Here are some tips to help you select the right lipstick:
1. Understand Your Undertone
- Cool Undertones: Look for lipsticks with blue, pink, or purple hues. Shades like berry, plum, or cherry red are perfect for you.
- Warm Undertones: Opt for shades with golden, peach, or orange tones. Think coral, warm reds, and peachy nudes.
- Neutral Undertones: You’re lucky! Most shades will look great on you. Try balancing between warm and cool shades.
2. Determine the Finish
- Matte: Provides a bold, sophisticated look. It's long-lasting, but can be drying. Use a lip balm beforehand!
- Glossy: Adds a luscious shine. Perfect for a casual look but requires more frequent touch-ups.
- Satin: A balanced finish between matte and glossy. Offers some shine while still being comfortable to wear.
3. Consider the Occasion
- Daily Wear: Opt for nudes or soft shades that can be easily reapplied.
- Work Meetings: Choose subtle colors like mauve or soft pink that enhance your features without being too bold.
- Special Events: Go for vibrant colors! Bright reds or deep berries can instantly elevate your outfit.
4. Test Before You Commit
Before making a purchase, try out lipsticks at the store or use samples. Swipe the color on your lips or the tips of your fingers. Look for:
- How the color complements your skin tone.
- The feel of the formula on your lips.
- Whether it lasts throughout your day.
Remember, lipstick is about personal preference, so have fun experimenting with different shades and styles! Remember to check out our video tutorial for practical tips on applying your fabulous new lipstick. You'll be rocking those lips in no time!
Also Read This: How to Make Anniversary Cards for Parents at Home: DIY Tutorial on Dailymotion
3. Step-by-Step Lipstick Application Process
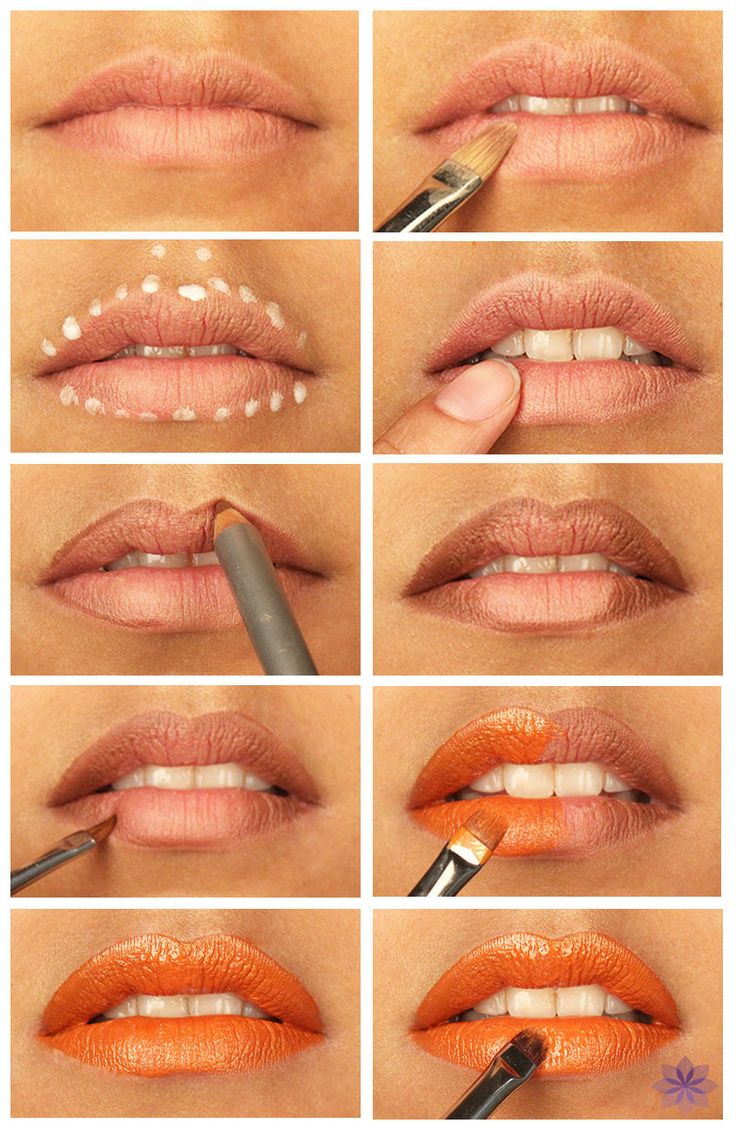
Applying lipstick might seem like a simple task, but achieving that flawless, puckered look requires a bit of finesse and technique. Let's break down the process step-by-step, so you can rock your lip color with confidence!
- Prep Your Lips: Start by exfoliating your lips to remove any dry skin. You can use a lip scrub or simply rub a soft toothbrush over your lips for a few seconds. Follow it up with a nourishing lip balm to keep your lips hydrated.
- Prime for Perfection: Applying a lip primer can give your lipstick a smooth base and help it last longer. If you don’t have a lip primer, dab on some foundation or concealer around your lips to create a uniform color.
- Outline with Lip Liner: To prevent your lipstick from feathering, outline your lips with a liner that matches your lipstick shade. Start at the Cupid's bow and work your way to the corners, making sure to stay just outside your natural lip line for a fuller look.
- Apply Your Lipstick: Now it’s time for the main event! Using a lip brush or the lipstick bullet directly, start applying the lipstick from the center of your lips and work your way outwards. For a more precise application, use the lip brush—it can help you stay within the lines!
- Great Finish with Blotting: Once you’ve applied the lipstick, press your lips together and then gently blot with a tissue. This will remove excess product and help the lipstick set, making it last longer.
- Final Touches: For the perfect pout, you can dab a little highlighter or a lighter lipstick shade in the center of your lips. This creates dimension and makes your lips look fuller!
And there you have it—a simple, step-by-step guide to applying lipstick like a pro! If you want to see this process in action, check out our video tutorial linked below!
Also Read This: How to Make a Monster Tail Loom Band Fun Crafting Tutorial on Dailymotion
4. Essential Tools for Perfect Lipstick Application
Just like any artist, having the right tools can make all the difference. Here are some essential tools you'll need for perfect lipstick application:
| Tool | Purpose |
|---|---|
| Exfoliator/Lip Scrub | Removes dead skin and smooths the lip surface for an even application. |
| Lip Balm | Keeps lips hydrated and prepares them for lipstick. |
| Lip Primer | Enhances longevity and smoothness of lipstick application. |
| Lip Liner | Defines the lips, prevents feathering, and helps shape your pout. |
| Lip Brush | Allows for precise application, especially with bold colors. |
| Setting Powder | Optional, but can be used to set your lipstick for all-day wear. |
With these tools at your disposal, you’ll be well on your way to achieving that perfect lip look! Remember, practice makes perfect, so don’t hesitate to experiment and find what works best for you. Happy applying!
Also Read This: How to Apply Red Lipstick: A Guide to Perfecting the Bold Look on Dailymotion
5. Common Mistakes to Avoid When Applying Lipstick
Applying lipstick can seem straightforward, but a few common mistakes can lead to less-than-perfect results. Let’s look at some of these pitfalls so you can steer clear of them next time you’re getting ready.
- Skipping Lip Balm: One of the biggest mistakes is applying lipstick on dry, chapped lips. Before you begin, always use a moisturizing lip balm. This not only keeps your lips hydrated but also creates a smooth canvas for even lipstick application.
- Ignoring Lip Liner: Many people underestimate the power of lip liner. It defines your lip shape and prevents your lipstick from feathering. Skipping this step, especially with bold shades, can result in smudged color and messy edges.
- Applying Directly from the Tube: Applicators can cling and cause uneven application. Instead of swiping directly from the tube, use a lip brush! This gives you better control and a more precise application.
- Choosing the Wrong Shade: Not every color will work for every skin tone. Always test lip colors to find the shades that complement your complexion. If you're uncertain, go for neutral shades that are universally flattering.
- Forgetting to Blot: After your first application, don’t skip the blott! Lightly pressing your lips between a tissue helps set the lipstick, reducing the chance of transfer and smudging throughout the day.
- Overdoing the Gloss: While a glossy finish can look fabulous, too much gloss can make your lipstick slide off your lips. If you want that shine, opt for a gloss applied lightly on top of your lipstick.
- Neglecting to Check the Edges: After applying your lipstick, take a moment to inspect the edges. If you have any uneven areas or excess product on your skin, use a clean brush or a cotton swab to clean it up. This little step makes a world of difference!
By keeping these common mistakes in mind and taking the time to prepare your lips properly, you’ll be well on your way to achieving that perfect pout every time!
Also Read This: Create Electricity from Potatoes with Easy Dailymotion Videos
6. Tips for Long-Lasting Lipstick
We all want our lipstick to look fresh and vibrant throughout the day, but sometimes it just doesn’t hold up. Here are some tried-and-true tips for ensuring your lipstick lasts longer, no matter what your day brings!
- Prep Your Lips: As we mentioned before, moisturizing is key! Start with a lip scrub to exfoliate any dry skin, followed by a nourishing lip balm to hydrate your lips. This prepares them for a smoother lipstick application.
- Use Lip Liner: Not just for defining your lips, lip liner can also act as a barrier to help your lipstick stay put. Choose a lip liner that matches your lipstick or is slightly darker to outline your lips and fill them in for extra staying power.
- Layer Your Products: For a long-lasting finish, apply lipstick in layers. Start with a thin coat, blot, and then apply another layer. This technique locks the color in place, preventing fading throughout the day.
- Set with Powder: It may sound odd, but lightly dusting a small amount of translucent powder over your lips can help set your lipstick. Just place a tissue over your lips, and gently dust the powder over it—this keeps your lipstick from budging!
- Avoid Oily Foods: If you’re planning a meal, keep in mind that greasy foods can break down the lipstick, leading to quicker wear. If you can, opt for lighter meals and save the oily options for after your lipstick has worn off.
- Touch Up Accordingly: Carry your lipstick with you for quick touch-ups. You may not need to apply it again fully, but a little refresh can do wonders for keeping your look intact.
- Choose Long-Wear Formulas: Finally, explore long-lasting or liquid lipstick options. Many brands offer formulas specifically designed for all-day wear, making your life a little easier when it comes to maintaining your lip look.
With these tips up your sleeve, you can confidently rock your lipstick all day long, no matter the occasion. Happy lipstick application!
Also Read This: Is Dailymotion Safe for Children?
7. How to Remove Lipstick Properly
Removing lipstick might seem like a straightforward task, but doing it properly can help maintain the health of your lips and make sure any leftover color doesn’t linger longer than it should. Here’s a step-by-step guide to removing your lipstick effectively:
- Choose the Right Remover: Depending on the type of lipstick you’re wearing, you’ll want to select the appropriate makeup remover. For regular lipsticks, a gentle makeup remover or micellar water often works well. For long-lasting or liquid lipsticks, consider using an oil-based remover, as it can break down the pigments more effectively.
- Hydrate Your Lips: Before you start removing your lipstick, it’s a good idea to apply a bit of lip balm or coconut oil to hydrate your lips. This not only makes the removal process smoother but also helps prevent any drying effects that might occur from the remover.
- Use a Cotton Pad: Soak a cotton pad with your chosen remover. Make sure it’s saturated but not dripping wet. Press it gently against your lips and let it sit for a few seconds. This will allow the product to break down the lipstick.
- Wipe Away Gently: After waiting, gently wipe the cotton pad from the center of your lips outward. Avoid scrubbing; you want to be as gentle as possible to avoid irritating the sensitive skin on your lips.
- Repeat if Necessary: If any lipstick remains, simply reapply the remover to your cotton pad and repeat the process until your lips are clean.
- Rinse Off: If you’ve used an oil-based remover, consider rinsing your lips with water after removing the lipstick. This helps remove any leftover residue and keeps your lips feeling fresh.
- Moisturize: Finally, finish off by applying a nourishing lip balm or treatment. This helps replenish any moisture lost during the removal process.
Following these steps will ensure that your lipstick comes off without any hassle, keeping your lips soft and hydrated. Remember, the health of your lips is just as important as the color you choose to wear!
Also Read This: How to Upload Videos on Dailymotion in Urdu: A Complete Guide
8. Watch the Full Video Tutorial on Dailymotion
Ready to see the lipstick application process in action? Watching a video tutorial can provide visual cues and tips that written instructions might miss. We've created a comprehensive video that walks you through the entire lipstick application process—from prep to removal. You can find it on Dailymotion!
Here’s what you can expect from the video:
- Step-by-Step Guidance: Each part of the lipstick application is shown in clear, easy-to-follow steps.
- Expert Tips: Learn about the little tricks professionals use to achieve the perfect pout.
- Common Mistakes: We point out typical errors people make while applying lipstick and how to avoid them.
- Product Recommendations: Get insight into the best products and tools to use for your lip looks.
So, grab your favorite lipstick and get ready to transform your lip game! You can watch the video here. We promise it’ll be a fun and educational experience that enhances your lipstick knowledge and skills.
Don’t forget to share your thoughts in the comments and let us know how your lipstick application journey goes after watching the video!
Conclusion and Final Thoughts
Mastering the art of applying lipstick can enhance your overall look and boost your confidence. With the right techniques and products, you can achieve a beautifully finished pout that complements any outfit or occasion. Here are a few key takeaways to remember:
- Choose the Right Shade: Consider your skin tone and the occasion when selecting a lipstick color.
- Prep Your Lips: Always exfoliate and moisturize your lips for a smoother application.
- Use Lip Liner: Defining the edges of your lips with liner can prevent feathering and extend wear.
- Application Technique: Whether using a brush or directly from the tube, ensure even coverage.
- Finish with a Setting Product: A setting spray or powder can help your lipstick last longer throughout the day.
To enhance your skills further, don't forget to check out the video tutorial included in this guide. It visually demonstrates each step and provides additional tips for perfecting your technique. Remember, practice makes perfect—so don’t hesitate to try different styles and colors!
Ultimately, applying lipstick is not just about the final look but also about enjoying the process. With these tips at your fingertips, you’re well on your way to becoming a lipstick pro. Happy applying!
 admin
admin


