Welcome to the delightful world of ribbon roses! These charming creations are not just for embellishing gifts; they can also be used in home décor, hair accessories, and even as part of your crafting projects. Making ribbon roses is a wonderful way to express creativity and add a personal touch to any item. Whether you are a seasoned crafter or just starting, this step-by-step guide will help you master the art of crafting beautiful ribbon roses that are sure to impress!
Materials Needed for Making Ribbon Roses
Before diving into the crafting process, it's essential to gather all the materials you'll need. Here’s a handy list of what you'll require to get started:
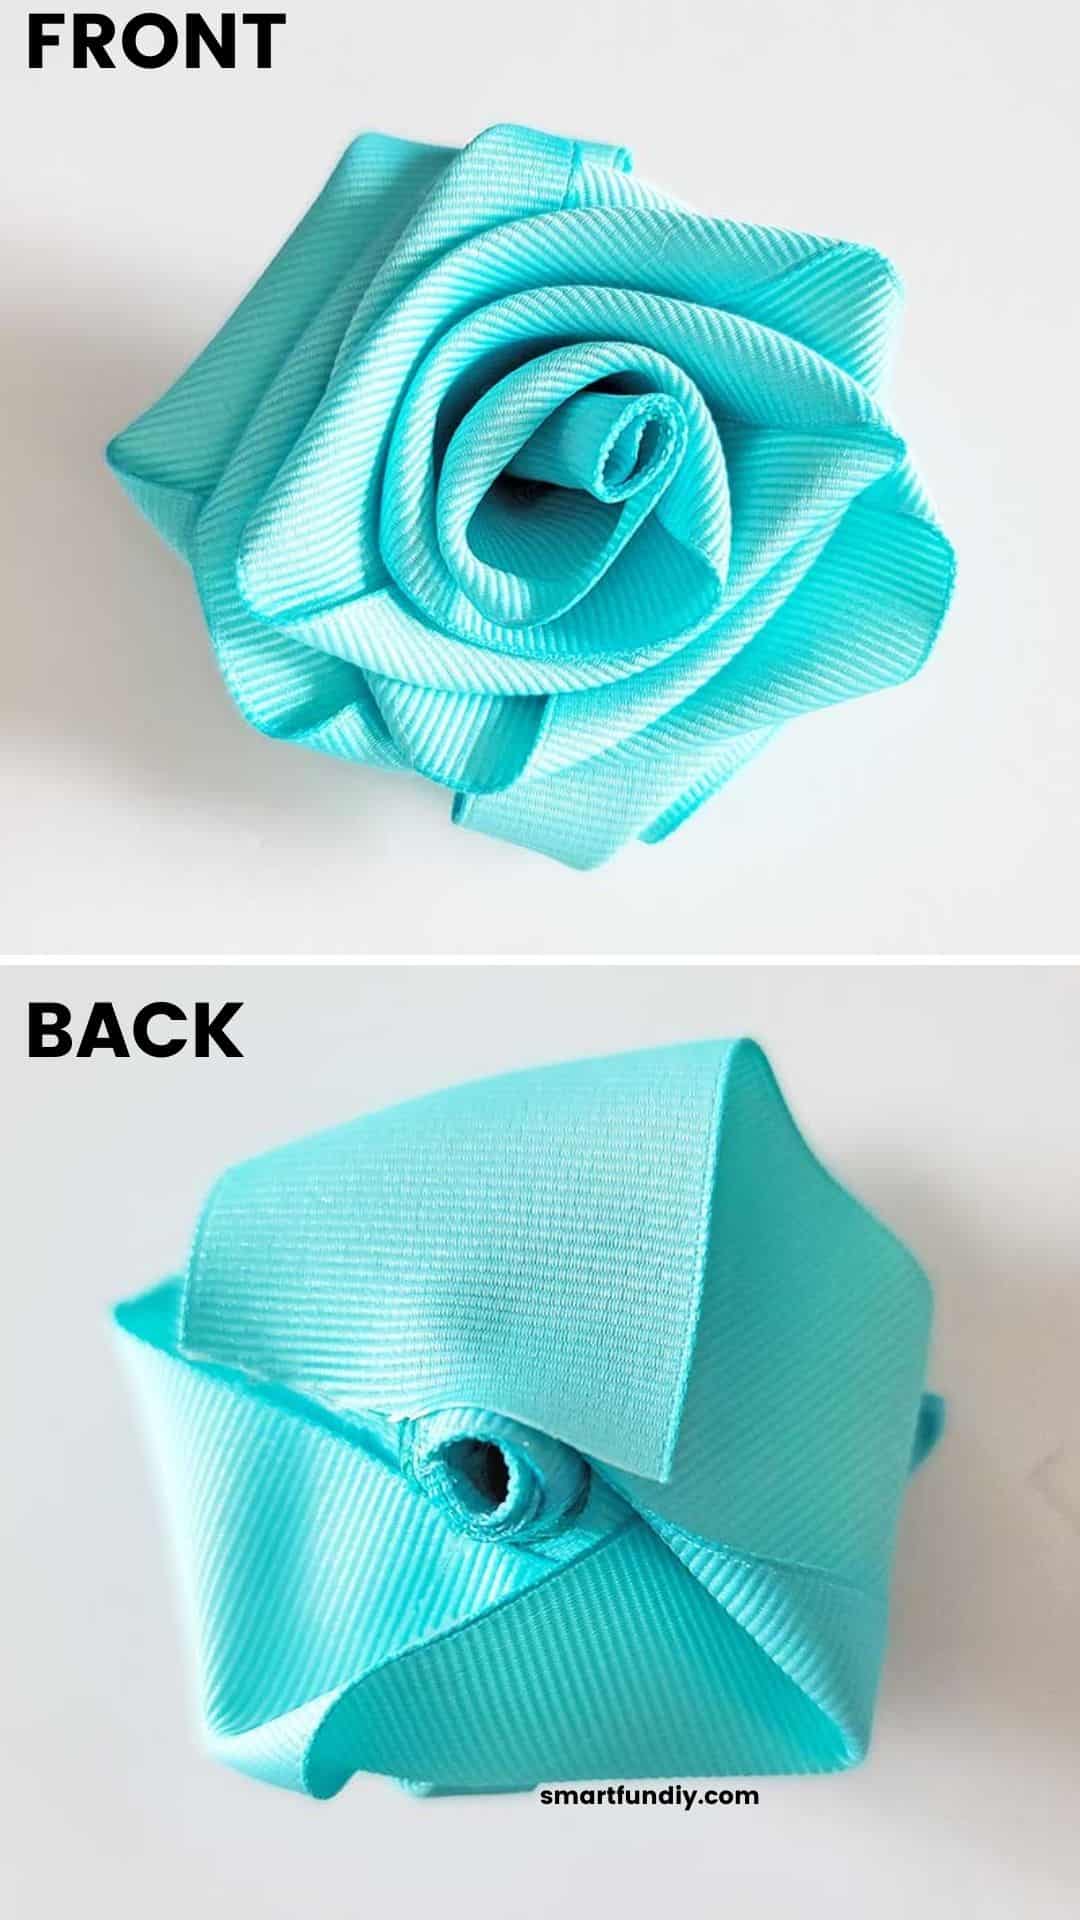
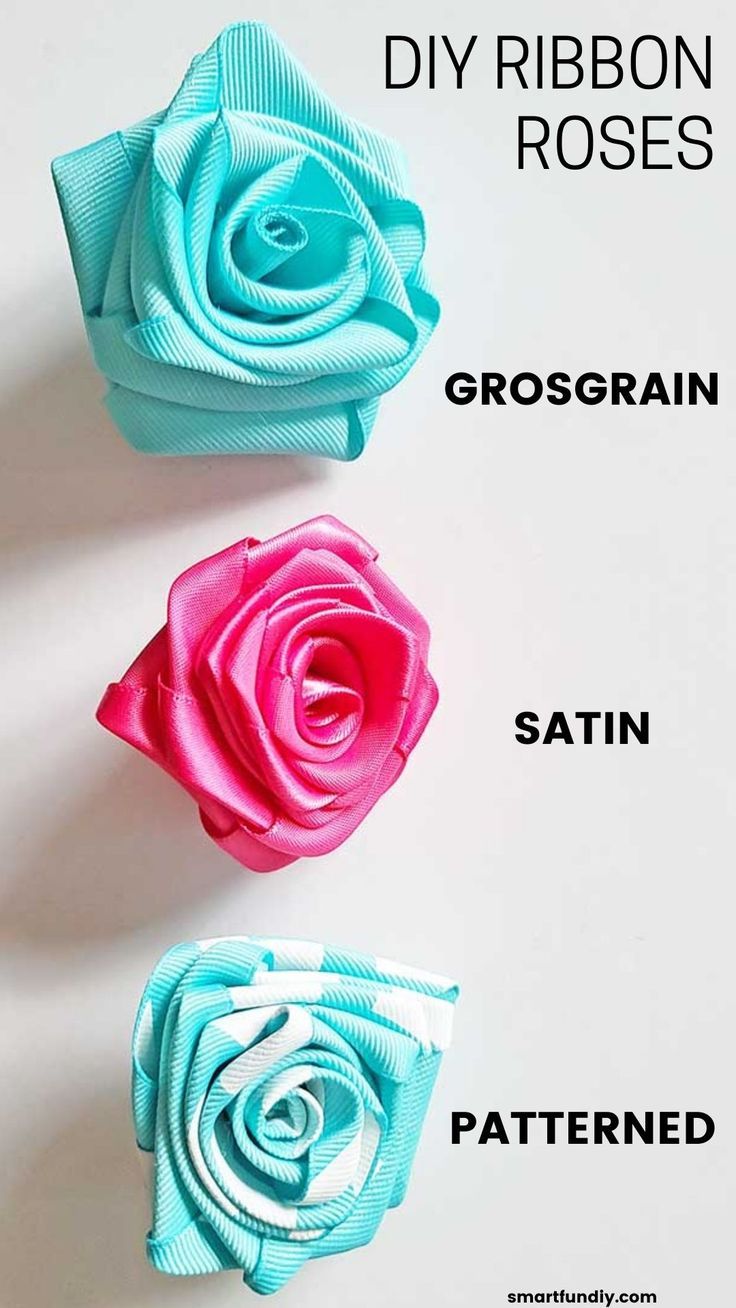
- Ribbon: Choose a ribbon that suits your style! Satin or organza ribbons work beautifully. You'll want a width of about 1 to 2 inches.
- Scissors: A good pair of sharp scissors is crucial for cutting ribbons with precision.
- Needle and Thread: A needle and thread (matching the color of your ribbon) will help secure your rose together.
- Hot Glue Gun (optional): For quick assembly and securing elements—this is handy but not mandatory.
- Wire (for stems, optional): If you want to give your rose some structure, adding a wire stem can make a significant difference.
- Beads or Pearls (optional): Adding these can elevate the look of your rose, giving it an extra sparkle.
- Leaf Ribbon (optional): If you want to add leaves to your rose, pick a green ribbon or fabric to create that natural look.
Once you have these materials, you’ll be well-equipped to start crafting your beautiful ribbon roses. Don’t worry if you don’t have every single item on the list—improvise where you can! The beauty of crafting is in the creative process. Let’s roll up our sleeves and get ready for a fun and rewarding experience in making ribbon roses!
Also Read This: Create DIY Nail Art Tools at Home: Watch on Dailymotion
3. Step 1: Preparing the Ribbon
Alright, let’s dive into the exciting world of ribbon roses! Before we jump into actually making these beauties, we need to get our materials ready. Here’s how to prepare your ribbon:
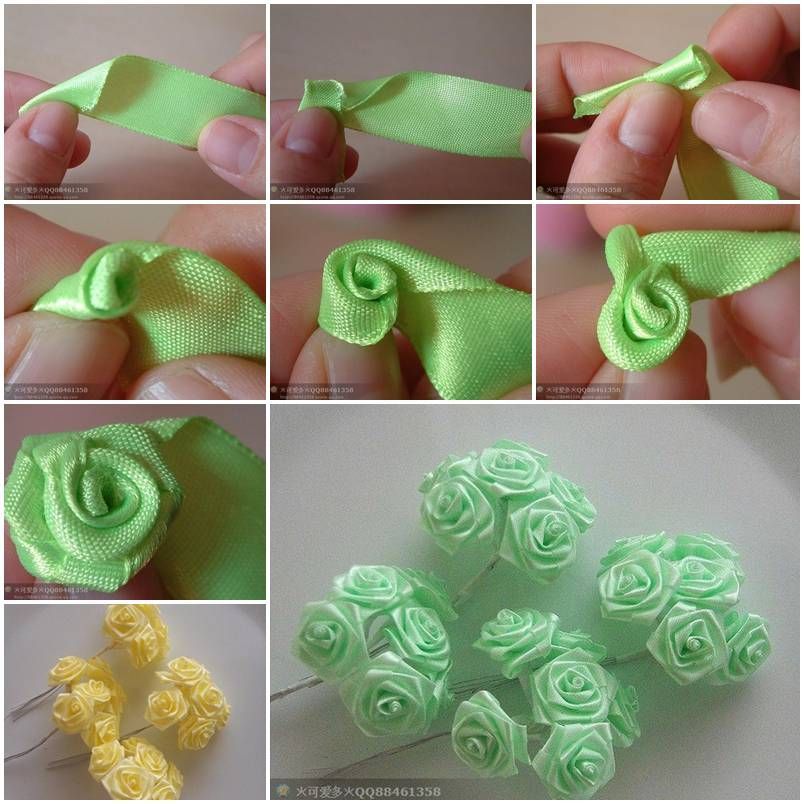
Choose Your Ribbon: The first step is selecting the right type of ribbon. For beautiful ribbon roses, I recommend using satin or polyester ribbons because they hold their shape well and have a lovely sheen. You can pick from various widths, but a 1.5-inch (or 3.8 cm) width works best for a typical rose. The color is entirely up to you! Think about the occasion or theme; vibrant colors make for fun decorations, while pastels give a more classic feel.
Measure and Cut: Now, let’s get practical. You will need to cut several pieces of ribbon for each rose you plan to make. Typically, around 15 inches (about 38 cm) per piece should suffice. Don’t worry about precision here; different lengths of ribbon can be used to create various sizes of roses. Once you’ve decided on your length, use scissors to make a nice clean cut. You might want to seal the edges by carefully running a lighter or candle flame along the cut edge. This prevents fraying and ensures a polished finish.
Shape and Heat the Ribbon: To give your ribbon that lovely petal curve, it’s beneficial to slightly heat it. You can do this using a hairdryer or by hovering it over a pot of hot water. Just ensure you don’t burn or melt the ribbon; we want a gentle curve, not a disaster! Once heated, gently pull and curve the ribbon into your desired petal shape. This will help it hold the petals’ form as we move forward.
Tip: If you're feeling adventurous, try using wired ribbon. This type often holds its shape better, and once you shape the petals, they’ll stay that way!
Also Read This: Achieve Voluminous Hair with a Round Brush Blow Dry Technique on Dailymotion
4. Step 2: Creating the Base of the Ribbon Rose
Now that your ribbon is prepped and ready, it’s time to create the base of our beautiful ribbon rose. This step is crucial as it sets the foundation for those stunning petals you’ll be adding later!
Gather Your Materials: Besides your prepared ribbon, grab a hot glue gun, floral wire, and some green floral tape. The floral wire is essential for anchoring the rose, and the floral tape will provide a neat finish around the stem. If you want to get extra creative, have some decorative beads or embellishments on hand!
Creating the Center: Start by taking one piece of your prepared ribbon (let's say 15 inches long) and fold it in half. This creates a center fold where your rose will start. Now, using your hot glue gun, add a bead of glue along the edge of the folded ribbon and roll the ribbon tightly from the fold. The initial roll will form the center of the rose, so make sure it’s tight and secure. Hold it in place for a few seconds while the glue sets.
Add the First Layer of Petals: Take another piece of ribbon and, starting just below the center roll, attach the first petal. To do this, place the ribbon at an angle, securing it with a bit of glue as you wrap. What you’re aiming for here is a natural petal shape with a slight overlap. As you wrap, keep adding more petals, securing each layer with a tiny dab of glue, and make sure they’re slightly overlapping to mimic the look of real flower petals.
Continue Building Up Layers: Repeat this process with additional ribbons to form more layers. Aim for around 4-5 layers for a full-looking rose. Be playful with the angles and overlaps—this will add depth and dimension to your flower!
Final Touches: Once you’re satisfied with the number of petals, secure the end of the ribbon with glue and trim any excess. Now, take your floral wire and insert it into the base of your rose, adding glue to hold it in place if needed. Cover the wire and any exposed areas with your green floral tape for a neat finish.
And voilà! You’ve created the base of your ribbon rose. Take a moment to admire your handiwork before moving on to the next steps of shaping and embellishing your ribbon roses!
Also Read This: How to Change Background in Adobe Photoshop CS6 Easy Steps to Follow
Step 3: Forming the Petals of the Rose
Now that we have our center created, it’s time to focus on forming the petals of our ribbon rose. This is where the magic happens! The beauty of ribbon roses lies in the petals, and with a little technique, you can make them look stunning. Here’s how to go about it:
1. Selecting Your Ribbon: Choose a ribbon that’s at least 1.5 inches wide for ample petal size. You can stick with one color or mix it up for a gradient effect. Go for materials like satin for a glossy finish or organza for a more delicate touch.
2. Preparing the Ribbon: Cut the ribbon into sections. A good starting length is around 12 inches for each petal. You can adjust based on how large or small you want your rose to be. If you’re using multiple colors, cut equal lengths of each color.
3. Creating the Petals: For each petal, take a piece of ribbon and fold it in half lengthwise. This creates a nice base. Then, handheldly shape it into a petal form by giving it a curve on one side. Think of it like folding a leaf; you want to create that natural curve.
Next, pinch the end of the folded ribbon together to form the petal's base. This will keep it secure and allow it to maintain its shape. Use a hot glue gun to attach the base of the petal to the center of the flower you created earlier. Make sure to leave some space between the petals for a natural look.
4. Layering the Petals: Repeat the petal creation process, adding each subsequent petal slightly overlapping the previous one. This layering creates depth and fullness. Keep in mind that the petals should gradually become larger as you move out from the center. Aim for about 5-7 petals for a lovely fullness.
5. Adjusting and Shaping: Don’t hesitate to adjust the shape and placement of your petals. You can take a moment to fluff them up or tweak their positions for the perfect look. Use your fingers to bend and shape the petals as you go. Remember, imperfect shapes can often make your rose look more realistic!
By the end of this step, you should have a beautiful array of petals, each adding to the charm and character of your rose. The more care you take in forming the petals, the more gorgeous your final product will be!
Also Read This: How to Make a Starburst Loom Bracelet: Easy Dailymotion Crafting Guide
Step 4: Assembling the Ribbon Rose
Alright, folks! We’re at the most exciting part—putting everything together to form your ribbon rose. This is where you’ll see all your efforts pay off as the rose starts to come to life. Here’s a simple assembly guide to follow:
1. Gather Your Materials: Ensure you have all your petals, the flower center, and any additional embellishments you want to use, like leaves or decorative accents. A hot glue gun and scissors are also necessary at this stage!
2. Start with the Center: Place the center (your rolled-up ribbon) on a flat surface. This will be the heart of your flower, so make sure it’s secure and in place. You may want to put a small dot of glue on the underside to keep it stable while you add petals.
3. Attach the First Layer of Petals: Begin attaching your first few petals around the center. Use your hot glue gun to apply a dot of glue at the base of each petal and press gently against the center. Start at the top, then move to the sides, allowing them to overlap slightly as discussed earlier.
4. Build the Layers: As you move outward, continue to add petals in layers. Keep in mind the larger petals go on top of the smaller ones. It helps to maintain an even distribution around the center. If it feels too sparse, don’t hesitate to add more petals!
5. Final Touches: Once you’ve placed all the petals, take a step back and admire your work. Adjust any petals that may have shifted during the assembly. If you’d like, you can add leaves by cutting pieces of green ribbon and gluing them at the base of the rose.
6. Secure the Flower: Once satisfied with the arrangement, give everything a final press down to secure the glue. You might want to allow the glue to set for a few minutes to ensure everything holds properly.
And there you have it! Your very own ribbon rose, crafted with love and attention. Maintain a relaxed posture as you work through this assembly. Enjoy the process—it’s not only about the end result but the joy of creating something beautiful!
Also Read This: How to Become a Motionmaker on Dailymotion: Unlock Premium Features
7. Step 5: Final Touches and Adjustments
Congratulations on reaching the final step of making your beautiful ribbon roses! Now, it’s time to add those all-important final touches and adjustments to ensure your roses look absolutely stunning. This phase is where you can really customize your roses and make them unique!
1. Adjust the Petals: Take a moment to inspect the petals. Do they have the shape and flair you desire? If some petals seem out of place or not as tightly gathered, gently tug on the edges to reshape them. You can also use a pair of tweezers to pull the petal edges for a more refined look.
2. Fluffing: Give your rose a little fluff! Use your fingers to gently lift and bend the petals outward slightly. This will give the flower a more natural and open appearance, as if it's just bloomed in a sunny garden.
3. Secure the Base: If your rose feels loose at the base, it's essential to secure it. Tie another small piece of ribbon around the base, or use a dab of hot glue to ensure everything stays put. This will also help to give your rose a neat, polished finish.
4. Add Leaves: Don’t forget about leaves! They can greatly enhance the overall look of your ribbon rose. You can make leaves from green ribbon using similar techniques as the petals or purchase pre-made leaves. Attach them to the base using glue or sew them in place for added stability.
5. Personalize Your Roses: Consider adding embellishments like beads, rhinestones, or glitter to your roses to give them a touch of glam. A simple pearl bead in the center can elevate the classic rose look! Think about your color theme and how these little additions can complement your project.
Once you’re satisfied with all the adjustments, step back and admire your work. The final touches are crucial in making your ribbon rose look special. Remember to take your time and enjoy this creative journey!
Also Read This: How Coca-Cola Is Produced – A Dailymotion Documentary Overview
8. Tips for Perfecting Your Ribbon Roses
Now that you’ve mastered the fundamental steps of creating ribbon roses, here are some valuable tips to help you perfect your technique and ensure every rose you make is a masterpiece!
- Choose the Right Ribbon: The type of ribbon you use can make a huge difference. Look for ribbons that have a nice sheen and are easy to work with. Polyester and satin ribbons are excellent choices for their flexibility and overall look.
- Practice Makes Perfect: Don’t be discouraged if your first few attempts don’t turn out the way you envisioned. Keep practicing! Over time, you’ll develop a technique that works best for you.
- Watch Tutorials: Sometimes, seeing someone else do it is the best way to learn. Check out online video tutorials for visual guidance. You might discover new techniques that enhance your skills.
- Color Combinations: Experiment with different color combinations. Try contrasting shades or even multi-colored petals for a fun twist. The more variety you incorporate, the more stunning your bouquet will become!
- Be Patient: Rushing through the process can lead to mistakes. Take your time with each rose, and enjoy every step. Your creativity will flourish when you work at your own pace.
With these tips at hand, you’re all set to create beautiful ribbon roses that can be used for various projects like wedding decorations, hair accessories, or gift embellishments. Let your creativity soar as you bring your ribbon roses to life! Happy crafting!
Also Read This: How to Make a Matchstick House: Easy Crafting Tutorial on Dailymotion
9. Frequently Asked Questions About Ribbon Roses
Making beautiful ribbon roses can seem a bit intimidating at first, but once you get the hang of it, you'll find it's a fun and rewarding craft! Here are some frequently asked questions that can help you on your crafting journey:
What materials do I need to make ribbon roses?
To get started, you'll need:
- Ribbon: Satin or grosgrain ribbons work best.
- Scissors: For cutting your ribbon.
- Needle and thread: Choose a thread that matches your ribbon color.
- Hot glue gun: This is optional but very helpful for securing pieces.
- Floral wire or stems: For creating realistic rose stems.
- Optional embellishments: Beads, leaves, or glitter to make your roses unique!
How do I choose the right ribbon?
The right ribbon can elevate your flower’s appearance immensely. Typically, you'll want to choose:
- Wider ribbons (about 2-3 inches) for larger, more dramatic roses.
- Narrower ribbons (about 1 inch) for smaller, dainty roses.
- Ribbons with a subtle sheen or texture to add depth to your roses.
Can I use other types of fabric?
Absolutely! While ribbons are the most common choice, you can experiment with:
- Felt: Creates soft, more structured flowers.
- Organdy: For a delicate, sheer look.
- Cotton: For a more casual, rustic feel.
How long will my ribbon roses last?
Ribbon roses, especially if made with quality materials, can last for years! If you're using them in arrangements, keep them away from direct sunlight to prevent fading. Store them in a cool, dry place, and they'll stay beautiful for a long time!
Can I make ribbon roses in different sizes?
Definitely! The size of your ribbon cut determines the size of your rose. For smaller roses, use shorter lengths of ribbon; for larger roses, use longer lengths. Play around with different sizes to create a stunning bouquet!
Are there specific techniques for tying and shaping the ribbons?
Yes, you can experiment with various techniques, such as:
- The spiral method: Stacking loops in a spiral for added fullness.
- Zig-zag method: Creating back-and-forth folds for texture.
- Twisted ribbons: For a unique look that looks more natural.
10. Conclusion and Encouragement to Create
In conclusion, making ribbon roses is an enjoyable craft that allows you to express your creativity! Whether you're looking to embellish your home décor, create handmade gifts, or add a personal touch to special occasions, ribbon roses can do it all.
Remember, every craft takes practice, and don't be discouraged if your first attempts don't turn out perfectly. Each rose you create will teach you something new! So grab your supplies and dive into this beautiful art form.
As you create, let your imagination run wild! Try out different colors, textures, and sizes. You can even combine your ribbon roses with other crafting techniques to produce stunning arrangements. Be bold, be creative, and most importantly, enjoy the process.
By following this step-by-step guide, you're well on your way to becoming a ribbon rose expert. So get crafting, and soon enough, you’ll have a bouquet of stunning ribbon roses to share with the world!
 admin
admin


